
How to Clean a Motorcycle Helmet Liner: Step-by-Step
This post contains affiliate links. As an Amazon Associate, we earn from qualifying purchases.
To clean a motorcycle helmet liner, first check if the padding is removable. If it is, hand wash it in lukewarm water (max 30°C/86°F) with a mild, neutral soap. For fixed liners, wipe gently with a damp cloth and a mild cleaner, but note that recommendations vary: SHOEI advises a neutral cleaning agent, while Sedici recommends a specific motorcycle helmet liner cleaner. Always air dry at room temperature away from sun and heat. Never use harsh chemicals, solvents, a clothes dryer, or hot water, as these can permanently damage the protective EPS foam and adhesives.
That temperature limit isn’t a suggestion. Exceed it, and you risk cooking the energy-absorbing foam inside the shell, damage you can’t see but that completely voids the helmet’s safety. For proper maintenance, you should also learn how to clean a motorcycle helmet liner.
What follows is the direct translation of six different helmet manufacturer manuals. You’ll get the step-by-step for removable and fixed liners, the exact products that are safe (and the long list that aren’t), and how to spot the line between a clean helmet and a compromised one.
Key Takeaways
- Hand wash removable liners in water no hotter than 30°C (86°F) with a mild, neutral soap. Machine washing is possible for some brands like SHOEI, but only on a delicate cycle inside a washing bag.
- For fixed or non-removable liners, use a damp cloth and a mild cleaner. Saturating them can break down adhesives and damage the EPS foam underneath.
- Always air dry at room temperature away from direct sunlight and any heat source.
- Never use solvents, petroleum products, ammonia, or abrasive cleaners. The list from Sedici’s manual is exhaustive for a reason: these chemicals eat into helmet materials.
- Inspect the EPS liner after cleaning. White scratches on black foam or any indentations are signs of damage from improper cleaning or drying.
Why Your Helmet Manual is the First Step
Before you touch a drop of water, find your helmet’s manual. This isn’t bureaucratic box-ticking. Manufacturers build helmets with specific glues, foams, and textiles. What works for a SHOEI removable liner could ruin the adhesives in a Sedici fixed-liner model when you compare a how to clean a motorcycle helmet liner.
The official word always beats forum consensus. For example, SHOEI and Suomy explicitly approve machine washing for their removable liners at 30°C. Bell’s Star Series manual, however, only instructs hand washing. If you machine-wash a Bell liner because a SHOEI guide said you could, you’ve just voided your safety warranty based on bad intel. The manual is your contract for the how to clean a motorcycle helmet liner question without breaking it.
Check your helmet’s make and model, then pull the official care instructions from the brand’s website. This is the only way to know if your liner is truly machine-washable or if it requires hand washing.
The 4-Step Hand Wash Method (Works for Most Liners)
This is the baseline. If your manual doesn’t specify a machine cycle, or if you’re just not sure, this hand wash method is the safest approach.
- Remove the liner carefully. Most cheek pads and crown liners snap out. Pull gently from the edges; don’t york on any fabric that seems anchored. If something doesn’t want to come out, it might be a fixed panel, stop and check the manual.
- Prep a basin with lukewarm water and mild soap. The water temperature should not exceed 30°C (86°F). Use a neutral, non-detergent soap like plain castile soap or a drop of mild baby shampoo. Avoid anything with additives, perfumes, or bleaching agents.
- Agitate gently and rinse thoroughly. Submerge the liner and swish it around. Don’t scrub or wring it, that can misshape the foam backing. Press the soapy water through the fabric, then drain the basin and rinse under cool running water until the water runs completely clear. Any soap residue will itch later.
- Press out water and begin drying. Lay the liner on a clean towel, roll it up, and press firmly to squeeze out moisture. Never twist. Then, lay the pieces flat on a fresh towel or a drying rack.
Where this goes sideways: Using hot water. It feels like it should clean better. But heat above the manufacturer’s limit can soften and deform the EPS foam that the liner is attached to, compromising its ability to absorb impact. The damage is internal and invisible.
What About Machine Washing?
Some brands permit it. SHOEI’s official stance is that removable parts can be washed in a machine at 30°C (86°F), but only inside a washing bag and with a neutral cleaning agent. Suomy’s S1-XR manual also mentions a 30°C maximum for hand washing, implying a gentle machine cycle could be acceptable if you mimic those conditions.
The rule is simple: if the manual doesn’t explicitly say you can, assume you can’t. The agitator in a standard washer is brutal on delicate foams and stitching. A front-loading machine on a delicate, cold cycle with the liner in a mesh bag is the only way to even consider it.
How to Clean Non-Removable or Fixed Liners
Not all liners come out. Many helmets have fixed padding around the crown or specific areas for structural integrity. The process here is completely different, and getting it wrong has real consequences.
You cannot soak these areas. The Sedici manual is blunt: improper cleaning may damage the adhesives that bond the liner to the EPS foam. Once those adhesives fail, the liner can shift or bubble, affecting fit and safety.
The method is a surface wipe. Dampen a soft cloth with cool water and wring it out completely. Add a tiny drop of mild soap to the cloth. Gently wipe the soiled areas of the fixed liner, being careful not to saturate the material. Immediately follow with a second pass using a cloth dampened with clean water only to rinse the soap away.
For these fixed sections, Sedici actually recommends using a specific motorcycle helmet liner cleaner over general soap. The thinking is that these products are formulated to clean without the moisture and surfactants that can seep into and weaken the underlying structure.
What NOT to Use on Your Helmet
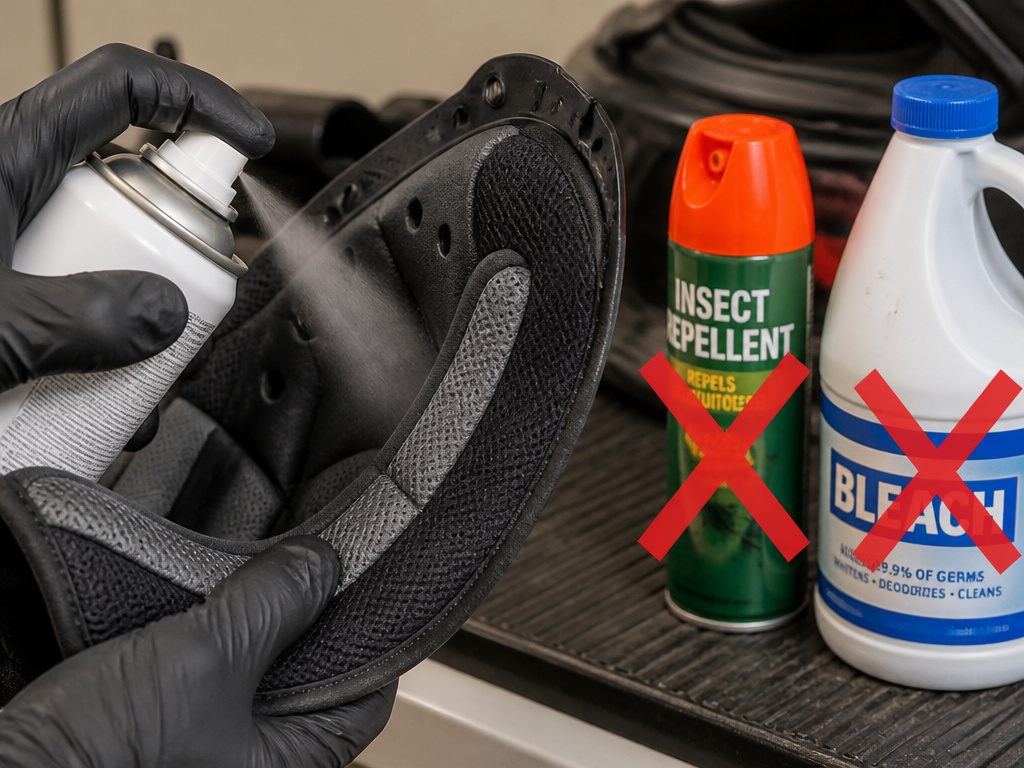
The list of banned substances is longer than the list of approved ones. This isn’t the brand being fussy; it’s chemistry. Here’s what the manuals specifically prohibit:
| Never Use | Why It’s Bad | Common Source |
|---|---|---|
| Petrochemicals / Solvents (Gasoline, paint thinner, benzene, acetone) | Dissolve EPS foam and can degrade plastic shell resins. | Garage cleaners, fuel spills. |
| Ammonia & Bleach | Break down textile fibers and adhesives; fumes can damage coatings. | Glass cleaners, household disinfectants. |
| Abrasive Powders & Stiff Brushes | Scratch visors and can grind down the EPS liner’s surface. | Scouring pads, some bathroom cleaners. |
| Alcohol | Dries out and cracks leather trim and can cloud visor coatings. | Rubbing alcohol, hand sanitizer. |
| Bug Repellant | Often contains DEET, which is a potent solvent for plastics and paints. | Insect spray. |
The Sedici manual’s warning is thorough for a reason. Exposure to fumes from these products can be enough to cause damage you won’t see until you need the helmet to work.
Common mistake: Using armor-all or plastic shine on the helmet’s exterior. These often contain petroleum distillates that can make the shell brittle over time. For the shell, a damp cloth with a drop of mild soap is all you need.
The Critical Drying Process: Air is Everything
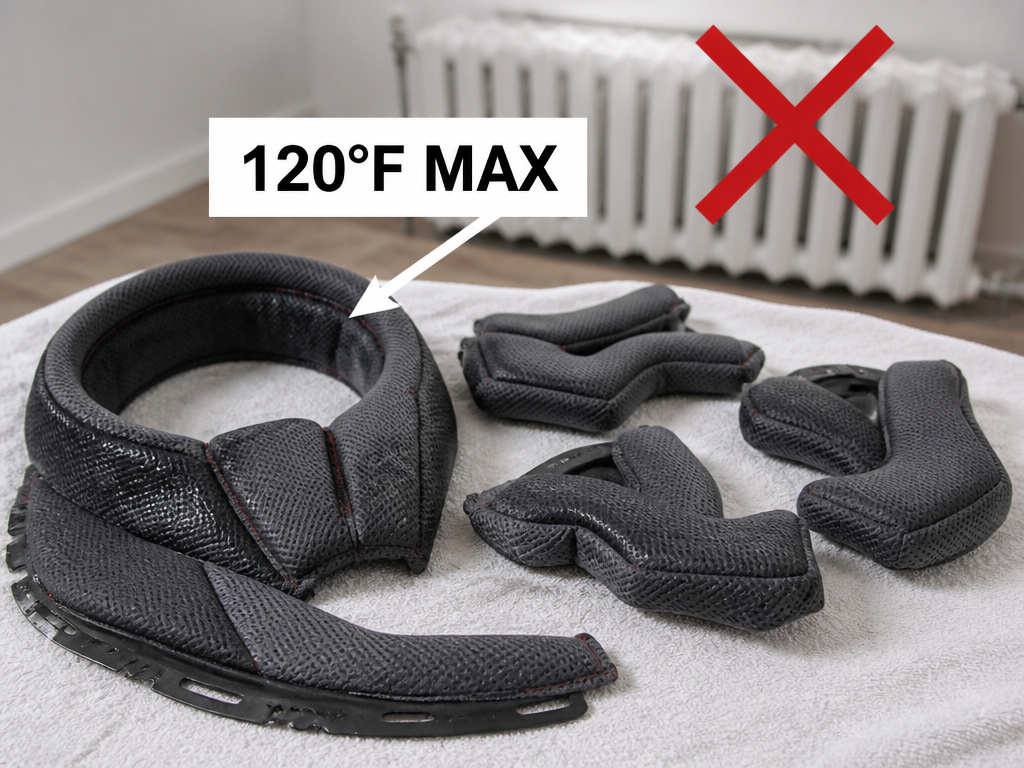
How you dry the liner is as important as how you wash it. Heat is the enemy of helmet integrity.
First, press out excess water with a towel, don’t wring. Then, lay the liner pieces flat in a well-ventilated room, away from windows. Room temperature, away from sunlight and heat is the universal instruction from Suomy, SHOEI, and Bell.
This is where manufacturer specs visibly disagree, and you should follow the strictest one that applies to you. Bell’s Star Series manual warns that exposure to temperatures in excess of 150°F can cause damage. Sedici’s manual says to keep the helmet away from heat in excess of 120°F. Your car’s dashboard on a sunny day can hit 150°F in minutes. A radiator, space heater, or clothes dryer will blast past both limits.
The takeaway? Never use a hair dryer, clothes dryer, or oven. Let it air dry, even if it takes a full day. Rushing this step can warp the EPS liner, creating pressure points or, worse, compromising the foam’s cellular structure.
Dealing with Stubborn Odors and Disinfecting
Sweat and bacteria cause smells. A proper wash with mild soap removes most of it. For lingering odors, manufacturers point to antibacterial detergents. SHOEI notes they are “useful for removing smells.”
This means a detergent formulated with antibacterial properties, not a harsh chemical disinfectant like bleach. You can add a small amount of a gentle antibacterial detergent to your hand-wash basin. The goal is to kill odor-causing bacteria, not to sterilize the liner.
For a deeper sanitization of a used helmet, a dedicated process is required that goes beyond liner cleaning. Our guide on disinfecting a used helmet walks through the steps without damaging sensitive materials. For ongoing odor control between washes, a spray designed for the job is safer than home remedies. We’ve tested the top helmet deodorizers that neutralize smells without leaving a residue.
How to Know If You Damaged Something
Improper cleaning doesn’t always announce itself immediately. You need to know what to look for during your next full helmet cleaning session.
- Visual on the EPS: After everything is dry, look at the exposed EPS foam (the polystyrene layer underneath the liner). SHOEI says white scratches on surfaces with black paint, or any indentations, are signs the foam was exposed to a solvent or heat.
- Tactile on the Liner: Does the fixed padding feel spongier or looser? Does it pull away from the shell slightly? This suggests adhesives were weakened by saturation.
- The Smell Test: A chemical or burnt smell after drying is a major red flag that something has broken down.
If you see any of these signs, the helmet’s protective integrity is in question. It’s a tough call, but safety gear has no margin for “probably okay.”
When to Replace, Not Just Clean
Cleaning maintains a helmet; it doesn’t renew it. All materials degrade. The manuals are clear on timelines, but they differ.
| Brand | Replacement Recommendation | Source |
|---|---|---|
| SHOEI | 5 years after first purchase at retail. | SHOEI Helmet Maintenance Page |
| Suomy (S1-XR) | Every 3 to 5 years depending on use. | Suomy S1-XR User Manual |
| Bell (Star Series) | At least every five years. | Bell Star Series Manual |
A helmet worn daily for long commutes in sun and sweat will age faster than one used for occasional weekend rides. UV light, salt from sweat, and the constant compression from your head break down materials long before a calendar date arrives.
Of course, replace immediately after any impact. And if a deep clean can’t fix persistent odor in a helmet, it might be a sign the materials are breaking down internally. Once the liner is clean and dry, reassemble the helmet carefully. A poorly seated liner can create helmet pressure points that turn a comfortable lid into a headache machine. Ensure all tabs and snaps are fully engaged.
Frequently Asked Questions
Can I use Dawn dish soap to clean my helmet liner?
Maybe, but it’s not ideal. Dawn is a detergent, not a neutral soap. It’s excellent at cutting grease but can be harsh on helmet fabrics and foams over time. For a one-time, heavy grease cleanup, a highly diluted drop might work. For regular cleaning, a true mild, neutral soap (like castile) is the safer, manufacturer-approved choice.
How often should I clean my helmet liner?
Aim to clean your liner regularly, such as when you notice odors or the fit feels less snug. You’ll know it’s time when you notice odors or the fit feels less snug because the padding is compacted with sweat and oils. A quick freshening between deep washes can help; simply remove the liners and let them air out overnight after a ride.
Can I put my helmet liner in the clothes dryer?
Absolutely not. No manufacturer approves this. The intense, direct heat of a dryer can warp and shrink foam, melt adhesives, and destroy the liner’s shape. Always dry your helmet liner safely by air at room temperature.
What’s the best way to clean a helmet with Bluetooth speakers?
Extreme caution. First, remove the speaker units and any wiring according to the electronics manufacturer’s instructions, usually this involves unplugging connectors. Clean the empty liner pockets with a damp cloth only, avoiding any moisture near the wire ports. Never submerge or spray a helmet with installed electronics. Let everything dry completely before reconnecting and powering on.
Before You Go
Stick to the numbers in the manual: 30°C (86°F) max wash temperature, mild neutral soap, air dry only. That’s the recipe that every brand agrees on in principle. The moment you deviate, with hotter water, a stronger cleaner, or a heat source, you’re gambling with the helmet’s safety.
Make the inspection part of the routine. When you’re done cleaning and the helmet is fully dry, spend two minutes looking at the EPS foam and feeling the liner’s attachment. That’s how you catch a mistake before it becomes a failure. Finally, remember that a clean helmet deserves proper storage. Keep it in a cool, dry place off the ground, not dangling from a mirror or baking on a shelf. The care you put in after the ride determines how it performs during the next one.
