
How to Dry Motorcycle Gear After Riding in the Rain
This post contains affiliate links. As an Amazon Associate, we earn from qualifying purchases.
To dry motorcycle gear after riding in the rain, hang each piece in a well-ventilated area at room temperature, away from direct heat and sunlight. Remove all liners and armor first. For GORE-TEX membranes, some brands permit a 20-minute tumble dry on warm to reactivate the DWR treatment, but only if the care label explicitly allows it. Your motorcycle’s drive chain also needs immediate lubrication with a special O-ring chain lubricant after wet riding.
That last point about the chain is where most guides stop short. Your gear isn’t the only thing that got wet. The manual for a bike like the Yamaha XSR700 states the drive chain must be lubricated “after washing the motorcycle, riding in the rain or riding in wet areas.” Skip that, and the O-rings dry out, grit grinds in, and you’re buying a new chain inside a season. The bike and the rider need separate, specific care, and knowing how to dry motorcycle gear after riding in the rain is part of that.
What follows: a room-by-room post-ride sequence, the manufacturer contradictions on tumble drying you must check, fixes for high-humidity stalls, and the one gear type you should never treat with a waterproof spray, all central to how to dry motorcycle gear after riding in the rain.
Key Takeaways
- Air dry at room temperature in a ventilated space, away from radiators and direct sun. Heat stiffens leather, melts adhesives, and deforms armor.
- Check the care label before using a dryer. REV’IT! Allows a 20-minute warm tumble dry for dry GORE-TEX to reactivate DWR, but states ‘DO NOT dry your REV’IT! Textile garment in a dryer’ for other textiles. Alpinestars says “never tumble dry” unless the label explicitly permits it.
- Lubricate your motorcycle’s drive chain after any wet ride with a special O-ring chain lubricant. Engine oil or generic lubricants damage the O-rings.
- Remove all liners and armor before drying to expose the maximum surface area and prevent trapped moisture that causes mildew.
- Never use a water-repellent spray on full-grain leather boots. It clogs the pores and kills breathability. Use a colorless leather grease instead.
The Step-by-Step Post-Ride Workflow
Walk in the door wet and follow this order. It saves time and prevents the mildew smell that comes from skipping steps.
First, deal with the bike. If you rode in the rain, your drive chain is wet. Grit and road salt are now a slurry in the links. The Yamaha XSR700 manual is clear: clean the chain with kerosene and a small soft brush, dry it, then thoroughly lubricate the drive chain with a special O-ring chain lubricant. Do not use engine oil or other lubricants. They contain substances that damage the O-rings. This isn’t optional maintenance. It’s the difference between a chain that lasts a long time and one that fails prematurely.
Before you start: Never use steam cleaners or high-pressure washers on a drive chain. The force drives water past the O-rings, which then rust from the inside out. The chain will fail without visible warning.
Next, strip your gear in the garage or entryway—not the living room. Hang the jacket and pants on a broad-shouldered hanger. Pull out every removable component.
- Remove the thermal and waterproof liners. Hang these separately.
- Take out the CE armor. Place the back protector, shoulder, and elbow pads on a towel.
- Pull the gloves inside out. Turn the liners out if possible.
- Remove boot liners. If your boots have removable footbeds or insulation, take them out.
This isn’t just about speed. Trapped moisture between a liner and a shell is where mildew grows. You’ll smell it next ride—a faint, sweet odor that means the gear is rotting from the inside.
Why Room Temperature and Ventilation Beat Heat Every Time
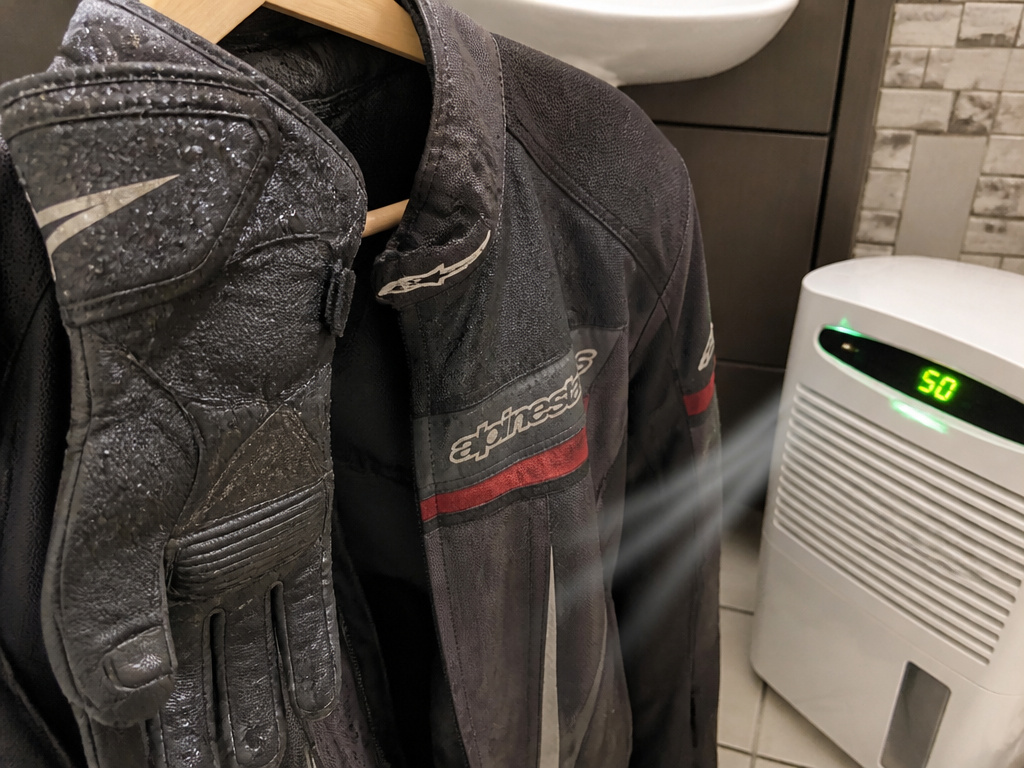
Direct heat is the fastest way to ruin gear. It seems logical—a radiator dries things fast. But it cooks the materials.
Leather stiffens and cracks under direct heat. REV’IT! Warns that placing gloves near a heat source or sunlight makes the material “become stiff.” That stiffness is permanent. The fibers lose their natural oils and the leather turns into a brittle shell. Textiles aren’t safe either. High heat can delaminate the waterproof membrane from the outer fabric, creating invisible leaks. The adhesives that hold your armor pockets in place can also soften and fail.
Where this goes sideways: Drying a textile jacket on a radiator. The outer fabric feels dry in an hour, but the membrane against the liner is still damp. You store it, and the moisture migrates back out, creating a perfect damp environment for mold by morning.
Ventilation moves moisture away. A fan in the room is better than any heater. Airflow across the surface of the gear pulls water into the atmosphere. In a humid climate, this is too slow. That’s where a dehumidifier earns its keep. Run one in a small, closed room like a bathroom with your gear hanging. It pulls gallons of water from the air, drying your kit in hours instead of days. The gear never gets above room temperature, so no damage occurs.
Drying Specific Gear Types (And the Manufacturer Conflicts)
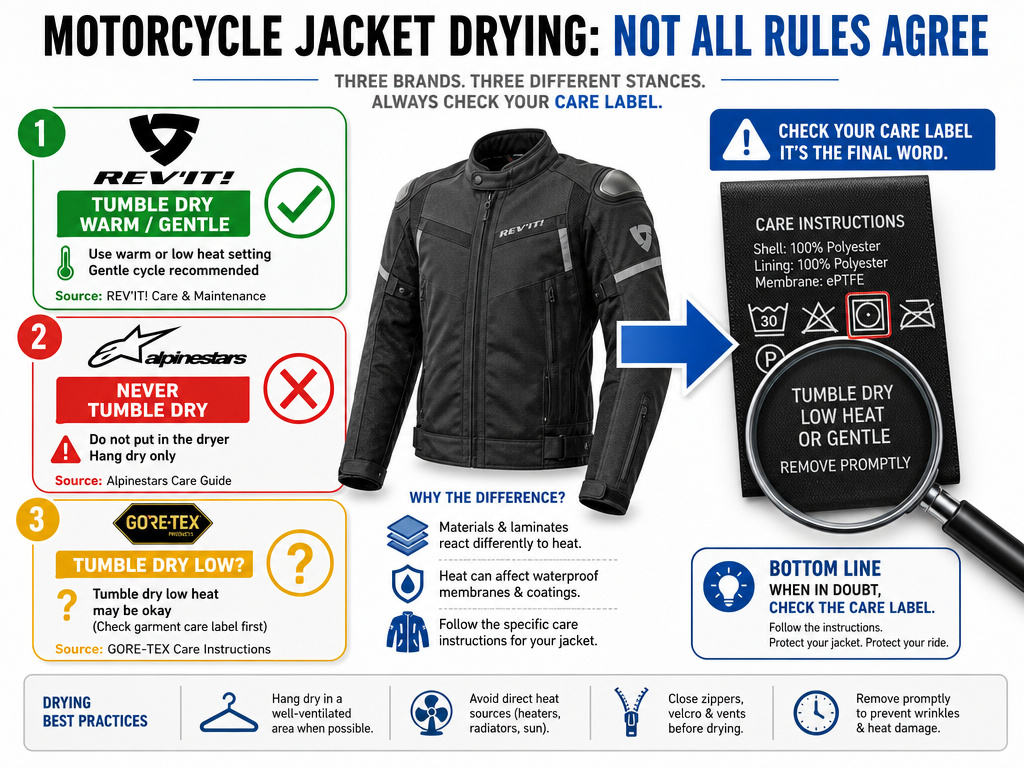
Each piece has its own rules. Getting one wrong can write off a $500 jacket.
Jackets and Pants (Textile & Leather)
The great divide is the tumble dryer. Brands directly contradict each other, so your care label is the final law.
| Brand / Source | Stance on Tumble Drying | When It Applies |
|---|---|---|
| REV’IT! | Line dry or tumble dry on warm, gentle cycle. Once dry, tumble dry for 20 minutes to reactivate DWR. | For GORE-TEX® garments only. For other textiles: “DO NOT dry your REV’IT! Textile garment in a dryer.” |
| Alpinestars | Never tumble dry or iron unless the care label explicitly allows a low-heat step. | Default position for all textile jackets. |
| GORE-TEX (via moto-guide) | Recommends about 20 minutes in the tumble dryer after air drying… But only if the label allows it. | General guidance for garments with a GORE-TEX membrane. |
The rule of thumb? If your jacket has a GORE-TEX or similar waterproof membrane, check the label. If it says “tumble dry low,” do it. The heat reactivates the Durable Water Repellent (DWR) treatment on the outer fabric, causing water to bead and roll off again. If the label says nothing, or says “do not tumble dry,” hang it in a ventilated room and walk away.
Leather is simpler: never machine wash, never tumble dry. Wipe it down with a damp cloth, then let it dry at room temperature, away from heat and sun. Once dry, condition it with a product like REV’IT! Leather Cleaner Conditioner to keep it supple.
Gloves
Gloves are the most delicate. REV’IT! States you should clean them by hand with a damp cloth, no hot water. Never use a washing machine, dry cleaner, or high-pressure device. The internal stitching and protective layers can separate.
Dry them at room temperature, stuffed with paper towels or a glove dryer that blows ambient air, not heat. Make sure they are completely dry before you store them. Damp gloves stored in a bag will deform and develop a permanent clammy feel.
For a dedicated guide on techniques, see our article on how to keep motorcycle gloves dry in the rain.
Boots
Remove the liners and footbeds. Stuff the boots with newspaper or a boot dryer that uses gentle, ambient air circulation. Never point a hair dryer into them. The concentrated heat can warp the sole structure or shrink the leather.
Here’s the critical boot rule: Never use a water-repellent spray on full-grain leather boots. REV’IT! Says this “will close the pores and the breathability of the shoe.” Full-grain leather is often pre-treated. If you need to condition it, use a colorless leather grease. For suede, you can use a spray like REV’IT! WATERPROOF SPRAY, but always brush the boot clean first.
If your boots are soaked, our focused walkthrough on how to dry wet motorcycle boots has the detailed steps.
Helmets
Take out the cheek pads and liner if they are removable. Most modern helmets have a removable interior for this reason. Wipe the shell and shield dry. Let the interior pads air dry on a towel. Never apply heat to the EPS foam liner inside the helmet—it can degrade. A helmet fan or simply leaving it in a dry room overnight works.
Solving the High-Humidity Stall
What if you live in a coastal area or it’s the rainy season? Air drying at room temperature might take three days, and that’s a mildew risk.
A dehumidifier is the answer. Place your gear in a small, enclosed room like a bathroom or laundry room with the dehumidifier. Close the door. The unit will extract the moisture from the air and the gear directly. It’s silent, uses less power than a heater, and never risks heat damage.
For a more permanent setup, some riders build a drying cabinet from a wardrobe or closet with a vent fan and a small, thermostatically controlled heater that keeps the air at a safe, low temperature. This is a project, but it solves the problem for year-round commuters.
Easy to miss: Moisture wicks from wetter areas to drier ones. If your jacket shell is dry but the collar foam is still damp, the moisture will migrate back overnight. Dry until every component is bone-dry to the touch.
What Not to Do: The Short List
These mistakes show up as repair bills or ruined gear within weeks.
- Don’t use direct heat sources. Radiators, hair dryers, and space heaters stiffen leather, delaminate textiles, and warp plastic armor.
- Don’t store anything damp. Alpinestars warns: “Never store damp; if caught in rain, air dry before putting away.” This includes gloves stuffed in a bag or a jacket thrown in a closet.
- Don’t guess on the dryer. If the care label doesn’t explicitly allow tumble drying, don’t do it. The Alpinestars jacket maintenance guide is categorical: “Never tumble dry or iron unless the care label explicitly allows.”
- Don’t forget the bike. Your chain needs post-rain lubrication more than your jacket needs a dryer. Use a special O-ring chain lubricant.
Using Fans and Air Circulation
Set up a fan to move air around your damp gear in a well-ventilated room. This method is universally safe. It works for leather, which must dry at room temperature away from direct heat, and for textiles where a dryer is prohibited. The moving air helps moisture evaporate without the risks of stiffening materials or melting internal membranes. Make sure gear is hung properly so air reaches the liners and cuffs. Never point a fan directly at a heat source like a radiator, as that creates a localized hot spot. The goal is consistent, gentle air movement until everything is completely dry before storage.
Using Boot/Glove Dryers or Warm Air Vents
Exercise caution with dedicated dryers or warm air vents. For many materials, direct heat is a problem. Manufacturer guidance consistently says to avoid direct heat sources and sunlight, as they can stiffen leather and damage textiles. If you use a low-temperature boot dryer, ensure it is not too hot to the touch. Never use these devices on gear with care labels that prohibit tumble drying or direct heat. The safest approach is to let room-temperature air from a vent circulate around the gear, not blow directly on it. Always verify the item is completely dry, especially in padded areas, before you consider it done.
Frequently Asked Questions
Can I use a regular clothes dryer for my motorcycle jacket?
Only if the care label inside the jacket explicitly says you can, and only on a low-heat or gentle setting. For garments with a waterproof membrane like GORE-TEX, a 20-minute warm tumble dry after the jacket is air-dry can reactivate the DWR treatment. When in doubt, air dry. The risk of melting seams or delaminating the membrane isn’t worth the saved time.
How long does it take for gear to air dry completely?
With good ventilation, a textile jacket with its liner removed may take a day or more to dry completely. Leather jackets take longer to dry completely. Gloves and boot liners can take many hours to dry completely if stuffed with paper to absorb moisture. In high humidity, drying can take much longer without a dehumidifier.
My gear smells musty after drying. What now?
That’s likely mildew. Wash the gear according to its care instructions to kill the spores. For textiles, use a technical gear cleaner like REV’IT! Textile Wash. For leather, use a dedicated leather cleaner. After washing, ensure it dries completely before storage. Moving forward, always remove liners and armor to dry, and consider a dehumidifier in your drying space.
Is it okay to ride with gear that’s still slightly damp?
It’s uncomfortable and cold, but the real issue is safety. Damp armor can shift in its pockets because the moisture reduces friction. More critically, damp gear loses insulating properties, increasing your risk of hypothermia on a long, cold ride. It’s always better to wait for dry gear.
How do I dry gear at work or on a trip?
This is the commuter’s challenge. Keep a compact travel clothesline and a small microfiber towel in your tail bag. When you arrive, remove any liners and armor, wipe down the gear, and hang it in a spare office or meeting room. A small USB-powered fan can dramatically speed up the process. The goal is airflow, not heat.
Before You Go
The one rule that overrides all others: your care label is the final authority. REV’IT! Says tumble dry GORE-TEX, Alpinestars says never tumble dry unless the label allows it. They can’t both be right for your specific jacket. Find the tag and follow it.
If your label is missing or faded, default to air drying at room temperature with maximum ventilation. It’s the slowest method, but it’s also the safest. Destroying a $700 jacket to save six hours is a bad trade.
And don’t forget the machine that got you wet. That quick chain lube with the special O-ring lubricant after a rain ride is the cheapest insurance your motorcycle will ever get.
