
How to Ride a Motorcycle for Beginners: Step-by-Step
This post contains affiliate links. As an Amazon Associate, we earn from qualifying purchases.
To ride a motorcycle, you master three core skills in this order: operating the clutch and throttle to find the friction zone for moving from a stop, using both brakes together every time you slow down, and shifting gears smoothly once you’re rolling. The entire process starts in a large, empty parking lot, not on a street.
That sequence, friction zone, braking, then shifting, is the spine of every official training course. The Motorcycle Safety Foundation (MSF) and state manuals build everything else on top of it. A core principle of how to ride a motorcycle for beginners is mastering this sequence. Get those three wrong, and the bike fights you. Get them right, and the rest, cornering, traffic, group rides, becomes a matter of adding layers, not relearning basics.
What follows is the curriculum from those official books, stripped of filler. You’ll get the exact pre-ride check, the step-by-step for your first launch, the practice drills that actually build muscle memory, and the one safety habit that cuts your crash risk more than anything else.
Key Takeaways
- More than half of all motorcycle crashes involve riders with less than five months of experience, according to the MSF. Your first season is the most critical for building safe habits.
- Always use both brakes. The Oregon DMV vehicle control skills manual states the front brake alone can provide 70% or more of your total stopping power.
- Search your path of travel 12 seconds ahead. This MSF rule is not a suggestion; it’s the primary tool for identifying hazards before they become emergencies.
- Start with a training course. Many states waive licensing tests if you complete the MSF Basic RiderCourse, and professional instruction is faster and safer than learning alone.
- Limit early group rides to four to six riders. The Ohio motorcycle operator manual explicitly advises keeping groups small, as larger packs increase pressure and separation risks for new riders.
The Mindset Before the Machine
Riding involves more risk than driving a car. The MSF handbook breaks it down to three reasons: the vehicle is less stable, you are more vulnerable, and you are less visible. Accepting that reality isn’t about fear; it’s about where you place your attention. Your job in the how to ride a motorcycle for beginners process isn’t to be fearless, it’s to be competent. Nervousness is the brain asking for more information. A structured learning timeline with clear drills answers that request.
The number one cause of motorcyclist fatalities is being hit by a driver who didn’t see them. That statistic frames every other skill. Visibility isn’t an accessory; it’s a core riding tactic. It means using your headlight, wearing bright or reflective motorcycle gear, and positioning yourself in the lane where you’re most likely to be seen in a driver’s mirror.
Common mistake: Rushing onto public roads after mastering basic controls in a parking lot. The mental load of traffic, signals, and unpredictable drivers requires a separate skill set that takes dedicated practice to develop.
Gear Up First
You need equipment that protects you and doesn’t distract you. Gear that does not fit properly can distract you. Fit is your first filter, not brand or price.
The mandatory list is short: A DOT- and ECE 22.06-certified full-face helmet, a motorcycle jacket with CE-rated armor at the shoulders and elbows, full-finger gloves, over-the-ankle boots, and durable pants. Denim offers little protection in a crash. Proper riding pants, even affordable textiles, are woven to resist abrasion.
For your first few practice sessions, dress for the ground, not the weather. You’ll be moving slowly, so overheating in a mesh jacket is unlikely. A dropped bike can cause abrasion injuries even at low speeds. The boot’s cuff had folded down on impact, offering zero support. Since that day, I only ride in boots that cover and lock the ankle in place.
Know Your Controls (Before You Start the Engine)
You must know where every control is by feel, without looking down. Confusion between the horn button and the turn signal switch is a classic beginner moment that can pull your eyes off the road.
| Control | Location (Standard Layout) | Primary Function |
|---|---|---|
| Clutch Lever | Left handlebar | Disengages engine from rear wheel for stopping, starting, and shifting. |
| Front Brake Lever | Right handlebar | Applies braking force to the front wheel. Provides majority of stopping power. |
| Shift Lever | Left foot | Changes gears. Pattern is typically 1-N-2-3-4-5-6 (down for first, up for the rest). |
| Rear Brake Pedal | Right foot | Applies braking force to the rear wheel. Crucial for low-speed stability. |
| Throttle | Right handlebar (grip) | Controls engine speed (RPMs). Rotate toward you to accelerate. |
Spend time sitting on a stationary bike. Squeeze the clutch. Feel for the friction zone, the point where the lever resistance changes and you feel the engine connect. Press the shift lever down and up with your foot. Rock the bike to feel how the rear brake pedal holds it. This “dry practice” for how to ride a motorcycle for beginners builds neural pathways so your first moving attempt isn’t a fumbling mess. For a full breakdown, our guide on motorcycle controls walks through each one in detail.
The Non-Negotiable Pre-Ride Inspection (T-CLOCS)
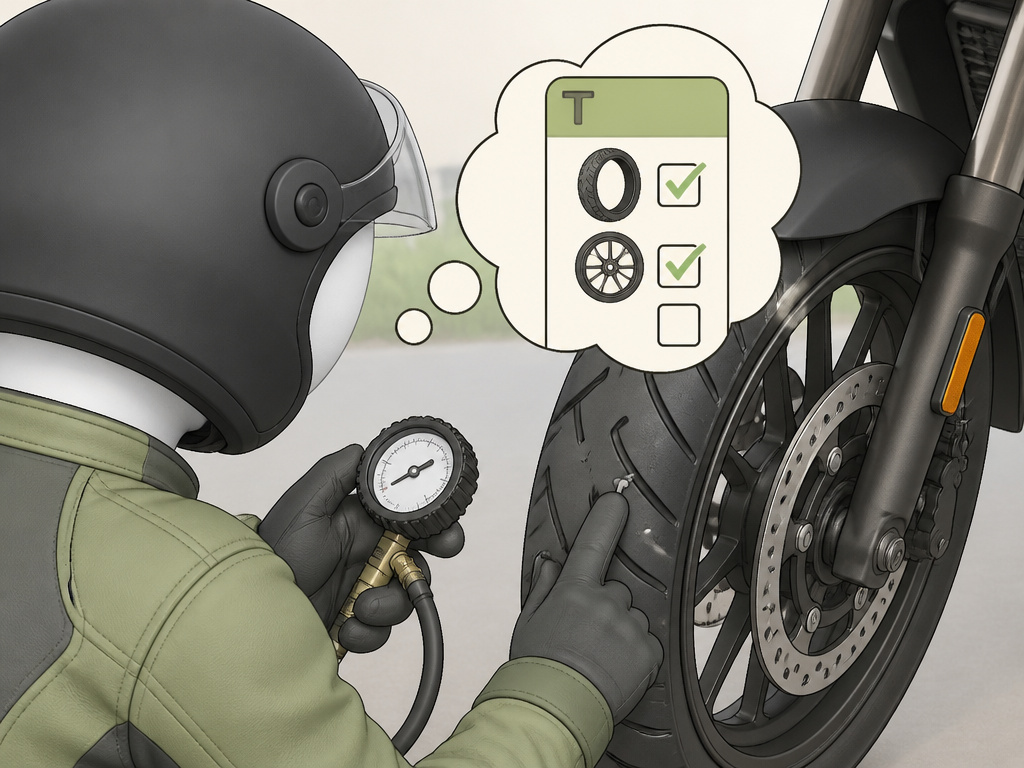
This check is from the Motorcycle Safety Foundation operator manual. It’s not optional. You are looking for problems that could leave you stranded or cause a crash. Do it every time you ride.
- T – Tires & Wheels: Check pressure with a gauge. Look for cuts, nails, or excessive wear. Spin the wheels to ensure they don’t rub and that the brakes aren’t dragging.
- C – Controls: Work the clutch, throttle, front brake, and rear brake. Do they move freely? Do cables look frayed? Ensure the throttle snaps shut when released.
- L – Lights & Electrics: Test headlight (high and low beam), tail/brake light, turn signals, and horn. A dead brake light is an invitation to be rear-ended.
- O – Oil & Fluids: Check engine oil level (on center stand or level ground). Look for leaks under the bike. Check coolant level if applicable.
- C – Chassis: Check the front suspension for binding. If there’s a chain, check its tension and lubrication according to the manufacturer’s specifications.
- S – Stands: Ensure the side stand operates smoothly and the spring holds it tightly in the up position. A loose stand can drop unexpectedly.
The First Ride: Starting, Shifting, and Stopping
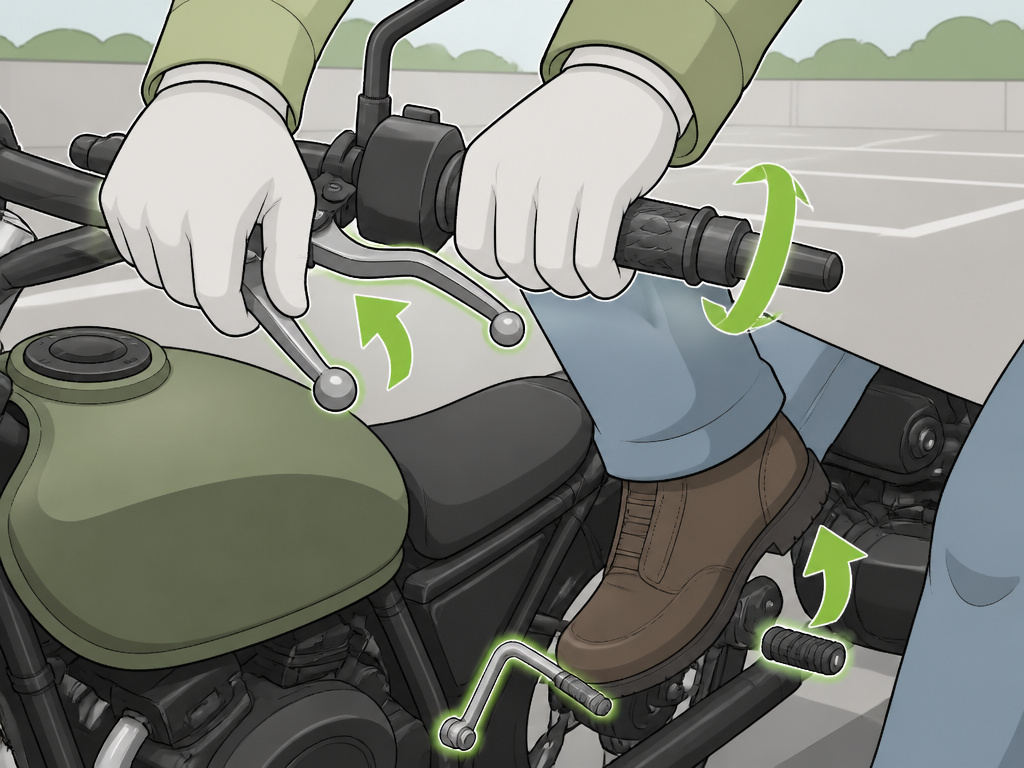
This is your parking-lot curriculum. Find a large, completely empty space.
Mounting and Starting:
- Stand on the bike’s left side. Squeeze the front brake lever so the bike can’t roll.
- Swing your right leg over and sit. Straighten the bike and kick the side stand up with your left foot.
- Turn the ignition on. Squeeze the clutch lever all the way in. This is a safety habit, as many motorcycles require squeezing the clutch before the starter will operate.
- Press the starter button.
A motorcycle’s friction zone is the point where the clutch begins to transmit the engine’s power to the rear wheel. It is found by slowly releasing the clutch lever until you feel the bike want to move forward, accompanied by a slight drop in engine RPM. This zone is the key to smooth starts and low-speed control.
Your First Launch (The Friction Zone Crawl):
- With the bike running and you sitting upright, squeeze the clutch and press the shift lever down firmly into first gear.
- Keep the clutch squeezed. Place your feet on the ground.
- Very slowly release the clutch lever. Don’t touch the throttle yet. Focus on the feeling in your hand and the sound of the engine.
- You’ll feel the engine note change and the bike will begin to pull forward slightly. This is the friction zone. The instant you feel it, stop releasing the clutch. Hold it right there.
- Let the bike walk itself forward a few feet, feet still down like outriggers. Then, squeeze the clutch back in to stop. Repeat this practice. The goal is to train your hand to find that zone instantly.
Adding Throttle and Stopping:
- Find the friction zone again. This time, as the bike starts to pull, gently add a tiny amount of throttle by rotating your right wrist.
- As you roll on the throttle, continue to release the clutch smoothly. Lift your feet onto the footrests.
- To stop, roll off the throttle, squeeze the clutch, and apply both brakes gently. Practice launching and stopping in a straight line. Master starting from a stop before you even think about turning.
Shifting to Second Gear:
Once you can launch and stop smoothly, ride in first gear to the far end of your lot. To upshift:
- Roll off the throttle and squeeze the clutch in quickly.
- Use your left toe to lift the shift lever firmly up one notch (from 1st to Neutral, then another to 2nd). You’ll feel a click.
- Smoothly release the clutch and roll back on the throttle. Downshifting is the reverse: clutch in, press the lever down, clutch out smoothly. The full process of shifting gears becomes automatic with practice.
The Correct Way to Brake:
Your motorcycle has two independent brakes. The Oregon DMV vehicle control skills manual is explicit: Always use both brakes every time you slow or stop. The front does most of the work, but the rear is essential for stability, especially at low speeds or on slippery surfaces.
- Practice: Ride at a slow walking pace in first gear. Apply both brakes evenly until you stop. Feel how the bike settles. Then practice from 10 mph, focusing on smooth, progressive pressure, not a grab. Jerky front brake application at low speed is the top cause of beginner drops.
Practice Drills That Build Real Skill
Parking lot practice is boring until it isn’t. These drills turn abstract controls into instinct.
The Box Turn:
Use cones or water bottles to mark a square. The goal is to ride around the perimeter, using the friction zone to control your speed, and making tight 90-degree turns at each corner. Look through the turn where you want to go, press the handlebar in the direction of the turn, and control speed with the rear brake and clutch. This drill teaches low-speed balance, steering, and clutch control simultaneously.
Straight-Line Weave:
Place cones in a straight line, spaced apart. Weave through them in first gear without putting a foot down. Focus on using your eyes to guide the bike, look at the gap between cones, not at the cone you’re trying to avoid. This builds the head-turn habit crucial for cornering.
Quick Stop:
From a low speed, practice stopping in the shortest, straightest distance possible. Apply firm, progressive pressure to both brakes without locking either wheel. Squeeze the clutch just before you stop to prevent stalling. This is the single most important crash-avoidance skill you can practice.
From the Lot to the Road: The Survival Mindset
When you can consistently perform the drills without thinking, you’re ready for very quiet residential streets. The game changes here. You are no longer the only variable. The core strategy for riding in traffic is encapsulated in the MSF’s SEE strategy: Search, Evaluate, Execute.
Search your path of travel 12 seconds ahead. That’s about a city block at 30 mph. Your eyes should be constantly scanning that far-off point, identifying potential hazards: a car waiting at a cross street, a pedestrian near the curb, a pothole.
Evaluate those hazards. What is the worst thing that car or pedestrian could do? Where is your escape path, the open lane space you can swerve into if needed? This is where you maintain an adequate space cushion around your bike. Don’t tailgate.
Execute your decision. Change lane position, adjust speed, or prepare to brake or swerve. Communicate your intentions with your turn signals, brake light, and lane position early and clearly.
Where this goes sideways: New riders focus only on the car immediately in front of them. By the time that car’s brake lights come on, you’re in reaction mode. The 12-second scan pulls your vision up and out, giving you time to plan instead of panic.
What Comes After You Learn?
You can launch, shift, brake, and navigate quiet streets. Now you need to make it legal and sustainable.
- Get Licensed: Most states require a separate motorcycle endorsement. The smartest path is to take the MSF Basic RiderCourse. You use their bikes, learn in a controlled environment, and upon completion, many states waive the riding and/or written test. Our guide on the motorcycle license process breaks down state-specific details.
- Buy Your First Bike: Now that you understand the basics, you can make a smart choice. The best first motorcycle is one you can flat-foot comfortably, that has manageable power (under 500cc for most), and that you won’t cry over if it tips in a parking lot.
- Insure It: Shop around. Many companies offer discounts for completing a rider course. At minimum, you need liability coverage; think about adding comprehensive and collision if the bike is worth it.
- Ride Solo (At First): The Ohio motorcycle operator manual advises it’s best to start with solo rides or one experienced rider. Group riding adds complexity. When you do join a group, keep it to four to six riders and put less experienced riders up front.
- Manage the Mental Game: It’s normal for riding anxiety to pop up when you first hit faster roads or highway interchanges. The antidote is specific, gradual exposure. Practice highway on-ramps at low-traffic times. Take a familiar back road slightly faster each time. Confidence is just competence, remembered.
How to choose a beginner motorcycle
Your first motorcycle should build confidence, not overwhelm you. Look for a bike you can comfortably manage. You should be able to place both feet flat on the ground when seated, and the weight should feel manageable when you walk it. A bike that is too tall or heavy can make basic maneuvers difficult. The power delivery should be smooth and predictable, not abrupt. Many new riders start with standard-style motorcycles or smaller displacement models, as they are often easier to control at low speeds and in parking lots. Find a motorcycle that helps you focus on learning to ride, instead of struggling with the bike.
Frequently Asked Questions
How hard is it to ride a motorcycle for beginners?
The physical skills of clutch control, braking, and shifting are learnable by most people in a weekend with proper instruction. The real difficulty is mental: developing the constant hazard-scanning focus and risk-management judgment required to ride safely in traffic. That takes months of consistent, mindful practice.
What is the 12-second rule on a motorcycle?
It’s a visual lead-time rule from the Motorcycle Safety Foundation. You should constantly be scanning the road 12 seconds ahead of your current position. This gives you time to identify potential hazards (like a car waiting to turn, debris, or changing traffic signals) and plan your response, rather than just reacting to emergencies.
What is the hardest part of riding a motorcycle?
For most new riders, it’s mastering low-speed control, specifically, the friction zone and rear brake for tight maneuvers like U-turns and parking. At higher speeds, the bike wants to stay upright. At walking speeds, it requires active balance and precise clutch modulation, which feels counterintuitive at first. This is why parking-lot drills are essential.
Should I learn on my own bike or in a course?
Take a course. The MSF Basic RiderCourse provides a structured curriculum, a professional instructor, and a loaner bike to drop without guilt. The ROI is immense: faster, safer learning, potential insurance discounts, and often a license test waiver. Self-teaching ingrains bad habits and dramatically increases your risk during the most vulnerable first months.
Is it safe to ride a motorcycle?
Motorcycling is an inherently risky activity. You are less stable, less visible, and more vulnerable than in a car. “Safe” is the wrong goal. The goal is managing risk. You do that through professional training, relentless skill practice, wearing full protective gear every ride, and adopting a defensive, hyper-aware riding mindset. The risk is never zero, but it is within your control to reduce it significantly.
Before You Go
The most dangerous period is behind you once you’ve gained significant experience with a conscious focus on skill, not just transportation. The habits you build in those initial hours, the T-CLOCS check, the two-brake stop, the 12-second scan, become your automatic defense system.
One final rule from the manuals that most riders ignore until it’s too late: Never ride under the influence of any impairing substance, including cannabis. It distorts your perception of time and space, and good riding is built on accurate perception. Your first bike isn’t just a purchase; it’s a commitment to a skill set. Treat it that way, and the miles will be worth it.
