
Motorcycle Controls Explained
This post contains affiliate links. As an Amazon Associate, we earn from qualifying purchases.
Motorcycle controls are largely standardized for a reason: on a manual motorcycle, your right hand twists the throttle clockwise to go, your left hand pulls the clutch, and your right foot presses the rear brake. This layout for manual motorcycles is reinforced by regulations like ISO 9021:2020 for throttle direction and U.S. FMVSS 123 for control operability, which aim to minimize rider error. The rules govern everything from which side the starter button goes on to how a passenger footrest must fold.
That standardization is the bedrock, but it has cracks. For example, the U.S. FMVSS 123 rule states that for an automatic-clutch motorcycle (that isn’t a scooter), a supplemental rear brake control shall be on the left handlebar. However, the ISO 9021:2020 standard simply lists it as an option that may be on the handlebars without mandating a side. The international ISO standard just lists it as an option that may be on the handlebars. If you ride a model sold in both markets, you could find the lever in different places. The rest of this guide provides a motorcycle controls explained walkthrough of the common controls on most bikes, why they’re placed where they are, and what to do when the rules don’t line up.
What follows: a breakdown of handlebar controls, foot controls, and the instrument panel, grounded in the official manuals from Ducati, Yamaha, and KTM. The guide explains the physical “force path” method for learning how power flows, details key variations for scooters and bikes with combined braking, and lists example maintenance checks from manufacturer manuals.
Key Takeaways
- Twist the throttle clockwise to increase speed, this is a global rule per ISO 9021:2020, ensuring muscle memory works on any bike.
- Right-handlebar controls must be operable without removing your hand from the throttle, a core NHTSA safety requirement to maintain control.
- Check and lubricate your drive chain every 500 miles (800 km) and after riding in the rain, as specified in Yamaha’s maintenance schedule.
- Scooters have unique control rules, if equipped with a supplemental rear brake, U.S. Law requires it to be on the right side, operable by your right foot.
- Law enforcement motorcycles are exempt from these federal control location standards, so their layouts can be completely custom.
The Handlebar Layout: Your Primary Interface
The handlebar is mission control. Every action starts here, and the placement of each switch isn’t just tradition, it’s law.
The ISO 9021:2020 standard is explicit. For a twist-grip throttle, “the motion shall be clockwise to increase speed when viewed from the right side of the handlebar.” That’s why you roll your right wrist forward to accelerate, whether you’re in Tokyo or Texas. The same standard mandates the starter switch be a ‘push’ type control on the right handlebar.
U.S. Regulations add a critical layer for safety. The NHTSA’s FMVSS 123 states that each control on the right handlebar “shall be operable by the operator’s right hand throughout its full range without removal of the operator’s right hand from the throttle.” The rule for the left side is a mirror image: left-handlebar controls must be usable without letting go of the handgrip. The goal is simple: you should never have to sacrifice throttle or steering control to hit the horn or turn signal.
A 50–60 word, third-person, pronoun-free blockquote covering a specific technical sub-topic or tool spec. The ISO 9021:2020 international standard specifies control types, positions, and identification symbols for motorcycles and mopeds. Clause 5.2.1.1 dictates that a twist-grip throttle’s motion shall be clockwise to increase speed. The standard also designates the starter switch as a push-type control located on the handlebars, right side.
On a manual motorcycle, the left cluster typically houses the clutch lever, turn signal switch, headlight controls, and horn button. On a KTM, the manual plainly states, “The clutch lever is fitted on the left side of the handlebar” and the “Horn button is fitted on the left side of the handlebar.” The right cluster holds the front brake lever, the throttle, the engine kill switch, and the starter button. KTM’s manual confirms: “The hand brake lever is fitted on the right side of the handlebar” and “The throttle grip is fitted on the right side of the handlebar.”
Why Controls Are Standardized (And Where They Aren’t)
Standardization prevents the “which lever is the brake?” panic when switching bikes, a core benefit of having motorcycle controls explained. But the rules aren’t perfectly unified globally.
The most notable disagreement is over the supplemental rear brake control for automatic-clutch motorcycles. The U.S. FMVSS 123 rule is strict: “If a motorcycle with an automatic clutch other than a scooter is equipped with a supplemental rear brake control, the control shall be located on the left handlebar.” The international ISO 9021:2020 standard, however, simply lists the “Rear brake (alternative)” as a control that may be located on the handlebars, without mandating a side based on clutch type.
This creates a potential divergence for models sold worldwide. It’s a perfect example of why you must physically locate every control on a new-to-you bike before riding.
| Control | Standard Location | Governing Rule / Source | Key Function |
|---|---|---|---|
| Twist-Grip Throttle | Right Handlebar | ISO 9021:2020, Clause 5.2.1.1 | Controls engine speed; clockwise rotation to increase. |
| Front Brake Lever | Right Handlebar | KTM Owner’s Manual | Activates the front brake. |
| Clutch Lever | Left Handlebar | KTM Owner’s Manual | Disengages the transmission (manual bikes). |
| Starter Button | Right Handlebar | ISO 9021:2020, Clause 5.2.1.1 | Push-type control to engage the electric starter. |
| Horn Button | Left Handlebar | KTM Owner’s Manual | Activates the audible warning device. |
Where this goes sideways: Assuming all bikes use a hand-operated clutch. Scooters have automatic transmissions (CVTs), so there is no clutch lever. The left lever may control a rear brake on some models, but U.S. Law for scooters requires a supplemental rear brake control to be on the right side, operable by the right foot.
The Foot Controls: Gears and Stopping Power
Your feet manage transmission and a significant portion of your braking force. The basic layout is universal: left side for gears, right side for the rear brake.
On a manual motorcycle, your left foot operates the gear change pedal. A firm press down shifts to a lower gear; a lift under the lever with your toe shifts to a higher gear. Your right foot operates the rear brake pedal, which is “located in front of the right footrest,” as the KTM manual notes. It’s crucial to develop a feel for this pedal’s pressure, as the rear brake provides stability, especially at low speeds.
Common mistake: Riding with your foot resting on the rear brake pedal. The KTM manual warns, “If the foot brake lever is not released, the brake linings drag continuously. Take your foot off the foot brake lever if you do not want to brake.” This causes premature wear, overheating, and reduced braking power.
Footrests and Stands: The Support System
These aren’t afterthoughts. Federal law (49 CFR § 571.123) requires footrests for each designated seating position. A passenger footrest “shall fold rearward and upward when not in use.” This prevents a dangling footrest from catching on the road or pavement during a lean.
Stands have a safety-directed design rule: “A stand shall fold rearward and upward if it contacts the ground when the motorcycle is moving forward.” This is why side stands kick forward when deployed, if you forget to retract it and start moving, the forward motion forces it up and back, not digging into the pavement. The KTM manual’s reminder is critical: “When you are riding, side stand must be folded up and secured.”
The Instrument Panel and Rider Aids
The dashboard is your information hub. Beyond the speedometer and tachometer, warning lights and rider aids are controlled here or via dedicated switches.
Modern bikes integrate complex electronics. Systems like ride-by-wire (an electronic throttle), traction control, and selectable riding modes change how the bike responds to your inputs. These aren’t covered by the old control location standards, so their interfaces vary by manufacturer. You might change riding modes via a button on the handlebar, a menu in the digital dash, or a combination of both. The principle remains: before you ride, understand how to access and interpret these systems.
I won’t recommend diving into power mode adjustments on your first ride. The visual feedback from a basic instrument panel, neutral light, turn signal indicators, high beam indicator, is what you need to process instantly. Fiddle with the electronics in a parking lot.
Here’s a quick reference for common symbols and lights you must recognize:
- Neutral Light (Green): Glows when the transmission is in neutral.
- Turn Signal Indicators (Green Arrows): Flash when your indicators are on. A faster flash usually means a bulb is out.
- High Beam Indicator (Blue): Illuminates when your high-beam headlight is on.
- Engine Warning Light (Orange/Red): Often shaped like an engine. Signals an issue with the engine management system.
- Oil Pressure Warning (Red): Typically an oil can icon. If this lights up while riding, stop safely and shut off the engine immediately.
- ABS Indicator (Orange): Lights up briefly at startup for a system check. If it stays on while riding, the ABS may be disabled.
The Physical “Force Path” Learning Method
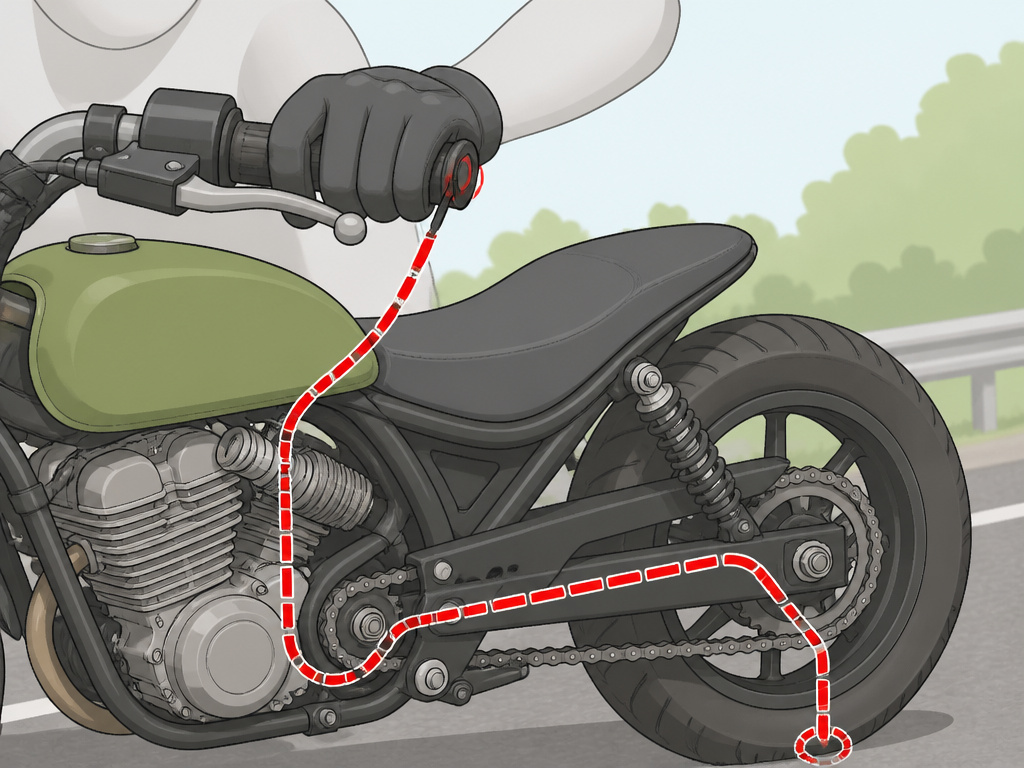
Diagrams are fine, but touch is better. The fastest way to understand how controls connect to the bike’s movement is to trace the physical path of force.
Walk around a parked bike. Start at the twist grip. Follow the throttle cable down to the throttle body on the engine. That controls air and fuel, making the crankshaft spin. The crankshaft connects to the transmission via the clutch (when it’s engaged). From the transmission, power goes to the countershaft sprocket, through the chain to the rear wheel sprocket, and finally to the rear tire’s contact patch.
Do this once, pointing at each component. It takes a few minutes. Suddenly, “the back thing” becomes the swingarm pivot, and the chain isn’t just a noisy line, it’s the final mechanical link between your right wrist and the road. This method turns abstract controls into a tangible system.
Control Variations: Scooters, Automatics, and Combined Braking

Not all motorcycles follow the classic manual layout. Understanding the exceptions is critical for safe operation.
- Scooters: Defined by the U.S. Standard as having a foot platform and step-through architecture. They use a Continuously Variable Transmission (CVT), so there’s no clutch lever or gear shifter. The left handlebar lever often controls the rear brake. Remember the unique U.S. Rule: a scooter’s supplemental rear brake control must be on the right side, operable by the right foot.
- Automatic Clutch Motorcycles: Some larger bikes (e.g., Honda DCT models) have automatic transmissions but a motorcycle frame. As noted, U.S. Law places a supplemental rear brake control on the left handlebar for these, unlike a scooter.
- Combined Braking Systems (CBS) & Anti-lock Braking Systems (ABS): The U.S. Standard addresses these. It states that if a motorcycle has “self-proportioning or antilock braking devices using a single control for front and rear brakes, the control shall be located and operable in the same manner as a rear brake control.” In practice, this often means a standard front brake lever that, when applied, automatically engages a portion of the rear brake as well.
| Motorcycle Type | Clutch Control | Rear Brake Control (Primary) | Key Regulatory Note |
|---|---|---|---|
| Manual Motorcycle | Left Handlebar Lever | Right Foot Pedal | Standard layout governed by ISO 9021 and FMVSS 123. |
| Scooter (CVT) | None (Automatic) | Left Handlebar Lever or Right Foot Pedal | U.S. FMVSS 123: Supplemental rear brake control on right side, operable by right foot. |
| Automatic Clutch Motorcycle (Non-Scooter) | None (Automatic) | Right Foot Pedal | U.S. FMVSS 123: Supplemental rear brake control on left handlebar. |
| Motorcycle with Combined Braking (CBS) | Varies | Right Foot Pedal | Single brake control (usually front lever) must be located as a rear brake control would be. |
Basic Control Maintenance and Safety Checks
Controls need occasional attention. Sticky throttles, sloppy levers, or loose footpegs are failures waiting to happen.
Manufacturer manuals provide specific intervals. For example, Yamaha’s maintenance schedule for the XSR700 calls for specific checks:
- Drive Chain: Check slack, alignment, and condition every 500 mi (800 km) and after washing the motorcycle, riding in the rain or riding in wet areas. Lubricate it thoroughly at the same time.
- Steering Bearings: Check for looseness at the initial 600 mi (1000 km) service, then every 4000 mi (7000 km). Repack with grease every 12000 mi (19000 km).
- Brake Lever Pivot: Apply silicone grease lightly at the 600 mi (1000 km) service, then every 4000 mi (7000 km).
A quick pre-ride check takes one minute:
- Squeeze levers. Do the clutch and front brake feel firm, with a little free play at the beginning?
- Test the throttle. Does it snap closed smoothly when you release it?
- Press the foot controls. Does the gear shifter move crisply? Does the rear brake pedal offer solid resistance?
- Kick the stands. Do they spring firmly into the up or down position?
Ducati’s advice is universal: “Perform the checks specified in chapter ‘Checks before riding’ before each ride.” Yamaha echoes this, warning that failure to do so may lead to damage or injury.
How to use a motorcycle choke
On older motorcycles or those with carburetors, a choke control enriches the fuel mixture for cold starts. It’s typically a lever or knob on the left side of the handlebar, allowing you to operate it without removing your hand from the grip. To use it, pull the lever or turn the knob to the ‘on’ position before starting the engine. Once the engine runs smoothly and begins to warm up, gradually push the lever or turn the knob back to the ‘off’ position. Riding with the choke left on for too long can cause poor performance and damage the engine.
Frequently Asked Questions
What are the six primary controls on a motorcycle?
For a manual motorcycle, the six primary controls are: the clutch lever (left handlebar), the front brake lever (right handlebar), the throttle (right handlebar), the gear shifter (left foot), the rear brake pedal (right foot), and the engine kill switch (right handlebar). These are the controls you use constantly while riding to manage speed, direction, and stopping.
What does 2 fingers down mean for bikers?
It’s a non-verbal way to say, “Watch out, bad stuff here.”
What is the 70/30 brake rule for motorcycles?
This is a general guideline for brake force distribution during hard, controlled stops on dry pavement, suggesting more braking power from the front brake than the rear. The front brake provides most of the stopping power because weight transfers forward during deceleration, loading the front tire. This is a guideline, not a rigid rule, emergency braking practice is essential.
What is the 12 second rule on a motorcycle?
It’s a following-distance rule for increased safety, where riders are taught to maintain a longer visual lead than the common rule for cars. This means looking as far ahead as you will travel in the next 12 seconds to identify potential hazards (like stopped traffic, debris, or merging cars) early, giving you more time to react smoothly without sudden, dangerous inputs.
Before You Go
One rule most guides skip: if you’re shopping for a used bike and the control layout seems odd, a lever in a strange place, missing footpegs, check if it was formerly a police bike. The U.S. NHTSA motorcycle safety standard (FMVSS 123) explicitly exempts “motorcycles that are designed, and sold exclusively for use by law enforcement agencies.” Their controls can be anywhere.
The official standards give you a reliable map. Your right hand twists forward to go. Your left foot shifts gears. Your right foot presses the rear brake. But always do your own reconnaissance. Sit on the bike. Find every switch, lever, and pedal before you start the engine. That brief ritual is the difference between a controlled ride and a frantic search for the horn when you need it. Trust the standards, but verify the specific machine under you.
