
How to Brake on a Motorcycle: The 4-Step Stopping Sequence
This post contains affiliate links. As an Amazon Associate, we earn from qualifying purchases.
Braking on a motorcycle requires using both brakes together, smoothly and progressively. On a bike with conventional brakes, apply most of your stopping power with the front lever and a lesser amount with the rear pedal, increasing pressure gradually without grabbing. For a complete stop, follow a four-step sequence: roll off the throttle, apply both brakes, pull in the clutch, and finally downshift.
That 70/30 split is a target, not a law. Your bike’s weight transfer under deceleration does most of the work, loading the front tire and giving it more grip. Understanding how to brake on a motorcycle means using that weight transfer. The rear tire gets lighter, which is why stomping on the rear pedal can lock it up easily.
This guide walks through that four-step sequence until it’s automatic, then covers what changes with ABS, linked brakes, and the how to brake on a motorcycle question on slick roads. We’ll also get into the parking lot drills that build the muscle memory you need for when a car pulls out.
Key Takeaways
- Follow the four-step stopping sequence: off throttle, on brakes, in clutch, then downshift. This order prevents stalling and keeps the bike stable.
- Apply brakes smoothly and progressively. A sudden grab can overwhelm the front tire’s grip, especially in a turn or on a wet road.
- With ABS, maintain constant pressure during an emergency stop. Do not pump the lever; let the system modulate for you.
- Always brake before you lean into a corner. Braking while leaned over reduces available traction and can stand the bike up.
- Practice emergency braking in a safe, empty lot. Knowing how your bike and ABS react under maximum pressure is a skill you must own.
The Physics You’re Working With
A motorcycle stops by converting forward motion into heat at the brake pads. That’s simple. The complex part is managing the bike’s weight, which shifts forward dramatically when you slow down.
This forward weight transfer is why the front brake provides most of your stopping power, around 70% on a conventional bike. The front tire gets pressed into the pavement, increasing its grip. The rear tire, by contrast, gets lighter. Stomp on the rear brake pedal with too much force and the wheel will lock and skid because there’s not enough weight on it to keep it gripping.
A motorcycle’s service brakes must stop it from 30 mph within 45 feet and from 60 mph within 180 feet on a specified test surface, per FMVSS 122 (U.S. Federal Standard). That’s the performance floor every street-legal bike is built to meet.
This weight shift happens every time you slow down. Your job is to apply brake force in proportion to that shift. Start gently, then increase pressure as the weight comes forward and the tire’s grip increases. A hard, immediate grab at the front lever before the weight has transferred is a classic recipe for a front-wheel skid.
The 4-Step Stopping Sequence (Every Time)
For a controlled, planned stop, like at a traffic light, this sequence keeps the bike stable and you in control. It works for linked and conventional brake systems.
- Roll Off the Throttle. This is your first source of deceleration. Simply close the throttle completely. The engine will begin to slow the bike.
- Apply Both Brakes Smoothly. Squeeze the front brake lever and press the rear brake pedal simultaneously. Increase pressure gradually as you feel the bike slow. This is where you manage that 70/30 front/rear balance.
- Pull in the Clutch. As the engine RPMs drop near idle, pull the clutch lever in fully. This disconnects the engine from the rear wheel to prevent a stall.
- Downshift (Optional). Once stopped, you can click down through the gears to first. Some riders downshift as they slow (engine braking), but doing it after you’ve stopped is simpler and safer when you’re new.
The most common mistake is pulling the clutch in too early. If you disconnect the engine before applying brakes, you lose engine braking and put all the stopping load on your brake pads and tires. Do steps 1 and 2 first. Let the bike slow, then clutch in.
Where this goes sideways: Pulling the clutch in at the very start of your stop. You lose valuable engine braking, making your actual brakes work harder and heat up faster, which can lead to longer stopping distances on a long downhill.
How Your Brake System Changes the Rule
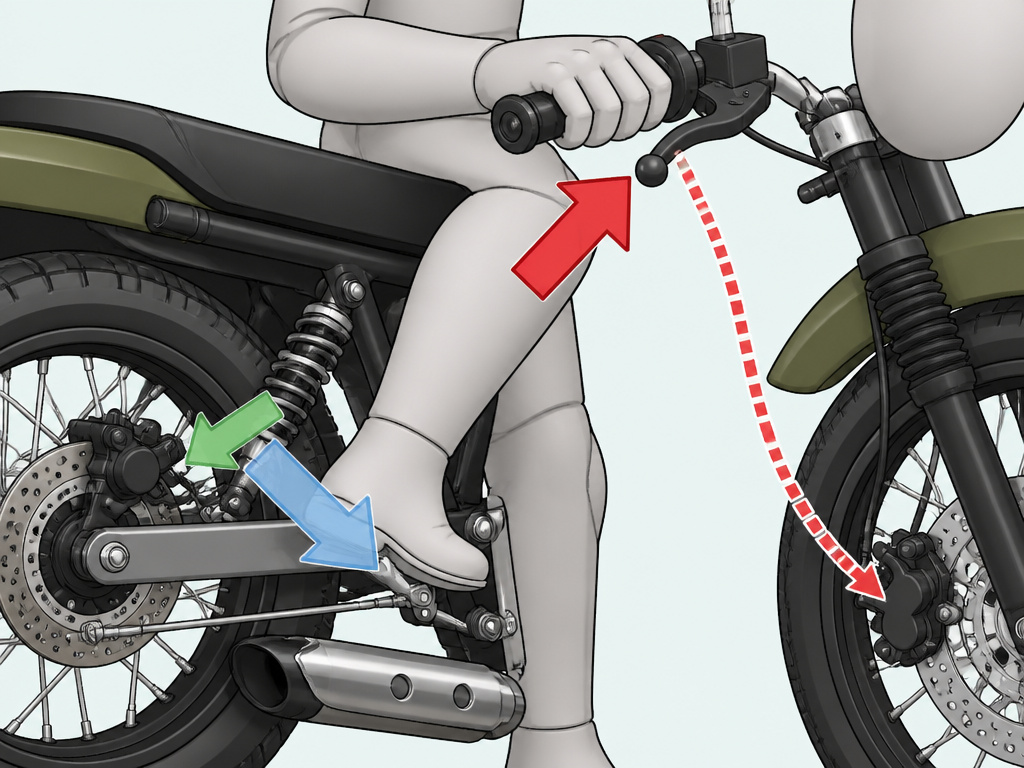
Not all motorcycles ask you to manage the front/rear balance manually. There are three main types, and you must know which one you have.
Conventional (Independent) Brakes
This is the classic setup. The front lever operates only the front brake caliper(s). The rear pedal operates only the rear brake caliper. You are the computer, responsible for the 70/30 split. The Suzuki ADDRESS 110 manual advises riders to “apply the front and rear brakes evenly and at the same time,” which is typical for conventional systems. In contrast, Harley-Davidson’s linked system (C-ELB) can apply rear braking when the front lever is used alone. This system rewards smooth, progressive input and punishes panic.
Linked Braking Systems (CBS)
A Combined Braking System (CBS) automates some of the distribution. On a Honda system, for example, applying the rear brake pedal also activates one piston in the front brake caliper. The goal is to provide more balanced braking with less skill required from the rider. You still use both controls, but the bike adds a helping hand.
Cornering Enhanced & Linked Systems (C-ABS, C-ELB)
Modern systems, like Harley-Davidson’s Cornering Enhanced Electronic Linked Braking (C-ELB), are more sophisticated. They use lean-angle sensors and wheel-speed data. As Harley’s service info states, “applying the front brake lever alone will cause the system to also dynamically apply an amount of braking to the rear.” The system varies the linking based on how hard you’re braking and how far you’re leaned over. The takeaway? If you have a linked system, you cannot practice the same way as a rider with conventional brakes. Your bike is making decisions for you. The principle of smooth application still applies, but the outcome in a panic stop may feel different.
| Brake System Type | How It Works | Key Rider Takeaway |
|---|---|---|
| Conventional | Front and rear brakes are completely independent. | You control 100% of the power distribution. Smooth, progressive input is critical. |
| Linked (CBS) | Applying one control partially activates the other brake. | The bike helps with balance, but you still use both controls. Stopping may feel more stable. |
| Cornering Enhanced (C-ABS/C-ELB) | Computer modulates brake pressure based on lean angle and force. | In a hard stop, maintain steady pressure. Do not pump. The bike is adjusting millisecond-by-millisecond. |
Braking With ABS: What Actually Happens

Anti-lock Braking Systems (ABS) prevent wheel lockup by modulating brake pressure when a sensor detects a wheel is about to stop rotating. This helps you maintain steering control during a maximum-effort stop.
The procedure for an emergency stop with ABS is simple: apply the brakes hard and hold that pressure. Do not modulate or pump the brakes. You will feel a pulsing in the brake lever or pedal, and you might hear a clicking from the ABS module. That’s normal. Hold the pressure until you stop.
ABS does not activate on the front wheel below 5 km/h (3 mph) or on the rear wheel below 8 km/h (5 mph). This is per Harley-Davidson’s technical documentation. At these very low speeds, the wheels can lock, which is why you might feel a final jerk as you come to a complete halt.
A major misconception is that ABS always shortens stopping distance. It doesn’t. Its primary job is to prevent lockup so you can steer. On loose surfaces like gravel, ABS may actually result in a longer stop because preventing lockup allows the tire to “plow” through the surface. But on pavement, maintaining steering control is almost always worth a potential few extra feet.
Common ABS Alert Lamps:
- Slow Flash at Startup: Normal self-check when the bike is powered on and stationary.
- Solid Light: Indicates an ABS fault. The system may be disabled. Have it serviced.
- Rapid Flash: Indicates a potential brake system fault. Stop riding safely and seek service.
Special Situations & Advanced Techniques
The standard four-step sequence is your foundation. These are the exceptions and next-level skills.
Emergency Braking
This is a maximum-performance stop to avoid a collision. The steps condense:
- Simultaneously: Roll off throttle, apply full firm pressure to both brakes (clutch comes in a split-second later).
- With ABS: Hold that pressure. Fight the instinct to let off. The pulsing is the system working.
- Without ABS: Apply maximum pressure just before the point of lockup. This requires practice to find the threshold.
Your body position matters. Grip the tank with your knees, keep your arms slightly bent, and look where you want to go, not at the obstacle. A stiff-armed, wide-eyed stance transfers weight poorly and reduces control.
Braking in a Corner
The golden rule: do the majority of your braking before you lean the bike. Traction is finite. If you use 80% of the tire’s grip for cornering, you only have 20% left for braking. Asking for more by grabbing the brakes mid-corner can result in a crash. The advanced technique is trail braking, carrying a small amount of brake pressure into the very beginning of a turn to help settle the suspension and tighten your line. This is a track and advanced street skill. For most road riding, get your speed set before you turn.
Braking on Poor Surfaces
Loose, wet, or uneven surfaces drastically reduce available traction. The principle of how to brake on a motorcycle here is to be exaggeratedly smooth.
- Wet Roads/Gravel: Use both brakes, but with much lighter, earlier pressure. Increase your following distance massively.
- Uneven Pavement/Bumps: Release brake pressure as you hit the bump. A tire that’s already slowing has less compliance to absorb the impact and can lose grip.
- Long Descents: Rely on engine braking by staying in a lower gear. Use the brakes intermittently to control speed. Constant brake application can overheat the fluid and pads, leading to brake fade, a sudden, scary loss of braking power.
The Parking Lot Practice Drills
You must build muscle memory in a safe place. Find a large, empty parking lot.
Drill 1: Progressive Squeeze
- Ride in a straight line at 20 mph.
- Practice squeezing the front brake lever gradually, taking a full two seconds to reach full pressure.
- Feel the weight transfer forward. Do this dozens of times until the smooth application is automatic.
Drill 2: Rear-Brake Sensitivity
- At 15 mph, apply only the rear brake gently.
- Gradually increase pressure until you feel the rear tire start to skid or the ABS activates.
- This teaches you exactly where the limit of rear traction is under light loading.
Drill 3: Full Emergency Stop
- At 25 mph, practice the full emergency stop procedure.
- Focus on quick, firm (not jerky) application and correct body position.
- With ABS, get used to the pulsing sensation and hold the pressure.
- Measure your stopping distance with cones. Try to shorten it with smoother technique, not more strength.
Brake Maintenance & Feel
Your technique means nothing if the brakes themselves are poorly maintained. Learn these cues.
A spongy lever that pulls close to the grip usually means air in the hydraulic lines. The brake fluid is compressible, so you’re squeezing bubbles instead of moving fluid to the caliper. This requires a brake bleed.
Excessive lever or pedal travel can indicate worn brake pads. As the pad material wears away, the piston in the caliper has to extend further, requiring more lever movement to make contact.
A slow loss of brake power over weeks, not minutes, can be a sign of contaminated brake fluid. Brake fluid absorbs moisture from the air over time, which lowers its boiling point. Under hard braking, the fluid can boil, creating gas bubbles and a sudden, total loss of pressure, a condition known as vapor lock.
Check your owner’s manual for service intervals. Brake fluid is typically replaced every two years. Pads are replaced when worn to the indicator mark.
Frequently Asked Questions
Do you use front or back brake on a motorcycle?
You use both, simultaneously and smoothly. The front brake provides about 70% of your stopping power on dry pavement due to weight transfer. The rear brake helps stabilize the bike and provides the remaining stopping force.
Which side of a motorcycle is the brake on?
The front brake lever is on the right handlebar, operated by your right hand. The rear brake pedal is on the right side of the motorcycle, operated by your right foot. The left hand controls the clutch, and the left foot controls the gear shifter.
What is the correct way to brake a bike in an emergency?
For bikes with ABS, apply firm, constant pressure to both brakes and hold it. Do not pump. For bikes without ABS, apply maximum pressure to both brakes just to the point before the wheels lock. This requires significant practice to master. In both cases, pull in the clutch as you brake to prevent stalling.
Should you downshift while braking?
You can, but it’s not required for stopping. Engine braking from downshifting can help slow the bike, but it adds complexity. For beginners, it’s safer to focus on smooth brake application and pull in the clutch to stop. You can always downshift to first gear once you are fully stopped.
Why does my motorcycle lurch forward when I brake?
This is often caused by abrupt or jerky brake application, especially on the front brake. You’re asking for more deceleration than the tire’s current grip can provide, causing the suspension to compress harshly. Practice the progressive squeeze drill to smooth out your input.
Before You Go
Braking isn’t about strength. It’s about timing, feel, and a deliberate sequence. The four-step stop, throttle, brakes, clutch, shift, is your bedrock. Drill it until you don’t think about it.
Then, learn your bike’s specific system. Is it conventional, linked, or cornering-enhanced? That changes what happens when you pull the lever. And if you have ABS, trust it. Practice that hard, constant-pressure stop so the sensation isn’t a surprise when you need it.
Finally, your brakes are a mechanical system. A spongy lever or a bike that pulls to one side under braking isn’t a technique issue, it’s a maintenance issue. Address it before your next ride. The difference between a controlled stop and an incident often comes down to a quarter-second and a few feet. Own that margin.
