
How to Trail Brake on a Motorcycle: Step-by-Step
This post contains affiliate links. As an Amazon Associate, we earn from qualifying purchases.
To trail brake on a motorcycle, you gradually release front brake pressure after you begin to lean into a corner. The front brake must be released steadily and off completely at a specific lean angle, such as the circa 50 degrees noted by the British Superbike School. Traditionally, trail braking is done exclusively with the front brake, and in modern usage it almost always refers to the front brake, though some riders and schools discuss rear brake techniques.
That’s the short, correct answer. The long one involves a real argument about whether you should ever brake while leaned, a measurable collapse in your tire’s braking grip within a fifth of a second, a practice drill you can run in a parking lot, and a key technique for advanced riders: how to trail brake on a motorcycle.
What follows: the official road-riding rule versus what top instructors actually teach, the one number that defines the technique’s real risk, and a three-stage practice plan to build the muscle memory without leaving a controlled environment.
Key Takeaways
- Trail braking is the planned, gradual release of front brake pressure as lean angle increases, not braking hard while leaned over.
- Your tire’s braking grip collapses to around 0.36 g by 8–9° of lean. At a committed road turn-in rate, you reach 8° of lean about 0.18 seconds after you first push on the bars. This is why it’s a release technique.
- Cornering ABS with a lean-angle sensor changes the risk profile, but standard ABS will not necessarily prevent a skid in a bend.
- The only safe way to learn is through structured, low-speed drills in a controlled area before ever trying it on the road.
What Is Trail Braking? (The Simple Definition)
Forget the hype. Trail braking means continuing to carry some front brake pressure after you begin to turn or lean the bike, and then gradually reducing—”trailing off”—that pressure as the lean angle increases.
Trail braking is the gradual release of front-brake pressure as lean angle increases into a corner. In modern motorcycle usage, it refers almost exclusively to the front brake. The technique blends decreasing brake pressure with increasing lean angle, operating within the tire’s finite traction budget.
It did not become a common motorcycle term until the 1990s. That timing isn’t random. Radial tire construction provided a stable, predictable contact patch that could handle combined braking and turning forces. Bias-ply tires would distort unpredictably. The stability of radials, as noted by RevZilla, made modern trail braking a viable and repeatable technique.
This is not “comfort braking,” which is a reactive, mid-corner squeeze because you entered too fast. Trail braking is a planned part of the corner entry. The goal is not to shed huge speed while leaned over. It’s to finalize your speed control smoothly as you tip in, which loads the front tire and makes the steering more responsive.
The Official Rule vs. The Professional Argument
Here is where the riding world splits. The Motorcycle Safety Foundation Basic RiderCourse teaches that the safest way for a beginner to approach a corner is to do all slowing before the entrance, discouraging any brake use while the motorcycle is leaned over. This is the official, conservative road-riding doctrine found in guides like the UK’s DVSA Roadcraft.
On the other side are instructors like Freddie Spencer and Nick Ienatsch. They argue trail braking should be used in nearly every corner as a means to help the motorcycle change direction, and that it gives the rider more control and significantly increases rider safety.
So who is right? Both, for their context. The MSF rule is perfect for someone drinking from the fire hose of basic clutch, throttle, and steering control. Adding brake modulation while leaned is a guaranteed overload. But as Bennetts Bikesocial points out, a serious problem emerges when riders gain confidence but their habits don’t evolve. They follow the “brake before the corner” rule, then open the throttle too early in the turn, which widens their line. Running wide is the number-one cause of single-vehicle corner crashes.
The professional argument is that trail braking is a skill, not a primary road strategy, which is the core of the how to trail brake on a motorcycle question. It’s for the unexpected: a tightening bend, gravel, an animal. If you panic and grab the brake mid-corner with no prior pressure, you risk exceeding the tire’s reduced traction budget, which can lead to a lockup or, as some sources note, cause the bike to stand up and run wide. If you’re already trailing a tiny amount of brake, the forks are compressed, the tire is loaded, and you can shed a small amount of speed without upsetting the bike. It’s control you keep in your back pocket.
The Golden Rule: As Lean Goes Up, Pressure Goes Down
This isn’t just a saying. It’s physics. Your tire has a fixed amount of grip, often shown as a friction circle or “traction budget.” That grip must be shared between braking (slowing down) and cornering (leaning over). The more you use for one, the less you have for the other.
The Golden Rule: as lean angle goes up, brake pressure goes down. You cannot exceed the tire’s total grip budget. Smooth, progressive release is everything.
This is why abrupt inputs are deadly. A 2019 study by Fatzinger et al. Measured exactly how much braking grip is lost as a sport bike leans over. The numbers are sobering.
| Bike Position | Front-Wheel Lockup Threshold (g-force) |
|---|---|
| Upright | 0.69 – 0.80 g |
| 3–4° Lean | 0.51 – 0.67 g |
| 8–9° Lean | 0.32 – 0.39 g |
At just 8–9 degrees of lean—a very mild cornering angle—your front tire’s ability to handle braking force collapses to a range of 0.32–0.39 g, down from 0.69–0.80 g when upright. At a normal road turn-in rate, you reach 8 degrees of lean about 0.18 seconds after you first push on the bars. This is the real, unforgiving timer on the technique. Understanding how to trail brake on a motorcycle is critical because it’s a release skill; you have almost no time to hold brake pressure. You must be coming off the lever as the bike falls into the lean.
Front Brake vs. Rear Brake: Which One Do You Use?

Traditionally, trail braking is done exclusively with the front brake. In modern usage, it almost always refers to the front brake. The front brake is about twice as effective at reducing speed. When you apply it, weight transfers forward, compressing the forks and sharpening the steering geometry, which helps the bike tip in.
But the rear brake has its advocates, notably many police riders. The British Superbike School analysis notes that when using the rear brake only, the rear tire starts to slide at around 30 degrees of lean with maximum braking, and runs out of grip completely around 50 degrees. In theory, the rear brake needs to start being released at 30 degrees and be off by 50.
Common mistake: Grabbing a handful of front brake mid-corner. At 30 degrees of lean, the tire’s grip for braking is almost gone. A hard pull will lock the front, and the bike will tuck and fall before standard ABS can react.
The rear brake can be used for small speed adjustments, but with maximum braking the rear tire starts to slide at around 30 degrees of lean. But it also makes a rear skid more likely due to weight transfer. Most top-level racers use the rear brake for tiny speed adjustments while trailing the front brake, not instead of it. For learning, stick with the front. It’s the primary tool, and mastering its modulation is the entire game.
When Trail Braking Helps (And When It’s the Wrong Tool)
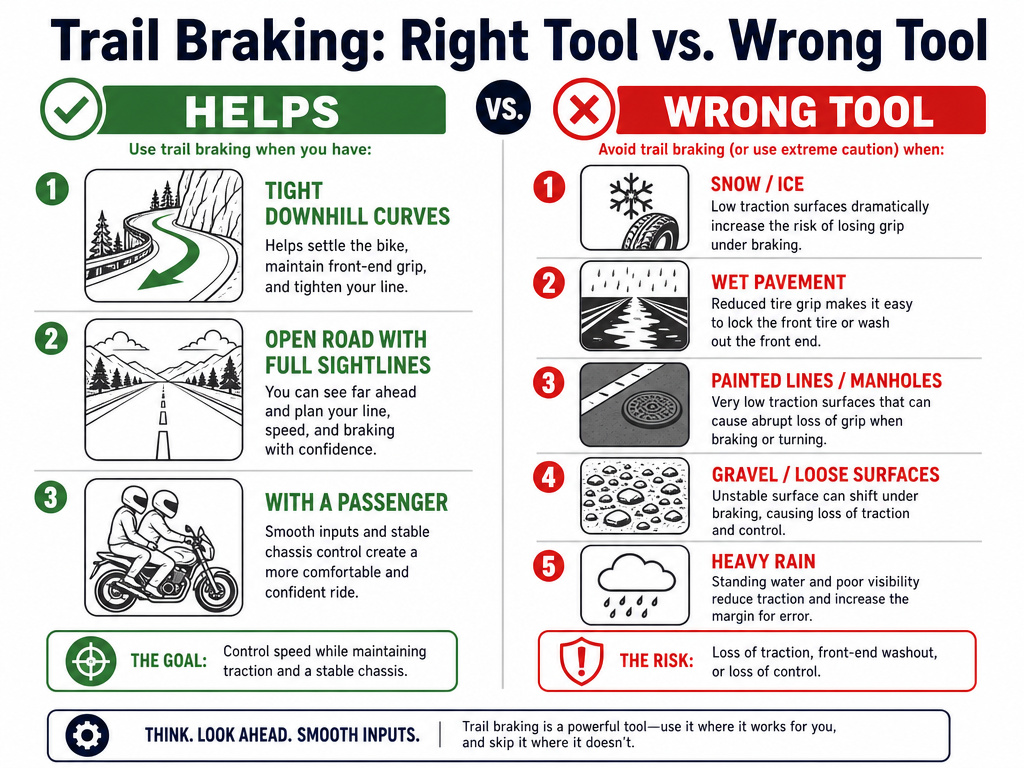
This isn’t a technique for every corner on your commute. It’s a specific tool for specific jobs. Based on advice from Bennetts Bikesocial and others, here are scenarios where light trail braking is genuinely useful on the road:
- Tight, downhill corners: Gravity increases speed, and the bike wants to run wide. Light brake pressure keeps weight on the front tire, making steering more stable and precise.
- Open corners with good visibility: If you can see all the way through the corner, your entry speed can be a touch higher because you have the option to trail brake to adjust.
- Carrying a passenger: The extra weight increases inertia. A progressive brake release as you lean in helps keep everything smooth and predictable.
Conversely, trail braking is the wrong tool whenever grip is compromised or unknown. The Corner Speed Blog is blunt about this. Do not attempt it with:
- Cold tires
- Wet or greasy surfaces
- Painted lines, metal covers, or manhole covers
- Gravel, sand, or polished asphalt
- The first few minutes of a rain shower
In these conditions, the “brake before the corner” rule is not beginner advice—it’s the only safe advice. Your traction budget is already slashed. Dividing it further is asking for a slide.
How to Practice Trail Braking Safely: A 3-Stage Plan
You must build this skill in a controlled, low-risk environment. A vacant parking lot is ideal. Do not try to learn this mid-corner on your favorite twisty road.
Stage 1: The Straight-Line Drill
This removes steering from the equation so you can focus on lever feel.
- Ride in a straight line at a slow, steady speed.
- Gently apply the front brake with one or two fingers.
- Focus on squeezing the lever smoothly, not grabbing it. Feel the fork compress.
- Release the pressure just as smoothly, over about one second.
- Repeat for 10-15 minutes. The goal is to make the brake application and release so smooth that a passenger wouldn’t feel a jerk.
Stage 2: The Large Circle Drill
Now you add lean angle. Set up a large circle using cones or visual markers.
- Approach the circle and apply light brake pressure before you initiate the turn.
- As you push on the inside bar to lean, begin to release brake pressure.
- Your goal is to have all brake pressure gone by the time you are at a steady, mild lean angle.
- Hold a neutral, steady throttle through the rest of the circle.
- Practice this for 20-30 minutes. Have a friend watch to see if the bike stands up or if your inputs are jerky.
Stage 3: Adding the “Why” – Data or Observation
If you have a bike with a lean-angle display or a data logger, use it. The goal is to see the relationship. You want the brake pressure trace to be a smooth downward slope as the lean-angle trace rises. If you don’t have data, have your observer focus on one thing: is your brake release finished before you reach your maximum lean? If not, you’re trailing too deep for your current skill level.
What About Cornering ABS?
Modern cornering ABS (sometimes called Cornering Brake Control) changes the equation. It uses an Inertial Measurement Unit (IMU) that reports lean, pitch, and yaw to the bike’s computer. The system knows how far over you are and can meter brake pressure to prevent a lockup or a stand-up more effectively than standard ABS.
Standard ABS is calibrated for an upright bike. The British Superbike School notes it will not necessarily prevent a skid and fall in bends, and will not prevent the bike from standing up and running wide. Cornering ABS is more effective for braking in corners. If your bike has it, the safety net is wider. But it is not a license to be brutal with the lever. The technique of smooth release remains the same.
What is the 100 points of grip concept?
Think of your tire’s total grip as a budget of 100 points. You can spend these points on braking, cornering, or acceleration, but you cannot exceed the total. When you brake hard in a straight line, you might use 80 points for braking, leaving 20 for a small steering input. As you lean the bike for a corner, you spend more points on cornering. This leaves fewer points available for braking. A study showed that at just 8 to 9 degrees of lean, the front tire’s braking grip collapses to roughly half of what it is when upright. The golden rule follows from this: as lean angle goes up, brake pressure must come down to avoid spending more points than you have.
Frequently Asked Questions
Is trail braking done with the front or rear brake?
In modern usage, trail braking almost always refers to the front brake. It is far more effective at slowing the bike and sharpens steering geometry. The rear brake can be used for minor adjustments, but for learning the core technique, focus solely on the front brake.
What is the 70/30 brake rule for motorcycles?
The rear brake is only half as effective at reducing speed as the front brake. This rule does not directly apply to trail braking, where you are using only a small, decreasing percentage of the front brake’s capability as you lean.
Won’t using the front brake in a corner make the bike stand up?
It can, if you apply it abruptly or too hard. A smooth, decreasing application as you lean in uses the geometry to your advantage, helping the bike tip in. A sudden grab mid-corner will absolutely make the bike stand up and run wide, which is a primary cause of running-wide crashes.
Should a beginner learn trail braking?
No. The Motorcycle Safety Foundation curriculum is correct for beginners: do all your slowing before the corner. A new rider needs to master throttle control, countersteering, and basic braking first. Trail braking is an advanced skill to layer on after those fundamentals are automatic, ideally with professional coaching.
Can you trail brake with any motorcycle?
Yes, the physics are the same. However, sport and standard bikes with responsive front ends and radial tires will give clearer feedback. Heavy cruisers or touring bikes with significant front-end dive require even smoother inputs. The practice drills are universal.
The Bottom Line
Trail braking is a precision skill, not a magic trick. It will not fix bad vision or poor line selection. If you’re not looking through the corner and picking a sensible path, no amount of brake finesse will save you.
Start in a parking lot. Drill the straight-line smoothness until it’s boring. Then connect that smooth release to a gentle lean in a giant circle. The goal is not to go fast; it’s to make the brake lever an extension of your finger, with pressure that breathes in and out with the bike’s posture.
One final number to remember: 0.18 seconds. That’s about how long you have between starting your turn and losing half your front braking grip. The technique lives in that sliver of time. Practice until your release is faster than that.
