
How to Get Back on a Motorcycle After a Crash
This post contains affiliate links. As an Amazon Associate, we earn from qualifying purchases.
Getting back on a motorcycle after a crash requires a three-part plan: heal your body, inspect your bike using the manufacturer’s checklist, and rebuild your skills in a controlled environment. The first ride back should be a short, familiar route in daylight.
Honda’s owner manuals have a specific post-crash procedure that riders of Honda motorcycles should follow before turning the key. It prioritizes checking tightness on critical parts like the handlebar, control levers, brakes, and wheels; finding damage there means you must stop. Knowing how to get back on a motorcycle after a crash begins with this mandatory safety check.
What follows is a rider’s roadmap for how to get back on a motorcycle after a crash. It begins with the essential safety checks from the OEM manuals, covers the mental work most guides skip, and finishes with a skill-rebuilding sequence that works. Your goal is to come back from the crash as a more prepared rider.
Key Takeaways
- After a crash, personal safety is your first priority and you should assess the severity of injuries; only consider riding if you decide you are capable of riding safely.
- Before riding, perform the manufacturer’s post-crash inspection, focusing on fluid leaks and the tightness of critical nuts and bolts on the handlebar, controls, brakes, and wheels.
- If there is any doubt about damage, ride slowly and cautiously to a qualified service facility for a thorough check. Honda states crash damage can be hidden.
- Rebuilding confidence starts off the bike with parking-lot drills on braking and swerving before attempting any traffic.
- Refit or replace any gear that sustained impact or no longer fits perfectly, as discomfort can become a serious distraction on a ride.
The Non-Negotiables: Safety Before the Ride
Before you think about psychology or practice laps, there’s a mechanical reality to address in how to get back on a motorcycle after a crash. A crash applies forces a bike isn’t designed for in normal use. Something can be bent, cracked, or loosened without a visible scratch.
The official word comes from Honda’s owner manuals, which have a dedicated “If You Crash” section. It doesn’t mince words. Your first priority is personal safety and assessing injuries. The manual says to call for emergency assistance if needed and to follow applicable laws if another person or vehicle is involved. Only if you decide you are capable of riding safely should you even look at the bike.
This is the baseline legal and moral responsibility. The bike can be fixed. Riding with a concussion or a broken rib because you’re toughing it out is how a minor incident becomes a catastrophe.
Before you start: A post-crash inspection is not a substitute for a professional mechanic’s evaluation. Honda explicitly advises that “you should have your motorcycle thoroughly checked at a qualified service facility as soon as possible.” This inspection is only to determine if the bike is possibly safe for a cautious, direct ride to that facility.
The 7-Step Post-Crash Bike Inspection (What the Manuals Say)
If you are physically able to proceed, the manufacturer gives you a specific checklist. This is the commodity advice every article repeats, but here it is verbatim from the source, because getting it wrong has consequences.
The Honda manual’s procedure is straightforward. It focuses on immediate, ride-stopping issues.
- Check for fluid leaks. Look under the bike for fresh oil, coolant, or brake fluid. A puddle is an automatic stop. A seep might be from a tipped-over bike, but it needs a mechanic’s eye.
- Inspect the tires and wheels. Look for deep cuts, gashes, or objects embedded in the tread. Spin each wheel to check for a wobble or a bent rim. A wobbly wheel will shake badly at speed.
- Check handlebar and control lever alignment. Sit on the bike and look down the handlebar. Does it look straight relative to the front wheel? Are the brake and clutch levers intact and positioned normally? A bent lever can affect your reach and control.
- Test control movement. Without starting the bike, work the throttle, clutch lever, and front brake lever. Do they move smoothly through their full range without binding or gritty feeling? A sticky throttle is a direct hazard.
- Check critical fastener tightness. The manual specifically says to check “the tightness of critical nuts and bolts securing such parts as the handlebar, control levers, brakes, and wheels.” Use a wrench to check axle nuts, brake caliper bolts, and handlebar clamp bolts. If anything is loose, do not ride.
- Conduct a basic brake test. With the bike upright and in neutral, roll it forward and apply the front brake. Does it engage firmly? Repeat for the rear brake. A mushy or non-existent feel means a line could be damaged or air is in the system.
- Look for frame or suspension damage. This is the hard one. Look for fresh, deep scratches or cracks on the frame near welds or steering head. Check the forks for oil leaks or misalignment. The manual adds: “Also, be sure to have your Honda dealer check the frame and suspension after any serious crash.”
| Check | What to Look For | If You Find It |
|---|---|---|
| Fluid Leaks | Fresh puddles or steady drips under engine, forks, or brakes. | Do not ride. Tow the bike. |
| Wheel & Tire | Cuts, embedded debris, visible wobble when spun. | Replace tire; wobble requires professional repair. |
| Handlebars/Levers | Misalignment, bends, difficulty operating. | Straighten or replace before riding. |
| Critical Fasteners | Loose axle nuts, caliper bolts, or handlebar clamps. | Tighten to spec. If unsure, do not ride. |
| Brake Feel | Lever goes to handlebar with little resistance. | Likely air in line or damage. Do not ride. |
If anything from this list is questionable, the manual’s instruction is clear: “If there is minor damage, or you are unsure about possible damage, ride slowly and cautiously.” And then get it to a pro. The final line is the most important: “Sometimes, crash damage is hidden or not immediately apparent.”
The Mental Comeback: It’s Not About “Manning Up”
The physical checks are a binary list. The mental work is messier. The fear you feel isn’t a weakness; it’s a functional survival instinct kicking in. Trying to bulldoze through it by “getting right back on the horse” is a classic way to set yourself up for a second, often worse, incident.
Your brain has just had a vivid, involuntary lesson in consequences. The goal isn’t to delete that memory, but to file it under “data” instead of “active threat.” This is where structured techniques for managing fear matter more than motivational quotes.
Start by analyzing the crash when you’re ready, but do it with a purpose. What was the sequence? Was it a target fixation issue, a braking error, an unexpected road surface? Be brutally factual, not self-punishing. This analysis directly informs the skills you need to practice. If it was a braking error, your first parking lot session is all about braking technique. If you froze and didn’t swerve, you drill emergency swerving maneuvers.
I won’t recommend a long, solo ride for your first trip back. The visual feedback is honest, but new anxiety amplifies every input and you chase ghosts. Found that out after my own off.
Also, handle the social pressure. Well-meaning family or friends may urge you to sell the bike. Their concern is real, but the decision is yours. A useful response is, “I’m following a structured plan to come back safely.” It shows responsibility without ceding control.
Your Gear: The Silent Partner That Needs a Check-Up
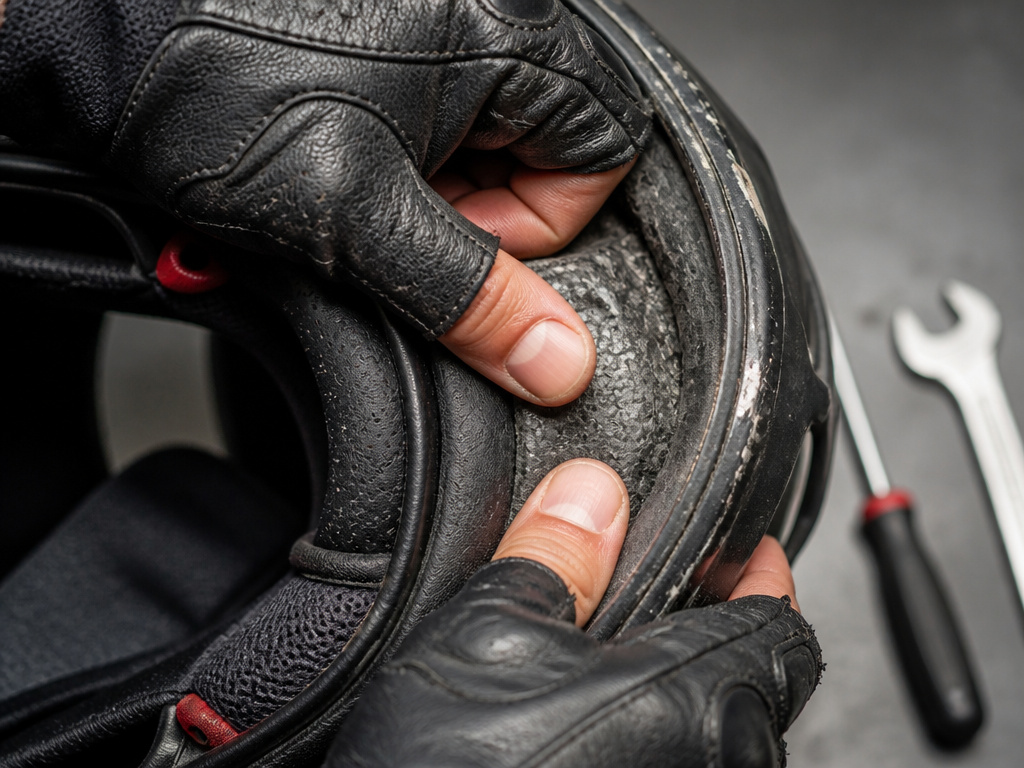
Your helmet, jacket, gloves, and boots are single-use items in a crash. Even if they look fine, their integrity is likely compromised. Helmet performance can degrade on impact, and certification standards exist to ensure baseline protection.
You must inspect gear after a crash. For the helmet, look for any cracks in the outer shell, even hairline ones. Check the EPS foam liner for any compression or deformation, press on it. If it gives and doesn’t spring back, it’s done. Scuffs are fine; cracks or soft spots are not. Many safety experts and helmet manufacturers recommend replacing any helmet that has impacted the ground, as damage may not be visible.
For jackets, pants, and gloves, look for torn seams, abraded material, and displaced armor. That armor is often certified to a CE standard (like CE Level 1 or 2). If it took a hit, it may be cracked or compressed underneath the fabric. My rule came from a dumb mistake: after washing a jacket I forgot to recheck the armor positions. One piece had shifted. I check every pad after a wash now.
Boots need the same check for cracks, torn stitching, or compromised ankle support. Gear is your second skin. Riding with damaged gear is like riding a bike with a hidden crack in the frame.
Rebuilding Skills in the Right Order
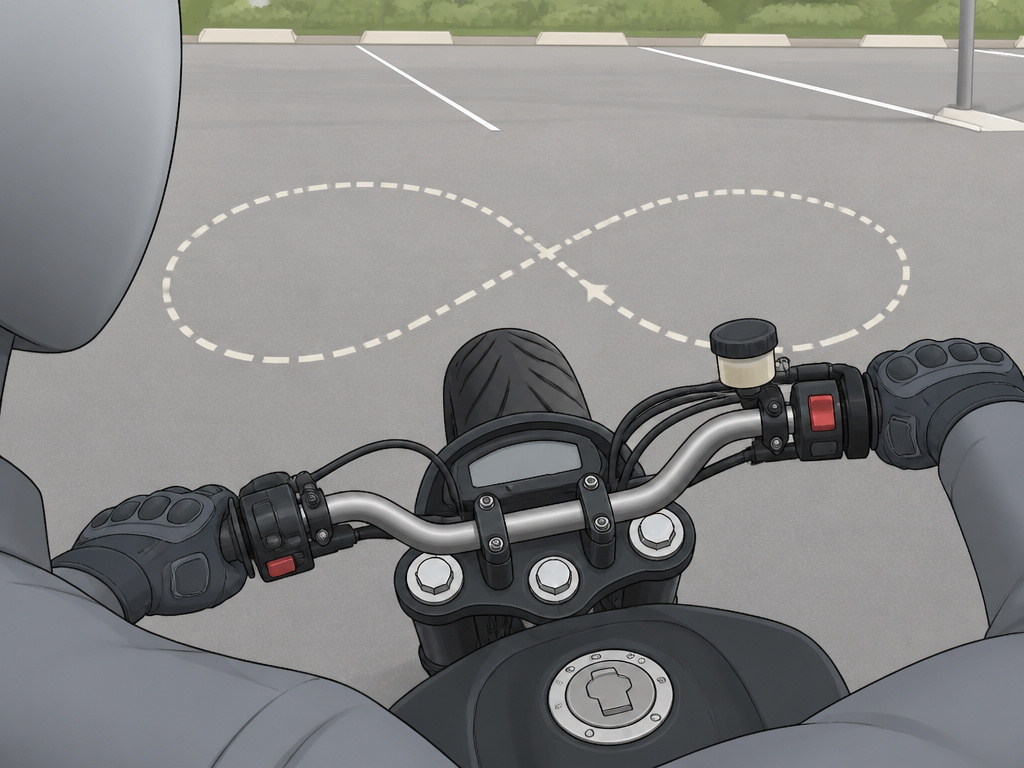
You’re healed, the bike is checked, your gear is sorted. Now you rebuild the muscle memory and confidence. This is a deliberate, almost clinical, re-acclimation.
Don’t start on the road. Start in an empty, paved parking lot. Your first session has one goal: re-familiarization. Practice the absolute basics:
- Slow-speed straight-line balance and clutch control.
- Progressive braking technique to a complete stop, using both brakes.
- Simple swerve maneuvers around imaginary obstacles.
The next session, add slightly more complex drills: U-turns, figure-eights, and quick stops from a bit more speed. The goal is to make the controls an extension of your thoughts again, without the pressure of traffic.
When you finally hit the road, make the first ride trivial. A short loop in your neighborhood in daylight, with zero traffic if possible. The objective is to complete the ride, not to enjoy it. The enjoyment comes back later, after several uneventful trips have rewritten the recent memory loop.
When to Consider a Different Path (Or a Different Bike)
Sometimes, the crash reveals a mismatch. The bike itself might be contributing to your anxiety. A tall, heavy adventure bike dropped at low speed can shatter confidence where a lighter standard bike might not.
There’s no shame in downsizing or switching styles to rebuild confidence. A smaller, lighter, less powerful motorcycle is far better than no motorcycle at all. The skills are transferable. You can always move back up later. This is a practical consideration most pride won’t let them address.
Likewise, if the crash involved a complex legal or insurance claim, get that fully resolved before focusing on riding again. The stress of an open claim is a massive distraction. Handling those necessary post-crash procedures thoroughly clears the mental deck.
How to ride with friends for support after a crash
Riding with trusted friends can provide a crucial safety net as you rebuild confidence. They can ride ahead or behind you, allowing you to focus on your own pace and control without pressure. Before setting out, communicate your needs clearly; let them know if you want to take a shorter route, avoid complex traffic, or make extra stops. Their presence can help you stay calm and focused, turning a potentially stressful solo ride into a manageable, supported task. Remember, your first priority is personal safety. If at any point you feel unsure about continuing, stop and assess the situation. Having supportive riders with you makes it easier to make that call without feeling rushed.
How to deal with emotional trauma after a motorcycle crash
The emotional impact of a crash can be as significant as any physical injury. Flashbacks, anxiety, or a loss of confidence are common reactions. Acknowledge these feelings as a normal part of the process. Start by setting very small, controlled goals for yourself, like sitting on the stationary bike or walking it around a parking lot. The goal is to rebuild a sense of control without overwhelming yourself. If you decide you are capable of riding, do so slowly and cautiously, perhaps in a completely familiar and low-traffic area. Be patient; pushing too hard too soon can reinforce fear. This mental work is about gradual exposure and rebuilding trust in yourself and the machine.
Frequently Asked Questions
What should you NOT do after a motorcycle accident?
Do not immediately jump up and try to move the bike or yourself if you’re seriously injured. Do not refuse medical evaluation at the scene because you “feel fine.” Do not skip the official manufacturer’s inspection checklist before riding the bike again. And do not rush the mental recovery, pushing too fast often backfires.
How long does it take to recover confidence after a motorcycle crash?
There’s no standard timeline. Physical healing dictates the earliest possible start. Mental recovery varies wildly, it could be a week for a minor tip-over, or months for a major incident. The key is to measure progress by completed drills and uneventful short rides, not by the calendar.
Is it normal to be scared to ride after a crash?
Yes. It is a universal, normal response. Fear is functional; it sharpens your attention to risk. The problem is paralyzing fear. The solution is to channel that heightened awareness into focused skill practice, which turns fear into preparedness.
Should I take a riding course after a crash?
Absolutely. A professional course, especially an advanced or refresher course, is one of the best investments you can make. It gives you a controlled environment to practice emergency skills with an instructor’s feedback, which directly overwrites the crash memory with positive, controlled outcomes.
What if I just don’t want to ride anymore?
That is a perfectly valid choice. Riding is a voluntary risk. If after honest reflection the joy no longer outweighs the risk for you, stepping away is the smartest, most mature decision you can make. Sell the bike, keep the good memories, and find a new hobby.
Before You Go
The threshold is simple: if you can’t perform the manufacturer’s inspection checklist with confidence, or if the thought of a parking lot drill makes your stomach knot, you’re not ready. Stop. Get the bike to a qualified service facility for that thorough check. Address the riding anxiety off the bike first.
The long-term confidence comes from competence, not courage. Every hour spent practicing defensive riding techniques in a lot does more for your safety than any amount of bravery on the highway. Come back slower than you think you need to. The road isn’t going anywhere.
