
How to Inspect Motorcycle Gear After a Crash: Step-by-Step
This post contains affiliate links. As an Amazon Associate, we earn from qualifying purchases.
To inspect motorcycle gear after a crash, you need a systematic, hands-on check of every component, prioritizing the helmet. A helmet with any visible crack, deep scratch, or compressed EPS liner must be replaced immediately. For jackets, pants, gloves, and boots, you’re looking for torn seams, compromised armor, and material abrasion that exposes underlying layers. The decision to repair or replace hinges on the severity of the damage, the gear’s age, and the manufacturer’s specific post-crash instructions.
That “immediately” on the helmet isn’t just a suggestion. The foam inside that absorbs impact is designed to crush once. Even if the outer shell looks fine, that inner structure could be compromised, and you won’t see it until the next impact. The rest of your gear has a more complex repair-or-replace calculus, but the helmet rule is absolute. Knowing how to inspect motorcycle gear after a crash is essential for this evaluation.
What follows is the garage-bench method for how to inspect motorcycle gear after a crash: a step-by-step walkthrough for helmets, then a material-by-material breakdown for everything else. You’ll learn the manufacturer rules you must follow (like Leatt’s three-year replacement or KASK’s professional inspection schedule), the hidden failure points most riders miss, and when a professional inspection service like Dainese’s is your smartest next move.
Key Takeaways
- Replace any helmet involved in a violent impact, even if it looks fine. The KASK inspection sheet states this as an absolute rule for its helmets because the energy-absorbing EPS liner can be compromised without visible signs.
- Inspect armor by removing it from its pockets. Check for cracks, hardening, or brittleness. Interior armor degrades over time and can be damaged in a tumble.
- Clean gear with a damp cloth and tap water only before inspecting. As Leatt’s manual specifies, cleaners or detergents can damage materials and hide defects. Proper cleaning reveals the true damage.
- Factor in gear age and prior repairs. Older materials become brittle, and multiple repairs can create weak points, turning a repairable tear into a write-off.
- For airbag vests or suits, professional inspection is mandatory. Systems like Dainese D-air require an official inspection and airbag exchange service after activation; attempting a reset yourself voids safety.
The Helmet Check: Your First Priority
A helmet isn’t a piece of gear you evaluate. It’s a single-use safety device you audit. The manufacturer guidelines here aren’t recommendations; they are the engineering limits of the product.
KASK’s official inspection procedure states that after a violent impact, the helmet shall be replaced even if there are no visible effects. That’s the baseline. Your job is to determine if the impact was “violent,” which any crash involving your head meeting pavement or a hard object qualifies as. From there, you perform a detailed visual and tactile inspection.
A professional inspection, like the one outlined by KASK, recommends a check every 12 months and after any exceptional event. This involves verifying strap anchor points, buckle integrity, and the legibility of internal safety labels.
Start with the shell. Run your fingers over every square inch, inside and out, feeling for hairline cracks, deep scratches, or deformations. Pay close attention around ventilation holes, which can distort under impact. Look for any signs of chemical exposure or unauthorized paint, as these can mask damage and automatically deem the helmet non-compliant per KASK’s standards.
Next, examine the retention system. The strap must be securely attached at all four anchor points. Check every centimeter of the strap and its stitching for cuts, fraying, or burns. Operate the buckle repeatedly—it must open, close, and hold under light tension without sticking. A frayed strap or a sticky buckle will fail when you need it most.
Finally, inspect the interior. Remove the cheek pads and liner if possible. Look at the EPS foam liner (the hard, polystyrene layer). Any cracks, dents, or compression in this material is a terminal failure. The foam works by crushing to dissipate energy; if it’s already crushed, it has nothing left to give.
| Component | What to Look For | If You Find This |
|---|---|---|
| Outer Shell | Cracks, deep scratches, deformation, chemical traces, flaking paint. | Replace the helmet. |
| EPS Liner | Any cracking, compression, or denting. Visible or not after a crash, assume damage. | Replace the helmet. |
| Strap & Buckle | Fraying, cuts, loose stitching, melted sections, sticky or broken buckle mechanism. | Replace the helmet (strap/buckle kits are often not certified for post-crash use). |
| Internal Labels | Faded, missing, or illegible CE mark, model, or manufacture date. | Helmet is non-compliant; replace it. |
The position is conservative. If your helmet was on your head during a crash, its job is done. The cost of a new helmet is a fixed number. The cost of a brain injury is not. KASK states the helmet shall be replaced after a violent impact, while other sources like Bison Track frame the repair-or-replace decision as a complex cost/benefit analysis based on age, prior repairs, and crash severity.
Inspecting Your Jacket and Pants: Beyond the Scuff
Your torso and leg gear took the brunt of the slide. Now you need to determine if it’s just cosmetically scuffed or structurally compromised. This is where you must differentiate between textile (like Cordura or nylon) and leather, as they fail in different ways.
First, get the gear clean. Dirt and road grime hide damage. Follow the manufacturer’s cleaning instructions to the letter. For Leatt knee guards, this means a damp cloth, a soft brush with tap water only, and absolutely no detergents or machine washing. Once clean and dry, you can see the true state of the material.
Common mistake: Judging gear by a single glance. A scuff on leather can polish out; the same scuff on nylon might have melted and weakened the fibers underneath. You need to feel it.
For Textile Jackets & Pants (Aerostich, Klim, etc.):
- Abrasion Zones: Look at shoulders, elbows, knees, and seat. Are the fibers frayed or melted? Rub your thumb hard over the area. If it feels significantly thinner, slick, or creates a “pill” of loose fibers, the outer layer is compromised.
- Seams: This is the critical failure point. Examine every stitch line, especially around armor pockets and stress areas. Pull gently on the seam from both sides. If the thread is cut, loose, or the material tears away from the stitching, the seam has failed.
- Armor: Remove every piece of CE-rated armor. Flex it gently. Look for cracks, especially at the edges. Press on it; it should rebound. If it’s stiff, brittle, or cracked, it’s dead. Armor degrades with age and must be checked regularly.
For Leather Jackets & Pants:
- Abrasion Zones: Look for deep, rough gouges that feel dry and stiff. Light scuffs that still feel supple are often just cosmetic. A deep scrape that removes the top grain and exposes the suede-like underlayer is a problem.
- Stitching: Just like textile, but leather puts more strain on thread. Check for pulled stitches where the thread is visibly stretched or broken.
- Hardware: Test every zipper, snap, and buckle. Zippers should run smoothly without catching. A single missing tooth can cause a full failure next time.
Aerostich provides a clear financial threshold in their owner’s manual: an R-3 suit is considered ‘totaled’ and cannot be repaired if the cost of repair exceeds half the replacement cost. If the repairs would cost more than a discounted new item, the choice becomes clear.
The Critical Details: Gloves, Boots, and Armor
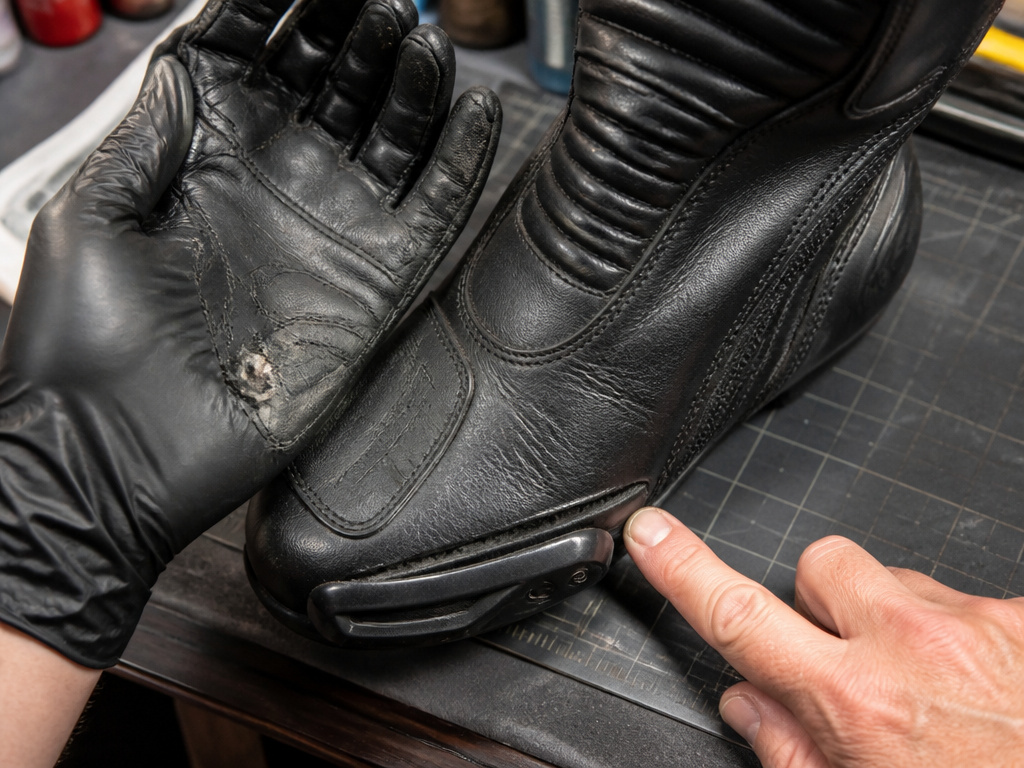
Hands and feet hit first and absorb tremendous force. Damage here is often overlooked because the gear is smaller, but the consequences are just as severe.
Glove Inspection:
- Palms: This is ground zero. Look for any wear through the palm material, especially on the heel of the hand and the thumb web. Even a small hole is a failure.
- Stitching: Examine the stitching connecting the palm to the fingers and backhand. Pull at the seams gently. Failed stitching here will unravel the entire glove in a slide.
- Reinforcements: Check slider pucks (if present) for deep gouges or cracks. Ensure they are still securely anchored.
- Closures: Test zippers, Velcro, and snaps. A failed wrist closure turns a protective glove into a liability.
Boot Inspection:
- Structure: Can the boot still support your ankle? Twist the boot gently. Excessive flex or a crunchy feeling indicates broken internal supports.
- Abrasion: Check the outer material on the toe, ankle, and shin for wear-through. On leather, look for deep, dry cracks.
- Stitching & Seams: Inspect the seam where the sole meets the upper. Any separation means water, dirt, and failure are imminent.
- Hardware: Buckles, zippers, and speed-lace systems must work perfectly. A jammed buckle can prevent a secure fit.
Armor Evaluation:
Remove all armor from your jacket, pants, knee guards, and back protector. This isn’t optional.
- Visually inspect for cracks, dents, or deformation.
- Flex the armor. It should have some give and return to shape. If it’s stiff as a board or snaps, it’s compromised.
- Check the certification. Armor like the Leatt Knee Guard 3DF 6.0 is tested to standards like EN 1621-1:2012. If it’s damaged, it no longer meets that standard.
This process for how to inspect motorcycle gear after a crash turns abstract safety into a tangible checklist. You’re not just looking for “damage”; you’re verifying that each component still meets its designed job specification. If any piece fails its check, it moves to the repair-or-replace column.
The Repair vs. Replace Decision Matrix

You’ve laid everything out on the workbench. Here’s how to make the call, moving from automatic replacements to judgment calls.
Automatic Replace (No Debate):
- Helmet: Involved in a crash with any head impact.
- Armor: Any hard shell or foam pad with visible cracks, deep dents, or that has hardened and lost flexibility.
- Airbag System: Any deployed airbag vest or suit (e.g., Dainese D-air). These require a manufacturer inspection and cartridge exchange. Dainese’s official service takes an average of 10 days for gear sent to Italy.
- Structural Failure: Boots with broken internal ankle supports, gloves with holes in the palm, or any seam that has completely separated under gentle tension.
The Judgment Call Zone:
This is where you weigh three factors, as highlighted in the real-world advice from gear repair shops:
- Age of the Gear: Leather dries out, textile fibers weaken, and thread becomes brittle. A five-year-old jacket with a torn seam is a weaker candidate for repair than a one-year-old jacket with the same tear.
- Prior Repair History: Gear that’s already been patched in multiple places becomes a quilt of different material strengths. Another repair might not hold, or could stress an adjacent old patch to failure.
- Cost vs. Value: This is Aerostich’s 50% rule in practice. Get a repair quote from a shop (like Bison Track or the manufacturer). If the quote approaches or exceeds half the cost of a new equivalent item, replacement is usually the wiser long-term investment.
Where this goes sideways: Opting for a cheap, DIY repair on a compromised seam or using non-breathable patches on a textile jacket. This can create stiff spots that tear more easily in a subsequent slide and trap heat and moisture.
To organize your thoughts, a simple table can frame the decision:
| Gear Item | Minor Damage (Likely Repairable) | Major Damage (Likely Replace) |
|---|---|---|
| Textile Jacket | Small seam tear, light scuffing on non-critical panel. | Abrasion wear-through on shoulder/elbow, melted fabric, large torn section. |
| Leather Jacket | Light surface scuff, small torn lining. | Deep, dry gashes exposing underlayer, large seam separation, hardened/rotted leather. |
| Gloves | Worn stitching on finger, minor backhand scuff. | Hole in palm, cracked slider puck, failed wrist closure. |
| Boots | Scuffed toe, loose speed-lace. | Separated sole, cracked ankle support, worn-through ankle armor. |
When in doubt, seek a professional opinion. Many manufacturers and dedicated gear shops offer inspection services. It’s the next best thing to having the engineer who designed it look it over.
How crash type (high-side, low-side, impact) affects damage
The type of crash dictates the inspection focus. A high-side throw subjects gear to a single, high-energy impact, demanding a search for hidden damage. A manufacturer states that after a violent impact, a helmet shall be replaced even with no visible effects. A low-side slide primarily tests abrasion resistance. One suit maker notes their nylon fabric slides further than leather, spreading wear over a larger area but potentially degrading the material’s integrity. A direct impact, like hitting a barrier, concentrates force. For protective products, this can cause components to show signs of damage, cracking, or deformity. Regardless of crash style, if gear was involved in any significant crash, the manufacturer may require you to return it for professional examination.
Frequently Asked Questions
What if my helmet was just dropped from my bike seat?
Short drop onto a flat surface (like a garage floor) usually doesn’t generate enough force to damage the EPS liner, as there’s no head inside to absorb the energy. However, you must still perform the full inspection for shell cracks, especially around the brim. If anything looks or feels suspect, err on the side of caution and replace it. The stance from KASK is to replace a helmet after a violent impact.
Can I just patch a hole in my textile jacket with a kit?
However, it is not a structural solution for abrasion zones like elbows or shoulders. The patch material will have different abrasion and stretch characteristics than the original, creating a potential weak point. For any hole in a high-wear area, professional repair or replacement is the only safe choice.
How do I find a professional gear repair service?
Start with the manufacturer of your gear. Companies like Dainese, Aerostich, and Klim often offer direct repair services or can authorize certified repair shops. Independent specialists like Bison Track also have strong reputations. Look for shops that specialize in motorcycle gear—not a general tailor or shoe repair place. They will understand the required materials, stitching techniques, and safety standards.
My gear is dirty from the crash. How do I clean it to inspect it?
Refer to the manufacturer’s label. For most outer shells and hard protectors, use a damp cloth with tap water only, as specified by Leatt. For removable liners and textiles that are machine-washable, use a gentle, non-detergent soap and air dry. Never use harsh chemicals, bleach, or machine wash items labeled “do not wash,” as this can degrade protective materials and void safety certifications.
Does insurance cover gear replacement after a crash?
Often, yes. If you have collision or medical payments coverage on your motorcycle policy, damaged safety gear is frequently a covered expense. Your health insurance may also cover it if prescribed as medically necessary protective equipment. Document everything: take clear photos of all damage before cleaning, keep the gear, and get a repair/replacement quote from a shop to submit with your claim.
Before You Go
The most important step happens before you even start inspecting: get the gear off the floor and onto a clean, well-lit bench. The difference between a quick glance and a methodical check is the difference between missing a cracked armor plate and finding it.
One rule I’ve adopted from the pros: if a piece of gear has a history of multiple major repairs, it’s time to retire it. The integrity becomes a patchwork, and you start trusting your skin to the weakest seam. The money you “save” on a fourth repair isn’t worth the risk.
Finally, file this process away not just for crashes, but for annual maintenance. Set a calendar reminder for every spring. A quiet hour in the garage checking seams, armor, and straps is the cheapest insurance policy you’ll ever buy. Your gear is a wearable checklist; your job is to make sure every box is still ticked.
