
How to Reset a Motorcycle Airbag Vest After Deployment
This post contains affiliate links. As an Amazon Associate, we earn from qualifying purchases.
To reset a motorcycle airbag vest after deployment, first ensure the vest is undamaged, then follow your system’s specific procedure: for a mechanical vest, replace the spent CO2 cartridge; for an electronic vest, you may need to replace the gas inflator module and potentially send the unit to a service center. The exact steps, tools, and service requirements differ sharply between brands like Helite, Alpinestars, and those using the In&motion system.
That “send it in” clause is the pivot. A mechanical tether system allows you to reset the vest in your garage in five minutes. This is one way to reset a motorcycle airbag vest after it deploys. An electronic system with a locked inflator might need a trip to a dealer. Your reset path is decided the moment you buy the vest, not the moment you crash.
What follows is the split: how to inspect any vest, the concrete steps for mechanical and electronic resets, the brand-specific limits you can’t ignore, and the one check that tells you a vest is trash, not worth the effort of how to reset a motorcycle airbag vest after deployment.
Key Takeaways
- Inspect every seam and strap first. A torn airbag chamber or damaged lanyard means the vest failed its job and cannot be safely reset.
- Mechanical vests reset with a new cartridge. Systems like Helite and Rock Tool Co require a simple CO2 canister swap, following the weight and size specs printed on the old cartridge.
- Electronic vests often require professional service. Brands like Alpinestars Tech-Air mandate returning the system to a dealer after deployment for inflator replacement and system check.
- Systems have a certified inflation limit. An In&motion vest is rated for 3 deployments; an Alpinestars Tech-Air bag is certified for up to 4. Hitting that limit locks the system.
- Storage between rides matters. Hang the vest flat; never leave it folded, in a hot car, or exposed to humidity, or the fabric and electronics can degrade.
The Essential Post-Deployment Inspection Checklist
Before you touch a cartridge or a reset button, you need to know if the vest is even a candidate for the process of how to reset a motorcycle airbag vest after deployment. A deployed airbag is a single-use safety device that just got used. The textile and components absorbed energy they weren’t designed to absorb twice.
You inspect with your hands and eyes. Run your fingers along every seam, feeling for popped stitches or a subtle bubble under the fabric where the airbag might have torn its internal chamber. Check the lanyard or trigger mechanism for fraying. Look at the CO2 cartridge port or electronic module area for cracks or corrosion.
Where this goes sideways: Skipping the inspection because the vest “looks okay.” A small seam tear near a shoulder strap will split wide open on the next inflation, directing gas away from the protective chambers. You’ll wear a non-protective garment instead of an airbag.
Here is the step-by-step list. Do all of it, in order.
- Deflate the airbag completely. For mechanical vests, unscrew the spent CO2 cartridge to vent any remaining gas. For electronic vests, let it deflate naturally—this can take from about 2 minutes to about 10 minutes depending on the brand and model. Don’t force it.
- Check the airbag compartment. Visually inspect the exterior fabric over the airbag. Look for holes, tears, or abrasions. Feel for unevenness or lumps that suggest a torn internal bladder.
- Examine all seams and stitching. Pay special attention to stress points: shoulders, sides, and where the lanyard attaches. Frayed thread or broken stitches here is a fail.
- Inspect the activation system. For a tether system, check the lanyard for cuts, excessive stretch, or worn sections. For an electronic vest, look at the housing for cracks and ensure all connectors are intact.
- Look at the cartridge or inflator port. Remove the spent component. Check the threads for damage and the port itself for any cracks or corrosion.
If you find any damage at all, stop. The reset process is over. You need to contact the manufacturer or a certified service center. Attempting to reset a damaged vest gives you a false sense of security with gear that is no longer certified to perform.
How to Reset a Mechanical (Tethered) Airbag Vest
Systems like the Helite Turtle 2 or the Rock Tool Co Touring Evo use a physical lanyard and a CO2 cartridge. The reset is manual, straightforward, and designed for the rider to do themselves. The core task is swapping a metal canister.
The first time I helped a friend reset his Helite after a low-speed tip-over, we spent time looking for a special tool. There isn’t one. The only tool you might need is the Allen key that came with the vest to open the mechanical trigger housing for its annual check. For the cartridge swap, it’s just your hands.
Here is the full sequence.
- Remove the spent cartridge. Unscrew it from the vest’s mechanism by turning it counter-clockwise. It will hiss as remaining gas escapes. Set it aside for proper recycling.
- Get the correct replacement. This is the step that matters. You must use a cartridge of the exact same size (50CC, 60CC, or 100CC) and from the same brand. A Helite CO2 cartridge has a 10-year warranty and a specific weight stamped on it. Using a non-approved cartridge can damage the mechanism or cause improper inflation.
- Optional: Perform the annual weight check. Since you have the cartridge out, this is the time. Weigh the new cartridge on a digital scale. For a 60CC Helite cartridge, the weight should be 182g +/- 3g. If it’s outside that tolerance, don’t use it.
- Install the new cartridge. Screw it into the vest’s mechanism by hand until it is snug. Do not overtighten with a tool; you can strip the soft aluminum threads.
- Re-attach the lanyard. Clip the lanyard’s carabiner to your motorcycle’s designated anchor point. The system is now armed.
The entire process is quick if you have the correct cartridge on hand. That’s the catch—you need to have a spare. A vest cannot be re-armed without it.
| Component | Action | Key Spec / Warning |
|---|---|---|
| Spent CO2 Cartridge | Remove & recycle | Single-use only. Check for rust before disposal. |
| Replacement Cartridge | Source correct size/brand | Must match vest specs (e.g., Helite 60CC). Weight must be within +/- 3g of stamped weight. |
| Mechanism Threads | Inspect while empty | Look for cracks or cross-threading. Damage here requires service. |
| Lanyard | Re-attach to bike | Check for fraying or cuts. A worn lanyard can snap before triggering the cartridge. |
How to Reset an Electronic Airbag Vest
Electronic systems like the Alpinestars Tech-Air or vests using the In&motion module (like the Klim Ai-1) are a different world. Sensors and a battery replace the lanyard, and a sealed gas inflator replaces the screw-in CO2 cartridge. Resetting often means dealing with an app, a service center, or both.
The general rule is: if the vest deployed in a crash, you will likely be sending it to the manufacturer or a dealer. The reason is liability and certification. These systems have complex pyrotechnic inflators and diagnostic electronics that the brands don’t trust users to handle.
For example, the Alpinestars Tech-Air Off-Road system manual is explicit: “After a deployment, the System must be returned to either an Alpinestars’ Tech-Air® Dealer.” You cannot buy a new inflator module off the shelf. Conversely, the In&motion system used by Klim is designed to withstand 3 inflations before a mandatory return, provided you follow their post-inflation inspection procedure.
That procedure may involve a pressure test. You would follow the specific instructions in the manufacturer’s manual.
The part nobody mentions: That pressure-test adapter isn’t a standard tool in your garage. It may need to be obtained from the manufacturer or an authorized service center.
Here is the typical electronic vest reset flowchart, which is really a decision tree for your wallet and downtime.
- Step 1: Diagnose via the app. Connect to the vest’s app (e.g., Tech-Air App). It will tell you the status: “System Deployed,” how many inflations remain, and if there are any error codes.
- Step 2: Check the inflator. For systems that allow user replacement, you’ll locate the inflator module (often in a back panel), disconnect it, and install a new, certified replacement module. This is not a universal part—an In&motion inflator does not fit an Alpinestars vest.
- Step 3: Pressure test (if applicable). If you have the adapter and the brand’s procedure allows it, perform the leak-down test. This is a key way to check if the airbag bladder is intact.
- Step 4: System reset. This might involve a button sequence on the vest, a command in the app, or simply reinstalling the battery. The app should then show a “System Ready” status.
- Step 5: If in doubt, send it in. If the app shows a solid red light, the system has hit its certified deployment limit (like 4 for Tech-Air), or you failed the pressure test, you must ship it for service.
Brand-Specific Reset Rules and Limits You Can’t Ignore

Not all airbag vests are created equal, and their reset rules prove it. The warranty length, the number of certified deployments, and who is allowed to do the work are all set by the manufacturer. Treating a complex electronic vest like a simple mechanical one is how you end up with a $800 paperweight.
The manuals specify these hard limits.
| Brand / System | Max Certified Deployments | Post-Deployment Action | Warranty Length |
|---|---|---|---|
| Helite (Mechanical) | Not explicitly limited | User replaces CO2 cartridge. Annual cartridge weight check required. | 2 years standard, 4 years with online registration. |
| In&motion (e.g., Klim) | 3 inflations before mandatory inspection | User may replace inflator & perform pressure test. Must be returned after 3rd deployment. | 2 years from purchase date. |
| Alpinestars Tech-Air | 4 inflations before airbag replacement | Must be returned to dealer/service center after deployment for inflator replacement. | Varies by region; service required every 2 years or 500 hours. |
| Rock Tool Co (Mechanical) | Not explicitly limited | User replaces CO2 cartridge. Regular visual inspection of parts required. | 3 years on all products. |
The “max deployments” number is critical. An Alpinestars Tech-Air vest will lock itself with a solid red light after its fourth deployment. At that point, even a dealer can’t just reset it—the entire airbag needs replacing during a full service. The In&motion system’s limit of three is similar. These aren’t suggestions; they are the limits of the certification.
Manufacturers specify different activation forces: Helite states around 60 lbs, while Rock Tool Co requires a minimum of 20 kg (about 44 lbs). This isn’t just a spec-sheet difference. A lighter trigger might be more sensitive in a low-speed crash, while a heavier one might prevent an accidental deployment if you forget to detach.
When Reset Is Not Enough: Signs You Need Professional Service or a Replacement
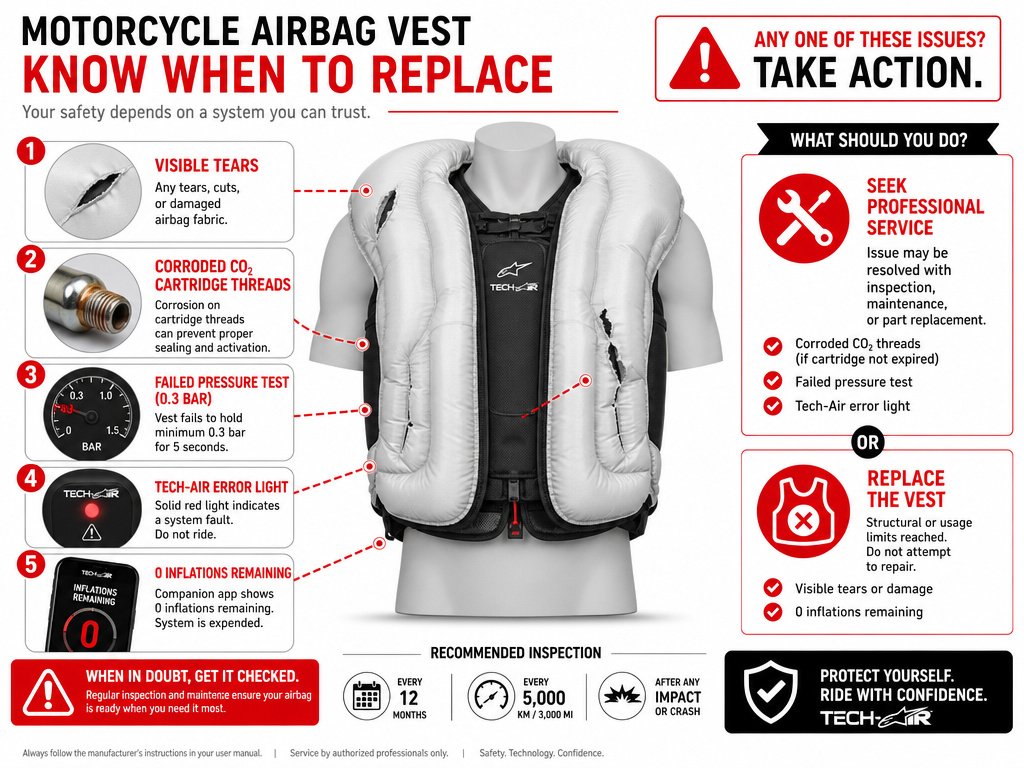
Sometimes, resetting is the wrong move. The inspection turns up a problem, or the system itself is telling you it’s done. Pushing past these limits isn’t being frugal; it’s gambling with the gear’s only job.
You need professional service if you find:
- Any visible damage: Holes, tears, frayed seams, or popped stitches on the vest or airbag cover.
- Corrosion or cracks: On the CO2 cartridge threads, the mechanical trigger housing, or the electronic inflator module port.
- A failed pressure test: For electronic vests that allow it, if the airbag cannot hold 0.3 bar for at least 5 seconds.
- System error lights: A solid red light on an Alpinestars Tech-Air vest, or any persistent error code in the companion app that doesn’t clear after a reset.
- You’ve hit the deployment limit: The app states “0 inflations remaining” or you know you’ve exceeded the certified number (3 for In&motion, 4 for Tech-Air).
You need a full replacement, not a service, if:
- The vest is old and has been stored poorly (folded, in humidity, in extreme heat).
- The manufacturer has discontinued support or parts for your model.
- The cost of service (inflator, shipping, labor) approaches 50-60% of the cost of a new, updated vest.
Sending a vest in for service isn’t a failure. It’s part of the cost of ownership for high-tech protection. A service center will replace the consumable parts (inflators, cartridges), perform a full diagnostic on the electronics and sensors, and re-certify the vest as safe. You get back what is essentially a new product.
Proper Storage and Care Between Rides
An airbag vest is a living piece of gear. How you store it between rides directly affects its readiness and lifespan. The manuals are unanimous on the big don’ts: no heat, no humidity, no permanent compression.
Store it on a hanger in a cool, dry place. That’s the single best thing you can do. Hanging it allows the fabrics and folds to relax and prevents permanent creases in the airbag bladder. Never leave it balled up in a saddlebag or top case for weeks.
Temperature is a silent killer. The Helite manual says not to expose the airbag to temps above 50°C and to store cartridges below 45°C. The In&motion manual also says to store below 45°C (113°F). A black vest in a sun-baked car trunk can easily exceed safe storage temperatures. That heat degrades the textiles, the elastic in the lanyard, and the seals in the airbag.
Keep it dry. While the outer fabric of most vests can handle a hand wash (no machine washing!), the internal components cannot. Never submerge the mechanical trigger or electronic module. The In&motion manual specifies a minimum 12-hour air dry in a ventilated area after cleaning.
Following these rules isn’t just about longevity; it’s about ensuring the vest will work on the ride that matters. A corroded lanyard snap or a heat-weakened seam could fail at the moment of truth.
Where to Buy Replacement Parts and Cartridges
Replacement parts, especially CO2 cartridges, are critical for resetting your vest. The best source is your vest’s manufacturer or an authorized dealer. Always check your specific product’s manual for the correct procedure and approved sources. Using non-approved parts can compromise the safety and warranty of your airbag system. After a deployment, ensure you are getting the exact replacement component specified for your model.
Frequently Asked Questions
Can an airbag vest be reused after deployment?
Yes, most can, but only after a thorough inspection and a reset by replacing the CO2 cartridge. A simple mechanical vest like a Helite is designed for user reset by replacing the CO2 cartridge. More complex electronic vests may require professional service to replace the gas inflator and verify system integrity. Reusability is contingent on the vest having no structural damage.
Do I need a special tool to reset my airbag vest?
For most mechanical vests, no. Cartridges unscrew by hand. Some, like Helite, include an Allen key for opening the trigger mechanism for annual maintenance, not for the basic reset. For electronic vests, a special pressure-test adapter may be needed to check for leaks after deployment, which typically must be obtained from the manufacturer or a service center.
How long does it take for the airbag to deflate after deployment?
Deflation times vary by system and source. One Helite source states complete deflation in ‘about 2 minutes,’ while another says recovery takes ‘about 10 minutes.’ Alpinestars Tech-Air systems are designed to be ready again in about 30 seconds. Always consult your specific vest’s manual for the most accurate timeline.
Can I reset an Alpinestars Tech-Air vest myself?
No. According to the official Alpinestars Tech-Air Off-Road manual, “After a deployment, the System must be returned to either an Alpinestars’ Tech-Air® Dealer.” The system uses sealed pyrotechnic gas inflators that require specialized tools and certification to replace. The user’s role is to diagnose via the app and ship the vest for service.
What happens if my vest deploys accidentally?
If a mechanical vest deploys because you forgot to detach the lanyard, you simply reset it with a new CO2 cartridge—annoying but not dangerous. For electronic vests, an accidental deployment (extremely rare) consumes one of its certified inflations. You would follow the same post-deployment inspection and service procedure as if it were a crash.
Before You Go
The reset process starts the day you buy the vest. If you choose a mechanical system, you’re committing to keeping spare cartridges on hand and doing an annual weight check. If you choose an electronic system, you’re committing to potential dealer visits and understanding app diagnostics.
One rule that applies to every vest: after any deployment, your first job is inspection, not resetting. Your eyes and fingers are the best tools you have. If you see damage, feel a torn seam, or get an error code you don’t understand, stop. A service check can be more reliable than a false assumption.
For many riders, the simplest path is a mechanical vest. The reset is trivial, and the reliability is in the physical trigger. But if you ride hard off-road or want the additional coverage of a full electronic system, factor the reset cost and downtime into your purchase. Plan for its second act before it ever has its first.
