
Motorcycle Defensive Riding Techniques: The 12-Second Rule
This post contains affiliate links. As an Amazon Associate, we earn from qualifying purchases.
Motorcycle defensive riding techniques are a set of proactive strategies to identify and avoid hazards by managing space, speed, and positioning. The core mindset is assuming you are invisible to other drivers and constantly scanning far ahead for escape routes, while using controlled braking techniques for maximum stopping power.
That 12-second lead time is the difference between reacting and planning. It pulls potential problems, a car waiting to turn, debris in the lane, into the present so you can adjust speed or position before you’re committed. This approach is about giving yourself the time and space to make calm, controlled decisions instead of panic maneuvers.
What follows breaks down the motorcycle defensive riding techniques that matter, drawn directly from state patrol and safety foundation manuals. This section explains the scanning framework, the lane positioning advice from law enforcement, the essential rules for intersections, and how to build these skills from your first ride.
Key Takeaways
- Scan far ahead to turn reactions into planned adjustments.
- Practice the 70/30 front-to-rear brake ratio; the front brake provides about three-quarters of a bike’s stopping power.
- Ride in the left or right tire track of cars, not the lane center, to avoid fluid and debris buildup per CHP policy.
- Most crashes happen on trips shorter than five miles, just after starting out, never skip the mental pre-ride.
- Limit riding to about six hours a day and take a break at least every two hours to combat fatigue.
The Core Mental Shift: SEE
Defensive riding starts in your head before you touch the throttle. A useful framework is the Motorcycle Safety Foundation’s SEE strategy. Search, Evaluate, Execute. This gives a structure to the constant scan-and-decide loop.
Search means looking for everything. Your search should include the car in front of you, the pedestrian on the curb, the pothole two lanes over, and the glare off a windshield that might hide a driver. Your eyes should be moving in a pattern: far ahead (12 seconds), middle distance (4-6 seconds), immediate path, mirrors, repeat. This wide-input scan is what avoids surprises.
A proper search pattern is your primary sensor. It turns a landscape of metal and asphalt into a map of moving risks and static obstacles, each with a time-to-impact and an escape route already plotted.
Evaluate is the decision engine. You identified a risk, now what? Is that parked car’s wheel turned? Could that driver be distracted? Is your current lane position the safest? Evaluation means assigning a probability and a plan. “Car might pull out. I will reduce speed, cover the brake, and move to the left portion of my lane to increase space and visibility.”
Execute is the smooth, controlled action. You’ve already decided to slow and move left, so you do it. No jerk, no panic. Execution is the payoff of the first two steps. When your search and evaluation are continuous, your executions are almost always minor adjustments, a slight throttle roll-off, a gentle lane shift. The violent swerves and emergency stops are what happen when SEE breaks down.
This mental shift for motorcycle defensive riding techniques requires practice. It feels overwhelming at first. Your brain will want to stare at the bumper of the car ahead. Force the scan. After a few rides, it becomes automatic, and the road feels slower and more manageable even at higher speeds.
What is the 12 second rule on a motorcycle?
The 12-second rule is a concrete scanning target. It means identifying a point on the road about 12 seconds of travel time ahead of you and actively scanning the area between you and that point for hazards. This is your primary visual horizon.
Why twelve seconds? At highway speeds, you cover a significant distance per second. Twelve seconds equals over 1,000 feet of preview. That distance gives you time to perceive a hazard, evaluate your options, and execute a smooth avoidance maneuver without slamming on the brakes. It turns a sudden emergency into a managed event. Most riders default to scanning only 3-4 seconds ahead, which is barely enough time to react, let alone plan.
To find your 12-second point, pick a stationary landmark, a sign, a tree, a bridge abutment. Start counting “one-one-thousand, two-one-thousand…” as you pass a fixed point near you. If you reach the landmark before you hit twelve, you’re following too closely for your speed. Increase your following distance until your count matches your scan.
This rule directly combats the most common crash scenario. The Colorado State Patrol notes most crashes happen on short trips, less than five miles, just a few minutes after starting out. That’s when mental focus is lowest. Forcing a 12-second scan from the moment you pull out engages your brain immediately.
Vision and Scanning: Your Best Defense
Your eyes are your best piece of safety gear. Effective vision techniques go beyond the 12-second rule to include peripheral awareness and specific hazard searches.
Peripheral vision is for monitoring motion and changes in your immediate bubble. Don’t stare into it. Use it to notice a car drifting in an adjacent lane or a pedestrian stepping off the curb. The California Highway Patrol manual advises riders to “use peripheral vision while riding; do not divert total attention.” This means your focus should be far ahead, while your periphery handles the close-quarters surveillance.
Specific searches are critical. At every intersection, look for the front wheel of a stopped car. A turned wheel is a committed driver. Scan the shadows under parked cars for feet. At night, watch for the “halo” of a single headlight that might be a motorcycle, or a car with one light out may be less visible or indicate a potential hazard.
When riding at night, your scan must adjust. Depth perception fails. Use the headlights of oncoming cars to back-light potential hazards like animals on the roadside. Increase your following distance dramatically to compensate for reduced visibility and longer stopping distances. The official advice from manuals like the one from the PennDOT motorcycle operator manual is to reduce speed and increase spacing any time visibility drops.
Mastering Lane Positioning
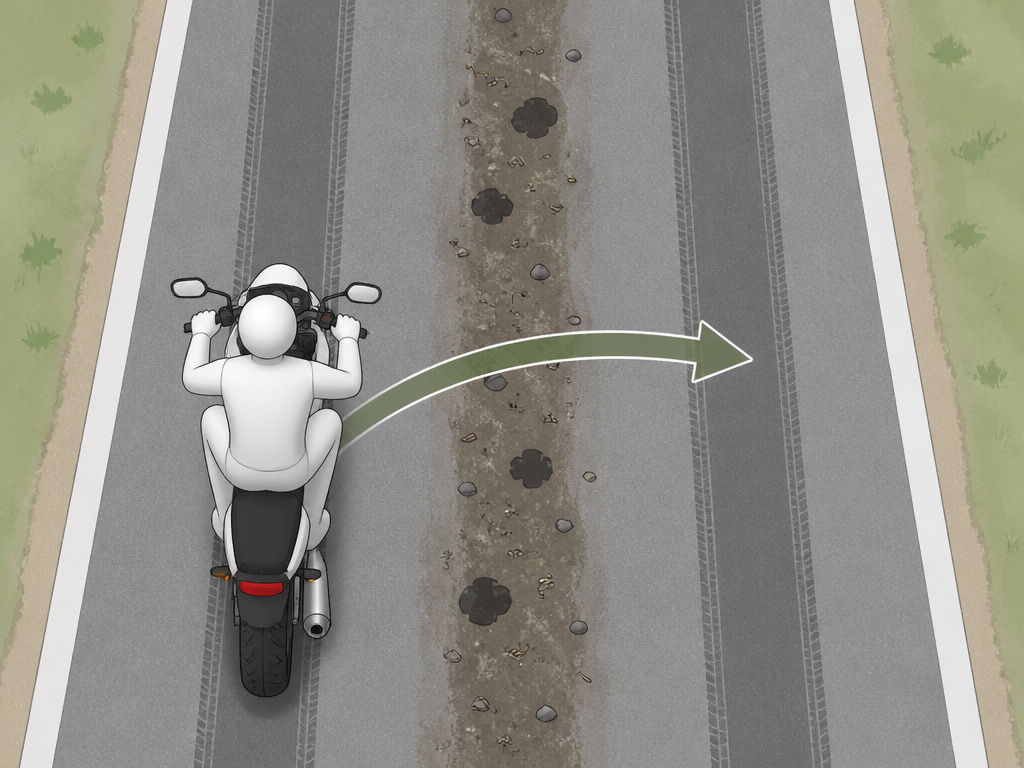
Where you sit in the lane is a constant negotiation for safety, visibility, and traction. There are three primary positions: left tire track (center-left), right tire track (center-right), and lane center.
Common civilian riding technique suggests using the center lane position for maximum visibility and space cushion on clean, dry pavement, while the California Highway Patrol advises against riding in the center of the traffic lane. The California Highway Patrol policy flips this. Their manual states officers should “always travel in the most heavily used portion of the traffic lane where other vehicles’ tires generally traverse (the left or right wheel track), and do not ride in the center of the traffic lane.”
Where this goes sideways: Riding the centerline at intersections. The CHP warns the lane center collects “oil, fuel, and water accumulations” and offers “no avenue of escape.” Your tires find the slick spot just as you need to brake or turn.
The CHP’s logic is debris and fluids avoidance. Cars drip oil and coolant in the center. That sludge is especially concentrated at intersections where vehicles idle. The tire tracks are cleaner and offer marginally better traction. The trade-off is you’re slightly less visible to drivers ahead and slightly more in the blind spot of cars in adjacent lanes.
So which is right? It’s conditional. Use the CHP’s tire-track positioning in cities, at intersections, and in wet weather. Use the center position on clean, open highways for visibility. Never camp in a driver’s blind spot. Your position should be dynamic, shifting every few seconds to maximize your view and remind others you’re there.
When riding in traffic, this becomes a dance. You might be in the left track to see past a truck, then shift right to be visible in the mirrors of a car you’re following, then center to prepare for a merge.
Space Cushion Management
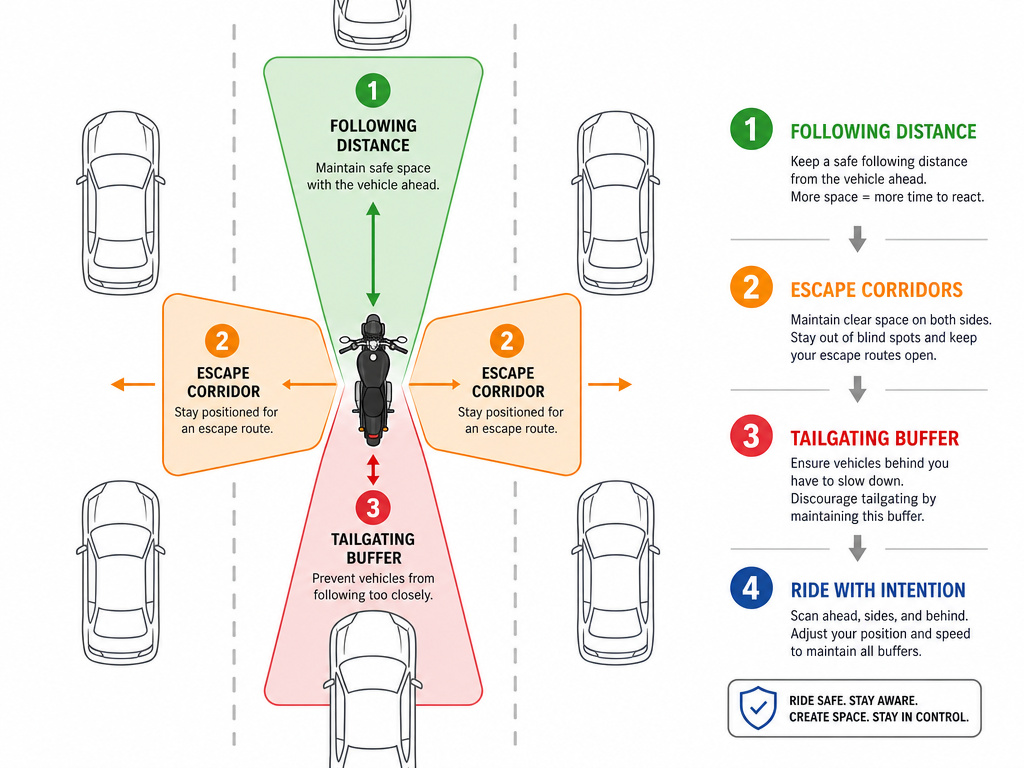
A space cushion is the buffer of empty space around your motorcycle. You manage it in four directions: front, rear, left, and right.
In front: This is your following distance. Maintain a safe following distance, increasing it with speed and in adverse conditions. The CHP simply says “always follow vehicles at a safe distance.” This space is your emergency braking and swerving budget.
To the rear: You control this with your lane positioning and sometimes your speed. If someone is tailgating, increase your following distance with the car in front of you. This gives you more room to brake gradually if needed, preventing you from being the meat in a sandwich. Don’t speed up. If possible, change lanes and let them pass.
To the sides: Maintain at least a lane position’s width between you and adjacent vehicles, parked cars, and road edges. The CHP warns “do not ride close to parked vehicles.” A door can open. A pedestrian can step out. A car can pull away without looking. That space is your evasion corridor.
When stopping in traffic, the CHP has specific tactics. “When coming to a stop behind other vehicles, always position at a safe distance favoring the right or left side of the lane. Do not stop directly behind a vehicle.” This angled stop gives you an escape path if a vehicle behind isn’t stopping. It also makes you more visible to drivers further back in line.
Intersection Protocol
Many multi-vehicle motorcycle crashes occur in intersections. Your approach must be systematic.
First, scan the intersection early as part of your 12-second lookout. Look for left-turners, the classic “left cross” is a top killer. Look for drivers running red lights. Look for pedestrians and cyclists. The CHP advises: “When a traffic signal changes to GREEN, before entering the intersection, make sure it is clear and all approaching vehicles on the cross street are stopping.” Trust no green light.
Second, cover your controls. As you approach, cover the front brake lever and have your foot over the rear brake. The CHP also recommends: “Gear down prior to entering an intersection if a potential hazard is present.” Having the correct gear selected allows you to speed up to avoid a hazard.
Third, position for visibility and escape. Don’t stop in the center of the lane. Stop in the left or right portion. This puts you in the side mirror view of the car ahead and gives you an escape route to the side if a rear-ender is imminent. The CHP even suggests “consider moving up between vehicles stopped at signals on multi-laned streets, this will prevent being struck from the rear.”
Finally, be ready to yield. The CHP states plainly: “Do not be afraid to give up the right-of-way.” Winning an argument with a two-ton vehicle is a Pyrrhic victory. If a driver is encroaching, let them have it. Your intersection safety depends on patience, not pride.
What is the 70/30 brake rule for motorcycles?
The 70/30 rule describes the ideal distribution of braking force between the front and rear brakes during a controlled, maximum-effort stop. Approximately 70% of your motorcycle’s stopping power comes from the front brake, and 30% from the rear.
The physics are simple. Braking transfers weight forward, loading the front tire and lifting weight off the rear. The heavily loaded front tire can handle more braking force before skidding. The lightly loaded rear tire has less traction available. The Virginia DMV manual states: “The front brake is more powerful. It provides about three-quarters of your motorcycle’s total stopping power.”
Yet, the Motorcycle Safety Foundation notes crash-involved riders commonly “underbrake the front tire and overbrake the rear.” They’re scared of locking the front wheel (a high-side risk) so they stomp the rear, which locks easily and slides out.
To practice, find a vacant lot. At low speed (20 mph), practice squeezing the front brake progressively harder each time, feeling for the point where the tire begins to lose traction. Do the same with the rear brake to feel how easily it locks. Then practice combining them. The goal is muscle memory for a smooth, progressive squeeze up front with supportive pressure in the rear. For a full drill, see our guide on motorcycle braking techniques.
Highway and Multi-Lane Tactics
High-speed roads demand an expanded space cushion and different scanning priorities. Your 12-second scan should be looking for clusters of cars, merging traffic, and debris that can be kicked up from tires.
A key highway technique is “tire watching.” Watch the tires of the vehicles ahead of you, not just their bodies. A tire turning or dipping is the earliest possible signal of a lane change or obstacle avoidance. You’ll see the hazard a full second before the driver reacts, giving you precious extra time.
When passing, do it decisively. Signal, check your mirror, then do a full head-check over your shoulder into the blind spot. The CHP is absolute: “Never change lanes or pass vehicles without first glancing over both shoulders and into the blind spot. Do not rely solely on mirrors.” Once clear, pass quickly and return to a safe following distance. Don’t linger beside a vehicle.
For large trucks, the rules amplify. Never ride in a truck’s blind spots (immediately behind, beside the cab, or just in front). If you can’t see the driver’s face in their side mirror, they can’t see you. Pass quickly. Expect turbulence when passing or being passed. Be aware that trucks can spray a shocking amount of road grit and water.
Managing fatigue is part of highway strategy. The Motorcycle Safety Foundation manual is specific: “Experienced riders seldom try to ride more than about six hours a day. Take frequent rest breaks. Stop and get off the motorcycle at least every two hours.” This isn’t a suggestion. Fatigue directly degrades your scanning, evaluation, and reaction time. For more on this, see techniques for staying alert on a motorcycle.
Handling Special Hazards
Road surfaces change. Your techniques must adapt.
Wet Roads: Wet roads are particularly dangerous as oil and dust can mix with water on the surface. Increase all following distances double. Smoothness is everything, no sudden throttle, brakes, or steering inputs. For detailed methods, our article on motorcycle riding techniques for wet conditions covers traction management.
Railroad Tracks: The Pennsylvania DOT manual offers clear guidance: “Usually it is safer to ride straight within your lane to cross tracks. Turning to take tracks head-on (at a 90° angle) can be more dangerous, your path may carry you into another lane of traffic.” For tracks parallel to your course, move away and cross at an angle of at least 45°. Stand on the pegs slightly to absorb the bump with your legs.
Debris and Obstacles: Scan constantly for gravel, sand, leaves, and roadkill. Avoid if possible. If you must cross loose debris, keep the bike upright, maintain steady throttle, and avoid braking or turning until you’re back on clean pavement. For an unavoidable solid object (like a piece of lumber), the California Highway Patrol advises that if you must cross an unavoidable solid object, straighten the motorcycle and attempt to go over it at a 90-degree angle while accelerating. Standard advice is to avoid road hazards if at all possible. The acceleration keeps the front end light.
Animals: This is about scanning the edges, not the center. In rural or wooded areas, scan the tree line and shoulders for movement. Use your high beam at night to catch eye shine. If an animal enters the road, the best option is usually to brake and steer around it if space allows. Swerving into oncoming traffic or off the road is often worse. For a deep dive, read our guide on avoiding deer on a motorcycle.
Skill Development and Training
Defensive techniques are perishable skills. They degrade without practice.
Start with the official Motorcycle Safety Foundation manual. It’s the foundation for most state licensing courses. The MSF’s Basic RiderCourse is a 15-hour investment that builds core control skills in a parking lot before introducing traffic strategies. Pennsylvania’s manual confirms the “Basic Rider Course lasts 15 hours.” It’s the single most effective thing a new rider can do.
For experienced riders, advanced courses focus on skill refinement and risk management. The MSF and many state programs offer one-day courses that drill emergency braking, swerving, and cornering on your own bike. These courses force you to find the limits of your brakes and tires in a controlled environment, so you know what’s available in a crisis. Practicing an emergency swerve in a lot teaches your body the countersteering input needed without the panic of traffic.
Self-directed practice is crucial. Once a month, revisit braking and swerving in that empty lot. Practice slow-speed control in a parking space. Mental rehearsal counts too. Before a ride, visualize applying the SEE strategy, scanning intersections, and positioning in lanes. This primes your brain to execute.
Finally, know the legal basics. The Oregon motorcycle operator manual notes a sobering statistic: “Studies show that 35% of motorcycle riders involved in fatal collisions in 2022 were riding without a valid motorcycle endorsement.” Formal training addresses skill, legal compliance, and understanding right-of-way laws that protect you.
How to do a pre-ride motorcycle check
A thorough check before you ride is a primary defensive technique. Start by ensuring your headlight is operational and illuminated, as running with lights on increases your visibility to others. Check your tires for adequate tread and pressure. Examine your controls, like the throttle, brakes, and clutch, for smooth operation. Confirm all your lights and signals work correctly. Look for any fluid leaks or loose components. This routine helps you catch minor issues that could become major problems on the road, ensuring your motorcycle responds as expected when you need it most.
How to signal and communicate on a motorcycle
Clear communication prevents conflicts. Use your turn signals well in advance of any lane change or turn. Make eye contact with drivers when possible, and use hand signals to reinforce your intentions. Your headlight, especially when illuminated at all times, is a key communication tool that makes you more visible. Position yourself in the lane where you can be seen in mirrors. Avoid a driver’s blind spot, and if you are not seen, be prepared to yield the right-of-way. Your horn is for alerting others, but use it judiciously to avoid startling.
Frequently Asked Questions
What does 2 fingers down mean for bikers?
It’s a casual hand signal among riders, often meaning “peace” or a general greeting. More formally, in some group riding contexts, it can indicate “two riders following” or point out a hazard. It is not a standardized safety signal like a turn signal or a pointing gesture to indicate road debris. For clear communication on the road, use your official turn signals and established hand signals for stopping or pointing.
What are the 5 keys to defensive driving?
While often asked for cars, the principles apply directly to motorcycles: 1) Aim High in Steering (scan far ahead, the 12-second rule). 2) Get the Big Picture (maintain 360-degree awareness, don’t tunnel vision). 3) Keep Your Eyes Moving (active scanning, use peripheral vision). 4) Leave Yourself an Out (maintain a space cushion on all sides). 5) Make Sure They See You (use lane positioning, headlight, and avoid blind spots). These align perfectly with the SEE strategy and space management techniques.
Should I always ride with my headlight on?
The California Highway Patrol policy manual mandates: “Headlights on all departmental motorcycles should be illuminated at all times during operation.” This is a stricter standard than most state vehicle codes, which typically require lights only at night or in low visibility. The CHP’s reasoning is that a headlight makes you more visible during the day. For civilian riders, it’s a best-practice recommendation. A daytime running light or high-beam modulator (where legal) can further increase conspicuity.
How much following distance is safe on a motorcycle?
Minimum of three seconds under ideal conditions. Four seconds is better for highway speeds. Increase it to five or six seconds in rain, fog, or at night. This distance is measured from the vehicle ahead of you to a fixed point. The CHP’s general order is to “always follow vehicles at a safe distance.” That safe distance grows with speed, traffic density, and deteriorating conditions. For a precise method, learn about maintaining a safe following distance on a motorcycle.
The Bottom Line
Defensive riding is a system built on a mindset: you are invisible, and the road is full of potential energy waiting to become kinetic. The California Highway Patrol policy manual provides a rare look at the protocols trained professionals use, like avoiding lane centers and angled stops, that most civilian guides miss.
The system works when practiced as a whole. Scan 12 seconds ahead. Manage your space cushion on all sides. Position your bike deliberately for visibility and traction. Practice your brakes until the 70/30 feel is instinct. These techniques collapse reaction time and expand your options.
One final, grounded number to remember: the Colorado State Patrol reports one of every five motorcycle crashes results in head or neck injuries, and helmets can cut the number and severity of those injuries by half. Your best defensive technique is the one that happens before you ride, strapping on a helmet, doing a T-CLOCS check, and committing to the scan from the first turn of the key. The road doesn’t care about your right-of-way. Your job is to see the threat before it sees you.
