
How to Stand on the Pegs on a Dirt Bike: Step-by-Step
This post contains affiliate links. As an Amazon Associate, we earn from qualifying purchases.
To stand on the pegs on a dirt bike, use the “attack position” with your knees bent, core engaged, and weight centered. Position the balls of your feet on the pegs, grip the bike with your knees, and look ahead. This turns your legs into shock absorbers, giving you more control and less fatigue on rough terrain.
The real difference between a smooth ride and a fight with the bike comes down to where you put your weight. That 250-pound machine is getting bounced around; if you’re rigid, it’ll throw you. If you’re loose and planted on the pegs, you move with it. Mastering how to stand on the pegs on a dirt bike is key to this.
What follows is the breakdown of that attack position, the ongoing debate over exactly where your foot should anchor, and the simple drills that build the muscle memory so you’re not thinking about it when the trail gets rough.
Key Takeaways
- Use the attack position as your neutral stance: knees bent, back straight, elbows up, weight centered.
- Grip the bike with your knees to connect your lower body to the frame, taking weight off your arms and preventing you from getting bucked.
- Practice standing first on smooth terrain, then in slow-speed maneuvers, before tackling rough trails.
- Be aware of the foot position debate: the “ball of the foot” is standard for grip and control, but a mid-arch placement can offer more stability in extreme, technical sections.
- Avoid pointing toes outward, locking your knees, or standing too far forward, these common mistakes break your connection to the bike.
The Attack Position: Your Off-Road Foundation
The attack position is your home base. It’s the neutral, ready stance that keeps you balanced while the bike moves underneath you.
Stand on the pegs with your knees and elbows slightly bent. Keep your back relatively straight, don’t hunch over the bars. Your weight should be centered over the footpegs, not on your hands. Grip the gas tank between your knees. This might sound like a lot to remember, but it all clicks into place to do one job: make you part of the motorcycle’s suspension.
The standard proper technique for standing is to use the “attack position.” It’s the neutral position your body should be in while standing on the pegs, with knees bent, back straight, and weight centered, allowing the rider to absorb impacts and maintain control.
This posture, a core part of how to stand on the pegs on a dirt bike, turns your legs into primary shock absorbers. On a bump, your ankles and knees compress. Your arms are free to steer and operate the controls lightly because you’re not holding yourself up with a death grip on the handlebars. It’s the difference between riding the bike and wrestling it.
The Great Foot Position Debate: Ball vs. Arch
Here’s where the clean theory gets messy. Ask three different riding schools where your foot should be on the peg, and you might get three answers. The good news is, they’re all right, for different situations.
Most formal instruction, like from the 2020 Racing Academy, states a golden rule: ride on the ball of your foot, not the arch. However, ADV Moto Skills argues there is no single best position and recommends the front to mid portion of the arch for challenging technical sections. This gives you the best combination of grip, feel, and control. Your heel stays low, and your ankle acts as a shock absorber. From here, you can quickly shift your weight or dab a foot if needed. This is the foundation you should learn first.
However, ADV Moto Skills argues there is no single best position. For challenging, technical sections where the bike is bouncing wildly, like over large rocks or ledges, they say the sweet spot is the front to mid portion of the arch. This plants your foot more firmly, making it less likely to slip off the peg when the impacts are violent.
| Foot Position | Best For | The Trade-Off |
|---|---|---|
| Ball of the Foot | General trail riding, corners, whoops. Provides ankle flex for absorption and quick control access. | Can position the heel farther back; a hard landing risks an Achilles tendon strain. |
| Mid-Arch | Extreme, technical terrain with big hits (rock gardens, ledges). Offers a firmer, more planted foundation. | Reduces ankle absorption, increases chance of accidentally hitting the brake or shifter. |
| Heels Down | Loose sand or steep climbs. Shifts weight rearward for better rear tire traction. | Limits ankle movement and can be tiring; not suitable for general use. |
The takeaway? Start with the ball of your foot. As you encounter nastier terrain and feel your feet wanting to bounce off, experiment with shifting back to a mid-arch placement for those specific sections. Your body positioning is never static; it adapts.
How to Grip the Bike (And Why It’s Everything)
Your feet are the anchor points, but your knees are the clamps. Grip the bike with your knees. This is the single most important habit for staying on the pegs.
When you squeeze the bike between your knees and calves, you connect your lower body directly to the frame. This does two critical things. First, it takes weight off your hands and arms. You steer with subtle inputs instead of manhandling the bars. Second, it prevents the bike from bucking you off. If the rear wheel kicks up on a rock, a bike you’re gripping with your legs will try to take you with it. A bike you’re just standing on top of will leave you behind.
This grip, essential for how to stand on the pegs on a dirt bike, also makes turning while standing possible. To turn left, put your weight into the right footpeg and lean the bike, all while maintaining that knee grip. Your upper body stays more upright. It feels counterintuitive at first, but it loads the tires properly for traction. This core principle applies whether you’re on a tight single-track or setting up for a dirt bike jump.
Common mistake: Letting your knees drift away from the bike. The moment you lose that clamp, your upper body tenses, your arms tire, and the bike starts dictating the ride.
When to Stand vs. When to Sit
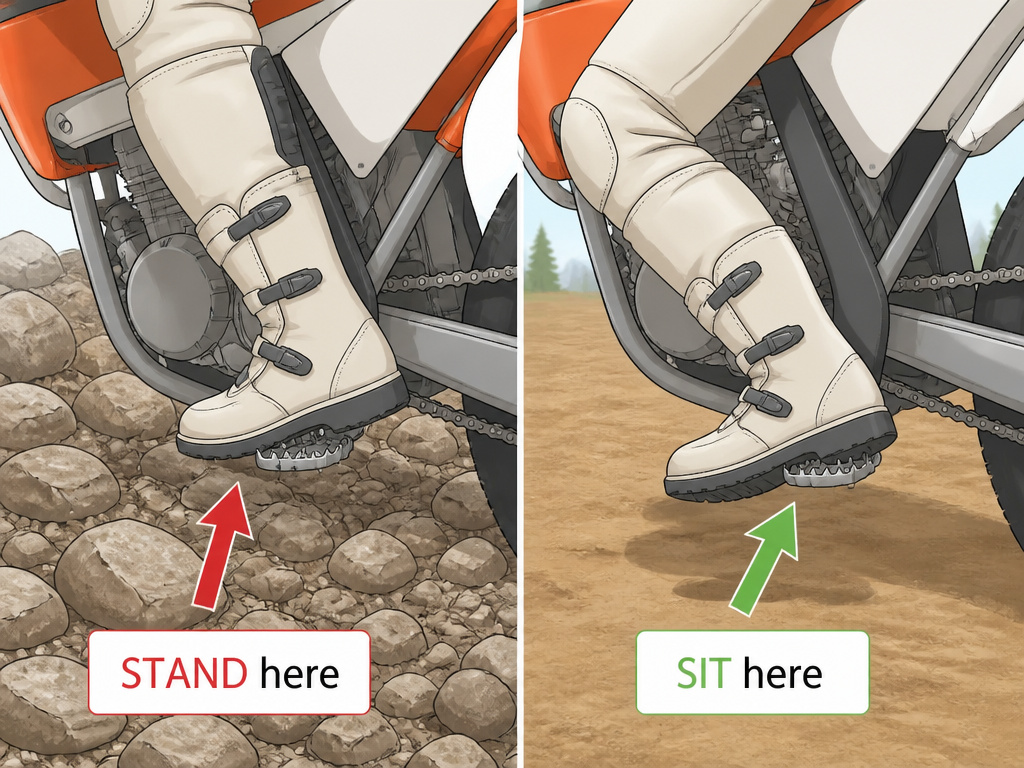
You don’t need to stand 100% of the time. That’s a great way to arrive at the trailhead exhausted. Standing is a tool for specific conditions.
You should nearly always be standing on technical, bumpy, or loose terrain. This includes rocky trails, roots, sand, and mud. Standing uses your legs to absorb impacts and gives the bike room to move. This position improves your view of the trail and helps you adjust your weight quickly for balance.
Sit down on smooth, fast sections like hard-packed dirt roads or open trails. Sitting conserves energy and lowers your center of gravity for stability at speed. You can still keep your feet on the pegs in the proper position, ready to stand up again when the terrain changes. The transition itself is a skill, practice going from seated to standing smoothly while rolling at a slow pace in a flat field.
For specific challenges, the rule adapts. When climbing hills, stand and shift your weight forward. In deep sand, stand and drop your heels to shift weight back. The bike tells you what it needs.
Practice Drills That Actually Work
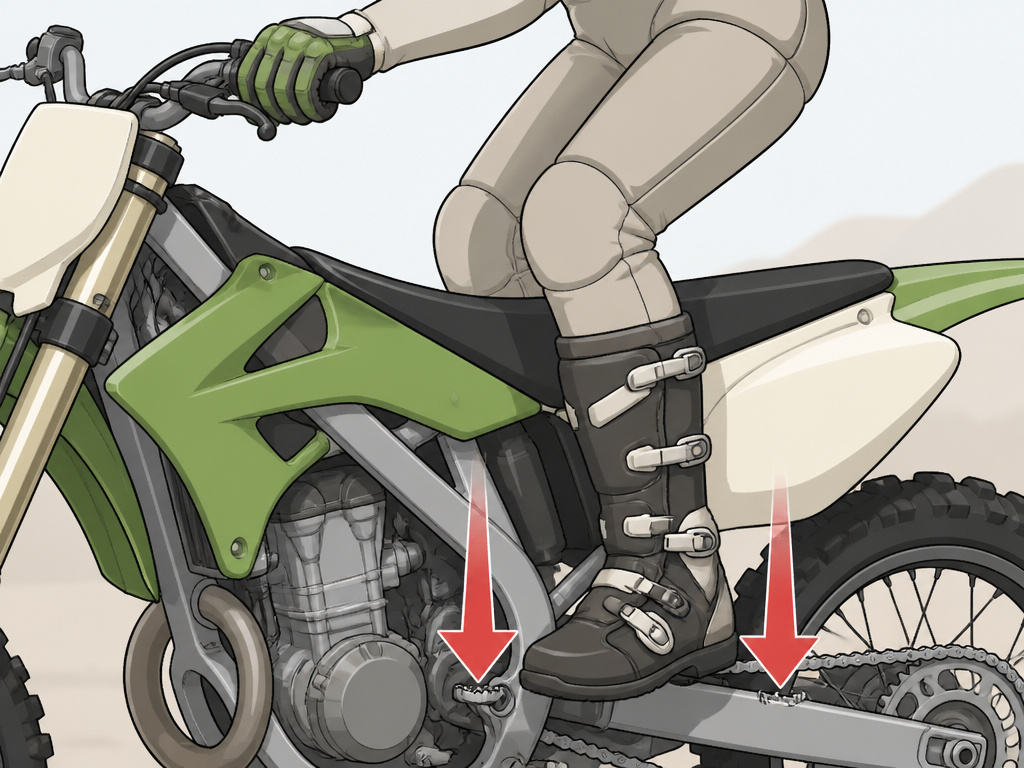
Reading about it does nothing. You have to build the muscle memory, and that starts slowly, in a controlled environment. Trying to learn while riding over rocks for the first time is a recipe for a crash.
Start with the bike stationary. On level ground, stand on the pegs and find the attack position. Hold it for a period of time. Focus on feeling your weight on your feet, the knee grip, and a light touch on the bars. Do this until it feels natural, not strained.
Next, find a flat, open area like a grassy field or empty parking lot. Practice riding at a walking pace while standing. Make wide turns, then gradually tighten them. The goal is to maintain balance and control without putting a foot down. This slow-speed work teaches fine control and builds the confidence to stand when you’re not relying on momentum.
Finally, introduce mild obstacles. Roll over a small log or a slight ditch while standing. Focus on letting your legs absorb the bump and keeping your upper body steady. This directly translates to trail riding. These are the essential dirt bike riding skills that make everything else possible.
Gear Tweaks for a Better Grip
Sometimes, the problem is your equipment. Slippery pegs or boots will fight you every step of the way.
First, look at your footpegs. Stock pegs often have worn-down or smooth teeth. Sharpening them with a file can dramatically improve grip. Aftermarket pegs with sharper teeth or a wider platform are a worthwhile upgrade. Your boot sole matters too; a dedicated off-road boot with a stiff, grippy sole designed for peg teeth is far better than a soft hiking boot.
You can also add grip elsewhere. Adhesive grip tape on the bike’s side panels where your knees contact gives you something to press against. A gripper seat cover helps when you are sitting and transitioning to standing. For electric dirt bikes, which free up both feet to stay on the pegs full-time due to no clutch or shifter, these mods are even more valuable for maintaining a solid connection.
Building Confidence and Fixing Common Mistakes
Fear is the biggest thing keeping new riders glued to the seat. The thought of standing while the bike is bouncing around is intimidating. The cure is progressive exposure.
Start on a flat, straight trail you know well. Stand up for a short time. Then sit. Do this repeatedly. The goal isn’t to ride standing, but to prove to yourself you can do it safely. Gradually extend the time. Then try it on a slightly bumpy section. Your brain needs to learn that standing is actually more stable.
Now, we’ll break the bad habits that hold you back.
- Pointing toes outward: This is the fastest way to have your foot slip off the peg. It also prevents proper knee grip. Angle your toes slightly inward, toward the bike frame.
- Locking your knees: Straight legs are rigid legs. They transmit every bump directly to your spine and throw off your balance. Keep a slight, soft bend in your knees at all times.
- Standing too far forward: This puts your weight over the front wheel and disrupts your foot placement. It makes the steering heavy and the front end feel vague. Center your weight over the pegs.
- Excessive upper body movement: Thrashing your arms and torso around pulls your feet off the pegs. Your lower body should be active and connected; your upper body should be relatively calm and quiet.
Mastering standing is what separates a passenger from a rider. It’s how you handle riding in mud, navigate sandy terrain, and control steep descending hills. It turns a scary, exhausting ordeal into a manageable, even enjoyable, challenge.
Using Controls While Standing
Operating the brake and shifter from a standing position requires a solid, balanced foundation. Keep your feet on the pegs, ideally on the balls of your feet, to maintain control. Grip the gas tank firmly between your knees to stabilize your lower body, allowing you to move your feet to the controls without shifting your weight excessively. To shift gears or brake, briefly lift your foot and use a precise, controlled motion, then immediately return it to the peg. The goal is to keep your feet in contact with the pegs as much as possible to maintain consistency and save energy, reducing fatigue in your arms and shoulders.
Adjusting Lever Positions for Standing
Proper lever setup is crucial for operating controls comfortably while standing in the attack position. Since your body position is higher and more forward than when seated, your levers may feel out of reach. Adjust your brake and clutch levers so you can operate them with just a slight bend in your wrist while standing with your elbows up. This prevents you from having to stretch or change your grip, which can compromise control. While the fact sheet doesn’t specify exact angles, the principle is to set them so your hands fall naturally onto the levers from your standing riding posture, allowing smooth operation without disturbing your balance.
Frequently Asked Questions
Is it bad to stand on dirt bike pegs?
No, it’s essential. Standing on the pegs is a fundamental off-road riding technique. It allows you to use your legs as shock absorbers, gives you better control and vision on rough terrain, and helps you shift your weight for traction and balance. Sitting down through rough sections is more tiring and offers less control.
How do you stand up on a dirt bike comfortably?
Comfort comes from proper technique and practice. Get into the attack position: knees bent, back straight, weight centered on the pegs, and grip the bike with your knees. This takes the strain off your arms. Start by practicing on smooth ground, then gradually move to easier trails. The muscles you need will develop, and the position will start to feel natural rather than forced.
Where should your feet be on dirt bike pegs?
For most general trail riding, many sources like 2020 Racing Academy and Dirt Bike Empire recommend positioning the balls of your feet on the pegs, while ADV Moto Skills suggests a dynamic approach based on terrain. This provides good control and allows your ankles to act as secondary shock absorbers. In extreme, bumpy technical sections, some riders shift to a mid-arch position for a more planted feel. Sources like 2020 Racing Academy advise avoiding the arch for normal riding, while ADV Moto Skills recommends the front to mid portion of the arch for challenging, technical sections.
Why do my feet keep coming off the dirt bike pegs?
This is usually caused by a combination of factors: incorrect foot position (toes pointing out), lack of knee grip on the bike, standing too rigidly with locked knees, or slippery footpegs/boots. Focus on gripping the bike firmly with your knees, angling your toes inward, and ensuring your footpegs have sharp, clean teeth for grip.
Before You Go
The best piece of gear for learning to stand on the pegs is patience. Commit to a session of slow-speed practice in a field before your next ride. That’s it. Focus solely on standing, knee grip, and balance. The trail will feel different immediately.
One rule most guides skip: if you find yourself sitting down and gripping the bars in a death grip the moment the trail gets rough, stop. Take a breath, stand up, and consciously relax your arms. Force the habit. Your speed doesn’t matter; your control does. Everything above assumes you’re building the skill, trying to learn it at race pace on an unfamiliar trail is how you get hurt. Smooth is slow at first, and slow is the foundation of fast.
