
Motorcycle Vision Techniques for Safer Riding
This post contains affiliate links. As an Amazon Associate, we earn from qualifying purchases.
Motorcycle vision techniques for safer riding are a set of trained habits that move your eyes ahead of your bike to identify hazards early. The core is the 12-second rule: scan the road at least 12 seconds ahead of your current position. This gives you the time to see a problem, decide on a response, and execute an avoidance maneuver, which is the basis of the SEE (Search, Evaluate, Execute) strategy taught by the Motorcycle Safety Foundation.
That time buffer is the difference between a controlled response and a panic reaction. A car door opening, gravel in a corner, a left-turning vehicle, they all give visual clues long before they become an immediate threat. Your job is to spot those clues by systematically managing where you look.
What follows breaks down the essential motorcycle vision techniques for safer riding, from the foundational 12-second rule to active scanning patterns and specific strategies for night and traffic. We’ll also cover practical drills to train these skills in a parking lot, so they become automatic when you need them.
Key Takeaways
- Practice the 12-second rule religiously. It’s the single most effective habit for creating reaction time.
- Your eyes must actively scan, not stare. Divide your focus between near (2 seconds), mid (4-8 seconds), and far (12+ seconds) zones, constantly refreshing the picture.
- To break target fixation, physically turn your head toward your intended path, not the obstacle. Your bike goes where you look.
- For night riding, slow down to match your reduced sight distance. Use the headlights of cars ahead to extend your vision and avoid staring directly at oncoming lights.
- Increase your consppicuity with gear and positioning. A 2014 study found a single central yellow headlight had a 74% detection rate versus 54% for a standard white light.
The 12-Second Rule Explained
The 12-second rule is a physical requirement. In that space, you can see the minivan’s wheels turn toward the intersection, the shopping cart rolling into the street, or the pavement change color ahead of a pothole.
A visual lead time of 12 seconds provides the necessary interval to complete the Search, Evaluate, Execute (SEE) risk-management process. This allows for identification of a hazard, assessment of escape options, and initiation of an avoidance maneuver before the threat is immediate.
The trick is actually finding that 12-second point. Pick a stationary object way down the road, a sign, a tree, a bridge. Start counting “one-one-thousand, two-one-thousand…” until you reach it. If you get there before you hit twelve, your eyes aren’t far enough ahead. This feels exaggerated at first. On a tight road, you might be looking through the next corner. That’s the point. Your primary focus should be the horizon, not the tarmac five feet in front of your front wheel.
Where this goes sideways: Most riders get stuck in the 4- to 6-second range. That’s just enough time to see a problem and hit it. At highway speeds, 6 seconds is a reaction and nothing more. You need the extra seconds to plan an escape.
Active Scanning Patterns: Near, Mid, Far
Your eyes should never lock in one place. Staring is how you miss the car edging into your lane from the side. Active scanning is a disciplined rhythm of checking different distances and areas central to motorcycle vision techniques for safer riding.
Think of your vision in three zones:
- Far Zone (12+ seconds): Your primary focus. This is where you apply the 12-second rule to identify major path changes and slow-moving hazards.
- Mid Zone (4-8 seconds): The area where immediate traffic moves. Check speed differentials, lane positions of cars around you, and signal lights.
- Near Zone (2 seconds): The patch of road directly ahead for surface hazards like roadkill, debris, or pavement seams.
You don’t look at these zones in a rigid sequence. You bounce between them, constantly updating a mental map. Every few seconds, also flick your eyes to your mirrors to monitor what’s happening behind you. This is a deliberate, systematic check.
A good defensive riding habit is to scan across intersections before you enter them, left, center, right, then left again. That second left check catches the car that decided to run the late yellow as you start your move.
Target Fixation: The Danger and How to Avoid It
Target fixation is the brain’s dangerous habit of steering toward whatever you’re staring at, especially under stress. See a pothole, stare at the pothole, hit the pothole. See the guardrail in a corner, stare at the guardrail, drift toward the guardrail.
The physiology is simple. Your body wants to align itself with your gaze. In a corner, if you fixate on the outside edge where you don’t want to go, your shoulders turn, your arms stiffen, and you unwittingly push the handlebar to steer right toward the danger.
Common mistake: Looking at the obstacle instead of the path. Your brain can’t process “don’t hit that;” it processes “that.” You will steer toward “that” every time.
The fix is a forceful physical override. You must turn your head and point your chin toward where you want the bike to go, the apex of the corner, the gap between two cars, the clear lane. Your peripheral vision will still register the obstacle, but your primary focus is the solution. This is the core skill taught at schools like the California Superbike School and Total Control. It feels unnatural until you’ve drilled it a hundred times. Then it’s the only thing that makes sense.
Practice this in an empty lot. Place a small object like a water bottle in your path. Ride toward it, and just before you reach it, force yourself to look at a point several feet to either side. The bike will follow your gaze and miss the bottle. Do it at walking speed first. The connection between your eyes and your hands is that direct.
Using Peripheral Vision and Managing Blind Spots

Your central vision is for detail. Your peripheral vision is for motion and threat detection. A shape moving in the edge of your vision is often the first sign of a car changing lanes into you. You can’t read a license plate with your periphery, but you can see a vehicle’s front end beginning to drift.
Ride with your peripheral vision actively engaged. Don’t tunnel-vision on the car’s tail lights directly ahead. Soften your gaze and be aware of the whole scene. This also helps with balance and lean at low speeds.
Blind spots are killing zones. Every vehicle has them, and you live in them. The rule is simple: if you can’t see the driver’s face in their side mirror, they cannot see you.
- Your blind spots: The areas behind and to the side of your bike, obscured by your shoulders and helmet. You must check over your shoulder before changing lanes.
- Their blind spots: Avoid lingering beside any vehicle, especially near the rear wheels. Either drop back or pass decisively. Your lane positioning is your primary tool here. Positioning yourself in the left or right portion of your lane (the “wheel track”) often makes you visible in their side mirror, pulling you out of the blind spot.
Increasing Your Visibility to Others
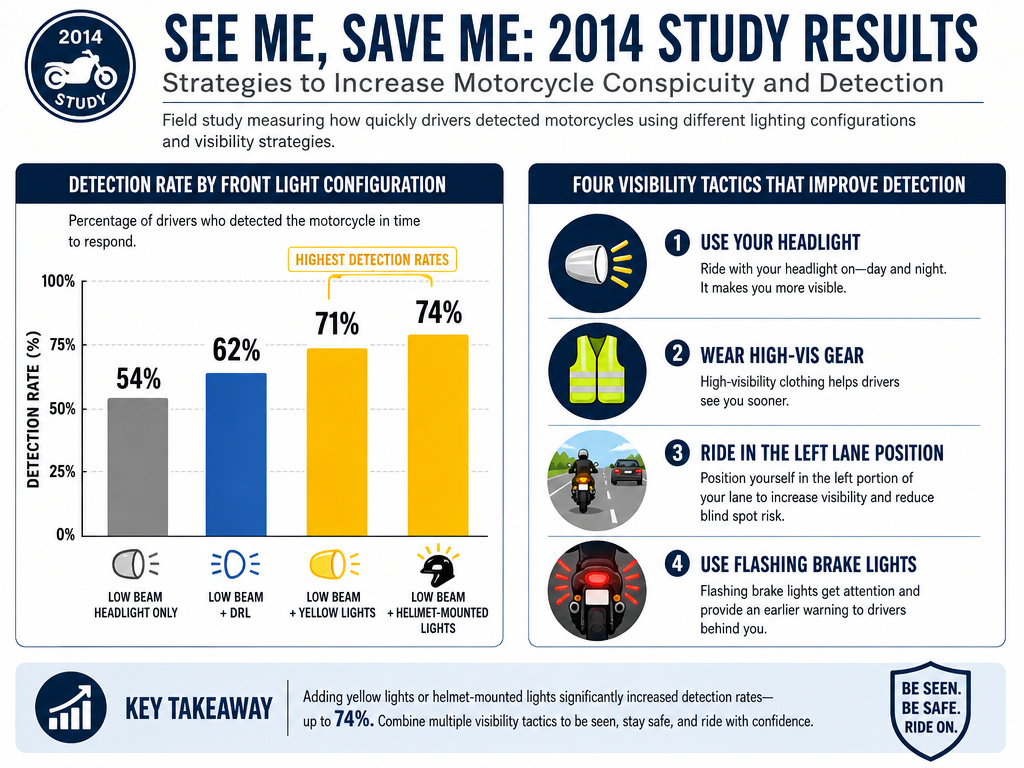
You can see perfectly and still get hit because someone else didn’t see you. Riding as if you’re invisible is the right mindset, but you must also work to be seen.
Conpicuity, the quality of being noticeable, is a technical term for a life-saving goal. Research quantifies this. A 2014 study in Accident Analysis & Prevention tested front light configurations. A single central yellow headlight had a 74% detection rate, and a helmet-mounted light configuration scored 71%. Both were significantly better than a standard single white headlight at 54%. Interestingly, a triangle configuration (headlight plus two mirror lights) at 62% was not a significant improvement. The takeaway: color and vertical separation matter.
| Visibility Tactic | How It Works | Best Used For |
|---|---|---|
| Headlight On | Creates contrast and motion cues for oncoming & cross traffic. | All riding, day and night (check local laws). |
| High-Vis Gear | Breaks up the rider’s silhouette against complex backgrounds. | Urban areas, low-light conditions, inclement weather. |
| Lane Positioning | Places you in the driver’s forward sight lines, not in mirror blind spots. | Highway riding, approaching intersections. |
| Brake Light Flasher | Draws urgent attention to your deceleration. | Sudden stops in traffic, high-risk rear-end scenarios. |
Your lane position is a constant communication tool. In the left part of your lane, you’re visible in the driver’s side mirror ahead. When approaching an intersection with a car waiting to turn left, a slight weave within your lane (if safe) can make your headlight “flash” from their perspective, breaking you out of the background.
Vision Techniques for Different Riding Environments
Your scanning pattern needs to adapt to your speed and surroundings. The 12-second rule is constant, but what you look for changes.
City Riding: Your mid and near zones get more attention. Scan driveways, cross streets, and sidewalks for pedestrians. Watch vehicle wheels, a turned front wheel is a more reliable turn indicator than a signal light that may not be on. Your riding in traffic vision is about predicting the unpredictable. Everyone is distracted.
Highway Riding: The far zone is critical. Look for brake light cascades far ahead. Use the spacing between taillights to judge traffic flow. Your biggest threats are lane-changers and sudden congestion.
Twisties/Backroads: Here, vision is everything. Look through the corner. Your eyes should be at the exit point before you even tip in. In a left-hand curve, look at the outside edge of the road ahead; in a right-hand curve, look toward the inside. This opens up your sight line and reduces the feeling of being rushed. Manage your speed so you can stop within the distance you can see to be clear, especially on blind crests or corners.
Night Riding Vision Techniques
Night riding severely reduces your visual information. For night riding, slow down to match your reduced sight distance.
The mechanics of night vision are brutal. Your central vision (cones) loses color and detail in low light. Your peripheral vision (rods) takes over but is poor at judging depth and speed. A monocular rear approach detection system studied in a SciTePress conference paper offered a sensing range from 20m at low speed up to 60m at night.
- Don’t outrun your headlight. Your high beam is your friend on dark roads.
- Use other vehicles’ lights. The headlights of oncoming cars can illuminate signs, animals, or debris on your side of the road. The tail lights of the car ahead show you the curve of the road.
- Avoid staring at oncoming lights. Look toward the right edge of your lane to avoid being dazzled. Glasses for night riding with an anti-reflective coating can cut distracting glare from streetlights and wet roads.
- Increase following distance. Everything takes longer to see and process. Double your usual space cushion.
Your vision is also compromised by a dirty or scratched face shield. Clean it meticulously. A fogged interior is just as bad. Night riding glasses with a clear, yellow, or photochromic lens can improve contrast without illegally tinting your view.
Practical Drills to Train Your Vision
Reading about these techniques does nothing. You have to build the muscle memory. Do these in a safe, empty parking lot.
- The 12-Second Count: As you ride a straight road, verbally call out “twelve” when you spot your point. Have a passenger verify or use landmarks you can later measure on a map. Do this until hitting the 12-second mark feels normal.
- Scanning Pattern Drill: Ride a large circle or straight line. Out loud, narrate your scan: “Far… Mirror… Mid… Near… Mirror…” Force the verbalization to force the habit.
- Head Turn Drill: Set up two cones a short distance apart. Ride toward them, looking directly at one. Just before you reach it, forcefully turn your head to look at the other cone and steer toward it. This physically teaches you to steer with your eyes.
- Slow-Speed Figure-Eight: This isn’t just for clutch control. It trains you to look through the turn to where you want the bike to go, not down at the ground in front of you. Where your chin points, the bike follows.
The short version: Spend regular time in a lot doing these drills. It’s more valuable than any advanced riding theory.
Connecting Vision to Emergency Maneuvers
When a hazard suddenly appears, your vision dictates your survival. The wrong look guarantees the wrong outcome.
Emergency Braking: Your instinct will be to look at the car you’re about to hit. You must fight it. Look at the gap beside it or the pavement directly in front of you. This keeps the bike upright and maximizes braking force. Staring at the obstacle causes riders to freeze or target-fixate into it.
Swerving: Your eyes find the escape path first. Your body and bike follow. A swerve is a quick, deliberate redirect. If you look at the debris you’re trying to avoid, you will hit it. The swerve path must be your sole visual target.
This connection is why staying alert and maintaining a visual lead is not optional. If you’re already looking 12 seconds ahead, the “emergency” often becomes a controlled, routine maneuver. The panic happens when your eyes are late to the party.
Watching Vehicle Wheels for Early Cues
Look at the wheels of nearby cars, not just their bodies. A car’s direction is ultimately decided by where its front wheels are pointed. You can see a wheel start to turn before the vehicle’s body begins to move. This gives you an extra split-second of warning about a lane change or a sudden turn into your path. Practice spotting this detail in traffic. It cuts through the visual clutter of brake lights and bodywork to show you a driver’s immediate intent, letting you adjust your position or speed before a conflict fully develops.
Frequently Asked Questions
What is the 12-second rule for motorcycle safety?
The 12-second rule is a vision technique where you consciously look at the road at least 12 seconds ahead of your current position. This distance provides the time needed to identify a hazard, evaluate your options, and execute an avoidance maneuver (the SEE strategy). At highway speeds, 12 seconds equals over a thousand feet of visual lead time.
What is target fixation and how do I avoid it?
Target fixation is the dangerous tendency to steer toward whatever you’re staring at, especially under stress. To avoid it, you must physically turn your head and point your chin toward your intended escape path or the direction you want to go, not at the obstacle. Your bike will follow your eyes. This is a core skill practiced in parking lot drills.
How do I make myself more visible to car drivers?
Use a combination of gear, lighting, and positioning. Run your headlight day and night. Wear high-visibility clothing. Use your lane position to stay in drivers’ forward sight lines and avoid their blind spots. Research indicates a yellow headlight or helmet-mounted lights can significantly improve your detection rate compared to a standard white headlight.
What are the best vision techniques for riding at night?
Slow down to match your reduced sight distance. Use your high beam whenever possible. Look toward the right edge of your lane to avoid being blinded by oncoming lights. Use the headlights of other vehicles to extend your vision. Keep your face shield and glasses spotlessly clean. Increase your following distance dramatically.
The Bottom Line
Good riding is 90% seeing. The techniques here, the 12-second lead, active scanning, breaking fixation, are the mandatory operating procedures for anyone who wants to keep the rubber side down.
But knowing them isn’t enough. You have to drill them until they’re autonomic. Start with the 12-second count on your next ride. Then, book a parking lot session and work on the head-turn drill. The goal is to make these vision habits so ingrained that you do them without thought when a car suddenly merges into your lane.
A final essential point: these methods only work if your vision is clear. If your eyewear for night riding is scratched or your helmet visor is permanently fogged, you’ve defeated the entire system before you even start. Fit first, features second. That applies to your eyes most of all.
