
Motorcycle Suspension Setup Guide: Step-by-Step Process
This post contains affiliate links. As an Amazon Associate, we earn from qualifying purchases.
The entire game in motorcycle suspension setup is matching three things: the sag for your weight, the preload to achieve it, and the damping clicker settings for your ride. Get sag wrong, and nothing else matters. Most factory suspensions are set for a standard rider weight of 75 to 85 kg (165 to 187 lb), per the KTM and WP Suspension manuals. If you’re outside that range, the process changes: a few pounds use preload; a bigger gap needs new springs. Damping clicker adjustments start from a factory baseline and are always changed one click at a time.
That standard weight range is the hinge. A rider at 95 kg (210 lb) trying to adjust sag on springs set for 80 kg will either fail to get the correct sag measurement or max out the preload, which wrecks the shock’s ability to move. This is a mechanical fact printed in the manuals, not an opinion. The rest of the process – measuring sag, counting clicks, adjusting damping – is just following the steps once you know which game you’re playing, a process detailed in any good motorcycle suspension setup guide.
What follows: how to measure sag against the OEM’s specific target (and where those targets disagree), how to read your bike’s adjustment points, the real difference between preload and damping, and the step-by-step clicker adjustments that actually change how the bike handles.
Key Takeaways
- The factory assumes a rider weight of 75–85 kg (165–187 lb). Minor differences use preload; larger gaps require a spring swap.
- Set sag first, using your bike’s specific OEM target if it has one (e.g., 35 mm riding sag for some WP shocks). It decides every other adjustment.
- Always adjust damping clickers one click at a time and ride slowly after each change to feel the result.
- Preload sets the bike’s ride height and sag; damping controls how fast the suspension moves. Confusing them is the most common tuning mistake.
- If your fork bottoms out frequently, harder springs are required – preload won’t fix it.
Before You Start: Tools and Safety
Before you start: The shock absorber is filled with highly compressed nitrogen. Do not attempt to disassemble it. Never use strong solvents like brake cleaner on fork tubes. Ride slowly after any adjustment to test the new handling.
You need a flat, level surface and a way to get both wheels off the ground. A front and rear stand is ideal. The tool list is short: a tape measure, zip ties or tape for marking, a notepad, and the correct spanner or screwdriver for your bike’s adjusters. For clicker adjustments, a small flathead or a dedicated tool often works.
Mechanical condition is essential. Check for fork seal leaks, shock fluid seepage, and dry linkage bearings. A worn-out shock won’t respond to clicks. Squared-off tires or notchy steering head bearings will mask any improvement you make. This isn’t scare talk. It’s the predictable outcome of tuning a worn component.
What is the Step-by-Step Process to Set Sag?
Sag is the amount the suspension settles under the bike’s and rider’s weight. It determines how much travel you have left for bumps and how the bike pitches under acceleration and braking. The generic rule says rider sag should be about 1/3 to 1/4 of total travel. Manufacturers have specific targets.
Here’s the walkthrough, adapted from WP and Öhlins manuals:
- Measure Unloaded (L1): With the bike on stands and wheels off the ground, measure from the rear axle straight up to a point on the tail. Mark that spot. Do the same on the front, measuring from the wiper seal on the fork stanchion.
- Measure with Bike Weight (L2): Take the bike off the stands, hold it upright (use a helper), and let it settle. Measure again. The difference is static sag – the sag from the bike’s weight alone.
- Measure with Rider (L3): With a helper holding the bike, get on in full gear. Bounce a few times to settle, then assume your normal riding position. Have your helper measure again. The difference between L1 and L3 is rider sag.
Where this goes sideways: Measuring with the bike leaning on its side stand. It throws the static sag number off by several millimeters, which then skews your rider sag calculation. Use a helper or a race stand every time.
Now you have numbers. This is where you hit the first major fork in the road, because manufacturers don’t agree on the ideal target.
| Source | Static Sag Target (Rear) | Rider Sag Target (Rear) | Notes |
|---|---|---|---|
| WP Suspension (specific model) | 12 mm (0.47 in) | 35 mm (1.38 in) | From a specific shock manual. |
| WP Suspension (APEX PRO 6746) | 20 mm (0.79 in) | 36 mm (1.42 in) | From a different shock model manual. |
| Öhlins | 25–30 mm | 30–40 mm | General recommendation for sport riding. |
| Pandomoto (Blog) | – | 30–40 mm | Cites common sport rider practice. |
The bottom line: You need to know which game you’re playing. If your bike has a specific OEM manual, use its numbers. If not, note that sources disagree: WP manuals specify 35 mm or 36 mm for specific shocks, while Öhlins and Pandomoto suggest a 30–40 mm range for sport riding. For the front, sources disagree: KTM/WP state “no exact riding sag can be determined for the fork,” while Öhlins recommends setting front fork static sag to 25-30 mm.
How to Adjust Preload to Hit Your Sag Target
If your measured rider sag is too much (suspension sits too low), you need more preload. If it’s too little (suspension too tall), you need less preload.
On the rear shock, this usually involves turning a locking collar with C-spanners or a threaded adjuster. On the front fork, it’s often a cap on top of the fork tube turned with a spanner. The Honda CBR1000SP/ST manual, for example, specifies 2 rotations from full soft on the front and 7 rotations from full hard on the rear for a 75 kg rider.
Adjusting preload changes the bike’s ride height and steering geometry. A higher rear (more preload) quickens steering; a lower rear slows it. Change it, then re-measure your sag.
TL;DR: Measure sag three times (unloaded, bike weight, rider). Compare your rider sag to your target (30–40 mm or your OEM spec). Adjust preload on the shock or fork, then re-measure. Repeat until sag is correct.
Preload vs. Damping: What Each One Actually Does
This is the core confusion. Mixing them up guarantees a bad setup.
Preload is the initial tension on the spring. It determines where the bike sits in its stroke and is adjusted to achieve the correct sag. It does not change the spring’s stiffness. A common mistake is cranking in more preload to “stiffen” the ride for track days. All you’ve done is raise the ride height and use up available travel.
Damping controls the speed at which the suspension compresses and rebounds. It’s the hydraulic resistance inside the fork or shock. This is where the clickers come in.
Think of it like this: preload sets the starting position of the bike on the spring. Damping controls the motion after it hits a bump. Adjusting preload to fix a harsh ride is like moving your chair to fix a wobbly leg. You’re solving the wrong problem.
How to Adjust Compression and Rebound Damping
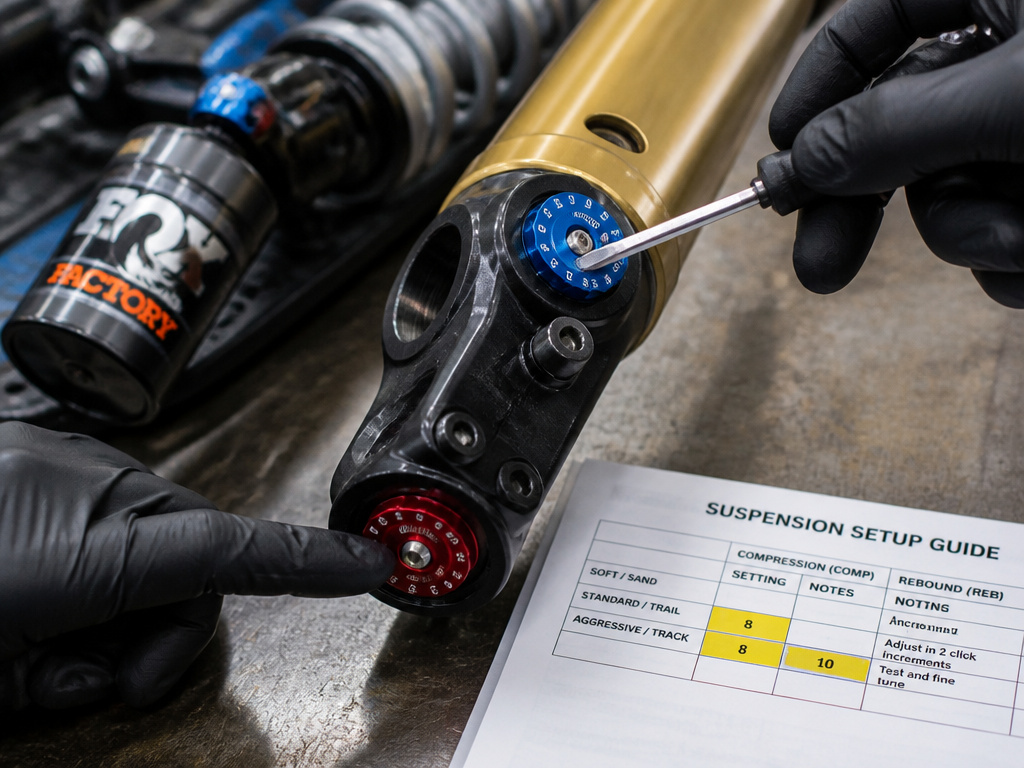
Damping adjustments are made with clickers, usually numbered. Turning them clockwise (in) increases damping (slower movement). Turning counter-clockwise (out) decreases damping (faster movement). The manuals tell you to start from full hard (all the way clockwise) and then back out a specific number of clicks for a baseline.
Here are the baseline settings straight from the WP Suspension fork manual for their “Comfort,” “Standard,” and “Sport” settings:
| Fork Setting | Compression Damping (Clicks from full hard) | Rebound Damping (Clicks from full hard) |
|---|---|---|
| Comfort (R) | 16 | 18 (all types) |
| Standard (R) | 12 | 18 (all types) |
| Sport (R) | 10 | 18 (all types) |
| Full Payload (R) | 8 | 18 (all types) |
For a WP APEX PRO shock absorber, the low-speed compression and rebound baselines are different:
| Shock Setting | Low-Speed Compression Clicks | Rebound Clicks |
|---|---|---|
| Comfort | 16 | 16 |
| Standard | 12 | 12 |
| Sport | 9 | 9 |
The procedure is simple:
- Find your clickers. Compression is often on top of the fork; rebound is on the bottom. On shocks, low-speed compression and rebound are usually on the reservoir.
- Gently turn each clicker clockwise until it stops. Don’t force it.
- Turn them counter-clockwise to the recommended baseline for your riding style (e.g., 12 clicks out for a “Standard” road setting).
- Make one change at a time. Adjust compression, go for a slow test ride on a familiar road, then adjust rebound.
The part nobody mentions: Clicker adjustments are not linear. The first few clicks make a big difference; the last few do almost nothing.
Symptoms of Incorrect Damping
Use this table to diagnose your ride feel. It assumes your sag and preload are already correct.
| Symptom | Likely Cause | Fix |
|---|---|---|
| Bike feels harsh, transmits small bumps to the handlebars. | Too much compression damping. | Turn compression clickers out (counter-clockwise) 1-2 clicks. |
| Bike wallows or dives excessively under braking. | Too little compression damping. | Turn compression clickers in (clockwise) 1-2 clicks. |
| Bike feels unstable after hitting a bump, “kicking” back up. | Too little rebound damping. | Turn rebound clickers in (clockwise) 1-2 clicks. |
| Bike packs down over successive bumps, feels like it’s not recovering. | Too much rebound damping. | Turn rebound clickers out (counter-clockwise) 1-2 clicks. |
When Do You Need New Springs or a Professional?
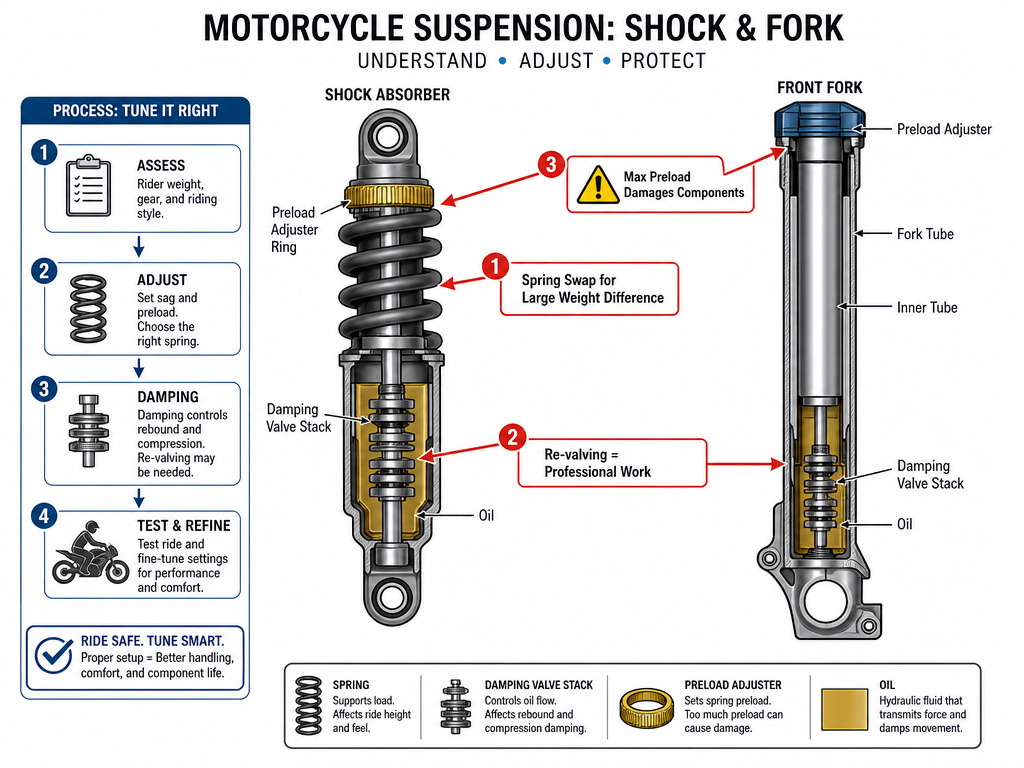
The manuals are clear: minor weight differences use preload; larger differences need new springs. If you are outside that 75–85 kg standard range by a larger amount, you are in spring-swap territory. Cranking preload to its limit to achieve sag will make the ride terrible and can damage components.
Similarly, if your fork frequently bottoms out with a clunk, the WP manual states harder springs must be fitted. Preload won’t stop bottoming; it just changes where in the stroke you start.
For damping work beyond clicker adjustments—like re-valving, changing shim stacks, or servicing a leaking unit—you need a professional. Öhlins explicitly warns: “Do not open, service or modify this product without proper education (authorized Öhlins dealer/distributor) and proper tools.” The shock is a sealed, nitrogen-charged unit. Getting it wrong is dangerous.
Maintenance and Service Intervals
Suspension is a wear item. The oil breaks down, seals wear, and gas pressure depletes. Ignoring service guarantees your careful tuning is wasted.
Here’s what the manufacturers say:
| Component | Service Interval (Off-Road / Racing) | Service Interval (On-Road) |
|---|---|---|
| KTM Fork | 20 operating hours or 5,000 km | 40 hours or 20,000 km |
| Öhlins Shock | 20 operating hours | 30,000 km or 3 years |
The fork oil specification for KTM/WP Suspension forks is SAE 4. For the WP APEX PRO shock, the fluid spec is SAE 2.5. Using the wrong oil changes the damping profile. For routine fork maintenance, Öhlins recommends regularly applying a little Öhlins grease (148-01) on the steel tubes and working it in. Avoid strong solvents like brake cleaner.
How to adjust motorcycle suspension for a passenger
Adding a passenger significantly increases the load on your suspension. The standard factory settings are typically calibrated for a single rider within a specific weight range. For the added weight of a passenger and any luggage, you will need to adjust the spring preload. Start by increasing the preload on both the front forks and the rear shock to compensate for the extra load and prevent the bike from sagging excessively or bottoming out. If the suspension still bottoms out frequently with the preload maxed, the total weight may exceed what the stock springs can handle, requiring the installation of harder springs. After making adjustments, ride slowly at first to get a feel for the new handling characteristics.
Off-road motorcycle sag and suspension setup
Off-road riding demands a different suspension approach than street use. Sag targets can vary, but a common guideline is to set your rider sag to roughly one-third to one-quarter of the suspension’s total travel. This provides a balance between stability and wheel travel over rough terrain. For the fork, exact riding sag numbers are less critical; focus on preventing frequent bottoming, which can cause damage and indicates a need for harder springs. Off-road conditions are harsh, so service intervals are shorter. Check your manufacturer’s recommendations, as some specify service after a low number of operating hours or kilometers for off-road use. Always make adjustments within the recommended ranges.
Frequently Asked Questions
How do you properly set up motorcycle suspension?
Proper setup follows a strict order: 1) Fix any mechanical issues (leaks, wear). 2) Set sag and preload for your weight. 3) Set damping clickers to the manufacturer’s baseline. 4) Make tiny, one-at-a-time damping adjustments based on test rides. Skipping to step 4 is why most DIY setups fail.
What is the 12-second rule on a motorcycle?
This isn’t a suspension term. You might be thinking of a rider training concept about maintaining a 12-second following distance for awareness. It has no bearing on setting your sag or making damping adjustments.
What’s the best suspension setup?
The “best” setup is the one matched to you and your bike. For a 75 kg rider on a sport bike on smooth roads, a “Standard” baseline from your manual is the recommended start. For heavier riders, rougher roads, or track use, the targets shift. There is no universal “best.”
Is high or low preload better?
Neither is inherently better. You set preload to achieve the correct sag measurement. If your sag is too small, you need less preload. If it’s too large, you need more. The goal is a number, not a direction.
The Bottom Line
Start with the factory’s standard rider weight assumption: 75–85 kg (165–187 lb). If you’re in that ballpark, you’re tuning. If you’re outside it by more than 10 kg, you’re likely shopping for springs. The entire process hinges on that.
Forget the idea of a perfect setup you find in a generic motorcycle suspension setup guide online. Your job is to find a baseline from your manual, get the sag right, and then use the clickers to solve specific problems you feel on the road. Change one thing, ride, note the change, and repeat. It’s a slow calibration, not a quick fix.
And if you only do one thing from this guide, let it be this: write down your starting point and every change you make. A notepad beats a memory every time. That’s how you go from random twisting to knowing exactly which clicker fixed that wallowing feeling in a fast sweeper.
