
Motorcycle Helmet Breath Deflector Explained
This post contains affiliate links. As an Amazon Associate, we earn from qualifying purchases.
A motorcycle helmet breath deflector is a plastic or foam barrier inside the chin bar that catches your warm, moist exhaled breath and redirects it downward, away from the cold interior surface of the visor. By preventing that warm air from hitting the visor, it stops the condensation that causes fogging. Its effectiveness depends heavily on the seal it creates. A poor seal, such as with a minimal-coverage guard, can allow fogging in as little as 5 seconds when stopped.
That seal is the whole game. A deflector that only covers your nose, as described in a US patent, fails after about five seconds at a stop. The design described in US Patent 6748607 claims to prevent fogging for about 30 seconds when stopped. This is the core of a motorcycle helmet breath deflector explained.
What follows breaks down the three main deflector types, the step-by-step installs that won’t void your helmet’s safety rating, and when you should skip a deflector entirely for a different anti-fog solution.
Key Takeaways
- A breath deflector works by creating a physical barrier and air channel, but its seal around your nose and mouth dictates whether it works for 5 seconds or 30.
- Installing a non-OEM or unapproved deflector can void your helmet’s DOT FMVSS No. 218 certification and all warranty claims, per Schuberth’s manual.
How Does a Motorcycle Helmet Breath Deflector Actually Work?
Fog forms when warm, saturated air hits a cold surface. Inside a helmet, that’s your breath meeting the visor. A deflector isn’t a magic anti-fog coating, as in the basic motorcycle helmet breath deflector explained. It’s a piece of plastic or dense foam that sits between your mouth and the visor.
The mechanism is straightforward. As you exhale, the deflector catches the breath stream. It then guides that air down and out through the bottom of the chin bar, often into the helmet’s existing exhaust channels. A deflector also has a soft cushion that seals against your face, preventing breath from escaping upward.
A breath guard assembly for a helmet includes a guard body with a protrusion covering the nose, a cushion attached to the back for contact, and engaging terminals on the lower end for attachment. Its design minimizes the spread of breath inside the helmet to prevent shield fogging.
This physical redirection is why deflectors work even when the helmet is stationary, which is the core of a motorcycle helmet breath deflector explained. They don’t rely on airflow from riding. That’s their key advantage over simple chin vents, which need forward motion to pull air through.
Where this goes sideways: If the deflector is too small or doesn’t seal, your breath leaks around it. A US Patent (6748607) notes that minimal-coverage guards, which only cover the nose, allow fogging after “about 5 seconds” when stopped. A seal can extend that to about 30 seconds. That’s the performance gap you’re shopping for.
The 3 Main Types of Motorcycle Helmet Breath Deflectors
Not all deflectors are built the same. The design and attachment method change how well they work, how easy they are to clean, and whether you can even install one in your helmet.
1. The Removable Snap-In Deflector
This is Some helmets, like the HJC RPHA-MAX, use a simple snap-in attachment, while others like the Alpinestars S-M10 use a screw-secured frame, and the Scorpion EXO-CX950 uses a click-in tab and gasket-tuck method. You can pop it out for cleaning with just your fingers.
- How it works: Simple friction and plastic clips hold it in place. It’s meant to be user-installed and removed.
- Best for: Riders who want easy cleaning or who ride in varied conditions and may want to remove the deflector in summer.
- The catch: The seal is often basic. If the plastic warps or the tabs wear out, it rattles and leaks air.
2. The Screw-Secured or Pinned Deflector Frame
Some helmets, like the Alpinestars S-M10, use this more permanent setup. The deflector attaches to an internal plastic frame, which is itself secured to the helmet shell with screws or pins.
- How it works: The frame is the anchor. The deflector clips or pins onto it. Removal requires a tool (like a screwdriver) and is meant to be infrequent.
- Best for: Track use or riders who want a rock-solid, rattle-free fit. The frame often allows for a larger, more effective deflector shape.
- The catch: It’s not user-friendly. You might void a warranty by removing it incorrectly, and replacing a lost screw is a hassle.
3. The Integrated Chin Vent System
Some helmets use an integrated chin vent system instead of a removable deflector. They use a clever chin vent shutter. When open, it sends air to your mouth. When closed, it redirects that airflow up along the inside of the visor to prevent fogging.
- How it works: It’s a fixed part of the helmet’s ventilation system. You operate it with a slider.
- Best for: Riders who prefer a minimalist, integrated solution without extra parts to lose.
- The catch: You can’t remove it for deep cleaning. Its effectiveness is tied to riding speed, as it needs some airflow to function.
| Deflector Type | Installation | Best For | Main Limitation |
|---|---|---|---|
| Removable Snap-In | Click tabs into place | Easy cleaning, seasonal use | Can loosen and leak over time |
| Screw-Secured Frame | Tool-required, semi-permanent | Maximum stability, track use | Difficult to remove/clean |
| Integrated Chin Vent | Fixed; operated by slider | Streamlined design, no extra parts | Less effective at very low speeds |
Choosing one often isn’t a choice. Your helmet comes with one system. The lesson is to understand what you have before you try to modify it.
Step-by-Step: How to Install a Breath Deflector (Without Breaking Anything)
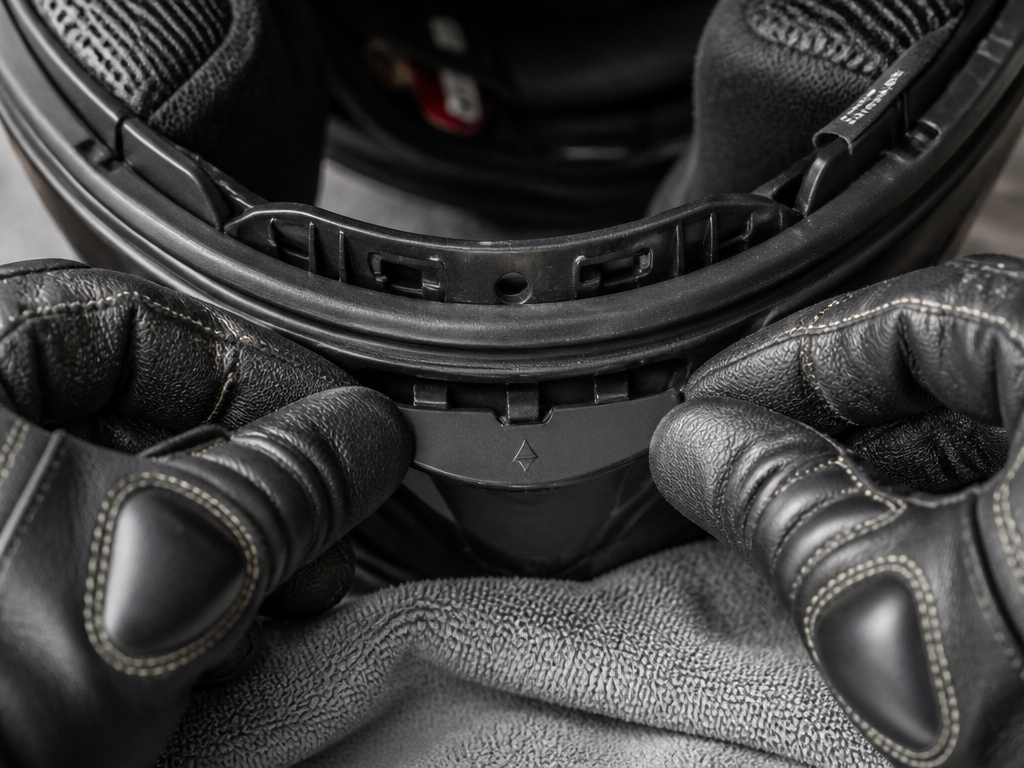
The process is different for every helmet. The only universal rule is to get the official manual. Here’s how the two common methods break down, sourced directly from OEM guides.
For a Simple Snap-In or Click-Tab Design (Like Scorpion)
The Scorpion EXO-CX950 manual provides a clear, three-step process that applies to many click-in styles:
- Open the chin bar and place the helmet upside down on a soft surface. This gives you access and prevents scratches.
- Insert the main tab into the anchor hole. On the Scorpion, you push the tab into a hole inside the chin bar until you hear a click.
- Tuck the side tabs under the rubber gasket. The manual specifies inserting the side mounting tabs under a rubber gasket on the top surface of the chin bar. Do one side, then the other.
That’s it. Reverse the steps to remove. The click tells you it’s seated. No force needed.
For a Screw-Secured Frame (Like Alpinestars)
This is more involved. The Alpinestars S-M10 manual describes a frame fixed with an internal screw, with the deflector pinned to that frame.
Before you start: Have the correct size screwdriver. Work on a clean, well-lit table. Keep track of every screw and pin. Losing one here can mean the part won’t reattach securely.
- Locate and remove the internal securing screw. This often requires peeling back the cheek pad liner to find the screw head.
- Gently push the frame inward to release it. Don’t pry. The frame should disengage from its mounts once the screw is out.
- Detach the old deflector from the frame. It’s usually held by small plastic pins. Note their orientation.
- Attach the new deflector to the frame, then re-seat the frame into the helmet shell.
- Reinstall the screw and tighten firmly, but do not over-tighten. Strip the plastic, and you’re ordering a new part.
If this sounds like too much, it probably is. For most riders, a snap-in design is the practical limit of home maintenance. The goal is to reduce wind noise and fog, not to dismantle your safety gear.
Breath Deflector vs. Pinlock vs. Anti-Fog Spray: Which Actually Works?
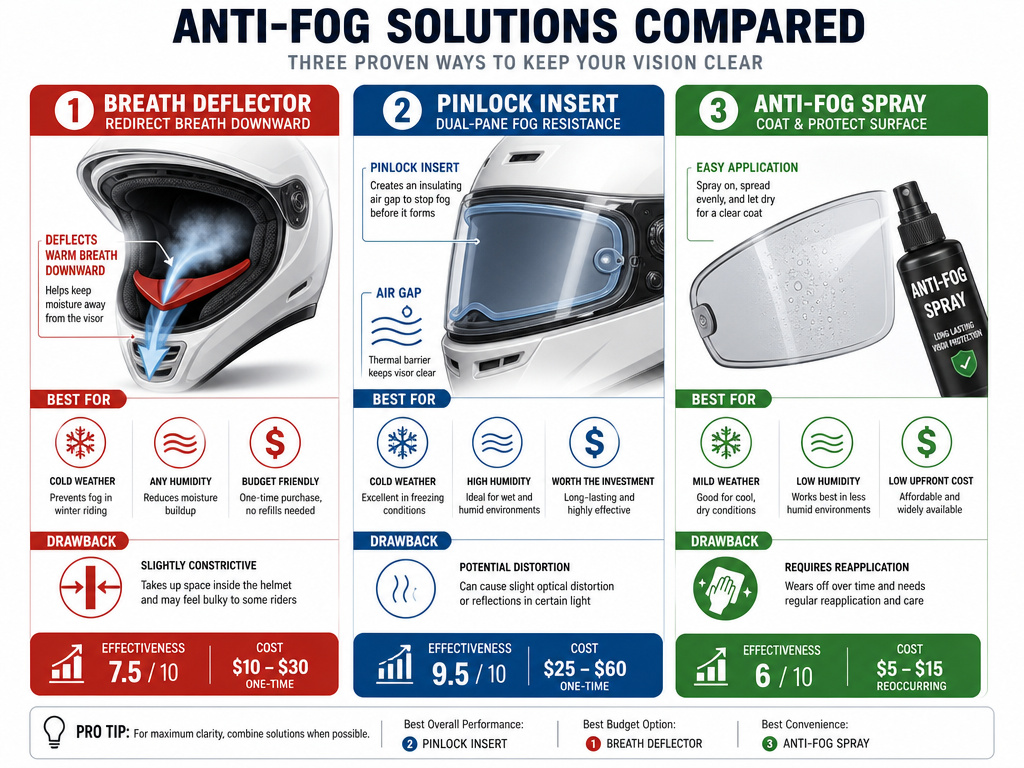
A deflector isn’t your only option to prevent fogging. It’s one tool in a small kit. The right choice depends on your climate, your helmet, and your tolerance for fuss.
| Solution | How It Works | Best For | Biggest Drawback |
|---|---|---|---|
| Breath Deflector | Physically redirects breath air downward. | Cold, dry climates; stop-and-go traffic. | Can feel claustrophobic; less effective in high humidity. |
| Pinlock Insert | Dual-pane visor creates a fog-resistant air gap. | Humid climates; riders who want a permanent, set-and-forget solution. | Requires a compatible visor; can slightly distort vision at the edges. |
| Anti-Fog Spray/Coatings | Chemical layer reduces surface tension on visor. | Riders on a budget; adding extra protection to other systems. | Short-lived (days to weeks); easily wiped off during cleaning. |
Here’s the deal.
I treat spray as a backup. It works until the first time you clean your visor with something harsh, then it’s gone. A deflector or Pinlock is part of the helmet.
Common Problems and How to Fix Them
Even a well-installed deflector can cause issues. These are the ones that show up after a few rides, not in the shop.
Problem: Fogging is worse with glasses.
The deflector seals your breath below your nose, but the warm air then flows up the sides of your face and fogs your lenses. It’s redirecting the problem, not solving it.
- Fix: Choose a deflector with wider “wings” that extend further back along your cheeks. If your helmet doesn’t offer one, treating your glasses with anti-fog spray is the next best step.
Problem: The deflector feels suffocating or makes breathing louder.
This is common. You’re hearing your own breath reflected back at you, and the plastic is close to your face.
- Fix: First, ensure it’s installed correctly and isn’t angled into your nostrils. With an OEM part, you might just have to get used to it. The feeling often lessens as you adapt.
Problem: It rattles or came loose.
The mounting tabs are worn, or the deflector was never fully clicked into place.
- Fix: Remove it and inspect the tabs. If they’re cracked, you need a replacement. If they’re just bent, you can sometimes gently reshape them with your fingers. Reinstall, making sure you hear and feel a positive click on each tab.
Problem: My visor still fogs around the edges.
This usually means the deflector is working for the center of the visor, but your breath is escaping around the sides of the deflector or your exhale is coming out your nose.
- Fix: Check the cushion seal. Is it compressed or missing?
Most of these are compromises. A perfect seal is often at odds with comfort. You have to find your own balance.
Safety and Certification: The One Rule You Can’t Ignore
This is essential. Your helmet is a certified safety device. Tampering with it has consequences.
The Schuberth C5 Carbon manual states it plainly: using an unapproved visor voids the helmet’s DOT FMVSS No. 218 certification and all warranty/insurance claims. The Schuberth manual states that using an unapproved visor voids the helmet’s DOT FMVSS No.
Common mistake: Installing a cheap, universal breath deflector from an online marketplace. If it requires glue, modifies the shell, or replaces an OEM part with something not tested with the helmet, you risk voiding its legal certification.
What does that mean for you?
Always buy OEM. If your helmet manufacturer sells a breath deflector for your model, that’s the only one you should use. It’s been tested with that specific helmet. If they don’t sell one, your helmet likely wasn’t designed for one. Don’t retrofit it. Use a Pinlock or spray instead.
This is why understanding your helmet’s design is crucial. A full face helmet or modular helmet designed for a deflector will have the mounting points built in. If they’re not there, forcing one in is a bad idea.
How do I know if a deflector fits my helmet brand?
Manufacturers use different attachment methods, so a universal fit is rare. Some helmets, like certain Scorpion models, use a click-in tab system where you insert the deflector into a hole until it clicks and tuck side tabs under a rubber gasket. Others use a simple press-in snap design or are secured with screws to an internal frame. Using an unapproved accessory can void your helmet’s safety certification and all warranty claims. Always check your helmet’s manual for specific instructions and only use deflectors designed for your exact model.
How much does a breath deflector cost and where can I get one?
This ensures you get the correct part designed specifically for your helmet model, which is crucial for proper fit and function. Avoid generic deflectors unless you are certain they are compatible with your helmet’s unique mounting system.
Why does my motorcycle helmet visor fog up?
Fog forms when warm, saturated air hits a cold surface. Inside a helmet, that’s your breath meeting the visor. Your exhaled air is warm and full of moisture. When that air contacts the colder plastic of the visor, it cools down rapidly. Cool air cannot hold as much moisture, so the excess water vapor condenses into tiny droplets on the visor, creating fog. A minimal-coverage breath guard that only seals around the nose may not fully contain this air, allowing fog to form in as little as five seconds when you are stopped and not moving air through the helmet.
Frequently Asked Questions
Does a breath deflector work with a beard?
It can, but the seal won’t be perfect. Trimming the beard along the upper lip and where the deflector touches can help. Otherwise, pair the deflector with a Pinlock for the best results.
How do I clean a breath deflector?
Follow the same rule as your visor. The Arai manual specifies a solution of mild soap or detergent and lukewarm water. Never use petrol, thinner, benzene, or any other solvents. These can degrade the plastic and foam. For snap-in types, remove the deflector, wash it in soapy water, rinse thoroughly, and let it air dry completely before reinstalling.
Can I use a breath deflector and a Pinlock together?
Absolutely. In fact, this is the most effective anti-fog combination you can get. The deflector handles the bulk of your exhaled breath, and the Pinlock insert acts as a final barrier for any residual moisture that makes it to the visor. It’s the standard setup for many riders in cold or humid climates. There’s no conflict between the two systems.
Why does my new helmet not have a breath deflector?
Many mid-range and some premium helmets now prioritize integrated chin vent systems (like Arai’s) or assume you’ll use a Pinlock insert. They omit the removable part to reduce cost, complexity, and potential rattles. Check your manual—the helmet might have a built-in channel designed to work with a specific OEM deflector sold separately.
How often should I replace my breath deflector?
Replace it if it’s damaged, cracked, or if the foam cushion is permanently compressed and no longer springs back. There’s no set mileage or time interval, unlike the helmet itself. Bell Helmets recommends replacing your helmet at least every five years, while Schuberth states the helmet should be replaced after 5 years of purchase, depending on use and care. Inspect the deflector whenever you clean your helmet.
The Bottom Line
A breath deflector is a simple tool for a specific job: keeping your breath off your visor. It works, but only if it fits your helmet and your face. The install is usually trivial—a click and a tuck—but the consequences of getting it wrong aren’t.
Skip the universal, stick-on junk. If your helmet has mounting points, buy the manufacturer’s part. If it doesn’t, don’t drill or glue. Use a Pinlock. And if you wear glasses, accept that you might need to treat the lenses too.
One rule to walk away with: if your deflector only covers your nose, it’s a five-second solution. Look for one that seals. That’s what turns a piece of plastic into something that actually keeps your vision clear.
