
How to Size Kids Motorcycle Gear: A Step-by-Step Guide
This post contains affiliate links. As an Amazon Associate, we earn from qualifying purchases.
Sizing kids motorcycle gear starts with the manufacturer’s rider specifications, not age labels. Match the child’s current weight and height to the bike’s manual first, then fit each piece of gear in a riding posture. A helmet must be snug, gloves must allow full finger curl, and boots must lock the ankle without heel lift. Snug protection beats room to grow on impact zones.
That manufacturer-first rule flips the standard advice. Most guides tell you to pick gear based on a child’s age or a generic “they’ll grow into it.” The manuals from KTM, Torrot, and Suzuki put hard numbers on weight and height because a bike’s suspension, power, and balance are engineered for them. This is why understanding how to size kids motorcycle gear is critical. Gear that’s sized wrong doesn’t just feel bad, it fails when the kid needs it.
What follows is the sequence for how to size kids motorcycle gear: verify the bike’s limits, measure the child accurately, and fit each piece with the same rigor you’d use for your own kit. We will show where to allow slack and where a tight, secure fit is essential.
Key Takeaways
- Start with the bike’s manual for rider weight and height limits before buying any gear.
- A proper helmet fit shows no cheek-pad gap and stays put when you try to twist it off.
- Gloves are not optional, fit them so the child can make a full fist without material bunching at the knuckles.
- Boots must lock the heel; any lift inside the boot means the ankle isn’t supported for a crash.
- Always check gear fit in a riding posture, not while standing still.
Why Manufacturer Specs Trump Age Labels
You see a helmet tagged “Ages 8-12” or a jacket labeled “Youth Large.” Those are marketing categories, not engineering limits. KTM manuals disagree on maximum rider weight: some specify 35 kg, while others specify 45 kg. The Suzuki DR-Z50 overview states a single-rider weight limit. The Torrot KIDS manual sets a maximum rider weight.
If your child is 32 kg, the Torrot bike is out of spec before they even put a helmet on. Suspension spring preload, frame geometry, and power delivery are calibrated for those numbers. Exceed them, and the bike handles unpredictably, the front end washes out easier, the rear shock bottoms over jumps. The process of how to size kids motorcycle gear using a generic age chart often misses the point entirely. Protection needs to match the forces the bike can generate.
Fit first, features second. A mid-range helmet that fits perfectly is safer than a premium lid that swims on their head.
The Helmet Sizing Process (Step-by-Step)
A loose helmet spins on impact. The energy transfers to the neck instead of being absorbed by the liner. The goal is a uniform, firm pressure around the entire head.
First, measure the head’s circumference at its widest point, about an inch above the eyebrows. Use a soft tape measure and record the number in centimeters. Compare it to the brand’s specific size chart. Alpinestars, Bell, and Arai all differ slightly. Never guess between sizes; if they’re between numbers, round down for a snug fit or try both shells.
The helmet must stay in place when you grasp the chin bar and gently try to rotate it left and right or roll it forward over the eyes. Any movement means the shell is too large, regardless of the circumference measurement.
Now, the checklist. Have the child put the helmet on. Fasten the chin strap. You should see no gap between the cheek pads and their face. Ask them to open their mouth wide; the top of the helmet should pull down slightly onto the forehead. Now, try to roll the helmet forward off their head while they resist. If it moves more than an inch, it’s too big.
Replace scratched visors or goggles promptly. The KTM manual is blunt: “When light shines directly on a scratched visor or goggles, you will be practically blind.” A scratch at the wrong angle turns a sunny trail into a hazard.
For more detail, our helmet sizing guide breaks down shell shapes and liner materials.
Gloves: The First Piece You Should Buy
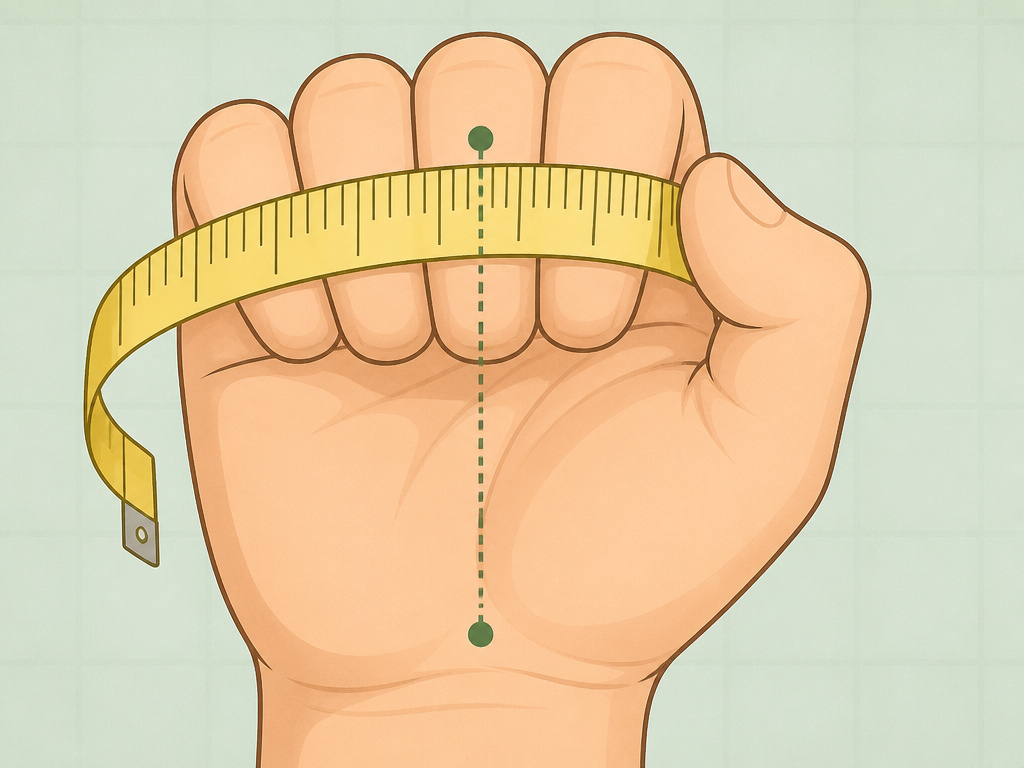
Hands hit the ground first. It’s a reflex, not a choice. A glove that’s too long in the fingers creates a lever point on impact, increasing the chance of a broken finger or worse. A glove that’s too short restricts blood flow and reduces lever sensitivity.
To measure, wrap a tailor’s tape around the dominant hand at its widest point, across the knuckles, excluding the thumb. Then measure from the tip of the middle finger to the base of the palm. Use the larger of the two numbers against the brand’s chart.
The fit test is simple. Have the child make a tight fist. No material should bunch excessively at the knuckles. Then, have them grip an imaginary handlebar. The seam at the end of the fingers should not press into the fingertip. There should be no gap at the wrist when they bend their hand up.
Leather palms break in; synthetic materials often don’t. A stiff new glove that’s the right size will soften. A stiff glove that’s too big will always be sloppy. For children with slender hands, finding gloves for small hands that aren’t just scaled-down adult patterns is a specific challenge.
Our guide on how to measure hand size for motorcycle gloves covers the nuances of palm width versus finger length.
Jackets, Pants, and Body Armor

Street jackets and off-road jerseys fit differently. A street jacket needs to be snug to keep armor positioned over shoulders, elbows, and back. An off-road jersey is cut looser for airflow and layered over a separate chest protector.
For a street or adventure jacket, have the child wear the base layer they’d ride in. Zip it up and have them sit on a bike or mimic the posture. Reach forward. The jacket should not ride up and expose their lower back. The shoulder seams should sit at the tip of the shoulder, not down the arm. Elbow armor should cup the point of the elbow without shifting when they bend their arm.
| Armor Checkpoint | Correct Fit | Wrong Fit Consequence |
|---|---|---|
| Shoulders | Centered on shoulder bone | Slips down arm, leaves collarbone exposed |
| Elbows | Stays over elbow point when arm is bent | Shifts to forearm during a slide |
| Back Protector | Covers spine from tailbone to mid-neck | Too short leaves lower spine unprotected |
Off-road gear is a system. The jersey goes over a roost protector or integrated chest/back plate. Pants are cut for knee braces or pads. The fit priority is freedom of movement, not skin-tight compression. For a deep dive on that specific fit, see our article on how motocross jersey and pants should fit.
Pants follow the same rule. Whether for street or dirt, riding pants fit is critical at the knee. The armor must not migrate when they crouch or kneel.
Boots and the Heel-Lock Test
Ankle injuries are common and slow to heal. A riding boot’s job is to prevent hyperextension. A street boot has a stiffer sole and more ankle structure than a dirt boot, which prioritizes flexion for shifting and braking.
The single most important fit factor is heel lock. With the boot laced or buckled, have the child stand up. Then, have them try to lift their heel inside the boot. If the heel comes up more than a few millimeters, the boot is too big. Length is secondary, there should be about a thumbnail’s width of space in front of the toes when they’re standing.
If a boot is too big, the foot can slide forward on impact, jamming the toes and removing ankle support. A boot that’s too short will cramp toes and cut off circulation within an hour. Always try boots with the socks they’ll ride in. For younger kids, consider boots with adjustable calf straps or multiple buckle positions to accommodate growth.
Common Sizing Mistakes and How to Avoid Them
The biggest error is buying for growth. It’s tempting to get a jacket two sizes up. On soft areas like the torso, a little room is okay. On hard armor points, shoulders, elbows, knees, heels, any slack is a failure point. Armor that floats doesn’t protect.
Another mistake is ignoring the riding posture test. A jacket that fits in the store can pull tight across the shoulders when reaching for handlebars. Pants can bind at the knees when crouched. Always check fit in a riding tuck.
Where this goes sideways: Assuming all youth gear from one brand fits the same. A Fox youth large helmet and a Fox youth large jersey are scaled independently. Always check the specific product’s size chart.
Finally, don’t mix protection levels. A heavy-duty helmet with street jeans is a mismatch. The gear should be appropriate for the riding style and the bike’s capability, as outlined in the bike’s manual.
Adjustability and the Second-Hand Market
Good youth gear has smart adjustability. Look for helmets with multiple cheek pad thickness options, jackets with sleeve-length adjusters, and boots with removable insoles. These features extend the usable life of the gear by a season, sometimes two.
The second-hand market for kids gear is active, and it’s a practical way to manage cost. However, fit and safety checks are absolutely required. Inspect any used helmet for cracks, dropped damage, or a degraded liner (it will smell sour). Check seams on jackets and gloves for rot or pulled stitching. Verify that armor is present, not removed, and hasn’t hardened with age.
If you’re considering a hand-me-down, treat it like a new purchase. Go through every fit check listed here. Past crashes are not always visible.
How to measure your child for motorcycle gear
Start by checking the motorcycle’s manual for its specific rider limits, as these are engineering limits, not marketing suggestions. Before measuring for gear, ensure your child meets the bike’s maximum rider weight and size specifications. To get accurate body measurements, have your child stand straight in lightweight clothing. Use a flexible measuring tape for the chest, measuring around the fullest part. Record their current height and weight. These numbers are your starting point, not the final answer. Gear must fit the child’s body, not just their age. A proper fit allows for movement without being loose enough to catch on the motorcycle or shift in a fall.
Using brand-specific size charts for kids gear
Always use the size chart provided by the specific gear manufacturer you are considering. Different brands have different fits, so a child’s measurements will correspond to different sizes across brands. Locate the brand’s official size chart, often found on their website or product packaging. Match your child’s accurate body measurements to the chart’s listed ranges for chest, height, and sometimes weight. Do not rely on generic age ranges like ‘Ages 8-12’ as these are not precise. If your child’s measurements fall between sizes, consider the type of gear; protective jackets and pants should account for the layers worn underneath, while a helmet must fit snugly without pressure points.
Frequently Asked Questions
How much room should I leave for my child to grow into their gear?
Leave minimal room. For helmets, buy for today’s head size, a loose helmet is dangerous. For jackets and pants, you can size for one season of growth if the armor still positions correctly. For boots, never buy oversized; a boot that’s too big offers no ankle support.
My child is between sizes on the chart. Should I size up or down?
Size down for helmets and gloves. These items are critical for impact protection and control feel, and a slightly snug fit is safer than a loose one. For jackets and pants, if the smaller size correctly positions the armor, choose it. If it’s restrictive in a riding posture, try the larger size, but ensure the armor doesn’t shift.
Are street and dirt bike gloves sized the same?
The sizing metrics (hand circumference, length) are the same, but the fit profile differs. Dirt gloves are often cut slightly roomier in the palm for comfort and airflow. Street gloves are tighter for better feel on levers. Always consult the specific brand’s size chart for the product line you’re buying.
How often should I re-check my child’s gear fit?
Check fit at the start of every riding season and anytime they have a noticeable growth spurt. A helmet that fit perfectly in spring might be tight by fall. Boots are often the first piece they outgrow.
Can I use a bicycle helmet for motorcycle riding?
No. Motorcycle helmets are certified to different impact and penetration standards (like DOT, ECE, or Snell). They’re designed for higher speeds and different impact scenarios. Always use a motorcycle-specific helmet.
The Bottom Line
Sizing kids gear is a three-part equation: the bike’s manual gives you the rider specs, the child’s measurements give you the starting point, and the riding posture test confirms the fit. Ignore age labels on gear. Focus on the numbers from KTM, Suzuki, and Torrot.
The one rule that overrides everything: if the armor moves when the child moves, it’s the wrong size. Snug beats roomy on every piece that touches an impact zone. Start with gloves and a helmet that fit perfectly, then build the rest of the kit around them. That’s how you turn a size chart into real protection.
