
How to Install an Aftermarket Motorcycle Exhaust
This post contains affiliate links. As an Amazon Associate, we earn from qualifying purchases.
Installing an aftermarket motorcycle exhaust requires matching four things: the right tools, brand-specific torque settings, correct alignment, and careful sequencing. A slip-on replacement usually fits in an afternoon with standard wrenches, while a full system demands patience and a torque wrench set in inch-pounds and foot-pounds. The exact process is in your kit’s manual, but the experience, the order of operations, the feel of the right alignment, the sound of the first start, is what the manuals assume you already know.
The key is treating the bike as a system under tension. Every fastener you remove releases that tension in a specific order, and every new piece you add must find its new equilibrium before you lock it down. This guide walks through that sequence for how to install an aftermarket motorcycle exhaust, focusing on the physical cues you’ll feel when the fit is right versus when you’re forcing it.
What follows: the tool list most generic guides miss, how to read a brand’s specific instructions for how to install an aftermarket motorcycle exhaust, the torque specs that matter (and where the experts disagree), and the post-install checks that catch a mistake before it costs you a gasket or an oxygen sensor.
Key Takeaways
- Loosen everything, tighten nothing until the entire new system is mocked up and aligned. A fastener torqued out of sequence creates a bind that cracks welds or strips threads.
- Torque wrenches are non-optional for exhaust manifold nuts and oxygen sensors. Harley-Davidson’s official spec for O2 sensors is 16–19 N·m (12–14 ft-lbs), while Vance & Hines calls for anti-seize without a reduced torque, this conflict means you must follow your kit’s manual exactly.
- Anti-seize is mandatory for oxygen sensor threads and any fastener that sees high heat. Harley-Davidson specifies either Permatex Anti-Seize Lubricant (Part No. 98960-97) or Loctite SILVER GRADE Anti-Seize Lubricant (Part No. 11100001).
- Let the bike cool completely before starting. A hot exhaust can burn through gloves in seconds and makes metal expand, so threads are at their tightest and most prone to galling.
- Check your local and state laws before modifying emissions equipment. Federal law prohibits modifications that cause the motorcycle to exceed federal noise standards, and in California, modifying the emission control system is illegal.
The Toolkit You Actually Need
A socket set gets the old exhaust off. A specific set of tools gets the new one on correctly when you learn how to install an aftermarket motorcycle exhaust, without leaks, and without stripping a single bolt.
You need metric sockets, usually 8mm through 17mm. You need a set of combination wrenches in the same range. You need a torque wrench that reads in inch-pounds and foot-pounds. The torque part is critical. An exhaust manifold nut torqued to 11.3–13.6 N·m (100–120 in-lbs) feels tight with a standard wrench, but a torque wrench tells you it’s actually correct. The same goes for the 27–34 N·m (20–25 ft-lbs) on a transmission bracket. Guesswork here leads to broken studs or a pipe that works loose in fifty miles.
The Technical Snippet: Proper installation requires wrenches certified to specific torque values. For example, the Harley-Davidson Screamin’ Eagle system specifies exhaust manifold nuts at 11.3–13.6 N·m (100–120 in-lbs), flange screws at 9.5–14.9 N·m (84–132 in-lbs), and a cross-under pipe clamp at 47.5 N·m (35 ft-lbs). Oxygen sensor torque is 16–19 N·m (12–14 ft-lbs), with ARF data port plugs at 40–60 N·m (30–44 ft-lbs). Each value requires a calibrated torque wrench.
Beyond wrenches, you need a tube of high-temperature anti-seize compound. You need a set of mechanic’s gloves, the cheap knit ones save your knuckles and keep oil off the new chrome. Have a rubber mallet or a dead-blow hammer handy for persuading a stubborn bracket, not for forcing pipes. A small pry bar or a set of plastic trim tools helps separate gasketed joints without gouging the sealing surface.
Finally, you need the installation manual for your specific exhaust kit. Print it. The best exhaust systems from Akrapovič or Vance & Hines include model-specific steps that generic guides omit. For instance, some Akrapovič slip-ons require an aluminium distance washer under only the right muffler clamp. A Yoshimura kit for a Kawasaki Z1000 reuses the OEM gasket and warns you to disconnect the exhaust valve servo cable to avoid a check engine light. The manual is your map.
Step-by-Step: Removal to Mock-up
Start with a cold bike. Disconnect the battery’s negative terminal. This isn’t just good practice; it prevents an accidental short if your wrench grounds against the frame while touching a positive cable.
- Remove the old exhaust. Loosen every clamp, bracket bolt, and manifold nut in the reverse order you’d tighten them. Support the muffler’s weight as you go, letting it hang by one mount can bend a bracket. For a full system, you’ll likely need to remove the saddlebags or a heat shield first. Refer to your factory service manual.
- Unplug oxygen sensors. Gently disconnect the electrical connectors. Do not pull on the wire; press the plastic tab and wiggle the connector off. If the sensor is seized in the pipe, let penetrating oil sit for an hour before gently working it out with a deep socket.
- Clean the mating surfaces. Once the old exhaust is off, scrape off any old gasket material from the cylinder head ports and any mid-pipe joints. A razor blade and a brass brush work here. You want a smooth, flat surface for the new gasket or ring to seal against.
- Apply anti-seize to O2 sensor threads. This step is essential. A light coating on the threads prevents galling and ensures you can remove the sensor years later. Vance & Hines instructions explicitly call for this, and Harley-Davidson mandates specific compounds. The motorcycle exhaust system explained shows why these sensors are crucial for your fuel mapping.
Before you start: Exhaust components reach temperatures that cause severe burns. Wear gloves and long sleeves. Ensure the motorcycle is stable on a lift or center stand to prevent tipping. Work in a well-ventilated space.
Now, lay out the new system. Identify all brackets, clamps, and hardware. Do not assume every bolt is the same length. Many kits use different hardware for different mounting points.
The Art of Alignment and Torque Sequence
This is where the job is won or lost. Your goal is to get every component seated and aligned with all fasteners finger-tight before any wrench touches them for final torque.
Start at the engine. Slip the new header pipes onto the studs and start the nuts by hand. Do not tighten them. Connect the next section of pipe, the mid-pipe or link pipe, and attach its mounting brackets loosely. Work your way back, adding the muffler(s) and all support brackets. Leave every clamp and bolt loose enough that you can still rotate the components.
Stand back. Look down the length of the bike. The pipes should appear parallel to each other and to the bike’s frame. There should be even clearance around the swingarm, shock, and other components. Akrapovič advises checking ground clearance and even suggests adjusting spring preload for advanced users. This is the time to make those assessments. A small twist at the head can mean a big rub at the rear.
Once aligned, begin the torque sequence. Always start at the engine and work back, following the manual’s specific order. This gradually pulls the system into alignment without stressing any one joint.
| Fastener Location | Example Torque Spec | Brand & Model Source | Consequence of Over/Under Torque |
|---|---|---|---|
| Exhaust Manifold Nuts | 11.3–13.6 N·m (100–120 in-lbs) | Harley-Davidson Screamin’ Eagle | Under: exhaust leak, lost power, popping. Over: snapped stud, ruined cylinder head threads. |
| O2 Sensor | 16–19 N·m (12–14 ft-lbs) | Harley-Davidson Screamin’ Eagle | Under: sensor works loose, throws error codes. Over: sensor body cracks or threads gall. |
| Transmission Bracket Bolt/Nut | 27–34 N·m (20–25 ft-lbs) | Harley-Davidson Screamin’ Eagle | Under: bracket fatigues and breaks from vibration. Over: cracked transmission case. |
| Muffler Hanger Clamp | 18 ft-lbs (25 N·m) | Yoshimura Kawasaki Z1000 | Under: muffler can rotate or slip. Over: crushed or deformed hanger. |
| General Link Pipe Clamp | 22 Nm (16 ft-lb) | Akrapovič Various Models | Under: exhaust leak at joint. Over: clamp deforms, causing a leak. |
Notice the O2 sensor spec. The Harley manual calls for 12-14 ft-lbs and requires anti-seize. General engineering practice often recommends a torque reduction when using anti-seize due to lower thread friction. The manual doesn’t mention this. Which is right? When sources disagree, for example, Harley-Davidson’s manual specifies 12–14 ft-lbs with anti-seize while general engineering practice often recommends a lower torque with anti-seize, you must decide which to follow; the manual’s spec is what the manufacturer warrants.
Edge Cases and Brand-Specific Quirks
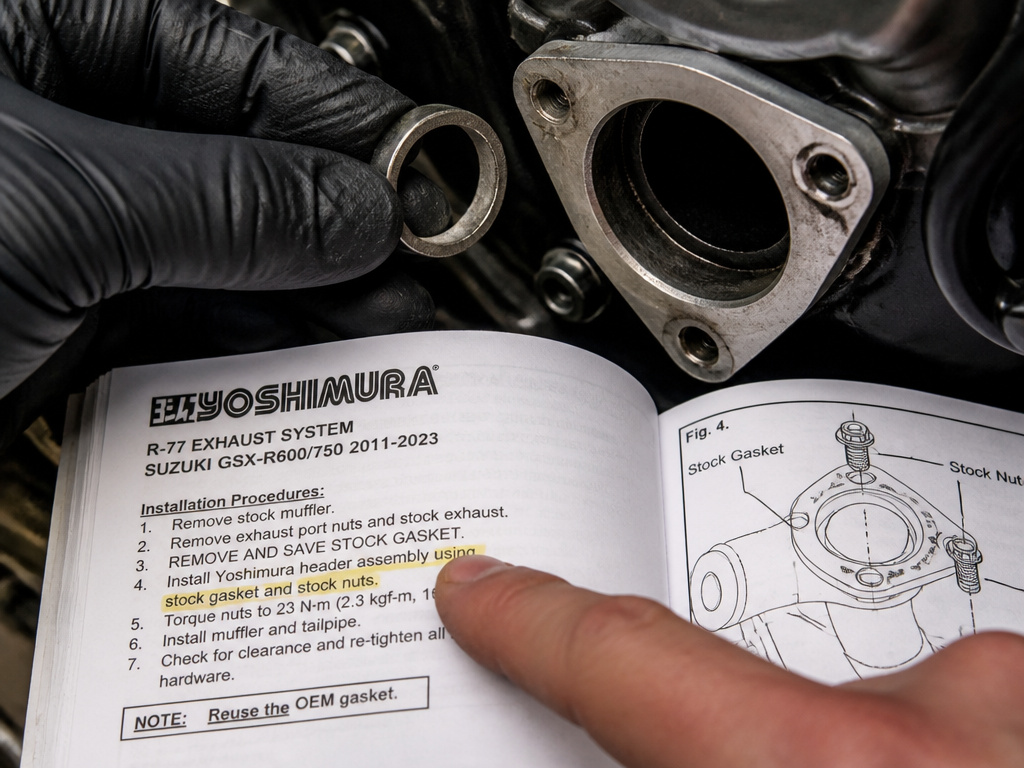
Not every exhaust is a simple bolt-on. Brand instructions contain steps a generic guide would never predict.
An Akrapovič slip-on for the Yamaha FJR 1300 requires you to “install the press-on nut onto the link pipe’s bracket exactly as shown and tighten the rubber stopper onto the bracket” before final assembly. Miss that, and the bracket won’t secure correctly.
For a Vance & Hines Harley-Davidson Softail Shortshots, the instructions note that “muffler bodies should protrude from heat shields by an equal amount on both pipes.” It’s a visual alignment check that ensures symmetry.
The most common quirk involves gaskets. Many riders assume a new kit includes all new gaskets. Not always. The Yoshimura instructions for the Z1000 state: “OEM gaskets are to be reused… If the gaskets are damaged… Please source them from your local dealer using the following part number: 11061-0240.” Installing without this reused gasket guarantees a leak.
These steps exist because exhausts are engineered to tight tolerances. The difference between slip-on and full exhaust complexity is largely defined by how many of these small, critical interfaces exist between the engine and the tailpipe.
The Final Step Everyone Skips
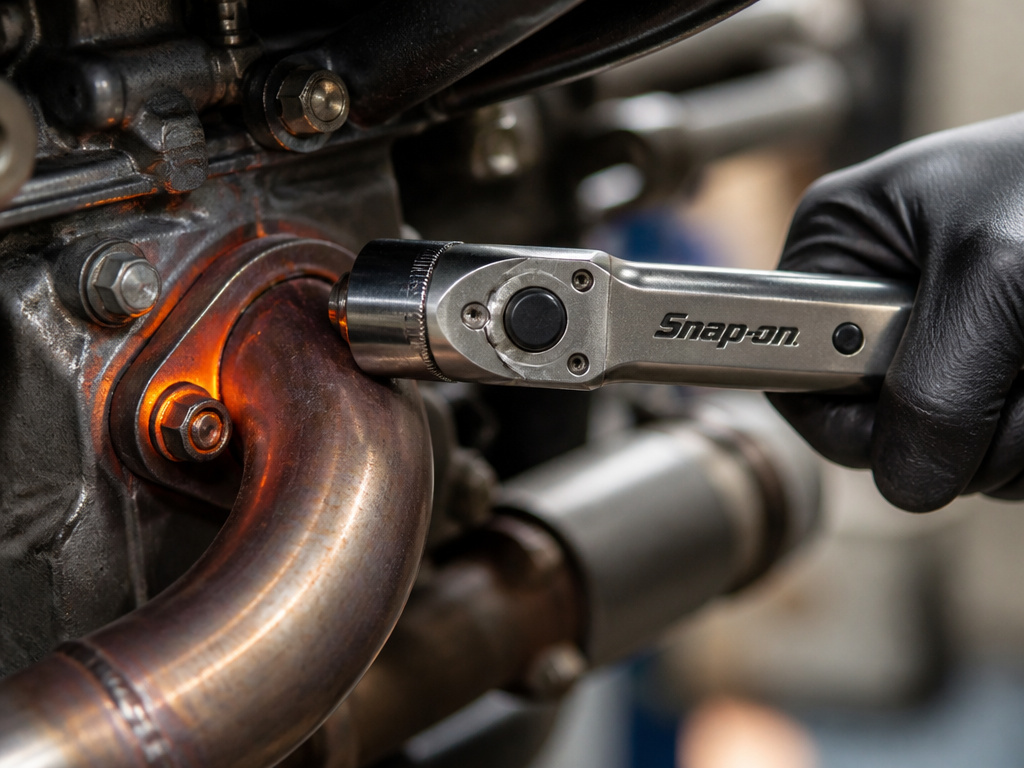
You’ve torqued every bolt. The system looks straight. The job isn’t done.
Reconnect the battery. Start the bike. Let it idle. Get down on the ground and listen along the exhaust joints. You’re listening for a distinct, rhythmic puffing sound, a hiss or a tick, that indicates a leak. A visual check works too: hold your hand near (not on) the joints to feel for pulsing hot gas.
If you find a leak, shut the bike off and let it cool. Do not try to tighten a hot exhaust clamp. The metal is expanded, and you’ll likely over-torque it. Once cool, loosen the clamp or fastener slightly, ensure the pipes are seated, and retorque to spec.
Next, take a short, gentle ride. Avoid high RPMs. Your goal is to heat-cycle the exhaust. Metal expands when hot, and fasteners can settle. After the bike cools completely, go back and check the torque on every critical fastener, especially the manifold nuts and the clamp right after the catalytic converter (if you still have one). This single post-ride check catches most minor settling.
Where this goes sideways: Skipping the post-heat-cycle re-torque. Vibration and thermal cycling can work fasteners loose within the first rides. A manifold nut that was perfect when cold can develop a leak after one good heat soak.
Now, address the finish. Wipe the entire exhaust down with a clean, damp cloth to remove fingerprints and installation grime. Harley-Davidson’s manual explicitly warns: “Oil from hands can leave permanent marks on exhaust system finish.” This is especially true for brushed or raw metal finishes.
For ongoing care, follow the maker’s advice. Yoshimura recommends cleaning with metal polish every 1-2 months, but warns not to use polish on their ‘Works Finish’ systems. Akrapovič stamps a unique serial number on each muffler’s inlet pipe for authenticity, note it and keep your paperwork. The do loud pipes save lives debate is one thing, but maintaining the pipes you have is a separate, practical discipline.
Legal and Mechanical Reality Checks
A louder exhaust is often the goal. The law has limits. The federal tampering prohibition, repeated in nearly every manufacturer’s manual, states it’s illegal to modify the exhaust in a way that makes the bike exceed federal noise standards. In California, it’s illegal to modify any part of the emission control system. Your aftermarket exhaust likely has a small, stamped EPA label stating it’s for “closed-course competition use only” or that it’s “50-state legal.” Know which one you bought and what your local inspection requires.
Mechanically, an exhaust change alters the bike’s backpressure. This almost always affects the air-fuel mixture. A slip-on might be fine. A full system can alter the air-fuel mixture, which in extreme cases can cause head pipes glowing visibly in normal light, a condition Yoshimura’s manual explicitly flags as indicating “an excessively lean condition that must be corrected.”
This is why the question “Do you have to tune a motorcycle for an aftermarket exhaust?” is so common. For a slip-on, maybe not. For a full system, the answer trends toward yes. A fuel controller or a dyno tune corrects the mixture. It’s the difference between a mod that works and one that shortens your engine’s life.
Full System vs Slip-On Installation
A full exhaust system replaces everything from the engine head to the tailpipe. This means removing the entire stock exhaust, including the header pipes, and installing new components that often require specific torque values for manifold nuts, clamps, and brackets. You’ll handle oxygen sensors and may need to apply anti-seize lubricant to their threads. A slip-on only replaces the muffler or end section, leaving the stock header pipes in place. Installation typically involves loosening a clamp, swapping the muffler, and re-tightening. Slip-ons are simpler but offer less performance gain. Always check if your model requires reusing the original gasket or disconnecting an exhaust valve servo to avoid a check engine light.
Frequently Asked Questions
Can I install an aftermarket exhaust by myself?
Yes, if you have a basic metric tool set, a torque wrench, and the patience to follow the instructions step-by-step. A slip-on is a straightforward project for most riders. A full system is more involved but still within a careful DIYer’s reach. The complexity isn’t in the skill required but in the discipline to align and torque correctly.
Do I need new gaskets?
Sometimes. Many systems reuse the stock header-to-head gasket. Mid-pipe connections often use a new ring gasket or spring-loaded ball-and-socket joints that don’t require one. Your kit’s instructions will say. If it says “reuse OEM gasket,” you must. If the old gasket is crushed or damaged, replace it with the exact OE part.
Why do my new pipes have blue and gold discoloration?
This is normal heat-induced oxidation, often called “bluing.” It’s a result of the metal reaching high temperatures, especially if the fuel mixture is lean. While you can minimize it with proper tuning, some color change is inevitable on stainless steel and titanium systems. Techniques to remove exhaust pipe bluing exist, but many riders consider it a badge of use.
How do I prevent rust on my new exhaust?
Regular cleaning is the best defense. Wipe off road salt, bugs, and grime promptly. For chrome systems, use a gentle metal polish as the manufacturer recommends. For raw stainless or titanium, occasional cleaning with a dedicated cleaner will keep it looking fresh. The process to clean motorcycle exhaust pipes is simple but needs to be done consistently.
Is an exhaust swap worth the performance gain?
For a slip-on, the gain is usually minimal, with changes primarily to sound and weight. The real performance benefit often comes from a full system combined with a tune. The value is subjective: for some, the sound and look are worth the cost; for others, only a measurable performance increase justifies it.
Before You Go
The install is straightforward if you treat it like a puzzle where every piece has a defined place and a specific tightness. The frustration comes from skipping steps, torquing a bolt early, forgetting anti-seize, or not checking alignment from three different angles.
One rule that reframes the whole job: your goal isn’t to put on a new exhaust. Your goal is to remove the old exhaust without breaking anything and install the new one so it can be removed again in five years. That mindset changes how you handle seized bolts, how you apply anti-seize, and why you use a torque wrench. It turns a weekend mod into a lasting upgrade.
After the first ride, listen. Not just to the new sound, but to the bike. Any new rattles? A sudden drop in fuel efficiency? A hiccup at a certain throttle position? These are clues. An exhaust change is rarely an isolated event. It’s the first domino. How you respond to what falls over next decides whether the mod was a success or the start of a longer, more expensive project.
