
How to Change Motorcycle Oil: Step-by-Step (With Specs)
This post contains affiliate links. As an Amazon Associate, we earn from qualifying purchases.
Changing your motorcycle oil requires matching three things: the right oil spec, the correct procedure for your bike’s sump type (wet or dry), and precise torque on the drain plug. A standard wet-sump change needs JASO MA-rated oil, a filter, a drain pan, and a torque wrench. The most common mistake is over-tightening the drain plug, which strips the threads in the engine case.
The spec matters more than the brand. Your bike’s manual lists an exact viscosity and a certification like JASO MA. Use the wrong one, and the clutch can slip or the transmission can wear prematurely. That’s the difference between a routine service and a repair bill. A key part of a routine service is knowing how to change motorcycle oil correctly.
What follows: the eight universal steps for how to change motorcycle oil, the tools that prevent stripped threads, how to handle a bike without a stand, and the brand-specific quirks that break the standard guide.
Key Takeaways
- Warm the engine before draining; manufacturers specify different times, such as at least 5 minutes for an Indian Scout or 3 minutes for a Honda CRF250X.
- Use a torque wrench on the drain plug. Overtightening strips the aluminum case; undertightening causes a leak.
- Always use JASO MA-rated oil for bikes with a wet clutch. Car oil lacks the friction modifiers and can cause clutch slip.
- For a dry-sump bike like an Indian Scout, check the oil level after running the engine for 30 seconds, not before. Always consult your specific manual.
- Dispose of used oil at an auto parts store or recycling center, it’s free, and dumping it is illegal.
The Tools and Supplies You Actually Need
You can do this job with a basic wrench set, but three tools turn the process of how to change motorcycle oil from a chore into a clean, reliable process. The first is a rear stand or lift. If you don’t have a center stand, a simple rear stand that lifts by the swingarm spools is the single best investment for home maintenance. It gets the bike level and stable. The second is a torque wrench. Motorcycle engine cases are aluminum, and the difference between tight and stripped is about 5 ft-lbs. The third is a oil filter wrench, the strap kind usually works best in tight spaces.
Your supply list is short, but non-negotiable:
- Motorcycle Oil: 3-5 quarts (check your manual). The spec is everything: viscosity (e.g., SAE 10W-40) and the JASO MA rating for wet-clutch bikes.
- Oil Filter: One that matches your bike’s model. An oil change kit often bundles the right filter with a new drain plug washer.
- Drain Pan: A dedicated pan that holds at least 1.5 times your oil capacity.
- Funnel: A long-neck funnel prevents spills when filling.
- Shop Towels or Rags: For the inevitable drip.
- New Drain Plug Washer: A copper or aluminum crush washer. Reusing the old one is the fastest route to a slow leak.
Where this goes sideways: Using car oil in a wet-clutch motorcycle. Automotive oils contain friction modifiers labeled “Energy Conserving” that can cause the clutch plates to slip. That’s why the JASO MA rating exists, it’s a guarantee the oil works with your clutch.
The 8-Step Oil Change Procedure
This is the universal sequence for a wet-sump motorcycle. Dry-sump bikes have a critical extra step at the end, which we’ll cover next.
1. Warm the Engine. Start the bike and let it idle to warm the oil. Consult your manual for the specific time, as recommendations vary (e.g., at least 5 minutes for an Indian Scout, 3 minutes for a Honda CRF250X). This gets the oil hot and thin, so it drains completely and suspends any metal or carbon particles. Turn the engine off.
2. Secure the Bike. Place it on a center stand or rear stand so it’s perfectly upright and level. This ensures you drain all the old oil and get an accurate fill later.
3. Drain the Oil. Put your drain pan underneath the drain plug. Using the correct size socket, loosen the plug. Once it’s loose, finish unscrewing it by hand, but keep pressure on it. The oil will be hot. Let it drain completely.
4. Remove the Old Filter. Move your drain pan under the oil filter. Use your filter wrench to loosen it. Oil will spill out as you remove it, so keep the pan ready. Wipe clean the filter mating surface on the engine.
5. Install the New Filter. Dab a bit of fresh oil on the rubber gasket of the new filter. Screw it on by hand until the gasket makes contact, then give it another ¾-turn by hand. Do not use the wrench to tighten it.
6. Replace the Drain Plug. Install a new crush washer on the plug. Screw it in by hand, then use your torque wrench. This is the step that breaks engines. Overtightening strips the soft aluminum threads.
7. Add New Oil. Remove the oil filler cap and use your funnel. Pour in the initial amount of oil as specified in your manual.
8. Check the Level. For a wet-sump bike, check the level via the sight glass or dipstick with the bike upright and engine off. For a dry-sump bike like the Indian Scout, you must start the engine, let it idle for 30 seconds, stop it, then check the level. Add oil slowly until the level reaches the top mark. Do not overfill.
The part nobody mentions: That final 30-second run after the fill does two things. It fills the new oil filter, and it circulates oil through the engine, giving you a true level reading. Skipping it means you’ll likely underfill by half a quart.
Wet Sump vs. Dry Sump: The Critical Difference
Most motorcycles use a wet-sump system, the oil sits in a pan at the bottom of the engine. You drain it from one plug, and you check the level with the bike upright and off. But some performance and cruiser bikes, like the Indian Scout or KTM’s LC8 engine, use a dry-sump system. Here, oil is stored in a separate tank. This changes two things: draining and checking.
To drain a dry-sump bike, consult your manual for the specific procedure, as some systems may have multiple drain points. Checking the level is the bigger trip-up. You don’t check it cold.
The procedure for a bike like the Indian Scout is specific: add the initial oil, start the engine, let it idle for 30 seconds, then shut it off. Now you check the sight glass. The oil level will also fluctuate with temperature and if the bike is leaning off its center stand.
| System Type | Where Oil Lives | Drain Plugs | When to Check Level |
|---|---|---|---|
| Wet Sump | Engine oil pan | 1 | Bike upright, engine OFF |
| Dry Sump | Separate oil tank | 2 (engine + tank) | After running engine for 30 seconds, then OFF |
If your manual says “semi-active dry sump” or mentions an external oil tank, assume you have this system. Getting it wrong means you could run the engine with no oil in the tank.
Choosing the Right Oil: Viscosity and JASO

The numbers on the bottle aren’t marketing. SAE 10W-40 means the oil has a viscosity grade of 10 in cold weather (the “W” stands for winter) and 40 at operating temperature. Your manual specifies this for a reason, it’s based on your engine’s clearances and your typical climate. Straying from it can affect cold starts and high-temperature protection.
The certification is required. For nearly all modern motorcycles with a wet clutch (where the clutch bathes in engine oil), you need oil that meets the JASO T903 MA or MA2 standard. This means it’s been tested for clutch compatibility. Oils labeled JASO MB or common car oils are designed to be more slippery and will make your clutch slip.
Worth knowing before you start: The Suzuki Address 110 manual states that if SAE 10W-40 isn’t available, you should select an alternative from a provided chart. It also explicitly calls for oil conforming to the JASO T903 standard. Your manual has this chart, use it.
Synthetic vs. Conventional matters less than getting the spec right. A high-quality conventional oil that meets JASO MA is better for your bike than a fancy synthetic that doesn’t. The debate over synthetic vs conventional motorcycle oil often misses this point.
What Your Old Oil Can Tell You
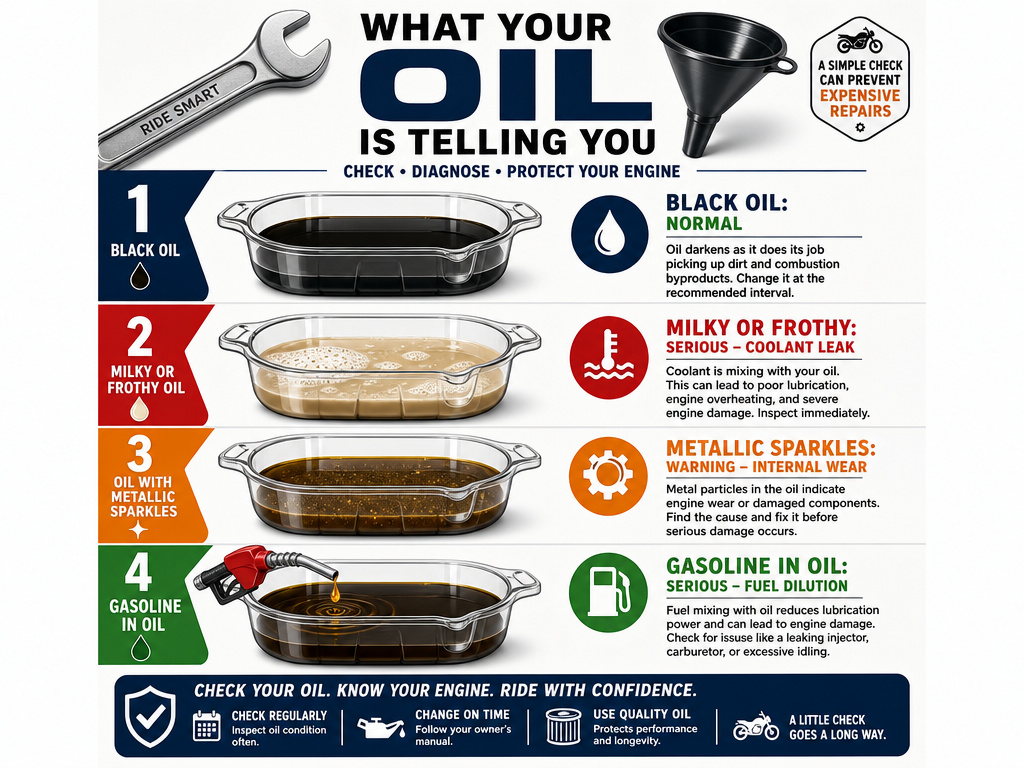
Draining the oil isn’t just maintenance, it’s a diagnostic. Don’t just pour it out and forget it. Look at it.
- Black and Sooty: Normal for a high-mileage bike or one that does short trips. It’s just combustion byproducts.
- Milky or Frothy: Water or coolant is mixing with the oil. This is serious. It points to a blown head gasket or a cracked case. Do not run the engine.
- Metallic Sparkles: Tiny, glitter-like particles are normal wear. Chunky metal flakes or shavings mean internal damage is occurring.
- Smells Like Gasoline: Fuel is diluting the oil, often from a rich fuel mixture or a leaking carburetor float. This thins the oil and kills its lubricating ability.
A quick inspection takes five seconds and can warn you of a major problem before it leaves you stranded. It’s the cheapest engine health check you can do.
The Torque Wrench Lesson: Why Guessing Costs $300
Hand-tight is not a measurement. Aluminum engine threads are soft. The factory service manual gives a torque value for a reason, it’s the clamp load needed to seal without deforming the metal.
Here’s a comparison of drain plug torques from different manufacturers, showing why you can’t guess:
| Motorcycle Model | Drain Plug Torque | Source |
|---|---|---|
| 2025 Indian Scout | 15 ft-lbs (20 Nm) | OEM Service Info |
| Suzuki Address 110 | 26 ft-lbs (35 Nm) | Owner’s Manual |
| 2006 Honda CRF250X | 16 ft-lbs (22 Nm) | Owner’s Manual |
| 2024 Harley-Davidson FLHX | 14-21 ft-lbs (19-28.5 Nm) | Service Manual |
If you put Harley torque on a Honda plug, you’re likely stripping it. A ½-inch drive click-type torque wrench costs less than a single dealer oil change. It pays for itself the first time you use it. The process is simple: set the value, tighten until the wrench clicks, then stop. No more, no less.
Handling Special Cases and Warranty Pitfalls
Not every oil change is straightforward. Some bikes have fairings or skid plates that must be removed to reach the drain plug. Others, like the Harley-Davidson FLHX, have a reduced oil change interval of 1500 miles if you frequently ride short trips in cold weather (under 60°F). Your manual lists these “severe service” schedules.
Then there’s the warranty question. Most manufacturers assume owners will do basic maintenance. But two stand out. KTM’s 2007 manual for the 950 SUPER ENDURO R explicitly states: “You may only change the engine oil yourself after the warranty period has expired. The warranty will become void if you change the oil yourself during the warranty period.” Similarly, BMW Motorrad’s policy strongly advises having maintenance “carried out by your authorised BMW motorcycle dealer” and refuses liability for damage from work done elsewhere.
If your bike is under a new-vehicle warranty, read the maintenance section of your manual carefully. The risk isn’t that you’ll do it wrong, it’s that they might deny a future claim.
How much can I save changing my own oil?
Changing your own oil avoids the labor charges of a professional service, which can be a significant part of the total bill. You pay only for the oil, filter, and any tools you need to buy once. The cost difference varies, but the core savings are consistent. Keep in mind that some manufacturers, like KTM and BMW, have policies that can affect warranty coverage if you perform the service yourself during the warranty period. For bikes outside of warranty, the financial benefit is clear. You also gain the direct knowledge that the job was done correctly with the right fluids and proper torque on critical components like the drain plug.
Frequently Asked Questions
Is it easy to change the oil on a motorcycle?
Yes, if you have the right tools and follow the manual. The hardest part is often getting the bike level and accessing the filter. For a first-timer, budget an hour and go slow. The second time will take 30 minutes.
How often should I change my motorcycle oil?
Follow your manual. Follow your manual. Intervals vary, from hours of operation for dirt bikes to kilometers/miles for street bikes. Dirt bikes like the Honda CRF250X are often based on hours, every 15 hours of operation. Don’t guess; check your oil change schedule.
How long should I run my motorcycle before changing the oil?
Manufacturers disagree. Indian says at least 5 minutes. Honda says 3 minutes. The principle is the same: get the oil warm so it flows easily and suspends contaminants. If your bike is at operating temperature from a recent ride, that’s perfect.
Can I use any 10W-40 oil?
No. You must use a 10W-40 that meets the JASO MA standard for wet-clutch motorcycles. Many 10W-40 oils are made for cars and lack this certification. Using them can lead to clutch problems. Always check for the JASO mark on the bottle.
What if I don’t have a center stand?
Use a rear stand that lifts by the swingarm spools or paddles. If you don’t have a stand, you can carefully prop the bike upright using blocks under the frame, but this is less stable. The key is to get the bike perfectly vertical for an accurate drain and fill.
How do I dispose of the old oil?
Take it to any auto parts store, repair shop, or municipal recycling center. They accept used oil and filters for free. It is illegal and harmful to pour it on the ground or into a drain.
The Bottom Line
Changing your own oil saves money and connects you to your bike. The rule is simple: match the oil spec, torque the plug, and follow the manual’s procedure for your sump type. The tools, a stand, a torque wrench, a filter wrench, pay for themselves in two changes.
If you’re under warranty, especially with a European brand, double-check the manual’s fine print. For everyone else, the barrier isn’t skill, it’s just having the correct information. Now you have it. Go get your hands dirty.
