
Motorcycle Exhaust System Explained: How to Choose
This post contains affiliate links. As an Amazon Associate, we earn from qualifying purchases.
A motorcycle exhaust system routes hot gases away from the engine, reduces noise to legal limits, and can be tuned to influence power. Its main parts are the header, mid-pipe, muffler, and often a catalytic converter, and they come in configurations like slip-ons and full systems, made from materials like stainless steel or carbon fiber. Performance, sound, and weight changes depend on the design, but every modification must stay within federal noise and emissions regulations.
That last point about regulations defines the line between a functional upgrade and a ticket or failed inspection. Federal law prohibits modifications that cause a motorcycle to exceed noise standards, and both Harley-Davidson and Yoshimura explicitly state this in their warranties. The engineering underneath is a direct trade-off: more power usually means more noise, and vice versa. This is a core concept in any motorcycle exhaust system explained.
What follows: a walkthrough of the parts, a clear breakdown of slip-on vs. Full systems, a look at the materials that matter, and the hard numbers on power and noise from a published study. You’ll also get the specific maintenance rules manufacturers actually print and the common failure modes no one mentions until they’re fixing them.
Key Takeaways
- A study on a 110cc engine quantified this trade-off: for maximum power, optimal dimensions were 50 mm diameter and 425 mm length, while for lowest noise they were 38 mm diameter and 525 mm length.
- Slip-on systems replace just the muffler for sound and looks, while full systems swap everything from the cylinder head for maximum performance gains, usually requiring an ECU tune.
- Carbon fiber and ‘Works Finish’ exhausts have strict no-chemicals and no-polish rules, respectively; ignoring these damages the finish permanently.
- Exhaust clamps and mounting bolts must be torqued to spec to survive vibration; loose hardware is the most common cause of leaks and failures.
- Head pipes glowing red in normal light indicate a dangerously lean fuel condition, not a normal exhaust trait.
What Are the Main Parts of a Motorcycle Exhaust System?
Look at the side of any bike. The exhaust is a pipeline that starts at the engine’s fiery exit and ends where the quieted gas hits the air. The best way to learn it is by tracing the force path from the cylinder head out.
Start at the engine. Each cylinder has an exhaust port. That’s where the header pipe bolts on, the first segment that collects the blast. On a multi-cylinder bike, these individual header pipes often merge into a collector. That merger is where you get the ‘2-into-1’ or ‘4-into-1’ names. From the collector, a single mid-pipe carries the gases back. Along that mid-pipe, you might find a catalytic converter, a honeycomb chamber that scrubs pollutants. Finally, the muffler swallows the flow, using chambers and packing material to kill sound waves before the tailpipe vents it all out.
The exhaust system is a tuned pathway. Its length, diameter, and internal shape influence how easily spent gases escape the engine. Too much restriction (backpressure) chokes power. Too little can hurt low-end torque. It’s a balancing act between scavenging efficiency and noise control.
The fit between these parts is everything. That’s where clamps and gaskets live. A cold exhaust has gaps; a hot one expands and seals. If the bolts holding it all together aren’t tight, vibration will find the weak spot. You’ll hear the leak first, a ticking or popping that wasn’t there before. Ignore it, and the metal fatigue sets in. A crack starts at a stressed weld or a thin bracket.
Slip-On vs. Full System: What You’re Actually Changing
The aftermarket offers two main paths: the slip-on and the full system. A slip-on replaces just the muffler and maybe a short section of the tailpipe. It bolts onto your stock header and mid-pipe. A full system, like a Harley-Davidson Screamin’ Eagle or a Yoshimura R77, replaces everything from the cylinder head back.
What a slip-on does: It changes the sound, often the look, and can shave a few pounds. It’s the gateway mod. Performance gains are usually minimal because the restrictive stock header and catalytic converter remain in place. You can install one in an hour with basic tools, and it rarely needs an engine tune. For many riders, that’s enough.
What a full system does: It rewrites the rules. By ditching the stock headers and cat, it opens up the exhaust flow dramatically. This is where real power gains happen, especially in the mid-to-high RPM range. But it also changes how the engine breathes. The air-fuel mixture that was perfect for the stock system is now wrong. That’s why a full system almost always requires a fuel management update, an ECU flash or a fuel controller. Skip that step, and you risk running lean, which leads to overheating, poor performance, and those glowing head pipes Yoshimura warns about.
The choice between a slip-on vs full exhaust depends on what you need. Want a throatier sound without a weekend of tuning? Slip-on. Chasing every last horsepower and willing to manage the tune? Full system.
The 2-into-1 vs. Everything Else Decision
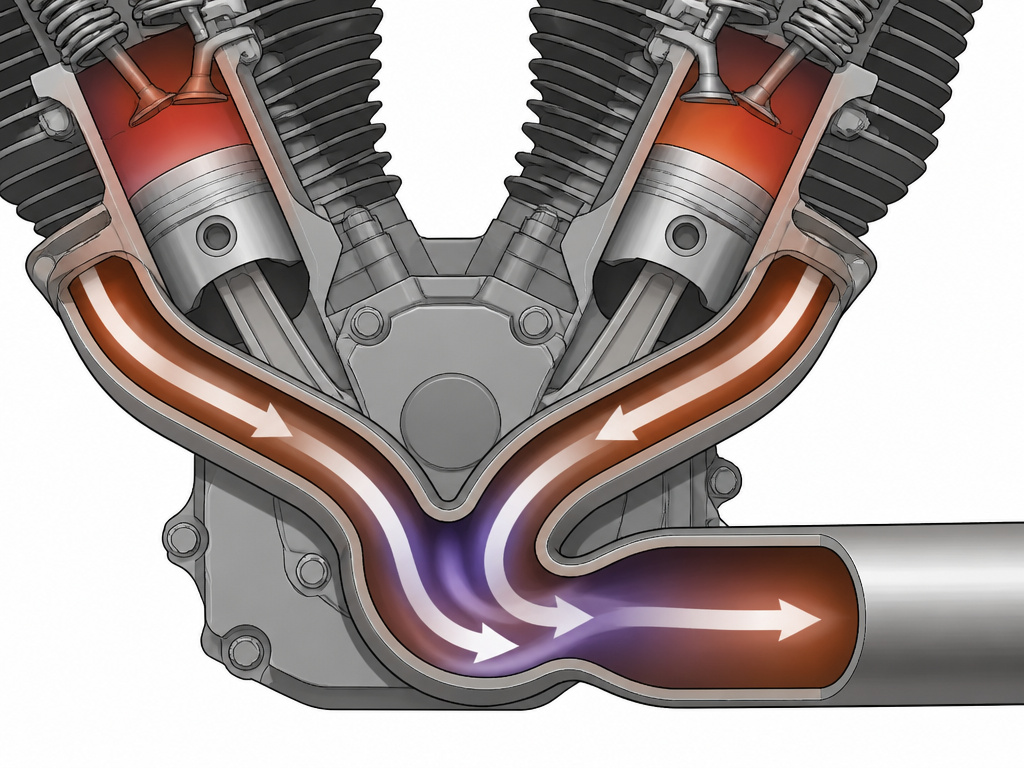
Among full systems, the configuration matters. You’ll see dual exhausts (a pipe for each cylinder), 2-into-1 (two headers merge into one mid-pipe), and 4-into-1 (common on sport bikes). The 2-into-1 has a cult following, especially in the cruiser world, for a practical reason.
A 2-into-1 system merges the exhaust pulses from both cylinders. This creates a scavenging effect, the pulse from one cylinder helps pull exhaust from the other, improving efficiency. The result is often a broader, stronger torque curve compared to duals, which can have a power peak but less grunt down low. There’s also a weight and simplicity advantage: one muffler, one set of mounting points.
But it’s not the universal answer. Duals offer a classic symmetrical look some riders won’t compromise. 4-into-1 systems on high-revving sport bikes are engineered for top-end power. The ‘best’ configuration depends on your engine’s character and where you want the power. For a big twin where low-end torque is king, the 2-into-1 usually wins.
Stainless, Titanium, or Carbon Fiber? The Material Trade-Off
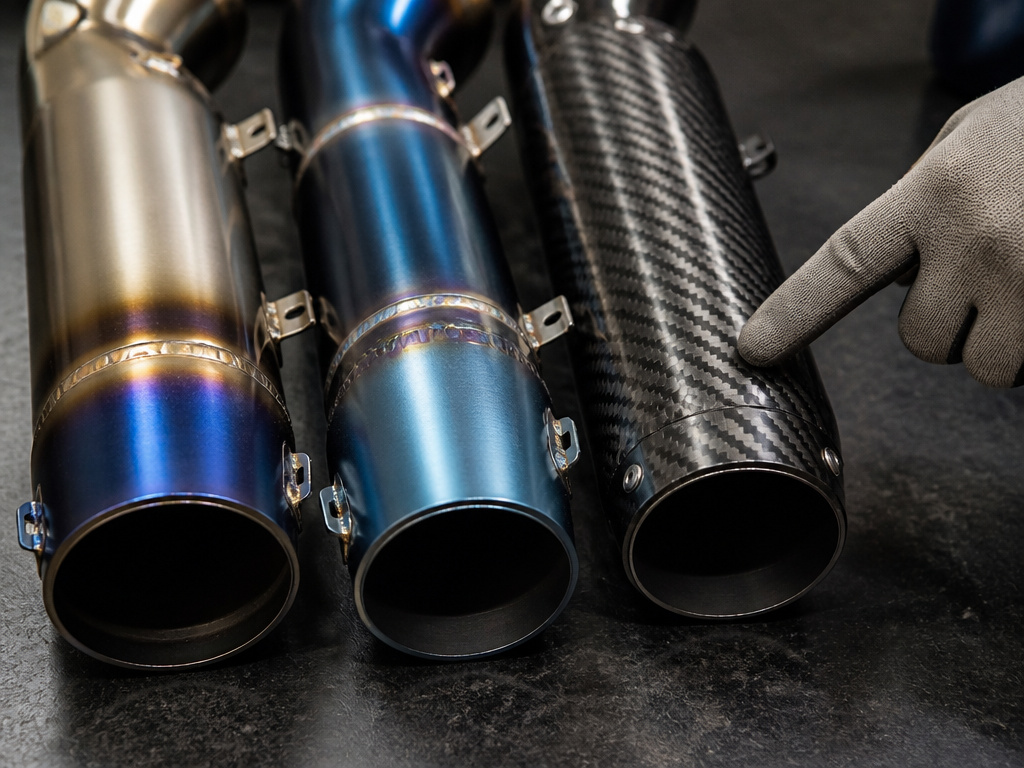
Exhaust materials aren’t just about shine. They dictate weight, heat tolerance, maintenance, and cost. The big three are stainless steel, titanium, and carbon fiber.
Stainless steel is the workhorse. It’s affordable, corrosion-resistant, and durable. It’s what you’ll find on most OEM and mid-range aftermarket systems. It can discolor (blue, gold, purple) from heat, which manufacturers like Yoshimura call normal. Maintenance is straightforward: clean with metal polish every 1-2 months to keep luster.
Titanium is the premium lightweight choice. It weighs about half as much as steel, which is unsprung weight you feel directly in handling. It also has a distinctive blue hue when heated. The catch is cost, it’s significantly more expensive.
Carbon fiber is the specialist. It’s light and looks distinctive, but it has strict limits. Yoshimura’s maintenance guide is clear: keep all chemicals and solvents away from carbon fiber. High temperatures can also break down the resin. An amber hue in the resin is an early sign of heat damage. If you see that, you’re supposed to stop using it and get it inspected. Carbon fiber isn’t for the forgetful owner.
Then there’s the ‘Works Finish’ from Yoshimura, a brushed metal look. The rule here is different: DO NOT USE POLISH. These systems are finished differently and polishing can damage the surface. For minor stains, consult the manufacturer’s guidance for appropriate cleaners.
| Material | Best For | Key Limitation |
|---|---|---|
| Stainless Steel | Most riders, balanced budget | Heavier, will heat-discolor |
| Titanium | Performance riders minimizing weight | High cost |
| Carbon Fiber | Lightweight, specific aesthetic | No chemicals; heat damage risk |
| Works Finish (Yoshimura) | Unique brushed appearance | Polishes and abrasives damage finish |
The Power vs. Noise Trade-Off (With Numbers)
You can’t have both. A peer-reviewed study on a 110cc motorcycle engine quantified this exact trade-off. Researchers changed the muffler diameter, pipe length, and filter hole size, then measured power and noise.
The results were clear and conflicting. For maximum power, the optimal setup was a 50 mm muffler diameter, 425 mm pipe length, and 2 mm filter hole. For the lowest noise, the optimal setup was a 38 mm diameter, 525 mm length, and 2 mm hole. The goals pull in opposite directions. A larger, shorter path makes power; a smaller, longer path kills sound.
The study’s proposed compromise was a 45 mm diameter, 475 mm length, and a 2 mm filter hole diameter. This is the engineering reality behind every aftermarket exhaust choice. A loud, free-flowing system can make more power, while a quiet one is optimized for noise reduction. Brands design around this spectrum, which is why off-road-only systems exist, they shed the regulatory weight of noise compliance for pure flow.
What “EPA Compliant” and “Legal for Street Use” Really Mean
Those labels on the box are legal shields. In the U.S., the Environmental Protection Agency sets noise and emissions standards for motorcycles. Both Harley-Davidson and Yoshimura state in their warranties that their systems, at the time of sale, meet these EPA Federal noise standards. They also include a tampering prohibition clause.
Federal law prohibits any modification that causes the system to exceed the noise standard. The warranty text specifically lists acts likely to constitute tampering: “removal or puncturing the muffler, baffles, header pipes, or any other component which conducts exhaust gases.” Drilling out baffles, running a straight pipe, or gutting the cat? That’s tampering. It voids the warranty and makes the bike illegal for street use.
This matters because enforcement happens. Some states conduct roadside sound checks. All states require an inspection for registration, and a visibly modified or excessively loud exhaust can be a fail. Buying a system marked “for closed-course competition only” saves money but makes your bike non-street-legal. The risk is yours.
Where this goes sideways: Assuming an aftermarket exhaust is automatically street-legal. Many racing systems are not. Running one on the street risks a fine, a failed inspection, and a voided manufacturer warranty if something else breaks.
How to Spot Exhaust Problems Before They Strand You
Exhaust issues announce themselves. You just have to know the language. Here’s a diagnostic guide based on common symptoms and their likely causes.
Symptom: Loud metallic rattling or buzzing.
- Likely Cause: Loose internal baffle or heat shield. A broken weld inside the muffler or a shield bracket that’s come loose.
- Check: Tap the muffler with a rubber mallet. A distinct rattle points to internal failure. Visually inspect all shield mounting points.
Symptom: Sooty black deposits at pipe joints or a ticking sound on deceleration.
- Likely Cause: Exhaust leak at a gasket or clamp.
- Check: With the engine cold, start it and feel around pipe connections (don’t burn yourself). A puff of gas confirms a leak. Tighten the clamp to spec first. If it persists, replace the gasket.
Symptom: Head pipes glowing dull red or orange in normal daylight.
- Likely Cause: Excessively lean air-fuel mixture. This is a serious engine tuning issue, not an exhaust problem.
- Action: Stop running the engine hard. The exhaust is just showing you the symptom. You need to check fuel delivery and likely get an ECU tune, especially after installing a full system.
Symptom: Blueish discoloration concentrated near the cylinder head.
- Likely Cause: Normal heat coloring for stainless steel and titanium. It’s a sign of high heat, not failure.
- Action: None needed. This is cosmetic.
Symptom: Amber hue in a carbon fiber muffler sleeve.
- Likely Cause: Early sign of resin breakdown from heat, per Yoshimura.
- Action: Discontinue use and contact the manufacturer for inspection. Continued use risks component failure.
The Right Tools & Tight Specs
If you’re going to touch the exhaust, you need the right tools. A basic socket set won’t cut it for proper installation or maintenance. You need a torque wrench. Exhaust hardware lives in a high-vibration environment, and precise tightness is what keeps it together.
Manufacturer service documents are full of specific torque values. These aren’t suggestions. Here are a few critical ones pulled directly from the source material:
| Component | Torque Spec | Source / Model |
|---|---|---|
| Exhaust Clamp | 10 lb-ft (13 Nm) | Yoshimura Slip-On |
| Muffler Mount Bolt | 10 lb-ft (13 Nm) | Yoshimura Slip-On |
| HO2S (O2 Sensor) in Adapter | 16–19 N·m (12–14 ft-lbs) | Harley-Davidson |
| HO2S Adapter in Head Pipe | 40.7–59.7 N·m (30–44 ft-lbs) | Harley-Davidson |
| Muffler Mounting Screws | 27–32.5 N·m (20–24 ft-lbs) | Harley-Davidson Softail |
| Exhaust Manifold Nuts | 11.3–13.6 N·m (100–120 in-lbs) | Harley-Davidson |
Why so precise? Under-torque, and vibration loosens the joint. Over-torque, and you strip threads or crush gaskets. Both lead to leaks. Using a torque wrench is the difference between a clean install an exhaust job and a callback to fix a blow-out.
Beyond the wrench, you’ll need anti-seize lubricant for sensor threads (copper-based is common), a flat gasket scraper, and sometimes an E-clip tool for footpeg retainers, as shown in Harley’s instructions. Having the factory service manual for your bike is the best prep, as these guides always reference it.
Essential Maintenance: What the Manuals Actually Say
Forget the internet hacks. Here’s what the companies that build these systems tell you to do, directly from their published guides.
For metal (stainless/titanium) systems:
- This retains luster and removes road grime. (Exception: DO NOT USE POLISH ON ‘WORKS FINISH’ SYSTEMS.)
- Wipe the system down with rubbing alcohol before long-term storage to remove contaminants.
- If you ride in coastal areas or where road salt is used, wipe the cooled exhaust down after rides to prevent rust.
- “Head pipes glowing (visible in normal light) may indicate an excessively lean condition that must be corrected.” That’s a direct quote from Yoshimura. It’s a warning, not a feature.
For carbon fiber systems:
- Keep all chemicals and solvents away. They damage the finish.
- Watch for an amber hue in the resin, a visual sign of heat damage. If seen, discontinue use and have it inspected.
- Clean only with mild, non-abrasive soap and water.
For all systems:
- Keep all clamps and bolts tight. Re-check them periodically as part of your pre-ride inspection.
- Yoshimura recommends repacking your muffler at least once per year. Worn packing leads to louder sound.
- After how to install a new system, wipe the muffler and tailpipe with rubbing alcohol to remove oil and fingerprints before the first start. Skin oils can bake into the finish.
Following these steps is about longevity. A clean exhaust pipes routine prevents corrosive buildup, and proper torquing prevents catastrophic failure. The exhaust bluing is often permanent, but keeping the metal clean underneath it is what matters.
How hard is it to install a motorcycle exhaust?
Installation requires attention to detail and proper tools. The most critical step is using a torque wrench to tighten all fasteners to the manufacturer’s specified values to prevent leaks or damage. For example, exhaust clamp and muffler mount bolts on a slip-on system have specific torque settings, as do muffler bracket screws, manifold nuts, and sensor fittings on larger systems. Before starting the engine for the first time, wipe down the muffler and tailpipe with rubbing alcohol to remove any oil or fingerprints. Be aware that federal law prohibits any modification to the exhaust system that causes the motorcycle to exceed federal noise standards, and such acts void the manufacturer’s warranty.
Frequently Asked Questions
Why is a 2 into 1 exhaust better?
2-into-1 exhaust can be better for low-end and mid-range torque due to improved scavenging efficiency. The merging of exhaust pulses from both cylinders creates a vacuum effect that helps pull gases out of the engine. This often results in a broader, more usable powerband compared to dual exhausts, especially on large V-twin engines. It also saves weight and simplifies the system with one muffler.
What is the best sounding exhaust for a motorcycle?
The “best” sound is subjective, but it’s dictated by engine configuration, pipe design, and muffler internals. Large twins with a 2-into-1 system often produce a deep, throaty rumble. Inline-four cylinder engines with a 4-into-1 system have a higher-pitched, sharper wail. The sound also depends on whether baffles are present. For a deeper tone, look for systems with larger diameter piping and less internal restriction. Your personal taste and local noise ordinances are the final judges. Consulting a guide to the best motorcycle exhausts with sound clips can help.
Why is straight piping illegal?
Straight piping, removing the muffler and baffles, is illegal because it almost always causes the motorcycle to exceed federal and local noise emission standards. It’s also considered tampering, which voids the manufacturer’s warranty and violates the Clean Air Act if a catalytic converter is removed. The “loud pipes save lives” debate is separate from the legal reality: excessive noise can result in fines and failed vehicle inspections.
Do I need to tune my bike after installing an exhaust?
For a slip-on system that retains the stock headers and catalytic converter, a tune is usually not required. For a full exhaust system that replaces the headers and cat, a tune is highly recommended and often mandatory. The increased airflow changes the air-fuel mixture, potentially causing the engine to run lean (too much air, not enough fuel), which can lead to overheating, poor performance, and engine damage. An ECU remap or fuel controller corrects this.
How do I know if my exhaust is leaking?
Signs of an exhaust leak include a ticking or popping sound that increases with engine RPM, sooty black carbon deposits around pipe joints or gaskets, a smell of exhaust fumes, and sometimes a slight loss of low-end power. A visual inspection for black soot at connections is the easiest check. A proper fix involves cooling the system, disassembling the joint, cleaning the surfaces, replacing the gasket if needed, and reassembling with the correct torque.
The Bottom Line
An exhaust system is more than a noise maker or a shiny accessory. It’s a tuned component that balances legal noise limits, engine performance, and material science. The choice between a slip-on and a full system, a central part of the motorcycle exhaust system explained, boils down to your goals: sound and looks, or maximum performance with required tuning.
Before you buy, read the manufacturer’s documentation. Does the system carry an EPA compliance statement? What are the specific care rules for its material? The best motorcycle exhaust for you is the one that fits your bike, your goals, and the law.
And if you take away one thing, let it be this: Use a torque wrench. The difference between a lasting upgrade and a roadside headache is often 10 foot-pounds. The specs are published for a reason. Trust them, not your gut feeling for “tight enough.” That’s how you install a system that lasts for years, not just a season.
