
How to Stay Visible on a Motorcycle at Night: Step-by-Step
This post contains affiliate links. As an Amazon Associate, we earn from qualifying purchases.
To stay visible on a motorcycle at night, your headlight must be on and properly aimed, you need high-contrast gear with reflective elements, and you must ride with lane positioning that keeps you out of a car’s blind spots. The Indian Motorcycle owner’s manual states riders “must remain as visible as possible at all times” and warns against modifying automatic headlight wiring. Upgrading to brighter LED lights or adding auxiliary lamps helps, but a bright or reflective helmet and jacket create a larger, more recognizable silhouette that drivers see first.
That “visible as possible” line from the manual is the whole game. It’s not a suggestion; it’s the manufacturer’s legal framing of your single biggest survival task after control. Your headlight is a tool, not a magic shield. It has to hit the road in the right place, and you have to wear something that catches its light or provides its own contrast against the dark. This is the core of how to stay visible on a motorcycle at night.
What follows is the operator’s checklist for how to stay visible on a motorcycle at night: the OEM-spec way to aim your light, the gear choices that actually get seen from a side mirror, and the riding moves that put you in the slice of roadway where a tired driver’s eyes might actually land. This isn’t about looking like a traffic cone. It’s about not being a surprise.
Key Takeaways
- Aim your headlight using the OEM procedure; a beam pointed at the ground 10 feet in front of you does nothing for distance vision or being seen.
- A bright or reflective helmet is your best single gear upgrade for night visibility, it’s the highest point on your body and the first thing a driver’s eyes track.
- Wear gear with contrast, not just color. A solid black jacket disappears; a jacket with lighter-colored panels or reflective stripes creates a human-shaped outline.
- Your headlight must be on by design. The Indian manual explicitly warns: “Do not modify the ignition/headlight wiring to circumvent the automatic headlight feature.”
- Add amber or white LED auxiliary lights for peripheral conspicuity, but ensure your bike’s charging system can handle the load without blowing a fuse mid-ride.
The Foundation: How Your Headlight Actually Works
It turns on automatically. For many modern bikes like Indians, the headlight is designed to come on with the engine, though some systems allow an override to operate them with the engine not running. The system is designed that way for a reason. The manual is blunt: modifying that wiring to install a manual switch is a warned-against move. The logic is simple, a rider who forgets to flip the switch is invisible.
But “on” isn’t enough. The beam has to go somewhere useful.
A headlamp with more than ½ of its LED light sources not functioning is a Major defect for the UK MOT. A reflector damaged on more than 50% of its surface is also a Major defect. This isn’t a minor ding; it’s a test failure that says your visibility is compromised.
Check your lights before every night ride. That means walking around the bike, not just tapping the switch from the saddle. Look for dead LEDs in clusters, cracks over the reflector, and a lens clouded by grime. A dirty lens can significantly reduce light output. The fix is a microfiber cloth and plastic cleaner, not a gas-station squeegee.
The 7.6-Meter Wall Test: How to Aim Your Headlight
This is the step every “visibility tips” article mentions and none provide. Here is the Harley-Davidson service procedure, verbatim. You need a tape measure, some painter’s tape, a flat wall, and a level surface.
1. Park the motorcycle on a line perpendicular to the wall.
2. Set the vehicle distance from the wall to the front axle at 7.6 m (25 ft).
3. Draw a vertical centerline on the wall aligned with that line.
4. Measure from the floor to the center of the headlamp.
5. Draw a horizontal line through the vertical line at that exact same height.
6. Align the top of the low-beam “hot spot” to that horizontal line.
The “hot spot” is the brightest, most focused part of the beam pattern. On low beam, you want the sharp cutoff line sitting on that horizontal tape line. If the beam is a foot above the line, you’re blinding oncoming traffic. If it’s a foot below, you’re lighting up your own front tire.
Where this goes sideways: Measuring from the headlight lens instead of its actual bulb center. On a Harley-Davidson Sport Glide (FLSB) or Street Glide (FLSL), the service manual notes horizontal alignment is not adjustable, you only tweak vertical. If your beam is pointing left or right, the housing might be misaligned from an impact.
| Step | Key Measurement | What Happens If It’s Wrong |
|---|---|---|
| 1. Distance | 7.6 m (25 ft) from axle to wall | Distance too short exaggerates aim error; too long makes the beam pattern too faint to see. |
| 2. Height | Floor to headlamp center | Beam aims too high (dazzles others) or too low (sees only 20 ft ahead). |
| 3. Alignment | Top of low-beam hotspot on horizontal line | Oncoming drivers flash their high beams at you constantly, or you can’t see road hazards in time to react. |
This is a job that can be done with a helper. Do it after any front-end work. Your night riding safety depends on it.
Your Night-Riding Gear Checklist
Forget “wear reflective.” That’s commodity advice. The question is what kind of reflective, and where.
My stance is simple: a high-visibility jacket or vest increases conspicuity more than extra lights. Riders who dismiss it as ugly are trading aesthetics for a measurable safety margin. The goal is contrast. A solid black jacket disappears into the night. A jacket with silver or white panels, or better yet, integrated reflective strips, creates a human-shaped outline.
Here’s the short list, in priority order:
- Helmet. White, silver, or bright yellow. If your helmet is dark, add retro-reflective tape to the back and sides. This is the single most effective gear move.
- Jacket or Vest. A dedicated hi-vis vest over your gear is good. A jacket with built-in reflective material (like Klim or Alpinestars offerings) is better, it’s always there.
- Gloves. Look for tabs or piping on the knuckles or cuff. A driver’s hand signal is more visible when their glove catches light.
- Boots/Ankles. Reflective ankle straps or boots with side panels. That’s moving light at a driver’s eye level.
Common mistake: Wearing all-black gear and assuming the headlight is enough. From a car’s side mirror at an intersection, your single headlight can look like a car farther away. A reflective helmet and shoulders shout “motorcycle right here.”
Brands I reach for here are Klim, Alpinestars, and Oxford for their dedicated reflective motorcycle gear. The material matters. Cheap vinyl reflective strips peel. Look for retro-reflective fabric that’s woven in or applied as a bonded laminate. It lasts through washes.
Lighting Upgrades: Halogen vs. LED vs. Adding More
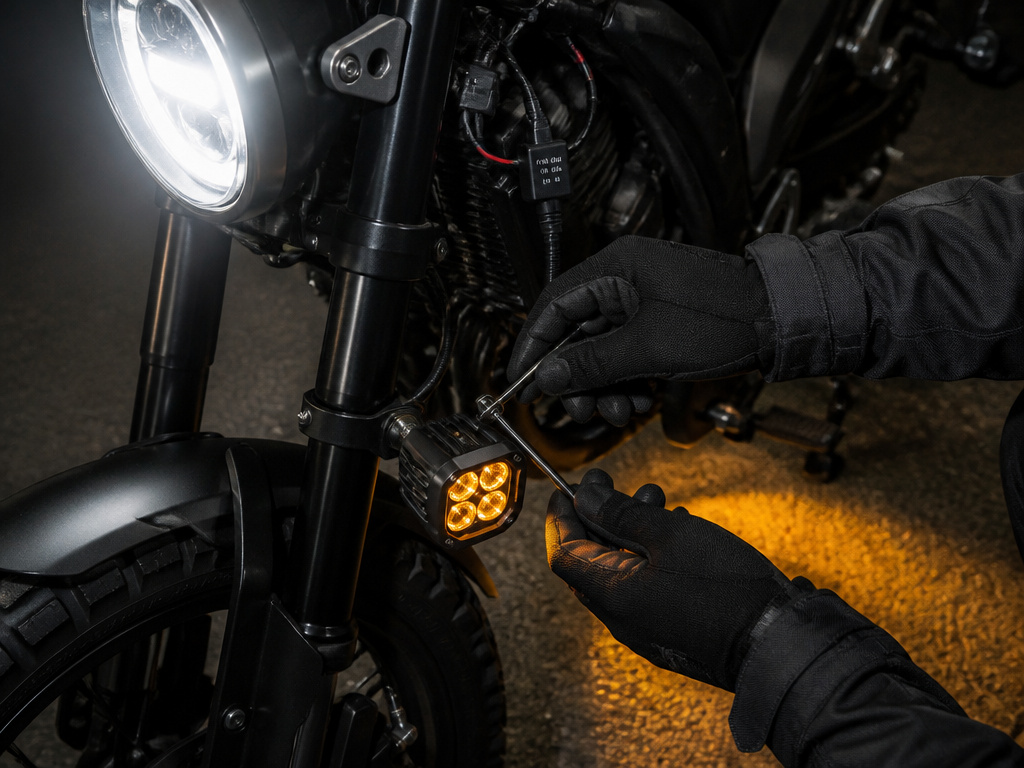
Your stock headlight is designed to meet a minimum legal standard. More light is almost always better, but the path matters.
| Upgrade Path | Best For | The Catch |
|---|---|---|
| Brighter Halogen Bulb | Quick, cheap improvement on older bikes. | Higher wattage can overload wiring or melt housings. Stick to the manufacturer’s specified maximum wattage. |
| LED Replacement Bulb | Much brighter, whiter light; longer life. | Must be CANbus-compatible to avoid error codes. Beam pattern may scatter in reflector housings. |
| LED Auxiliary Lights | Adding wide peripheral light or a long-distance spot. | Requires proper mounting, wiring, and switch. Don’t exceed your bike’s electrical system’s capacity. |
The FMVSS 108 standard allows for headlight modulation, a pulsing beam at 240 ±40 cycles per minute, but it must cut off in well-lit areas (below 270 lux). These modulators work, but regulations require them to deactivate under certain light conditions. I find a set of amber LED auxiliary lights mounted low on the forks to be more effective. They create a unique, wide triangle of light that screams “motorcycle” without the strobe effect.
If you add lights, ensure they are properly wired and fused. For a deep dive on options, see our guide to the best motorcycle auxiliary lights.
Riding Tactics: Lane Position and Driver Psychology
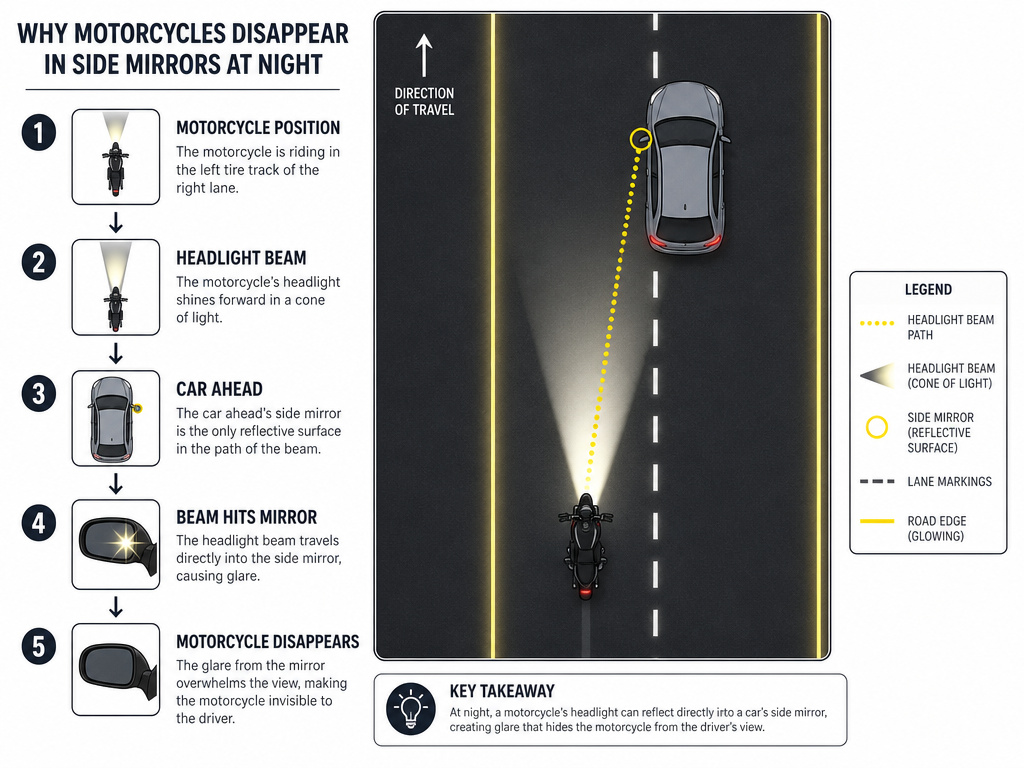
Your gear and lights set the stage. Your riding position directs the play. The principle is to place yourself where a driver is most likely to see you in their existing field of view.
- At Intersections: Don’t hug the curb. Position yourself in the left portion of the lane (in countries where you drive on the right). This puts you closer to the oncoming left-turning driver’s natural sightline.
- On Highways/Multi-Lane: Ride in the left tire track of your lane. This keeps you out of the center oil strip and makes you visible in the lead car’s side mirror. Adjust slightly right or left to ensure your headlight isn’t hidden in the glare of the car ahead.
- When Being Passed: Don’t swerve, just a gentle shift.
These tactics for how to stay visible on a motorcycle at night are part of a broader night riding skill set that includes managing glare and increased following distance. Your visor is critical here; you must have a clean, anti-fog coated visor. Consider clear riding glasses if your helmet lacks a pinlock.
The Legal Lines: What the Standards Say
Your modifications have limits. The UK MOT manual provides fail thresholds: over half your LED array dead, or a reflector 50% damaged. Direction indicators must flash between 60 and 120 times per minute, too fast or slow is a failure.
In the US, FMVSS 108 references SAE Standard J584 Motorcycle Headlamps April 1964. For motorcycles made on or after September 1, 2000, that standard with the photometric specifications of Figure 32 is mandatory. A turn signal lamp need only meet one-half of the minimum photometric values specified for cars. This is why motorcycle turn signals can seem weaker.
Internationally, standards like the GB 18100-1 motorcycle lighting standard define test zones. For instance, it specifies checking that a red tail light isn’t visible from the front within a zone 25 meters away, between 1 and 2.2 meters high. These aren’t abstract rules; they’re the engineering basis for how your bike was certified. Stray too far in a modification, and you might violate the very official lighting installation standard that makes your bike road-legal.
How to use your brake light to get noticed
Your brake light is a primary communication tool. Use it deliberately to signal your presence and intentions to drivers behind you. A gentle, repeated tap on the brake lever can flash the light. This is useful when slowing for a potential hazard ahead or when you sense a following vehicle may not be fully aware of you.
What makes riding at night more dangerous
Night riding introduces a distinct set of hazards that demand heightened awareness. Reduced visibility makes it harder to see and be seen, compounding the risk from impaired or fatigued drivers whose reaction times are slowed. The glare from oncoming headlights can temporarily blind you, and your own headlight’s reach is limited, making animals or road debris harder to spot in time.
Frequently Asked Questions
How can I increase my motorcycle visibility at night without buying new gear?
Start with a thorough headlight aim using an appropriate method. Clean your lens, lights, and reflectors. Add inexpensive reflective tape to your helmet sides and the back of your jacket. Finally, consciously practice lane positioning that maximizes your placement in car mirrors.
Is it illegal to have a headlight modulator?
In the US, FMVSS 108 permits them if they meet specific requirements including a pulse rate of 240 ±40 cycles per minute and deactivation in well-lit conditions (below 270 lux). However, state laws vary, and some drivers find them aggressively annoying, which can create its own risk.
What is the most important piece of gear for night visibility?
Your helmet. It’s the highest point, and it’s where other drivers’ eyes are drawn. A white or bright-colored helmet is best. If yours is dark, applying high-quality retro-reflective tape to the back and sides is the most impactful, low-cost upgrade you can make.
Can I install brighter bulbs in my stock headlight housing?
Yes, but with caution. Check your owner’s manual for the maximum wattage. Exceeding it can melt wiring or the housing itself.
Do those light-up vests actually work?
Yes, LED motorcycle vests are highly effective at getting attention because they are novel and create a large, human-shaped light source. For consistent protection, built-in reflective material is more reliable.
The Bottom Line
Visibility isn’t a single feature you buy. It’s a system you maintain and operate. Start with a correctly aimed headlight, that’s a free fix. Then build a gear layer that creates contrast, with your helmet as the priority. Finally, ride with the assumption that no one sees you, and position your bike to force your way into their field of view.
The manufacturer’s warning against modifying your headlight wiring is there because human memory is faulty. Your best visibility tips are the ones that are always on, always working, and built into your routine. Fit your reflective vest. Check your beam against the garage door. Then go ride.
