
Parts of a Motorcycle Explained: How Systems Work Together
This post contains affiliate links. As an Amazon Associate, we earn from qualifying purchases.
Parts of a motorcycle explained by walking around the bike and tracing the force from your right wrist to the tire on the pavement, throttle cable, throttle body, crankshaft, gearbox, chain, rear tire. You remember each piece because you touch it, and you learn why it matters because you follow the path it pushes power down.
That walkaround method beats any diagram. It turns the parts of a motorcycle explained list of names into a map of a working machine. You stop calling the swingarm pivot “the back thing” and start seeing where the force goes when you twist the grip.
What follows is that walkaround, mapped onto the standard parts of a motorcycle explained list every guide covers. You get the names, but you also get the job each part has in getting you down the road. By the end, you will know what to check before a ride and why a loose chain matters more than memorizing engine internals.
Key Takeaways
- Teach bike anatomy with a walkaround, tracing force from the throttle grip to the rear tire, it sticks because you touch each part.
- The steering head bearings are underrated; a notch or grind in the steering feel means they are worn and the front end is vague.
- New riders should learn the clutch safety interlock and sidestand switch location before engine specs; these little parts stop the bike from starting.
- Pre-operation checks each time you ride are not a suggestion; Yamaha’s manual states they are required for safe operation.
- Understand tire pressure adjustments are not static; Harley-Davidson’s manual adds up to 9 psi if the bike is warm and the day is hot.
The Walkaround Force Path
Start at the right grip. Twist it. That motion pulls a cable or triggers a sensor. That is your first part: the throttle control. It is a simple mechanical link or an electronic signal. Follow it down to where the air goes in, the throttle body. This is where fuel meets air for the burn.
The burn happens in the engine. For now, just know it turns fuel into spinning force. That force leaves the engine via the crankshaft and enters the transmission. Your left foot works the gear shifter to pick a ratio inside that gearbox.
The spinning force exits the transmission at the countershaft sprocket. A drive chain (or belt or shaft) carries that spin to the rear wheel sprocket, which is bolted to the rear wheel. The tire deforms against the pavement and you move.
That is the core path. Every other part on the bike either supports this path, controls it, or stops it. Learning this first means every other component has a clear job.
A walkaround tracing this force path, throttle cable, throttle body, crank, gearbox, chain, rear tire, is an effective way to teach motorcycle anatomy. New riders remember the swingarm pivot and countershaft sprocket because they touched them following the power, not just named them from a diagram.
The Chassis: The Frame That Holds the Path
The frame is the skeleton. It holds the engine, supports the suspension, and gives you something to hold onto. There are different motorcycle frame types, from steel twin-spar on sportbikes to tubular cradle designs on cruisers. The frame connects to the swingarm at the swingarm pivot, a large bolt or bearing assembly at the frame’s rear that allows the rear wheel to move up and down.
Up front, the steering head is the bearing assembly in the frame where the front forks pivot. This is the steering head bearing. When these wear out, the steering feels notchy or grinds slightly at the straight-ahead position. It is an underrated wear item that makes the front end feel vague and disconnected.
The suspension, with forks in front and a shock in the rear, allows the wheels to move independently of the frame to absorb bumps. They are just springs and dampers. But their condition dictates how well the tire stays planted. A leaking fork seal or a shock that does not rebound means the contact patch, the part of the tire actually touching the road, is unstable.
The Contact Patch & Suspension
The wheels and tires are where everything ends up. All the engine’s power and all your braking force get delivered through two palm-sized patches of rubber. Tire pressure is not a set-and-forget number. According to Harley-Davidson’s service manual, you must adjust for temperature and whether the motorcycle has been recently ridden or has sat for 2 hours or more.
| Ambient Air Temperature | Bike Cold (2+ hours) | Add This PSI | Bike Recently Ridden | Add This PSI |
|---|---|---|---|---|
| 68°F (20°C) or less | 0 psi | 5 psi (34 kPa) | ||
| 79°F (26°C) | 1 psi (7 kPa) | 6 psi (41 kPa) | ||
| 88°F (31°C) | 2 psi (14 kPa) | 7 psi (48 kPa) | ||
| 99°F (37°C) | 3 psi (21 kPa) | 8 psi (55 kPa) | ||
| 108°F (42°C) or higher | 4 psi (28 kPa) | 9 psi (62 kPa) |
The braking system exists to control the energy at the contact patch. You have a front brake and a rear brake, usually controlled by separate levers. They work by squeezing a brake caliper onto a brake rotor (disc) attached to the wheel. The difference in front vs rear brake performance is massive, the front does the majority of the stopping work because weight shifts forward during deceleration.
The Controls: Your Interface
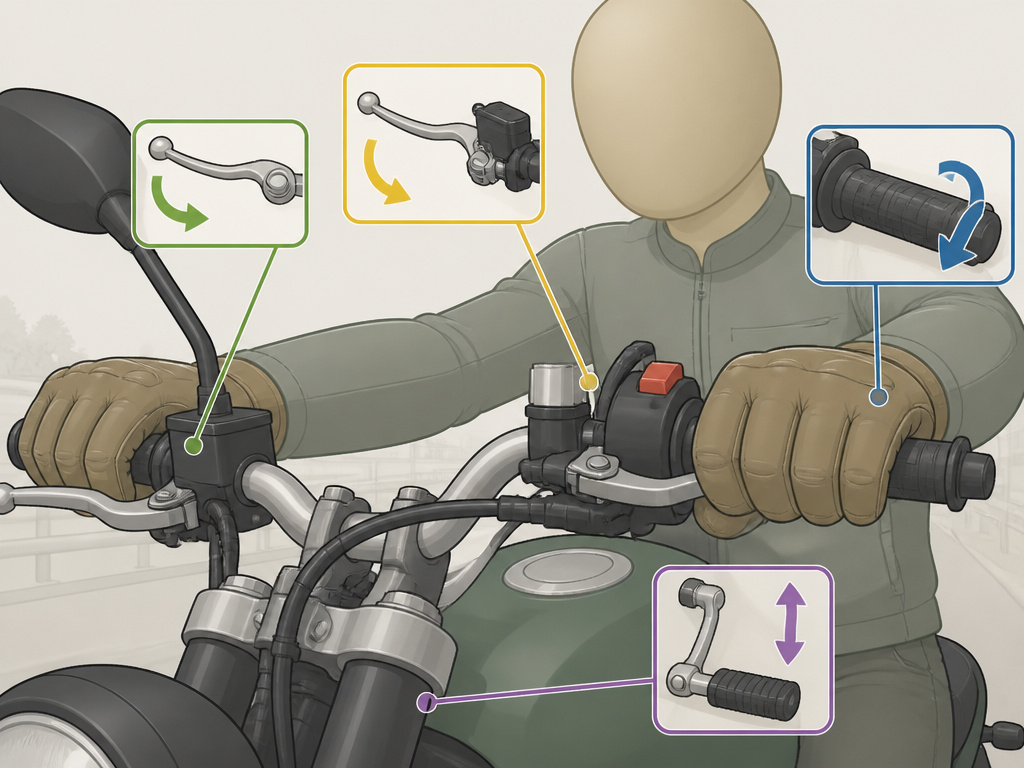
This is where you actually operate the machine. The handlebars hold the primary controls: throttle, front brake lever, clutch lever, and switches for lights, horn, and turn signals. Learning the motorcycle controls layout is a new rider’s first practical task.
On the left grip, the clutch lever operates the clutch, which disconnects the engine from the transmission so you can stop or change gears. Using the motorcycle clutch is a fundamental skill; it is a friction zone, not an on-off switch.
Your left foot works the gear shifter to select neutral, first, second, and so on. Shifting gears on a motorcycle involves a coordinated clutch-and-throttle dance. Your right foot operates the rear brake pedal.
Where this goes sideways: Ignoring the clutch safety interlock or sidestand switch. These small parts prevent the bike from starting if the clutch isn’t pulled in or the sidestand is down. They fail as dirty switches, leaving you stranded with a bike that cranks but won’t start, usually in a parking lot.
Other critical controls are the kill switch (emergency engine cut-off) and the fuel petcock (on older bikes), which must be turned on after storage. Modern bikes have an ABS module that prevents wheel lock-up, but it is just another part in the brake hydraulic line.
The Engine & Drivetrain: Making and Delivering Power
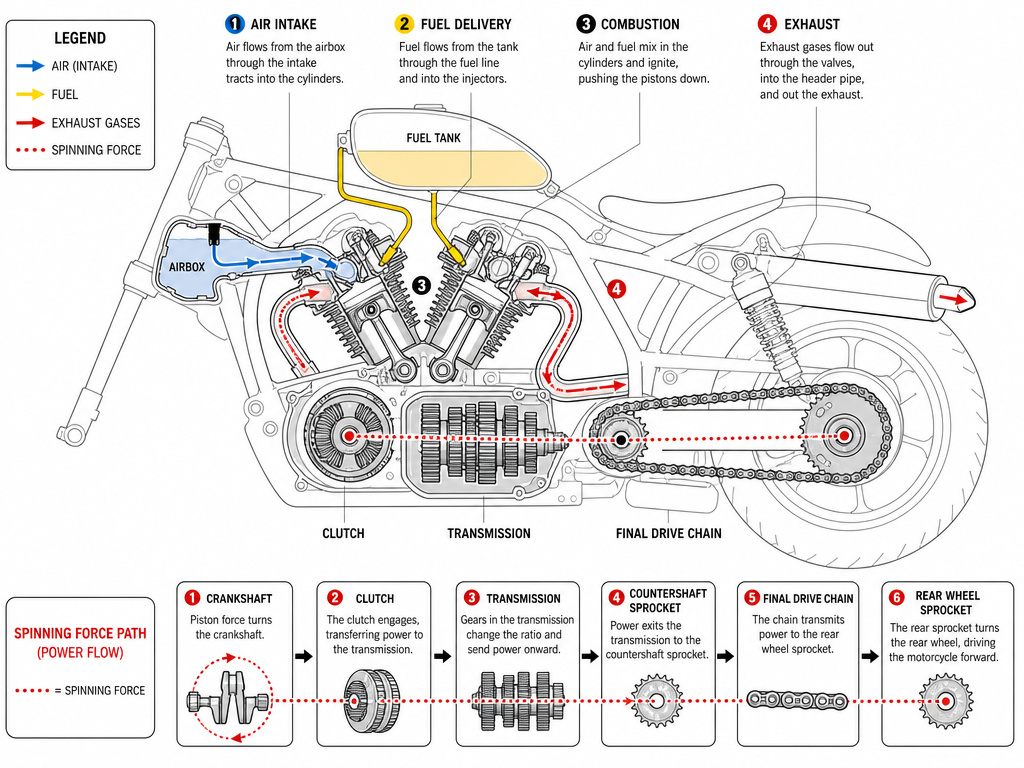
The engine is the pump. It sucks in air and fuel, compresses it, ignites it, and uses the explosion to spin a crank. There are different types of motorcycle engines, singles, parallel twins, V-twins, inline-fours. The specifics matter less for anatomy than understanding its inputs and outputs.
Inputs are air (via the airbox), fuel (from the fuel tank via a pump or carbs), and spark (from the ignition system). Outputs are heat, exhaust gas, and spinning force.
The exhaust system carries away the hot, spent gas. It includes headers, a catalytic converter (on modern bikes), and a muffler. A well-designed motorcycle exhaust also helps with engine performance by managing backpressure.
The spinning force goes through the clutch (which you control), into the transmission (which you select with the shifter), out the countershaft sprocket, and along the final drive. This is usually a chain and sprocket system, but can be a belt or a driveshaft. A loose chain can damage the swingarm and, if severe enough, may jump off the sprocket.
Electrical & Ancillary Systems
The battery provides power to start the bike and run lights when the engine is off. According to Indian Motorcycle’s manual, a healthy, fully charged battery should read 12.8-13.2 volts. If it drops to 12.3-12.6 volts (50%-75% charge), it needs a 4-6 hour charge. For storage longer than two weeks, Indian recommends maintaining the battery with a Battery Minder 2012-AGM charger (PN2830438).
The lighting system includes the headlight, taillight, brake light, turn signals, and instrument panel lights. Yamaha emphasizes wearing a brightly colored jacket and using extra caution at intersections because being seen is a rider’s primary defense.
The dashboard or instrument cluster gives you data: speed, RPM, fuel level, gear position, and warning lights for oil pressure, engine temperature, or ABS status.
Basic Maintenance Checks Linked to Parts
You do not need to be a mechanic to spot trouble. Link your pre-ride check to the parts you now know.
- Tires & Wheels: Look for cuts, embedded objects, and wear bars. Check pressure using the temperature-adjusted table. Spin the wheels and look for wobbles or dents.
- Brakes: Squeeze the levers and press the pedal. They should feel firm, not mushy or travel to the grip. Look at the brake fluid reservoir; the fluid level should be within the specified range.
- Chain (or belt): It should have the proper amount of up-and-down play as specified in your owner’s manual. Look for rust, stiff links, or a glazed, dry appearance.
- Lights & Signals: Turn the key on. Test headlight (high and low), taillight, brake light (front lever and rear pedal), and all turn signals. A quick walkaround confirms they work.
- Fluids: Check engine oil level (on center stand or level ground), coolant level (see-through reservoir), and brake fluid levels.
- Steering: With the bike off the stand, turn the handlebars lock-to-lock. The movement should be smooth with no notchiness or grinding at the straight-ahead position, that is the steering head bearing check.
Common mistake: Performing pre-ride checks statically without thinking about function. You are not just looking at a tire; you are checking the contact patch that transmits all force. You are not just looking at a chain; you are checking the final link in the power path from your wrist.
Manufacturers have specific schedules. Indian Motorcycle sets the first engine break-in service at 500 miles (800 km). Harley-Davidson specifies spoke tension checks at 1,000 mi, 5,000 mi, 20,000 mi, and every 15,000 mi thereafter. These are in the manual for a reason, they are the intervals where wear shows up.
Motorcycle Dashboard and Instruments
Frequently Asked Questions
What are the basic parts of a motorcycle?
The basic parts are the frame (chassis), engine, fuel system, exhaust system, transmission, final drive (chain/belt), suspension (forks/shock), wheels & tires, braking system, controls (handlebars, levers, footpegs), electrical system (battery, lights, instruments), and the rider’s seat. They all exist to either create power, deliver it to the ground, control the bike, or keep the rider informed and safe.
What is the most important part for a new rider to understand?
The controls, specifically the clutch, throttle, and front brake, and the contact patches of the tires. You must know how to operate the machine and understand that all control happens through two small patches of rubber. Engine specs are irrelevant if you cannot smoothly coordinate the clutch and throttle or if your tires are underinflated.
How often should I check my motorcycle before riding?
Yamaha’s owner manual is explicit: perform pre-operation checks each time you use the vehicle. This is not a weekly or monthly suggestion. A quick walkaround covering tires, brakes, lights, and chain can reveal a problem before it leaves you stranded or causes a crash.
What does “lugging the engine” mean?
Lugging is running the engine at extremely low RPM in a high gear. Indian Motorcycle’s break-in procedure warns to avoid it. It strains the engine because each combustion stroke has to fight high resistance without sufficient momentum. It feels like the engine is chugging or vibrating excessively. Downshift to bring the RPM up.
Can I do my own maintenance without voiding the warranty?
It depends on the manufacturer and your location. Harley-Davidson states that using non-approved parts or procedures may void the limited warranty. In some countries, like Brazil, all regular maintenance may need to be performed by an authorized dealer for the warranty to remain in effect. Always check your specific warranty booklet and local regulations.
The Bottom Line
Do not memorize an exploded diagram. Walk around your bike and trace the force. Start at the throttle grip, follow the cable, find the throttle body, put your hand on the engine, follow the chain to the rear tire. That twenty-minute exercise teaches you more than an hour of reading. It turns “parts of a motorcycle” from a trivia list into a functional map.
Before you study engine types or suspension tuning, master the walkaround and the pre-ride check list. Know what a loose chain sounds like, what a soft brake lever means, and how a notchy steering head feels. Those are the failures that happen first. The rest is what you learn after the bike is already working as it should.
