
Motorcycle Jacket Layering Guide: The 3-Layer System
This post contains affiliate links. As an Amazon Associate, we earn from qualifying purchases.
Motorcycle jacket layering requires a three-layer system: a moisture-wicking base layer next to your skin, an insulating mid layer for warmth, and your protective jacket as the wind- and abrasion-resistant outer shell. This system allows you to adjust insulation as conditions change, outperforming any single heavy jacket. The outer shell’s fit is critical, too tight and layers bind; too loose and armor floats. For most riders, a roomy fit that accommodates layers without restricting movement is the target.
Aerostich’s Darien jacket manual states the outer shell should fit like a “roomy mountain parka,” which contradicts the common retail advice to buy a snug, fitted jacket for safety. The difference isn’t about preference; it’s about whether your armor stays over your joints when you add a fleece or heated vest underneath, a key principle in any motorcycle jacket layering guide.
What follows: the mechanics of each layer, the one fit rule that decides everything, and specific adaptations for scorching heat and deep cold that most motorcycle jacket layering guides gloss over. By the end, you’ll know how to pack your saddlebags for a three-season tour without guessing.
Key Takeaways
- Buy your jacket one size larger than your street-wear size to accommodate layers, a size 40 jacket should fit over a size 40 suit, per Aerostich’s sizing guide.
- Skip cotton entirely for your base layer; it holds moisture against your skin, accelerating heat loss in the cold and causing chafing in the heat.
- Heated gear acts as your mid layer; it must fit snugly against your base layer, with your windproof outer shell sealing tightly over it to trap the warmth.
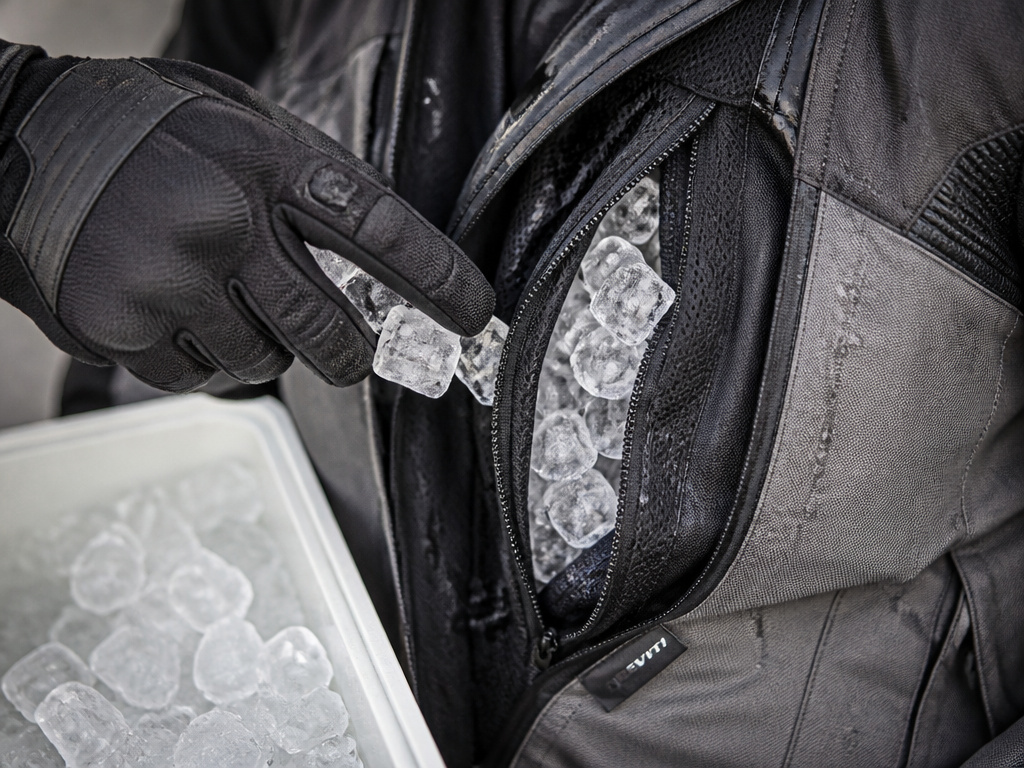
- In extreme heat (80°–100°F), wet your shirt for evaporative cooling or pack your jacket pockets with crushed ice, which can provide cooling for 45 minutes to 1.5 hours.
- Remove armor in extreme cold if jacket stiffness becomes unacceptable, as the Aerostich manual advises, to make room for thicker insulating layers.
The 3-Layer System Explained
The system works because each layer has one job, a principle central to any motorcycle jacket layering guide. Get those jobs right, and you can ride from a 40°F morning to a 75°F afternoon by shedding a layer at a gas stop. Get them wrong, and you’re either sweating in a sauna or shivering on the highway.
The base layer manages moisture. It sits directly against your skin and must move sweat away into the next layer. Synthetic fabrics like polyester or natural merino wool do this. Cotton fails, it absorbs sweat like a sponge and holds it against you, making you cold when it’s chilly and soggy when it’s hot. A proper motorcycle base layer is non-negotiable.
The mid layer insulates. This is your warmth, stored in trapped air. Fleece, lightweight down, or synthetic insulation like Primaloft work here. This layer is also where you slot a heated vest or liner. The key is loft, the material’s ability to trap air, not just thickness.
The outer shell provides abrasion and impact protection. It is not an insulating layer. Its job is to block wind, shed rain, and hold your armor in place over your shoulders, elbows, and back. A jacket’s EN 17092 certification (Class A, AA, AAA) tells you how well its materials resist abrasion in a standardized test.
Your jacket is the fixed element. The art of layering is varying the base and mid layers beneath it to match the day’s ride.
Jacket Fit: The One Rule That Decides Everything
If your jacket is too tight, adding a mid layer will compress the insulation, making it useless. It will also pull armor away from your elbows and shoulders. If your jacket is too loose, the armor will float around, offering minimal impact protection in a crash.
Aerostich provides the clearest rule in its Darien jacket owner’s guide: sizes correspond to men’s chest measurement, and “a size 40 Darien will fit over a size 40 men’s suit.” They strongly recommend a “looser fit” where “the outer shell should fit like a roomy mountain parka.” This is for a reason, to “accommodate layering in colder conditions.”
This conflicts with the common advice to buy a fitted, snug jacket. The snug-fit camp argues it keeps armor in place. The roomy-fit camp, backed by the manufacturer’s manual, argues you can always snug a jacket down with adjustment straps, but you can’t add space that isn’t there.
| Fit Philosophy | Primary Goal | Risk If Wrong |
|---|---|---|
| Snug / Fitted | Armor stays put over joints with minimal layers. | Adding a mid layer compresses insulation, restricts movement, and can displace armor. |
| Roomy / Parka (Aerostich) | Guarantees space for layers and full range of motion. | Armor may shift if not properly secured with internal straps; requires more adjustment. |
Your body position matters. Jackets are cut for a seated, slightly-forward-leaning riding position. When you stand up straight in a showroom, a perfectly fitted jacket will feel tight across the shoulders and back when you mount the bike. Always check fit in a riding stance.
For a deep dive on this, see our guide to motorcycle jacket fit. The short version: simulate riding. If you can’t freely move your arms and torso with a mid layer on, the jacket is too small.
Layering for Cold & Winter Riding
Cold isn’t just about temperature; it’s about wind chill stealing warmth faster than your body can make it. A good cold weather layering system blocks wind first, then adds insulation.
Start with a merino wool or synthetic base layer. Merino is superior for long days because it regulates temperature and resists odor. Next, add your insulating mid layer. A grid-fleece jacket is a versatile choice. For severe cold, this is where you integrate heated gear.
Where this goes sideways: Putting a heated vest over a bulky sweater. The heated layer should be your primary mid layer, worn snugly over your base layer. Your outer jacket must then seal over it. If there’s a gap, the heat escapes into the air instead of warming you.
The Dainese Esplora Layer is a specialized thermal mid layer designed for this job. It uses 120g of Thermore® wadding over the body and 100g on the sleeves. It’s meant to be worn under a modular jacket on long, cold trips. This is the “buy once” version of the DIY fleece layer.
For your outer shell, close all vents. Ensure wrist cuffs, the waist, and the neck seal tightly. Any gap is a highway for cold air. If you’re using a four-season jacket with a removable thermal liner, that liner typically acts as your mid layer. In that case, you might only need a base layer beneath it.
One edge case from the Aerostich manual: “You may notice stiffness in the jacket during colder weather; if unacceptable, consider removing the pads to provide more room for insulating clothing.” It’s a last-resort move, but it acknowledges that extreme cold can make a layered jacket too rigid to ride in safely.
Layering for Extreme Heat & Humidity
Most layering guides stop at “wear a moisture-wicking base layer and open the vents.” That’s not enough for a highway ride at 95°F and 90% humidity. The physics change: your jacket’s breathable membrane needs a temperature and humidity difference between inside and outside to work.
The Aerostich Darien manual spells out the limit: “For TLTex® fabric to work best, the climate outside of the jacket must be slightly less hot and humid than the micro-climate that exists between your skin and the inside of the jacket. In other words, at +98°F and 100% humidity, you might be miserable.“
When you hit that wall, you have two proven countermeasures from the same manual:
- Wet your shirt for evaporative cooling in very hot conditions (80°–100°F).
- Packing the jacket pockets with crushed ice can provide cooling for between forty-five minutes and an hour and a half.
These aren’t gimmicks. They’re documented last-ditch efforts to keep riding when the atmosphere won’t cooperate. Your base layer should be the lightest, most breathable synthetic you own. Your “mid layer” in this case is often just a wet shirt or a cooling vest. The outer shell should be a highly ventilated mesh or perforated leather jacket. The goal is maximum airflow, not insulation.
Integrating Heated Gear Into Your Layers
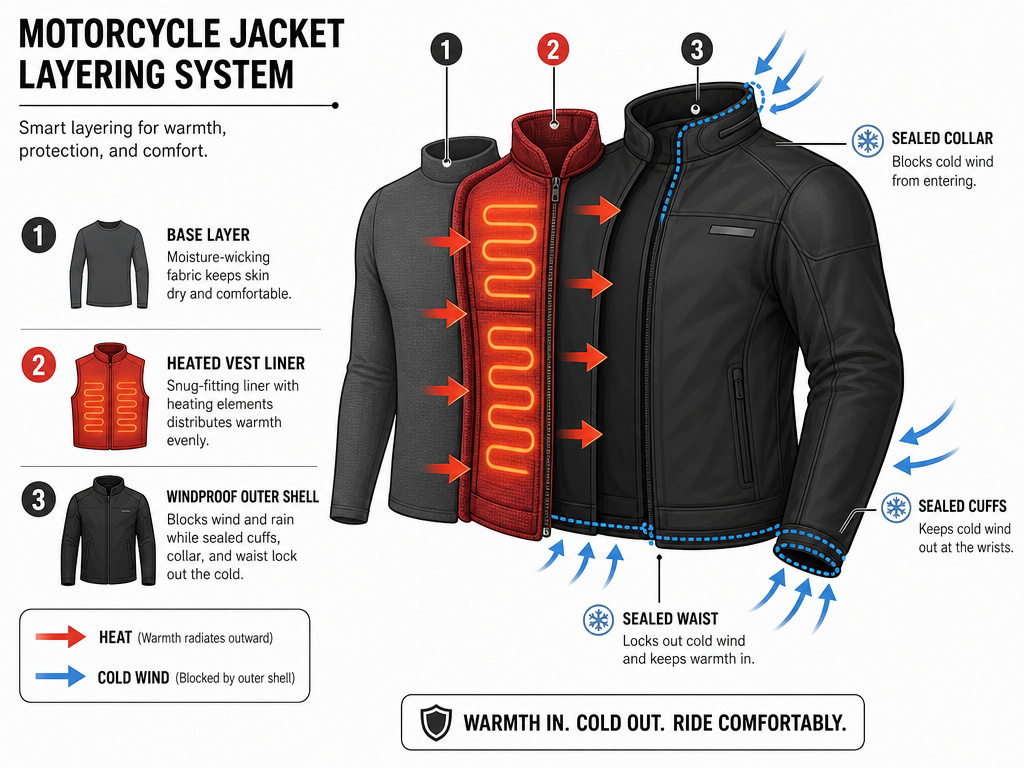
Heated gear doesn’t replace your layers; it becomes one. Think of a heated vest or jacket liner as a warmth-generating mid layer. The same fit rules apply: it needs to be snug against your base layer to transfer heat efficiently, and your windproof outer shell must seal over it to trap that heat.
A common mistake is buying a heated liner that’s too large, thinking it will be more comfortable. The result is a layer of warm air between the liner and your body that does nothing for you. The heat has to conduct directly.
The part nobody mentions: Heated gear draws power. If your outer shell is leaky, you’re essentially paying to heat the great outdoors. Before cranking the controller to max, ensure your jacket’s cuffs, collar, and waist are sealed. A good winter layering system makes your heated gear more efficient, not less.
For gloves and socks, fit is even more critical. A heated glove liner inside a too-tight glove will restrict blood flow, making your hands colder. Heated insoles change the stack height inside your boots. Test the fit of your entire system, boots, socks, insoles, while sitting on your bike before you rely on it for a long ride.
Materials & Certification: What Actually Protects You
Layering isn’t just about comfort; it’s about maintaining protection. The outer shell’s material determines your abrasion resistance. The common choices are leather, textile (like Cordura), or a blend.
Leather is the traditional benchmark. Textiles like Cordura nylon, used in the Aerostich Darien, offer a balance of protection, weather resistance, and lighter weight. The Darien manual notes its Cordura fabric melts at about 450°F, a risk if you contact hot exhaust components, and that it’s “slippery” compared to leather, which can affect slide dynamics.
The certification on the label tells you what the finished jacket has been tested to withstand. The EN 17092 standard tests abrasion on a Darmstadt machine; a pass/fail is based on whether holes of 5mm or more develop. Classes range from AAA (highest) to A. The SPIDI Voyager Evo jacket, for example, is certified to prEN 17092:2017 Class A.
| Material | Best For | Key Consideration for Layering |
|---|---|---|
| Leather | Abrasion resistance, wind blocking. | Often less room for layers in sport cuts; may require a size up for touring. |
| Textile (Cordura) | All-weather versatility, lighter weight. | Look for a roomy “adventure” cut to layer easily; check for a removable thermal liner. |
| Mesh/Perforated | Maximum ventilation in heat. | Provides almost no insulation; layering is only for sun/abrasion protection, not warmth. |
When choosing among different jacket styles, consider how you’ll layer underneath. An adventure-style textile jacket is often the most accommodating.
Common Layering Mistakes to Avoid
These are the errors that leave riders cold, sweaty, or less protected on the road.
- Using Cotton as a Base Layer: It’s a sponge. In cold, wet cotton drains body heat much faster than dry air. In heat, it stays soggy and causes chafing.
- Buying a Jacket That’s Too Snug for Layers: You can’t add space you don’t have. Armor displacement is a real risk. If you plan to ride in varied conditions, size for your bulkiest intended layer.
- Leaving Gaps at Cuffs, Waist, and Neck: A small gap at 70 mph acts like a vacuum, pulling out warm air or letting in cold. Seal every adjustment point.
- Treating a Waterproof Liner as a Mid Layer: A waterproof membrane is a barrier, not an insulator. It should be part of your outer shell system. Wearing it as a separate mid layer traps sweat vapor inside, making you wet from the inside out.
- Over-layering and Restricting Movement: If you can’t turn your head to check your blind spot or operate the controls smoothly, you’ve added too much bulk. Safety trumps warmth.
For a broader look at assembling a full kit, our overview of motorcycle apparel ties all the pieces together.
How does layering change for different riding styles
Your riding position dictates your layering strategy. Jackets are designed for a seated, slightly-forward-leaning position. An adventure rider covering variable weather needs a system that fits like a roomy mountain parka to accommodate thick insulating layers underneath. For very hot conditions, wetting your shirt for evaporative cooling is advised. A cruiser rider in a more upright position might prioritize a different outer fit, but the principle remains: your outer shell must be sized to fit over all your intended layers without binding, especially at the shoulders and arms when you reach for the controls.
Layering pants and base layers for motorcycle riding
Lower body layering follows the same core logic as your jacket. Start with a moisture-wicking base layer to keep skin dry. Your protective riding pants are the outer shell, and they must be roomy enough to fit over insulating mid-layers like fleece or softshell pants without restricting movement at the knees and hips. In extreme cold, consider that some jacket armor can be removed to provide more room for insulating clothing underneath; a similar principle can apply to bulky knee protectors. Always ensure your final combination allows for full, comfortable control operation.
Frequently Asked Questions
What should I wear under my motorcycle jacket?
Wear a moisture-wicking base layer made of synthetic material (polyester) or merino wool. Avoid cotton. Over that, add an insulating mid layer like fleece or a heated vest if it’s cold. The jacket is your protective outer layer.
Is CE/AA enough protection for highway riding?
CE/AA rating (EN 17092 Class AA) is the EN 17092 Class AA level of protection for general street and highway riding. For maximum protection, look for Class AAA.
How should a motorcycle jacket fit with layers?
It should fit like a “roomy mountain parka,” as Aerostich directs, when you’re wearing your intended layers. You should be able to move freely in a riding position without the jacket pulling tight across the shoulders or back. The armor should remain centered over your elbows and shoulders.
Can I use a heated vest with any jacket?
You can, but its effectiveness depends on your outer jacket’s windproofing. A heated vest works best under a wind-tight shell that traps the warmth. Using it under a well-ventilated summer mesh jacket will waste most of the heat.
What is the best base layer for motorcycle riding?
Merino wool is excellent for its temperature regulation, moisture-wicking, and natural odor resistance. For hotter climates or higher sweat output, a lightweight synthetic (polyester) base layer will dry faster and often costs less.
Before You Go
The single biggest shift is rethinking jacket fit. If you’ve always bought snug, try your street size plus one the next time you shop for a versatile riding jacket. Put on a fleece and get into a riding crouch. That extra inch in the shoulders and back is what makes three-season riding possible.
One rule most guides skip: if your jacket becomes impossibly stiff in deep cold, the manufacturer’s manual itself says you can remove the armor to make room. It’s a last resort, but it’s a documented option when the alternative is not riding safely at all.
Finally, trust the manuals over the marketing. The numbers and methods here, the 45-90 minute ice pack cooling, the 120g/100g Thermore wadding specs, the roomy parka fit, come straight from the companies that build and guarantee the gear. That’s the difference between a theory and a system that’s been ridden hard.
