
How to Test a Motorcycle Stator: Step-by-Step
This post contains affiliate links. As an Amazon Associate, we earn from qualifying purchases.
To test a motorcycle stator, you need a multimeter to perform three electrical checks: measure the resistance between the stator’s phase wires, check for a short to ground, and test the AC voltage output with the engine running. For a typical three-phase stator, resistance should be low, usually between 0.2 and 0.5 ohms, with no connection to ground, and it should produce increasing AC voltage as engine RPM rises.
The readings are small. A meter that can accurately measure low resistance matters, and a bad connection can look like a bad stator. The real work is isolating the fault before you buy a part, which is why you need to know how to test a motorcycle stator.
What follows: the three electrical tests, where to find your stator’s specs, how a melted connector fools you, and a flowchart to decide if it’s the stator, the regulator rectifier, or the motorcycle battery.
Key Takeaways
- Test stator resistance between phases first, a reading outside 0.2–0.5 Ω usually means a bad winding.
- The short-to-ground test is critical, any continuity between a stator wire and the engine case means the stator has failed internally.
- A healthy stator produces rising AC voltage with RPM, you should see 20-25V AC at idle and 100+ VAC at 4000 RPM.
- Always inspect the connectors before testing, a burnt or loose connection is a common root cause that mimics stator failure.
- Use a troubleshooting flowchart to isolate the fault between the stator, regulator, and battery before replacing anything.
The 3 Electrical Tests Every Stator Needs
Grab a digital multimeter. You’ll use it on the ohms (Ω) setting for two tests and the AC volts (V~) setting for the third. The stator has three wires, typically yellow, coming from the engine case. You need to access the connector where these wires meet the bike’s main harness.
A known-good Yamaha Venture XVZ1300 stator produces ~20-25 volts AC at idle and over 100 volts AC at 4000 RPM, according to community testing in the Venturers motorcycle stator testing guide. These figures aren’t always in the factory manual.
First, disconnect the stator’s plug. You must test the stator in isolation, with all wires unplugged from the regulator/rectifier. Testing through a connected harness can give false readings.
1. Phase-to-Phase Resistance Test
Set your multimeter to the lowest ohms setting. Touch one probe to one yellow stator wire, and the other probe to a second yellow wire. Write down the reading. Repeat for all three combinations (Wire 1 to 2, 2 to 3, 1 to 3).
What you’re looking for: A low, stable resistance that is nearly identical between all three pairs. For many motorcycles, this is between 0.2 and 0.7 ohms, but you should check your specific model’s service manual. The Yamaha FZS1000 manual, for example, specifies 0.27–0.33 Ω at 20°C (68°F).
What the readings mean:
- 0.2–0.7 Ω (and balanced): Stator windings are likely good.
- OL or Infinite Ω: The circuit is open. A winding is broken inside the stator. Replace it.
- 0.00 Ω or very close: A short exists between phases. The stator is bad.
- Unbalanced readings (e.g., 0.3, 0.3, 1.2): One winding is damaged. The stator is bad.
Some meters struggle at this low range. If you get a flickering or implausibly high reading, check your probe contact and meter battery first.
2. Short-to-Ground Test
Keep the multimeter on ohms. Touch one probe to any metal part of the engine case (a clean bolt works). Touch the other probe to each of the three yellow stator wires, one at a time.
What you’re looking for: The meter should read “OL” (over limit) or show infinite resistance for every wire.
What the readings mean:
- OL on all three wires: Good. The insulation on the windings is intact.
- Any resistance reading (e.g., 5Ω, 500Ω): Bad. That stator wire is shorted to the engine ground. The stator must be replaced. This is a definitive failure.
This test is essential. A stator shorted to ground will drain your motorcycle battery and cannot charge the system.
3. Dynamic AC Voltage Output Test
This test requires a running engine. Reconnect the stator plug to the harness. Set your multimeter to AC Volts (V~). Start the engine.
Touch the meter probes to two of the three yellow wires at the connector (you may need back-probe pins or careful piercing). Note the voltage at idle (around 1200 RPM). Then, slowly increase engine speed to about 4000 RPM and note the voltage again.
What you’re looking for: Voltage that climbs smoothly and proportionally with RPM.
- At idle: Expect ~20-25 VAC.
- At 4000 RPM: Expect 60-100+ VAC.
What the readings mean:
- Voltage rises with RPM and is similar across all phase combinations: Stator output is likely healthy.
- Low or no voltage output on one or more phases: The stator is failing.
- Voltage is unstable or erratic: Could be a failing stator or a bad connection.
If the stator passes all three tests, your charging problem is almost certainly elsewhere, like the regulator rectifier or a wiring fault.
Where to Start: The Connector Inspection
Before you touch the multimeter, look at the plastic plug where the stator meets the main harness. On many bikes, this is under the seat or near the battery. Unplug it.
Look for melted plastic, discolored pins, or signs of heat stress. Smell it. A burnt plastic odor is a dead giveaway. Wiggle the connector while the bike is running and see if the headlight flickers or the voltmeter jumps.
Common mistake: Replacing a stator without checking the connector. Heat from a poor connection melts the plastic, which worsens the connection, creating more heat. The stator tests bad because the circuit is broken at the plug, not inside the engine.
This is so common that Harley-Davidon’s TSB M1507 for charging issues dedicates multiple steps to inspecting, cleaning, and performing a “wiggle test” on the main fuse and regulator connectors. A failed wiggle test means the connector is the culprit.
If the connector looks good, clean the pins with electrical contact cleaner and a brush. Apply a dab of dielectric grease before reconnecting. This simple step has fixed more “bad stator” diagnoses than any specialty tool.
Finding Your Bike’s Specific Stator Specs
You need to know what “good” looks like for your motorcycle. The numbers in the general guide (0.2-0.7 ohms) are a safe range, but your service manual has the exact specification.
| Motorcycle Model | Stator Resistance Spec (Ω @ 68°F/20°C) | Source |
|---|---|---|
| Yamaha FZS1000 (N) | 0.27 – 0.33 Ω | Yamaha Factory Service Manual |
| Yamaha Venture XVZ1300 | 0.279 – 0.341 Ω @ 68°F | The Venturers Tech Library |
| General Guideline | 0.2 – 0.7 Ω | Common Industry Range |
If you don’t have a manual, search online for “[your motorcycle model year] stator resistance spec“. Forum threads and model-specific technical libraries, like the one for the Yamaha Venture, often have this information crowdsourced from owners.
The AC voltage output spec is trickier. Many factory manuals don’t list it. For example, the Yamaha Venture’s AC output (~20-25V AC idle, 100+ VAC @ 4000 RPM) was established by community testing in The Venturers library.
Stator vs. Regulator vs. Battery: The Diagnostic Flowchart
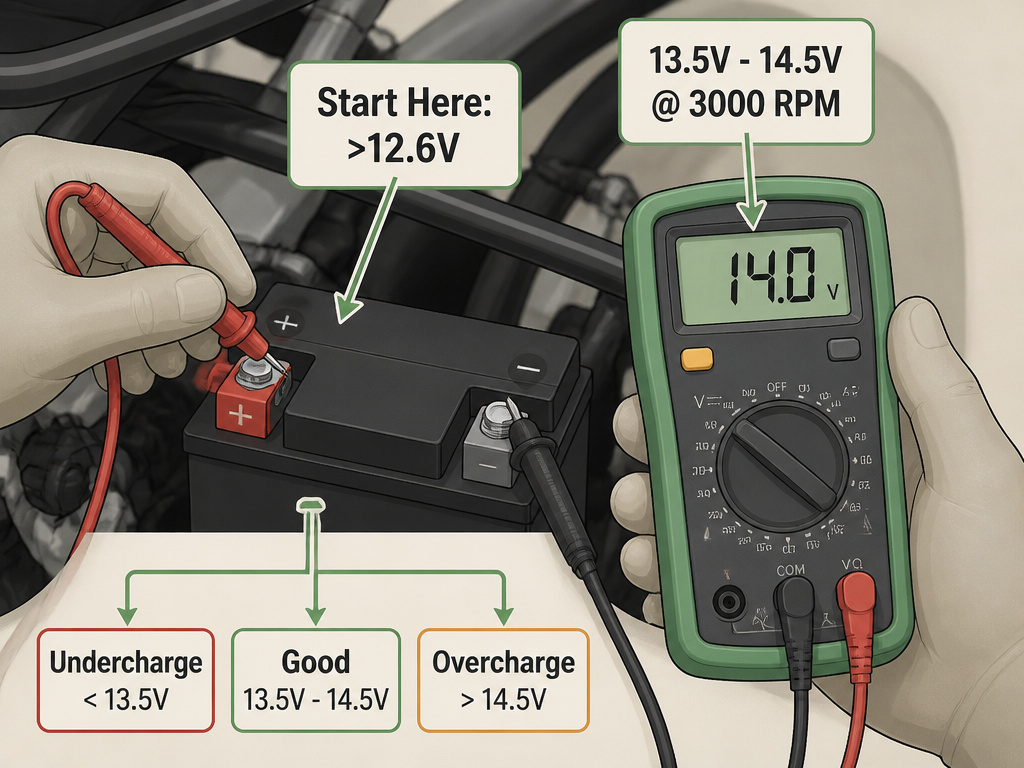
Electrical troubleshooting logic is sequential. Follow a troubleshooting guide to isolate the fault. You don’t throw parts at the problem. Follow this decision path to isolate the faulty component when your bike isn’t charging.
- Start with the Battery. Is the battery fully charged and holding voltage above 12.6V when the bike is off? If not, charge or replace it first. A dead battery can mask other problems.
- Check Running Voltage. Start the bike, rev to 3000 RPM, and measure DC voltage at the battery terminals. You should see 13.5V to 14.5V.
- If voltage is in range: Your charging system is working. Your problem is likely excessive drain or a bad battery.
- If voltage is below 13.5V (Undercharging): Proceed to stator testing.
- If voltage is above 14.5V (Overcharging): The regulator/rectifier is almost certainly faulty.
- Perform the 3 Stator Tests. As outlined above.
- If stator fails any test: Replace the stator. Retest the running voltage afterwards.
- If stator passes all tests: The fault is almost definitely in the regulator/rectifier or the wiring between it and the battery.
- Inspect the Wiring. Check for damaged wires, corroded grounds, and don’t forget to check fuses. A blown main fuse can stop charging.
This method saves you from buying a stator only to find the regulator rectifier was bad all along.
Single-Phase vs. Three-Phase Stators
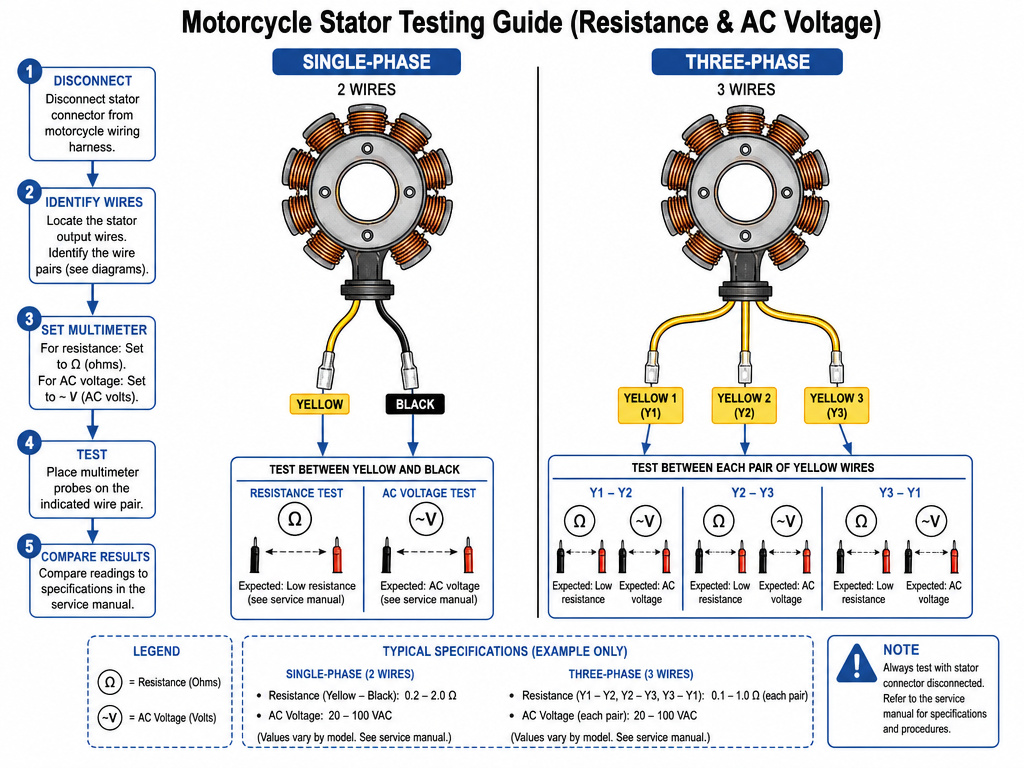
Most modern bikes use a three-phase stator (three yellow wires). Some older or smaller bikes use a single-phase system, which has only two output wires. The testing philosophy is the same, but the specifics differ.
- Three-Phase: Test resistance between all three wire pairs (1-2, 2-3, 1-3). Check each for a short to ground. Test AC voltage between each pair.
- Single-Phase: Test resistance between the two output wires. Check each for a short to ground. Test AC voltage between those two wires.
The expected resistance for a single-phase stator is often slightly higher, but it should still be a low, stable value (often under 1.0 ohm). Always defer to your bike’s service manual.
Tools You Actually Need
You can do 95% of this diagnosis when you compare a how to test a motorcycle stator with two tools.
- A Digital Multimeter: A basic model from Fluke, Klein, or even a hardware store brand is fine. Ensure it has audible continuity and a low ohms scale.
- Service Manual or Reliable Spec Sheet: Don’t guess. Know your target numbers.
A mechanics’ stethoscope can sometimes hear a failing stator (a rhythmic scraping), but the meter gives the proof. A soldering iron and heat-shrink tubing are for the repair phase, after you’ve confirmed the diagnosis.
Frequently Asked Questions
How do I know if my motorcycle stator is bad?
The classic symptom is a dead battery despite riding. The bike may start with a jump but dies again after a short ride. Your headlight may dim at idle and brighten slightly when you rev, but not enough. The only way to know for sure is to perform the three electrical tests with a multimeter.
Can I test a stator without a multimeter?
You can do a basic visual inspection for burnt windings or smell for burnt insulation if the stator is already removed. You cannot reliably diagnose winding resistance, shorts to ground, or AC output without a multimeter. It’s the essential tool.
What does ‘OL’ mean on my multimeter when testing a stator?
‘OL’ means “Over Limit” or infinite resistance. In the phase-to-phase resistance test, ‘OL’ indicates an open circuit, a broken wire inside the stator winding. In the short-to-ground test, ‘OL’ is the desired result, showing no connection to ground.
Should I test the stator with it installed or removed?
Test it installed and connected first. The electrical tests are valid with the stator in the engine. Only remove the stator for replacement after you’ve confirmed it’s faulty, or for a final visual inspection if you suspect physical damage.
My stator tests good, but my bike still isn’t charging. What now?
If your stator passes all three tests, the problem is almost certainly the regulator/rectifier, a wiring fault, or a poor connection. Double-check all connectors, especially the main plug to the regulator. Follow the troubleshooting electrical flowchart to systematically rule out each component.
The Bottom Line
Testing a stator isn’t magic, it’s a process of elimination with a meter for the how to test a motorcycle stator. Resistance, short-to-ground, AC output. The connector inspection is the step that finds the easy fix. Always test the stator before you condemn it; a $20 multimeter can save you a $200 part and an afternoon of labor.
If your stator is bad, replace it. If it’s good, your search moves to the regulator and the wiring. And if your bike is among the many with a documented connector issue, a tube of dielectric grease might be the only tool you need.
