
How to Polish a Motorcycle Helmet Shell: Step-by-Step
This post contains affiliate links. As an Amazon Associate, we earn from qualifying purchases.
To polish a motorcycle helmet shell safely, match the product and technique to your helmet’s finish. For a glossy shell, use automotive polish or a plastic cleaner with a soft microfiber cloth. For a matte (non-glossy) shell, never use polish, clean only with warm water and mild soap. Polish removes light scratches and restores shine; it does not repair structural damage or compromise the helmet’s safety integrity.
That distinction between glossy and matte is the whole job. Get it wrong once and you permanently change the helmet’s appearance. The goal is to restore clarity and protect the clear coat, not to create a mirror finish that hides underlying wear. Understanding how to polish a motorcycle helmet shell is therefore essential.
What follows is the process broken down by finish type, the exact products manufacturers name, and the one mistake that turns a simple how to polish a motorcycle helmet shell job into a ruined shell. We’ll also cover how to tell if a scratch is too deep to buff out and what to do after you polish to keep it looking good.
Key Takeaways
- The finish type dictates everything. Polish only glossy shells; clean matte shells with warm water and mild soap only.
- Use automotive polishing products or plastic cleaners designed for clear coat finishes, as recommended by HJC and SHOEI.
- Apply polish with a soft, clean microfiber cloth using light, circular motions, excessive pressure creates micro-abrasions.
- Never use petroleum-based solvents or harsh chemicals, as they can deteriorate the plastic shell and EPS safety liner.
- Store your polished helmet in a cool, dry place away from heat sources above 50°C (122°F) to preserve the finish.
The Two-Finish Rule: Glossy vs. Matte
Look at your helmet. Is it shiny? Or does it have a flat, satin texture? That visual cue is your first and most important instruction. Helmet manufacturers build shells with two distinct finish types, and the care for each is completely different.
The core procedural break is between glossy and matte/non-glossy finishes. Polishing a matte helmet with any compound will permanently alter its appearance, creating a “glossy” effect that ruins the intended look, according to HJC Helmets.
Glossy finishes are what most people think of for polishing. HJC states that clean glossy helmet shells with products designed for automotive cleaning and polishing. This is a hard, protective layer designed to take a polish. SHOEI also directs riders to use helmet cleaner, wax, or plastic cleaner available on the market for shell stains. For these, polishing is not just safe, it’s the intended maintenance to remove light scratches and restore reflectivity.
Matte finishes are a different beast. That flat appearance isn’t a lack of clear coat; it’s a specific textured coating. HJC’s instructions are explicit: “For our flat finish (non-glossy) helmets, we recommend using warm water and mild soap.” The reason is physics. Any abrasive, even a fine polishing compound, will gradually wear down that textured surface, smoothing it out. The result is a patchy, unintentionally shiny spot that you cannot reverse. SHOEI echoes this, warning against using an “excessive amount of compound.”
Here’s how the two paths diverge from the start:
| Finish Type | Safe Cleaning | Safe Polishing | Risk of Wrong Product |
|---|---|---|---|
| Glossy | Mild soap & water, automotive cleaner | Automotive polish, plastic cleaner, wax | Over-polishing can dull finish with light abrasions |
| Matte/Flat | Warm water & mild soap only | None – do not polish | Creates irreversible “glossy” spots, ruins finish |
What You Actually Need (And What to Trash)
You don’t need a garage full of specialty gear. In fact, using the wrong item from your garage is the fastest way to cause damage. Gather these few things, and double-check your cabinet for the banned items.
The Safe Kit:
- Microfiber Cloths (3-4): You need a dedicated cloth for applying product, one for buffing it off, and a clean, dry one for the final wipe. Old t-shirts can leave lint; microfiber grabs dust and polish without scratching.
- Automotive Polish or Plastic Cleaner: This is the key product. Choose a non-abrasive polish designed for automotive clear coats or a plastic cleaner/restorer. Brands like Meguiar’s PlastX or similar clear plastic polishes are common picks in polish reviews.
- Mild Soap (Dish soap is fine): For the initial wash and for matte helmets.
- Isopropyl Alcohol & Cotton Swabs: For targeted adhesive removal from stickers, applied with caution.
- Lukewarm Water: In a bucket or spray bottle.
The Banned List:
- Petroleum-Based Solvents: Lighter fluid, Goo Gone, gasoline. SHOEI explicitly warns these deteriorate plastic.
- Household Abrasive Cleaners: Comet, baking soda paste, magic erasers. These are far too aggressive.
- Generic “All-Purpose” Cleaners: Often contain ammonia or other harsh chemicals that can haze plastic.
- Power Buffers or Drills with Buffing Pads: The shell is curved and thin. A power tool generates too much heat, too fast, which can soften the plastic and compromise the underlying EPS liner.
Step-by-Step Polish for a Glossy Shell
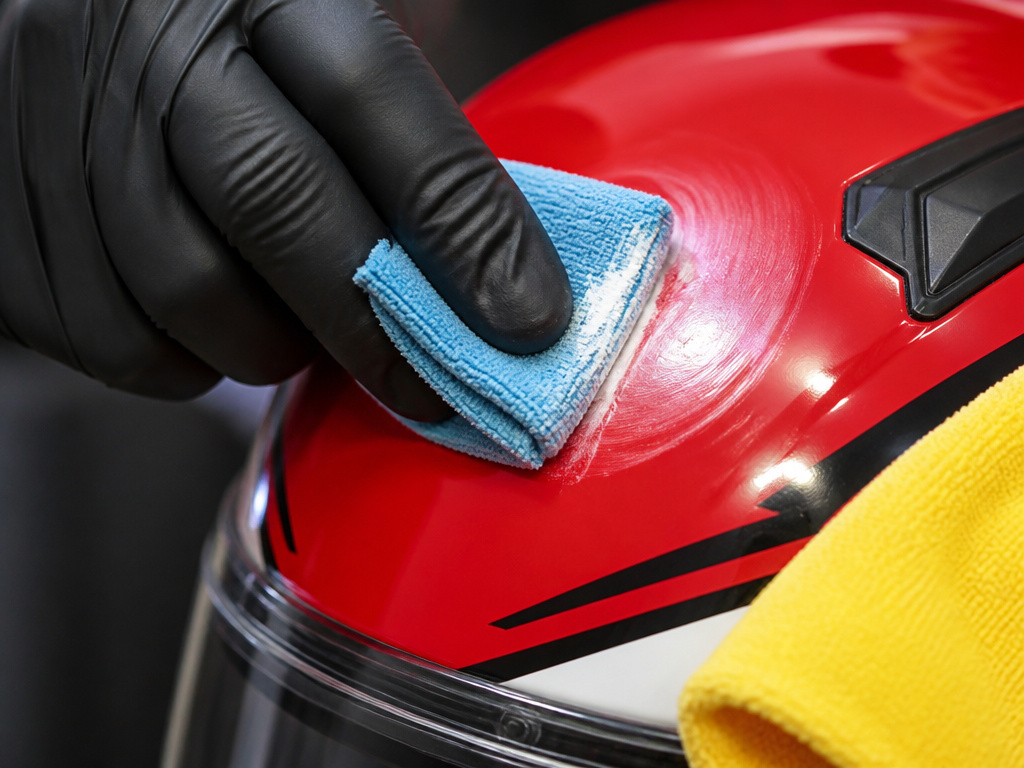
This is a slow, gentle process. Rushing it or using force is how you swap shallow scratches for a network of fine swirl marks. Set aside 30 minutes for the job.
1. Wash the Shell Thoroughly.
You cannot polish over dirt. It becomes sandpaper. Mix a few drops of mild soap in a bucket of lukewarm water. Soak a microfiber cloth, wring it out well, and wipe the entire shell down. Rinse the cloth frequently. Pay special attention to the chin vent and around the visor base, bug guts and road film love to hide there. For stubborn bug splatter, our guide on safe cleaning has the soak-and-lift method that works without scrubbing. Dry completely with a clean, dry microfiber.
2. Apply the Polish to the Cloth, Not the Helmet.
Squeeze a dime-sized amount of your automotive polish or plastic cleaner onto a fresh microfiber cloth. Fold the cloth to work the product into the fibers. Applying polish directly to the helmet can lead to uneven, thick globs that are harder to buff off.
3. Work in Small, Circular Sections.
Start on the crown, an area that’s easy to see. Using light pressure, rub the polish onto the shell with small, overlapping circles. Let the product do the work, you’re not sanding. Cover an area about the size of your hand, then move to the next section. A common mistake is to polish the entire helmet at once; the first section will have dried and hardened, making it a nightmare to remove.
4. Buff Off Before It Dries.
After working a section for 30-45 seconds, immediately take a clean, dry microfiber cloth and buff the residue away. Use straight, light strokes. If the polish has dried to a haze, lightly mist the area with water on a cloth and buff again. You should see the shine returning and light scratches fading.
5. Inspect and Repeat (If Needed).
After the first pass, check your work under good light. Deeper scratches may need a second, focused application. For scratches that catch your fingernail, polishing might not be enough. In those cases, understand that you’re dealing with a clear coat scratch that may require a different repair approach.
Navigating Stickers, Scratches, and Stubborn Stains
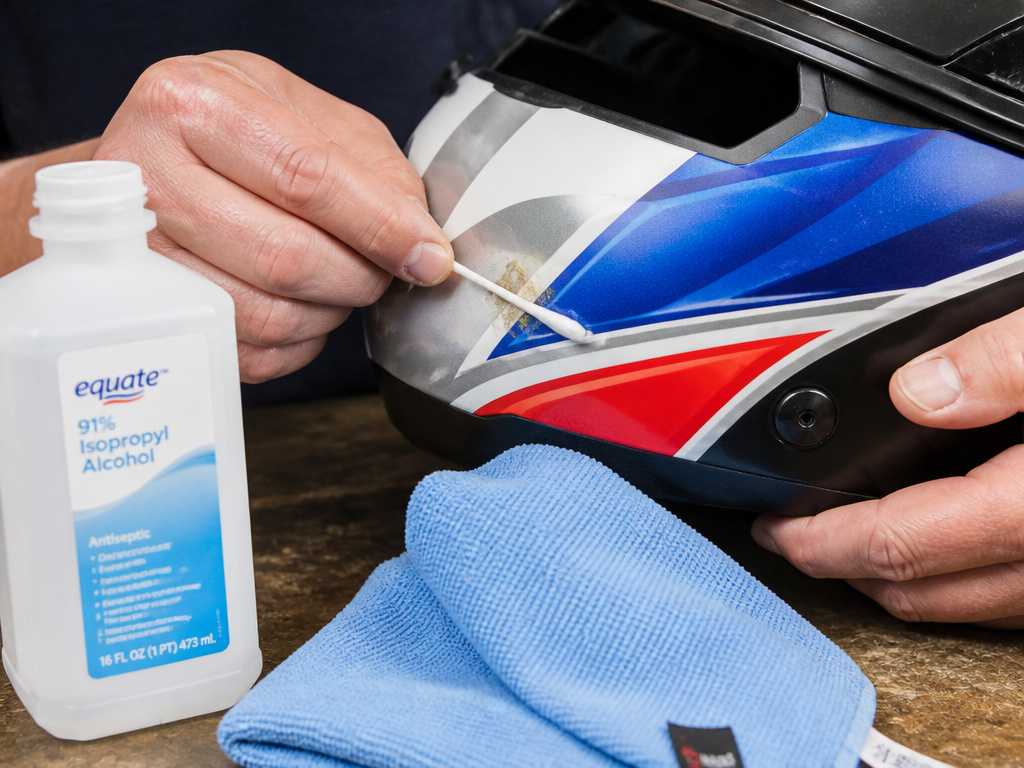
A clean shell is one thing. Helmets collect history in the form of decal residue, deep scuffs, and yellowed plastic around vents. Here’s how to handle the common headaches without creating new ones.
Removing Sticker Residue: A Source of Disagreement
You’ll find conflicting advice here, straight from the manufacturers. HJC explicitly says, “To remove the adhesive residue, use alcohol swabs.” SHOEI, however, warns against “petroleum agent[s]” that deteriorate plastic. Isopropyl alcohol is a solvent, and its use is a point of disagreement between manufacturers.
- The Safe Method: Use isopropyl alcohol on a cotton swab. Dab it directly on the sticky residue, not the surrounding paint. Let it sit briefly to dissolve the glue, then gently wipe away. HJC adds a critical follow-up: “immediately wipe away the excess liquid and clean the area with soap and water.” This neutralizes the solvent. Never scrub.
Assessing Scratches: Can You Polish It Out?
Run your fingernail across the scratch.
- If your nail DOES NOT catch: This is a surface scratch in the clear coat. It will likely come out with careful polishing, as HJC notes rubbing compounds “can be used for deep cleaning to remove many scratches and scuffs.”
- If your nail DOES catch: The scratch has penetrated through the clear coat into the color layer or base plastic. Polishing will not remove it. You’re now looking at touch-up paint or, for a perfect result, professional surface preparation and repainting. Attempting to buff it out will just thin the surrounding clear coat.
Dealing with Scuffed and Yellowed Plastic
The principles are the same: clean first, apply minimally with a cloth, and buff thoroughly. Always test on a small, hidden area first.
What Not to Do: The Fastest Ways to Ruin a Shell
Good intentions with bad products wreck more helmets than neglect. These aren’t theoretical warnings, they’re the documented failure modes from the people who built your helmet.
Never use petroleum agent. It deteriorates plastic.. SHOEI Worldwide
- Don’t Use a Power Buffer. The shell’s complex curves focus heat on small areas. That heat can soften the plastic substrate and, more dangerously, degrade the EPS foam safety liner inside. SHOEI states the EPS liner is “weak against solvent or heat.” Damage here is invisible but catastrophic for safety.
- Don’t Polish a Matte Helmet. We’ve covered it, but it’s the most common irreversible error. That flat finish is a final, deliberate coating. Polishing it is like sanding matte photo paper to make it glossy.
- Don’t Use Abrasive Household Cleaners or “Hacks.” Baking soda, toothpaste, or melamine sponges (Magic Eraser) are micro-abrasives. They will scratch the clear coat, leaving a dull, hazy finish that’s worse than the original scratch. HJC calls this outcome “light abrasions which may dull the finish.”
- Don’t Soak the Helmet. Never submerge it or run water forcefully into the vents. Water can seep behind interior liners and compromise the adhesive holding the EPS liner to the shell. Always use a damp cloth, not a hose.
- Don’t Neglect the Interior. While polishing the outside, it’s the perfect time for a full helmet cleaning. A clean, odor-free interior makes the whole helmet feel renewed.
After the Polish: Care and Storage
Sun, rain, and storage habits determine how long your work will last.
Frequency:
UV Exposure: Ultraviolet light is the real enemy, breaking down the plastic’s polymers and causing long-term fading and brittleness. Whenever possible, store your helmet away from direct sunlight. A helmet bag or a closet shelf is ideal.
The Right Way to Store It: The final step in helmet care is often the most ignored. HJC specifies two non-negotiable rules:
- Store the helmet in a cool and dry place.
- Keep it away from heat in excess of 50ºC (122ºF) and do not set it on or near hot surfaces.
This means not leaving it on your bike’s mirror, not storing it in a rear trunk on a hot day, and keeping it away from radiators or heating vents. Heat accelerates the aging process of all the helmet’s materials, shell, liner, and adhesives.
Frequently Asked Questions
What can I use to remove scratches from my helmet visor?
Deep scratches that impair vision mean the visor should be replaced. Never use metal polish or abrasive pastes, as they will permanently haze the plastic.
What is the 5 year rule for motorcycle helmets?
Polished shell doesn’t reset this clock.
Can polishing weaken my helmet’s shell?
No, when done correctly. Polishing only affects the outermost clear coat layer, which is cosmetic. It does not sand down or heat-treat the structural shell material (polycarbonate, fiberglass, carbon fiber) beneath. However, using banned chemicals (petroleum agents) or excessive heat from a power buffer can potentially weaken plastics.
Will polishing damage my helmet’s decals or graphics?
It can. If your graphics are under the clear coat (factory-applied), they are protected. If they are stickers or decals applied on top of the clear coat, polishing will gradually wear them thin and dull their edges. Avoid direct, repeated polishing over top-mounted decals.
How do I clean the inside of my helmet?
For removable liners, follow the manufacturer’s wash instructions (usually gentle cycle, air dry). For non-removable interiors, SHOEI recommends wiping with a cloth soaked in a solution of neutral detergent and water, taking care not to scratch or dent the EPS liner. Never saturate it or use solvents.
The Bottom Line
Polishing a helmet is about preservation, not transformation. The one rule that overrides all others: know your finish. Glossy gets polish; matte gets soap and water. Everything else, the microfiber cloths, the gentle circles, the immediate buffing, flows from that.
A well-maintained shell looks better and makes it easier to spot the real damage that matters: the deep gouges, the cracks, or the fading that signals it’s time for a replacement. It’s a ten-minute job that extends the life of a critical piece of gear. Do it with the right products, store it off the bike, and your helmet will look after you as long as it should.
