
How to Paint a Motorcycle Helmet: The Only Safe Procedure
This post contains affiliate links. As an Amazon Associate, we earn from qualifying purchases.
Manufacturers disagree on whether a helmet can or should be painted by the user: Bell Helmets and Suomy prohibit it, while Gentex Corporation provides a detailed, approved procedure for its specific flight helmet. This is a key consideration when learning how to paint a motorcycle helmet.
That’s the rule from the people who make and certify the gear. The contradiction is real: one side says never, the other side provides a detailed spec sheet. Your helmet’s safety rating, and your legal protection in a crash, hinge on which set of instructions you decide applies to your polycarbonate or fiberglass lid.
What follows is not a how-to. It’s a breakdown of the two official stances on the how to paint a motorcycle helmet question, the materials they actually name, and the single inspection step that overrides everything. If you’re determined to proceed, you’ll know exactly what you’re agreeing to break.
Key Takeaways
- Bell and Suomy manuals prohibit painting, stating solvents can cause invisible shell damage that leads to premature fracturing on impact.
- The Gentex HGU-56/P military procedure is the only verified safe method, using aliphatic naphtha cleaner, MIL-P-23377 epoxy primer, and specific curing times.
- Any hole or soft spot in the shell means you discard it—painting over damage is never an option.
- Sources disagree on cleaning agents: Bell Helmets mandates mild soap and water for the shell, while Gentex Corporation specifies aliphatic naphtha for the shell and 70% isopropyl alcohol for the visor.
- Storage temperature matters for Bell helmets: exceeding 150°F (65.5°C), like in a car on a sunny day, can cause damage.
The Two Official Stances on Painting Helmets
You have two documents, from two authorities, that give opposite answers. One is a consumer warning. The other is a military repair protocol. Neither is a blog post.
Bell’s stance is absolute. Their motorcycle helmet instruction manual states: “Use only mild soap and water to clean the interior and exterior of your helmet. Never decorate your helmet with paint, decals, stickers, or tape.” The reason follows: “Many helmet components can be seriously damaged by chemicals and/or solvents contained in most paint or by careless handling during the repainting process.” They note this damage is often not visible, leading to premature fracturing of the shell when impacted. Suomy’s manual is even more direct: “Any modification or painting of the helmet will void the warranty.”
Common mistake: Assuming a helmet is just a painted shell. The energy-absorbing liner underneath is a foam that can be chemically compromised by solvent vapors penetrating vent holes or seams. The damage doesn’t show until the helmet fails in a crash.
The other document is Gentex Corporation Technical Manual TP0351-Rev6 for the HGU-56/P flight helmet. It is a step-by-step guide for repainting that specific composite shell. It names every material: clean with aliphatic naphtha, sand with 320-grit sandpaper, apply epoxy primer MIL-P-23377, then polyurethane paint NSN 8010-01-167-1139. It gives cure times: 8 hours for primer, 24 hours for the topcoat, both at 70°F.
The contradiction in the how to paint a motorcycle helmet guidance isn’t a mistake. It’s a boundary. Bell is protecting its liability and your head across millions of helmets made from various plastics and composites. Gentex is maintaining a specific piece of military gear with known material properties. Your Shoei, Arai, or HJC helmet is not a Gentex HGU-56/P.
| Source | Stance on Painting | Key Reason | Applicable To |
|---|---|---|---|
| Bell Helmets Manual | Prohibited | Solvents cause invisible damage to shell/liner | All Bell consumer motorcycle helmets |
| Suomy Manual | Voids warranty | Modification invalidates certification | All Suomy consumer helmets |
| Gentex Corp. Manual | Detailed procedure provided | Standardized maintenance for specific gear | Gentex HGU-56/P flight helmet only |
The Real Risks Beyond the Warranty Sticker
Voiding the warranty is the smallest problem. The real risks are chemical and mechanical.
The shell of your helmet is a carefully engineered part of the safety system. Bell’s manual warns against letting a helmet contact gasoline or other petroleum products because it causes “serious damage to the energy absorbing liner and/or the outer shell.” Most spray paints, thinners, and even some primers are petroleum-based solvents. They can cause the polycarbonate to become brittle or the resin in a fiberglass matrix to soften. You won’t see the cloudiness or cracking until you flex the shell—or until it flexes in a crash.
Then there’s the fit. The soft comfort liners and cheek pads are often made of foam that absorbs solvent fumes. This can degrade the foam, changing the fit and compromising its ability to cradle your head during an impact. A helmet that fits differently is a helmet that might not stay on.
And storage? If you’re planning a multi-day paint job, know this: Bell specifies that its helmets stored in temperatures over 150°F can be damaged. The interior of a car on a sunny day hits that easily. Leaving your half-painted project in a garage that bakes in the afternoon sun could ruin it before the clear coat dries. For proper long-term storage, you need a climate-controlled space, not a shelf in the workshop.
The Only Safe Procedure (The Gentex Method)
If you have a Gentex HGU-56/P flight helmet, follow their manual. For everyone else, this is the gold-standard reference for what a “safe” paint job requires. It highlights how far a DIY rattle-can project is from a certified repair.
Before you start: This procedure uses strong chemical solvents. Work in a well-ventilated area with a respirator rated for organic vapors. Wear nitrile gloves. Have a fire extinguisher nearby. Aliphatic naphtha is flammable.
The process is unforgiving: 1. Inspection: As per the Gentex manual, if inspection reveals holes or soft areas in the helmet shell, the shell shall be discarded. Painting is not a repair.
- Cleaning: Wipe the shell with aliphatic naphtha to remove all grease and contaminants. Do not soak or submerge the shell in any paint-stripping solution.
- Sanding: Sand the area with 320-grit sandpaper to create a surface for the primer to adhere to.
- Priming: Apply epoxy primer MIL-P-23377. Allow it to cure for 8 hours at 70°F.
- Painting: Apply polyurethane paint NSN 8010-01-167-1139. Allow it to cure for 24 hours at 70°F.
The takeaway isn’t the steps; it’s the specificity. They don’t say “a primer.” They give a military standard number. They don’t say “a few hours.” They specify a temperature and a duration. This is the level of control needed to not compromise the shell. Your can of generic automotive primer from the hardware store doesn’t have a spec sheet testing its compatibility with helmet composites.
What About Touch-Ups, Decals, and Other “Safe” Customizations?
The manufacturer prohibitions usually group paint, decals, and stickers together. The concern is the adhesive chemistry. If you want to add a vinyl decal, you’re still introducing an unknown chemical onto the shell.
For minor scratches, some brands offer official touch-up solutions. Harley-Davidson, for example, lists specific touch-up paint (part number 99825-02) and clear coat (part number 98600EK) for its branded accessories. This is the exception that proves the rule: the manufacturer has tested these specific products for compatibility with their finishes.
Where this goes sideways: Using a generic “plastic adhesion promoter” before spraying. These are often extremely aggressive solvents designed for car bumpers.
If you must apply a decal, note that sources disagree on cleaning agents: Bell recommends mild soap and water for the shell, while Gentex specifies isopropyl alcohol for the visor. Apply the decal, smooth out air bubbles, and leave it alone. Don’t layer them thickly, and never apply them over a vent or seam where adhesive could seep into the interior.
The Professional Alternative: When to Send It Out
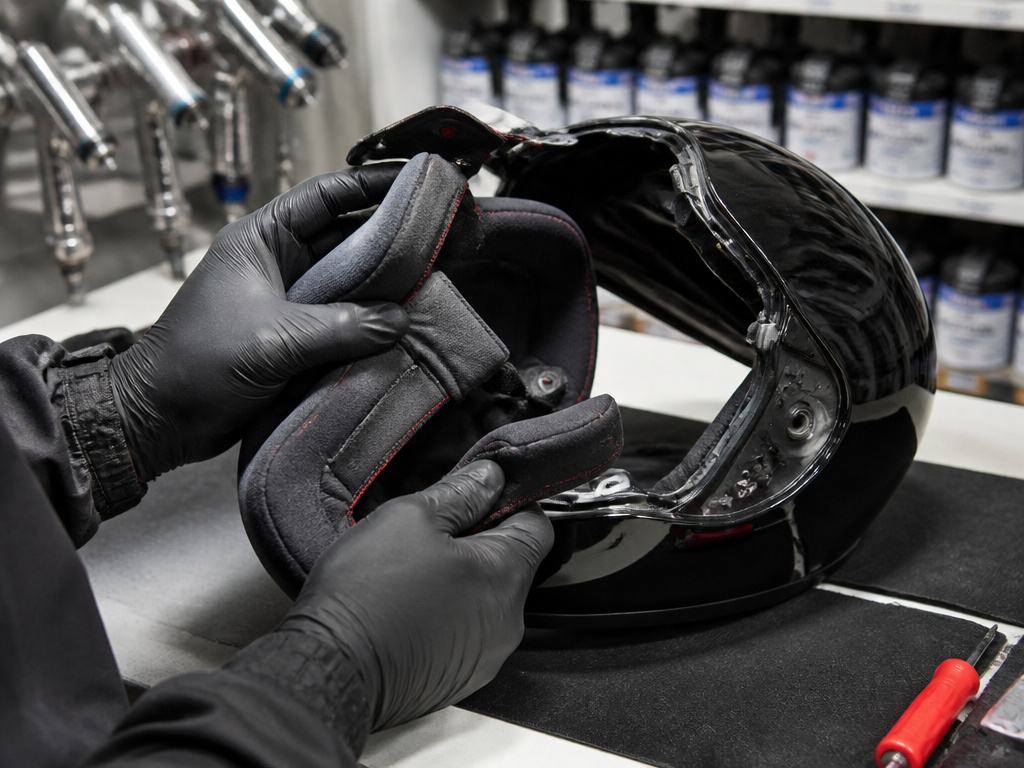
Given the risks, the logical alternative is to pay a professional. But not all painters are equal.
A true professional custom helmet painter will: * Ask about the helmet’s material before quoting.
- Use a paint system they have tested on that specific material, often a flexible automotive urethane.
- Completely disassemble the helmet, removing all liners, pads, shields, and hardware to prevent solvent contamination.
- Never sand into the structural layers of the shell. They work on the factory clear coat.
- Be upfront that their work will void the manufacturer’s warranty.
The cost reflects this. A custom paint job can be expensive. For a similar cost, you could often buy a new helmet. This is the real calculus: is a custom look worth potentially compromising an expensive piece of safety equipment and losing its warranty? For most riders, the answer should be no.
How to paint a helmet step by step
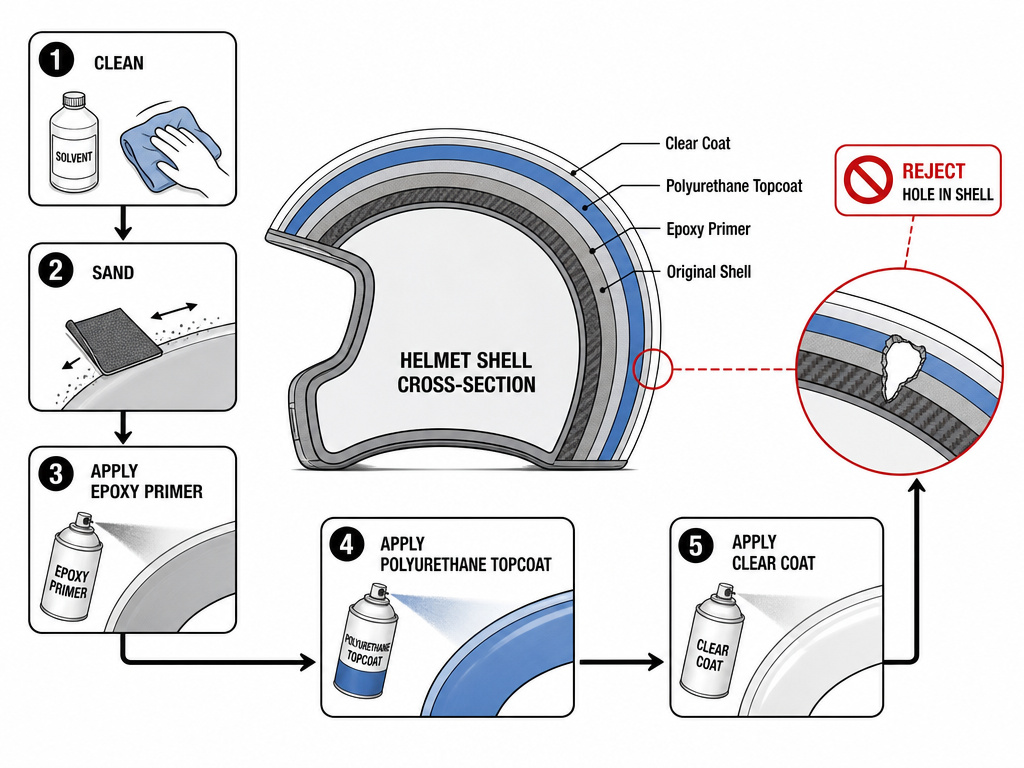
One manufacturer’s approved process starts with a thorough cleaning of the shell using a specific solvent. The surface is then sanded with a specific grit of sandpaper. An epoxy primer is applied and must cure for a set number of hours at a specific temperature. After priming, a polyurethane topcoat is applied, followed by a clear coat. This topcoat also requires a full day to cure at the same controlled temperature. This entire procedure requires an inspection; the Gentex manual states that if inspection reveals holes or soft areas in the shell, the shell shall be discarded.
Painting methods for helmets
The approved industrial process specifies using a polyurethane paint system designed for a professional finish. It’s crucial to understand that any painting method introduces risk. The solvents in paints can damage helmet components, and the handling during the process can compromise the shell’s integrity, potentially causing it to fail on impact.
How to add designs or graphics to a helmet
Officially, many motorcycle helmet manufacturers prohibit adding any designs. Their manuals explicitly state you should never decorate your helmet with paint, decals, stickers, or tape. The reason is that adhesives and the chemicals in paints or solvents can weaken the helmet shell and its components. This damage is often invisible but can lead to the shell fracturing prematurely in a crash. If you proceed against this warning, any modification will void the helmet’s warranty.
Frequently Asked Questions
What kind of paint do you use on a motorcycle helmet?
No paint is officially approved for consumer motorcycle helmets by their manufacturers. The only specified paint is polyurethane paint NSN 8010-01-167-1139, listed in the Gentex military manual for their flight helmet. Using any other paint, including automotive spray paint, introduces unknown chemical risks to your helmet’s shell.
Is it okay to paint a motorcycle helmet?
According to Bell and Suomy owner’s manuals, it is not okay. They prohibit it because paint solvents can cause invisible damage that weakens the shell. Doing so will also void your warranty. The only exception is a professional using materials tested for your helmet’s specific composite.
Can I use automotive spray paint on a helmet?
You can, but you shouldn’t. Automotive paint is formulated for different materials than those used in many helmet shells. The solvents in automotive paint may not be compatible and could degrade the helmet’s structural integrity.
How can I customize my helmet safely?
The only manufacturer-endorsed customizations are those they offer. For aftermarket additions, using vinyl decals applied to a clean, dry surface is the lowest-risk option, though it may still affect the warranty. The safest path is to choose a helmet you like the look of from the start.
Before You Go
The manuals are clear. Painting your helmet is a gamble where the stakes are the helmet’s ability to do its one job. The Gentex procedure exists, but it’s a blueprint for a different piece of equipment under controlled conditions, not a free pass for DIY.
If you have a helmet you want to paint because it’s old or scratched, Bell has another recommendation: replace it every 3–5 years. A faded, scratched helmet is telling you it’s nearing the end of its service life anyway. Putting new paint on a compromised or aging shell addresses the wrong problem.
Don’t spray your helmet with chemicals its engineers warned you about. The custom look isn’t worth the hidden crack.
