
How to Adjust Motorcycle Chain Slack: Step-by-Step
This post contains affiliate links. As an Amazon Associate, we earn from qualifying purchases.
Adjust motorcycle chain slack by loosening the rear axle nut, turning the chain adjusters evenly on both sides to achieve the slack specified in your owner’s manual, and re-torquing the axle nut to the specified value. Overtightening wears the countershaft bearing; too much slack can damage the frame.
That 35–45 mm spec for the Africa Twin is not a universal rule. Your CBF250 wants 15–25 mm. Your friend’s dirt bike wants something else entirely. The manuals disagree on where to measure, side stand or center stand, and they rarely explain why. A key part of the process is knowing how to adjust motorcycle chain slack correctly.
What follows is the adjustment sequence every bike shares, the model-specific numbers that actually matter, and the two torque values that decide whether your adjustment lasts one ride or one season.
Key Takeaways
- Find your bike’s manual. Slack specs vary wildly: a Honda CBF250 uses 15–25 mm, while a CRF1000 Africa Twin needs 35–45 mm.
- Overtightening is the common mistake. A too-tight chain loads the countershaft bearing and wears the sprocket teeth prematurely.
- Use a torque wrench on the axle nut. Guessing often leads to under- or over-torquing, which affects wheel alignment and safety. A Honda CRF250R requires 94 lbf·ft.
- Check for tight spots. Rotate the wheel and measure in several places; if slack varies more than a few millimeters, the chain is worn and due for replacement.
- Lube after adjusting. A dry chain wears faster. Apply Pro Honda HP Chain Lube or an equivalent to each joint after the slack is set.
Why Chain Slack Isn’t One-Size-Fits-All
Bikes are designed differently. A lightweight street bike like the Honda CBF250 has minimal suspension travel and a stiff swingarm. Its manual calls for 15–25 mm of slack. A long-travel adventure bike like the Honda CRF1000 Africa Twin has a swingarm that pivots through a wider arc. Its manual specifies 35–45 mm.
The Honda CRF1000 Africa Twin shop manual states that excessive chain slack of 60 mm (2.4 in) or more may damage the frame. This is a model-specific failure mode, not generic advice.
Get the spec wrong for how to adjust motorcycle chain slack, and you’re not just optimizing wear. You’re risking damage. Too tight, and you pre-load the transmission’s output shaft bearing. Too loose, and the chain can slap into the swingarm or, as Honda notes for the Africa Twin, the frame itself. This is why the first step isn’t grabbing a wrench, it’s grabbing your owner’s manual or finding the official service PDF online.
The Tools You Actually Need (It’s a Short List)
You don’t need a mechanic’s shop. For 90% of bikes, three tools handle the job.
- Wrench or socket for the rear axle nut. Size varies by bike. A 24mm, 27mm, or 32mm is common.
- Wrenches for the adjuster lock nuts. Usually a pair of open-end wrenches, often 10mm and 12mm or 12mm and 14mm.
- A torque wrench. You must have this tool if you want to do the job correctly. The axle nut torque is critical for safety and alignment. Guessing can leave it dangerously loose or damage threads.
A ruler or tape measure marked in millimeters is essential for checking slack. A chain alignment tool or a simple motion pro aligner is cheap insurance for keeping the rear wheel straight. A paddock stand or rear wheel lift makes the job easier, but you can work with the bike on its side stand if you’re careful.
The 6-Step Adjustment Sequence (and the Torque Values That Matter)
This is the core procedure. The sequence for how to adjust motorcycle chain slack matters more than speed.
- Secure the bike and find the tight spot. Place the bike on a paddock stand or its side stand, transmission in neutral. Rotate the rear wheel by hand and feel for the point where the chain feels tightest. You must measure slack here. Measuring at a loose point will cause you to over-tighten the chain.
- Loosen the axle nut. Break it loose with your wrench, but don’t remove it. You only need it loose enough to allow the wheel to move forward and back.
- Loosen the adjuster lock nuts. On each side of the swingarm, you’ll find a lock nut securing an adjuster bolt. Loosen these lock nuts. Now you can turn the adjuster bolts.
- Adjust evenly. Turn the adjuster bolts on both sides equally. The direction is usually marked. Counterclockwise typically decreases slack (tightens); clockwise increases it. Watch the alignment marks on the swingarm. Move each side the same number of marks or turns to keep the wheel straight. This is where a chain alignment tool proves its worth.
-
Tighten the axle nut to spec. This is the step people skip and regret. Do not just crank it down. Use your torque wrench. > Common mistake: Guessing the axle nut torque. Using the wrong value risks a loose wheel or stripped threads.
Set your torque wrench, and tighten the axle nut to the value in your manual. If you don’t have a manual, Look up the specific axle nut torque value for your model in the owner’s manual. 6. Finalize and lock. While holding the adjuster bolts so they don’t turn, tighten the lock nuts to their specified torque. For the Africa Twin, that’s 27 N·m (20 lbf·ft). Re-check the chain slack. Spin the wheel again and verify the measurement at the tight spot.
| Bike Model | Chain Slack Spec | Axle Nut Torque | Key Note |
|---|---|---|---|
| Honda CBF250 | 15–25 mm (0.6–1.0 in) | Not Specified | Check every 1,000 km |
| Honda CRF260 COTA | 25–35 mm (1.0–1.4 in) | 69 N·m (51 lbf·ft) | Check often during break-in |
| Honda CRF1000 Africa Twin | 35–45 mm (1.4–1.8 in) | 100 N·m (74 lbf·ft) | ≥60 mm slack can damage frame |
| Honda CRF250R | Not Specified | 94 lbf·ft (128 N·m) | Adjuster lock nut torque: 20 lbf·ft |
Measuring Slack: Side Stand vs. Center Stand Confusion
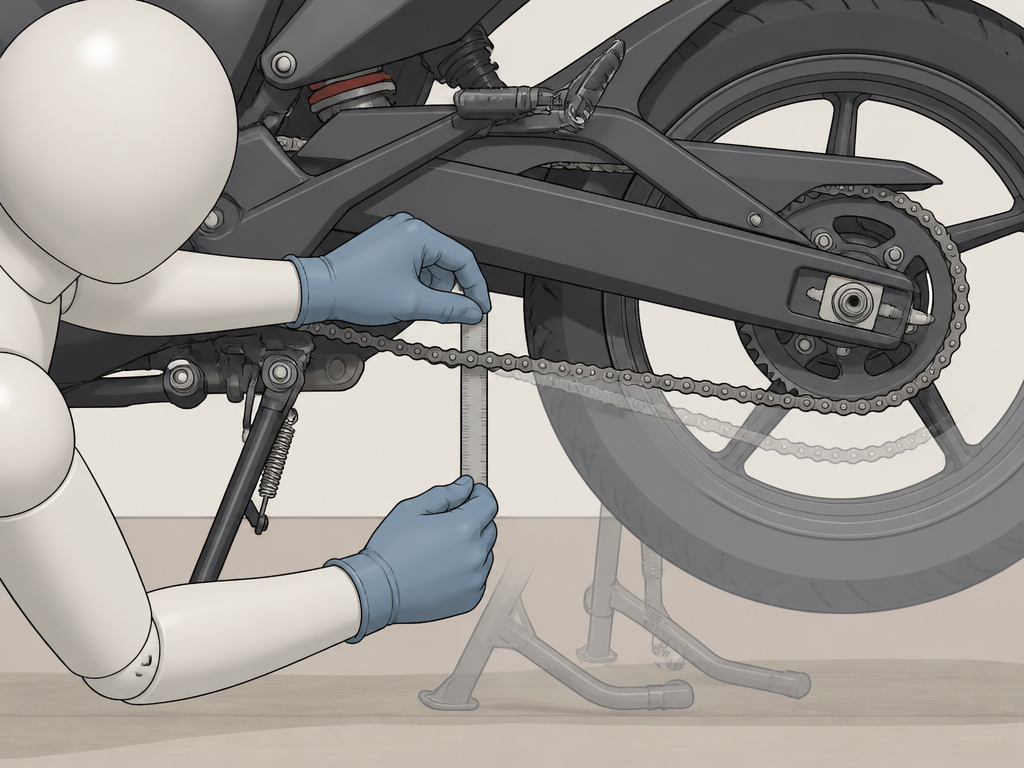
Here’s where forums light up with arguments. Your manual has the final say, and they don’t agree.
Honda manuals for the CRF260 COTA and CRF1000 Africa Twin specify using the side stand, while other manufacturers or common practice may specify a center stand or paddock stand.
Where this goes sideways: Measuring slack with the bike on a center stand when the manual says side stand. You’ll get a looser measurement, tighten the chain further, and end up with a dangerously over-tight chain once the bike’s weight compresses the suspension.
The rule is simple: do what your manual says. If it says side stand, measure with the bike on the side stand. If you only have a rear stand, be aware your measurement will be off. The safest default for home mechanics without the manual is to mimic the bike’s static, laden state, side stand, no rider. And always measure at the chain’s tightest point, midway between the two sprockets on the lower run.
The Post-Adjustment Checklist: Don’t Just Put the Tools Away
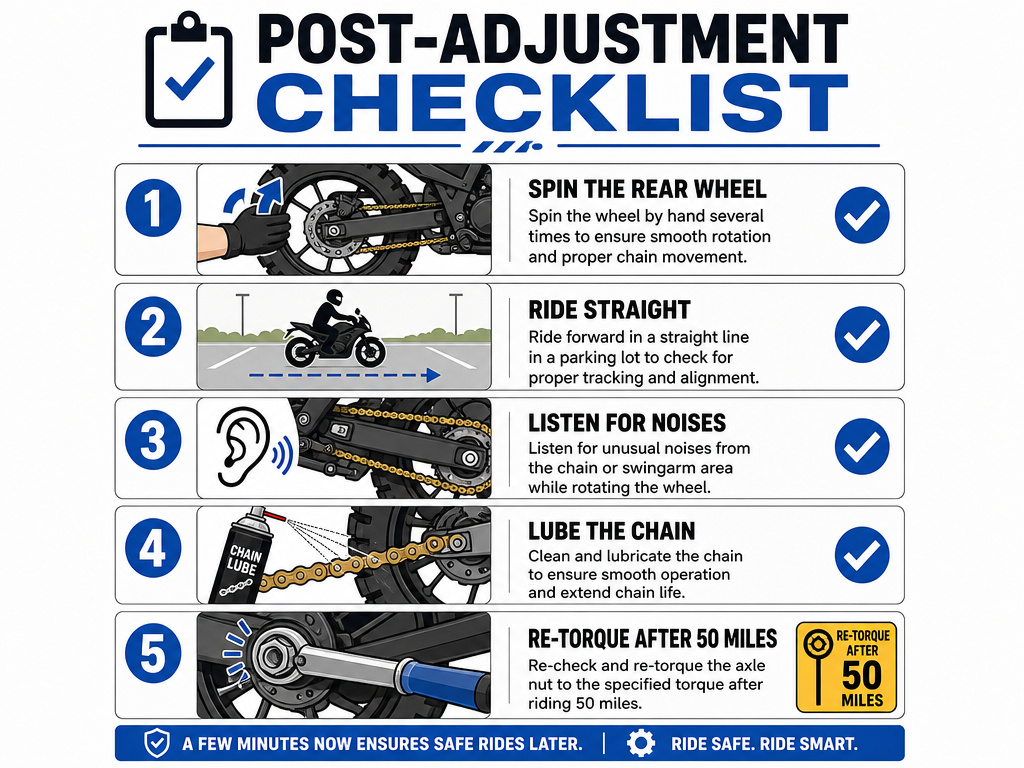
An adjustment isn’t done when the lock nuts are tight. A quick verification ride catches problems before they become dangerous.
- Test the wheel spin. Before you start the bike, spin the rear wheel by hand. It should rotate freely with no binding or rough spots from the chain. A dragging brake or misaligned wheel will feel stiff.
- Do a slow-speed parking lot test. Ride in a straight line at walking speed and let go of the bars (briefly, in a safe area). If the bike pulls to one side, your wheel alignment is off. Go back and check your adjuster marks.
- Listen. After the test ride, while the bike is still on the stand, check for any new rubbing sounds from the chain against the swingarm slider.
- Lube it. You’ve likely moved the chain over fresh, dry rollers. Apply your preferred chain lube thoroughly. Let it soak in for a few minutes before riding.
- Re-torque after 50 miles. This is the step nobody does, and it’s the one that finds loose hardware. After a short ride, let the bike cool and put the torque wrench back on the axle nut. You’ll be surprised how often it needs another quarter-turn.
When Adjustment Isn’t Enough: Signs You Need a New Chain
Adjusters have a limit. If you’re running out of room or the chain slack keeps increasing rapidly, you’re done adjusting. It’s time for a chain replacement.
Rotate the wheel and check chain slack in several sections. If slack in one section increases beyond the standard measurement, the chain has stretched unevenly and needs to be replaced.
Here are the hard signs:
- Visible tight spots as you rotate the wheel, where the chain feels taut then very loose.
- The adjuster blocks are at the end of their travel. You can’t tighten the chain any further.
- Stiff links. A link that doesn’t bend freely will cause a clunking sound and accelerate wear.
- Rust or cracked O-rings. Surface rust can be cleaned, but deep rust or dried, cracked rubber seals means the internal lubricant is gone and wear is accelerating.
If you see these, start shopping for a new chain and sprocket set. Always replace both sprockets with the chain. A new chain on worn sprockets will be destroyed in a few hundred miles.
What is the typical chain slack range?
There is no single typical range. The correct slack is specific to a bike’s design. For example, a small street bike like the Honda CBF250 uses a narrow 15–25 mm range. A sport-oriented model like the Honda CRF260 COTA uses 25–35 mm. A large adventure bike with long suspension travel, like the Honda CRF1000 Africa Twin, requires more slack at 35–45 mm. A dirt bike’s specification would be different again. Using the wrong range can cause damage; too little slack overloads bearings, while too much can let the chain hit the frame or swingarm. Always find the specification for your exact motorcycle.
Frequently Asked Questions
How often should I adjust my motorcycle chain?
Check slack regularly as recommended in your owner’s manual. Adjust it only when it falls outside the manual’s specification. The Honda CBF250 manual recommends checking every 1,000 km (600 miles). During a new bike’s break-in period, like with the CRF260 COTA, check it more often as the chain seats in.
What is the “12-second rule” for chain slack?
Forget it. It’s an old, imprecise mechanic’s trick, pushing the chain up and counting how long it takes to fall. It doesn’t account for different bike weights or spec ranges. Use a ruler and your manual’s millimeter spec every time.
Can I adjust the chain with the bike on the side stand?
Yes, if your manual specifies that condition. The Honda Africa Twin and CRF260 COTA manuals explicitly say to use the side stand. If your manual says to use a center stand, use that. The key is consistency: always measure in the same state.
My chain is noisy after adjustment. What did I do wrong?
Three likely causes. First, you forgot to lubricate the chain after adjusting. Second, you overtightened it, causing a high-pitched whine. Third, the wheel is misaligned, causing the chain to run at an angle and whine against the sprocket. Re-check your slack and alignment.
Do I need a special tool to adjust chain slack?
No special tool is required, but a torque wrench is strongly recommended for the axle nut. A basic chain alignment tool is also cheap and eliminates guesswork from keeping the wheel straight. For final drive systems that aren’t chain, the process is different, learn about belt drive tension adjustment.
The Bottom Line
Adjusting chain slack is a ten-minute job that protects a thousand dollars worth of drivetrain. The sequence is universal, but the numbers are not. Your manual’s slack range and torque specs are law. Overtightening is a faster route to a repair bill than a slightly loose chain. Use a torque wrench, check for tight spots, and lube the chain when you’re done. If your adjusters are maxed out or the chain is uneven, stop adjusting. It’s time for a new chain and sprockets. Do this simple check monthly, and your chain will last for thousands of predictable miles.
