
How Does Heated Motorcycle Gear Work?
This post contains affiliate links. As an Amazon Associate, we earn from qualifying purchases.
Heated motorcycle gear works by using a four-part electrical circuit, source, path, load, and control, to convert your bike’s battery power into heat through resistive elements woven into the fabric. The bike’s 12V system provides the source, wires and connectors are the path, the heating panels are the load, and a temperature controller manages the flow. Harley-Davidson heated gear, such as a jacket liner, can draw 6.00 amps when cold, and a vest liner can draw 3.87 amps, specific loads your bike’s charging system must support without draining the battery.
That specific amperage draw is the whole game. Your bike’s stator has a finite output, measured in amps at your cruising RPM. If the total draw of your heated gear and other accessories exceeds what the stator can produce, you drain the battery. The system isn’t magic; it’s basic electrical math applied to your back, hands, and feet. Understanding how does heated motorcycle gear work is key to this calculation.
What follows: a breakdown of the four-part circuit, the materials inside your gear, and the exact math to check your bike’s capacity, all central to how does heated motorcycle gear work. We’ll walk through the wiring, the controllers, and the common failure points that leave you cold. By the end, you’ll know whether your bike can handle a full kit and how to install it without frying anything.
Key Takeaways
- Heated gear is a simple resistive circuit, electricity flows through a wire that resists the flow, creating heat. The four parts are source (battery), path (wiring), load (heating element), and control (switch/controller).
- Your bike’s charging system capacity is a fixed limit you must respect. You must know your stator’s output at cruising RPM and subtract the draw of all existing lights, fuel pumps, and electronics. The leftover amps are what’s available for heated gear.
- One harness per rider is a hard safety rule from manufacturers like Gerbing. Never interlink a rider and passenger’s gear on a single harness; the combined draw can overload the circuit and create a fire hazard.
- The co-ax 2555 plug is the most common connector for heated gear. It’s designed to prevent polarity reversal and keep the hot terminal from contacting the bike’s frame, which is often used as a ground path.
- Heated gear is a mid-layer, not an outer shell. Harley-Davidson states its gear should be worn over a light shirt, while Tourmaster advises wearing its gear over one thin layer but warns that effectiveness is reduced over thicker items like jeans.
The Four-Part Circuit Explained
Every piece of heated gear, from a glove to a full jacket liner, is a complete electrical circuit. The National Highway Traffic Safety Administration (NHTSA) breaks this down in their official motorcycle component service bulletin for diagnosing heated grips. The same four parts apply to any heated clothing.
The source is your motorcycle’s 12-volt battery. This is the power supply. The path is the wiring, connectors, and harness that carry electricity from the battery to the gear. The load is the heating element itself, the wire or carbon fiber panel inside the fabric that creates heat by resisting the electrical current. The control is the switch or digital controller that adjusts the current flow to change the heat level.
If any one of these four parts fails, the circuit is broken and you get no heat, which is a key point in understanding how does heated motorcycle gear work. A blown fuse breaks the path. A broken wire inside a glove severs the load. A faulty controller won’t complete the circuit. It’s that simple.
This is the basic electrical principle behind all 12V heated gear: a complete circuit with a resistive load. The heat generated is proportional to the current (amps) flowing through the element and its resistance (ohms), following Joule’s law.
So when your glove stops warming, you don’t blame “the heater.” You check the circuit. Start at the battery connection, then the fuse, then the controller, then the gear itself. One break kills it all.
How the Heating Elements Actually Work
The “heater” in your gear isn’t a miniature space heater. It’s a long, thin, resistive wire or fiber woven or sewn into the fabric in a serpentine pattern. When electricity passes through it, the material resists the flow, and that resistance converts electrical energy into thermal energy, heat.
Two main types of elements are common. Steel fiber elements, like those in the Tourmaster Synergy 2.0, are durable strands of steel alloy. Carbon fiber elements are thinner and more flexible, often used in higher-end gear for a less bulky feel. Both work on the same resistive principle.
The element is laid out in zones, typically chest, back, and sometimes sleeves in a jacket. These zones are wired in parallel, so if one zone fails, the others can still work. The wiring is insulated and then laminated between layers of fabric to protect it from moisture, abrasion, and your body’s movement.
You don’t feel a wire. You feel warmth. That’s because the element distributes heat across the entire panel. A good element heats evenly; a failing one develops hot or cold spots where the wire is damaged or a connection has corroded.
Where this goes sideways: Assuming a battery tender lead can power your gear. The light-gauge wires in a float-charger harness aren’t rated for the power draw of heated gear, a jacket liner can pull 6 amps. Using that harness risks overheating the wires, melting the insulation, and starting an electrical fire. Use the manufacturer’s supplied harness.
Your Bike’s Electrical Limits: The Stator Math
This is the part that stops most riders cold, pun intended. Your motorcycle’s electrical system is not a bottomless well. The stator, the generator inside your engine, produces a finite amount of alternating current (AC), which is then converted to direct current (DC) by the regulator/rectifier to charge the battery and run everything.
The key number is your stator’s output in amps at your typical cruising RPM. You find this in your factory service manual. It’s not the peak output at redline; it’s the output at, say, 3500 RPM in top gear. That’s what’s available while you’re riding down the highway.
| Component | Typical Amperage Draw (12V, Cold) | Notes |
|---|---|---|
| Harley-Davidson Jacket Liner | 6.00A (77W) | Largest single draw. |
| Harley-Davidson Vest Liner | 3.87A (44W) | |
| Harley-Davidson Pant Liner | 3.87A (44W) | |
| Harley-Davidson Gloves | 2.28A (22W) | Per pair. |
| Headlight (Low Beam) | ~3-5A | Check your manual. |
| Fuel Pump & ECU | ~5-7A | Constant draw. |
| Tail Light & Brake Light | ~1-3A |
Here’s the calculation you must do before you buy gear. Find your stator’s cruising output. Subtract the draw of all your bike’s always-on components (lights, ECU, fuel pump). The remaining amps are your budget for accessories like heated gear.
If your stator puts out 30 amps at cruise and your bike uses 18 amps for itself, you have a 12-amp budget. A jacket liner (6A) and gloves (2.2A) total 8.2A, that fits. Add a vest for a passenger (3.87A) and you’re at 12.07A, over budget. At that point, you’re draining the battery, not charging it.
Some bikes actually discharge at idle. If you sit at traffic lights for long periods with heated gear on high, you can drain the battery enough that the bike won’t restart. This is why a properly functioning charging system and battery are essential.
The math isn’t optional. Guessing burns out stators and leaves you stranded.
Power Sources: Bike Battery vs. Portable Battery
You have two main ways to feed this circuit: plug into the motorcycle’s 12V system or use a portable battery pack. Each has a specific job.
Bike-Powered (12V) Systems are for long rides. They connect via a harness connected to the battery and draw power directly from the motorcycle’s electrical system. The advantage is unlimited runtime as long as the engine is running and the stator can keep up. The disadvantage is the installation and the strict electrical math we just covered.
Portable Battery-Powered Systems are for short trips, commuting, or use off the bike. They have a built-in lithium-ion battery, like the Synergy Pro Plus series. The advantage is simplicity, no bike wiring. The disadvantage is strict runtime limits. A jacket on high has a finite runtime; on a lower setting, runtime is longer. When the battery dies, the heat stops.
| Power Source | Best For | Major Limitation |
|---|---|---|
| Motorcycle 12V System | Long-distance touring, cold climates. | Requires spare stator capacity and correct installation. |
| Portable Battery Pack | Short commutes, layering for variable weather, use off the bike. | Finite runtime; battery must be recharged. |
| Hybrid Systems (12V with battery backup) | Riders who want both options. | Most expensive and complex. |
The choice between battery vs 12V heated gear comes down to your riding style. If you ride for hours in the cold, the bike-powered system is the only serious option. If you just need to take the chill off a 30-minute commute, a battery-powered vest is simpler.
Some newer bikes with CANBUS electrical systems complicate the 12V option. CANBUS systems monitor current draw and may shut off an accessory port if it detects what it thinks is a fault. For these bikes, a direct-to-battery harness is often the only reliable method.
Controllers and Heat Settings
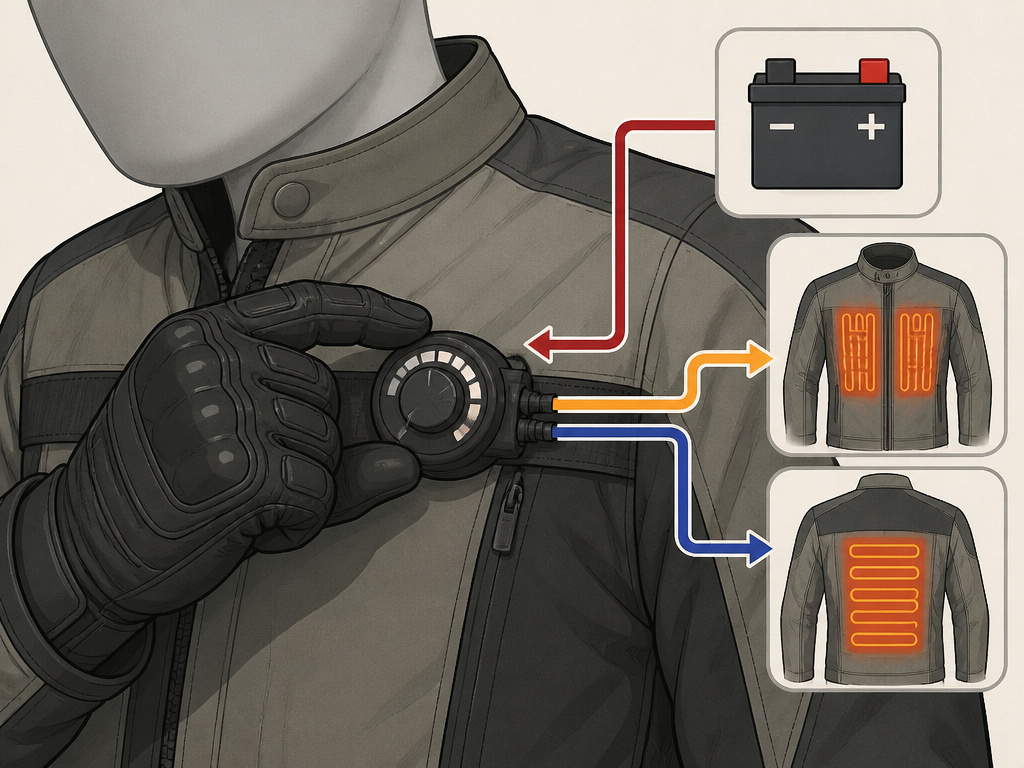
The controller is the “control” part of the circuit. It’s a variable resistor or a pulse-width modulation (PWM) device that regulates how much current reaches the heating element. More current = more heat.
Basic controllers offer 3-5 heat settings (Low, Medium, High). These are usually simple resistors that drop a set voltage, limiting the current. Advanced controllers, like Harley-Davidson’s One-Touch Programmable, are digital. They let you set a specific temperature or customize heat by zone (e.g., more heat on the chest, less on the back).
The controller is your point of failure. If the dial gets wet or the internal circuit fries, your gear might stick on high, shut off, or flicker. Most controllers are wired between the battery harness and the gear itself. Some, like the Gerbing system, use a dual controller that manages a jacket and gloves in a daisy chain.
Easy to miss: Turning the gear off before turning off the engine. Gerbing’s manual states this explicitly. If you kill the engine with the gear still on, the initial voltage spike from the regulator/rectifier can feed back into the controller and damage its sensitive electronics. Make it a habit: gear off, then engine off.
How to Layer and Wear Heated Gear Correctly
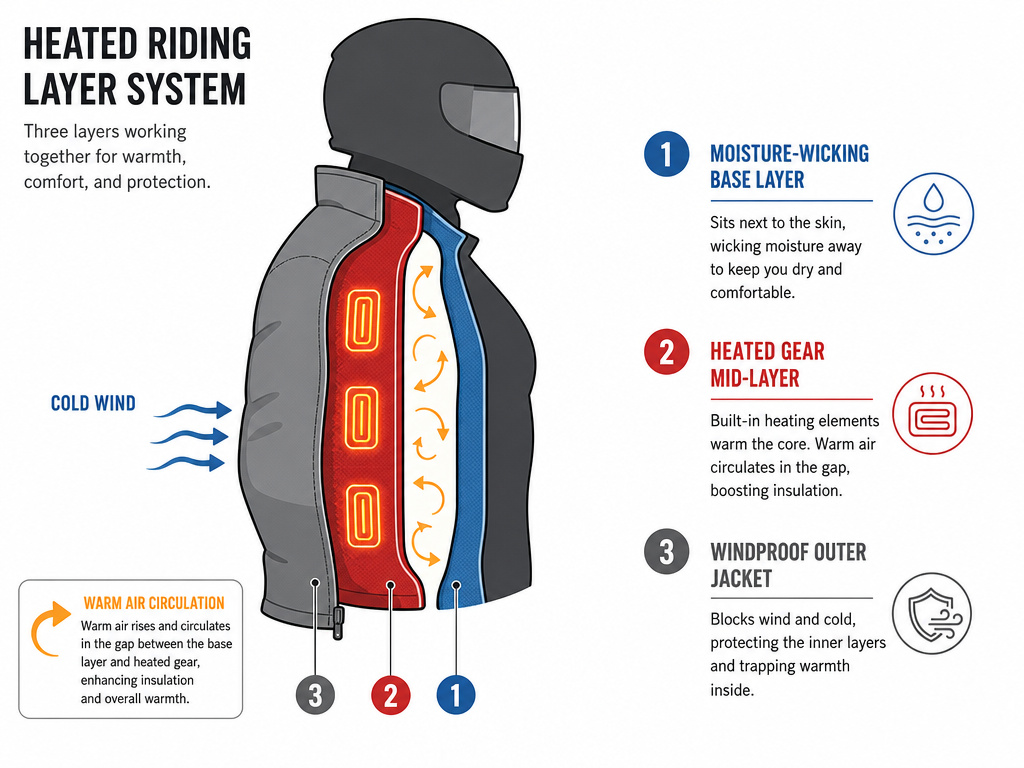
Heated gear is a tool, not a miracle. It works within a layering system. The manufacturer instructions are specific, and they disagree slightly on the details.
Harley-Davidson’s manual for their BTC gear states it is “not required to be worn snug to the body as the gap between the rider and the garment is beneficial to the heat transfer process.” They recommend wearing it beneath a leather or textile riding jacket.
The Tourmaster Synergy manual says the gear is “most effective when worn over one thin layer.” But it warns that wearing it over “jeans or sweatpants” reduces effectiveness.
The consensus: wear a thin, moisture-wicking base layer. Put the heated gear on over that. Then put your windproof, insulated riding jacket over the heated gear. The heated gear is a mid-layer. It is not your outer shell. The gap they mention allows warm air to circulate, improving convection heating. Wearing it directly against your skin can create hot spots and reduce the area heated.
For your legs, the same rule applies. Thin base layer, heated pant liner, then your riding pants or overpants. The heat needs to radiate out, not be compressed against your skin by tight outerwear.
This layering is why fit matters. A heated liner that’s too tight under your jacket compresses the elements and restricts airflow. One that’s too baggy can let the elements shift and create uncomfortable pressure points. You’re looking for a fit that allows easy movement with your outer jacket on.
Troubleshooting Common Problems
When heat fails, it’s always one of the four parts of the circuit. Here’s a diagnostic flow.
No heat in any gear:
- Source/Path: Check the battery connection. Is the harness plugged in? Is the fuse in the harness blown? Use a multimeter to check for 12V+ at the harness plug.
- Control: Is the controller turned on? Does it have power? If it’s a wired controller, check its connections.
Heat in one piece of gear but not another (in a daisy chain):
- Path: The connection between the two pieces is the culprit. Unplug and replug the co-ax connector. Look for bent or corroded pins.
- Load: The heating element in the cold gear may have a break. This is common in gloves where wires flex thousands of times.
Low heat or heat that fades at idle:
- Source: Your stator isn’t keeping up. This is the electrical load calculation problem. At idle, stator output drops. If your total draw exceeds output, voltage drops, and heat fades. Rev the engine; if heat returns, you’ve confirmed a capacity issue.
- Path: A corroded or loose connection creates resistance, which drops voltage before it reaches the element.
For heated grips, the NHTSA heated hand grip function report gives a specific test: if only the right grip is cold, disconnect it and test resistance across the grip’s terminals. You should measure 1 to 9 ohms. A reading outside that means the internal coil is broken and the grip needs replacement.
Cold spots within a single garment usually mean a broken element wire. You can’t fix this; the garment needs repair or replacement. This is why you store gear folded, not crumpled, and never fold it while it’s plugged in.
Is Heated Motorcycle Gear Worth It?
It depends on how you ride and where you live. For the rider who pushes into spring and fall, or who tours through mountain passes, it makes a major difference. It extends your riding season by hours per day and increases safety by keeping you alert and your muscles relaxed.
The value proposition isn’t just about comfort. Shivering riders tense up, react slower, and make poor decisions. Cold hands lose dexterity, affecting brake and clutch control. Heated gear directly counters that. Compared to the cost of a slide because you were too stiff to counter-steer properly, it’s cheap insurance.
But it’s not the first thing you buy. My stance is unchanged: heated grips are a better winter investment than any heated gear layer. Cold hands ruin control before a cold core does. Start with heated grips and a windscreen or handguards. Then, if you still have cold spots on your core or feet, add heated gear.
For the fair-weather rider who only goes out on sunny 70°F days, it’s hard to justify the cost and installation hassle. A good insulating layer and a windproof shell will suffice.
If you decide it’s worth it, start with a vest or jacket liner. They provide the most warmth for the draw and are the easiest to integrate. Look at the best heated gear reviews to see which models have proven durable. Brands like Gerbing and Warm & Safe have long track records. The Harley-Davidson One-Touch Programmable gear is for serious cold, rated down to 32°F (0°C).
Types of Heated Motorcycle Gear
Heated gear comes in many forms to protect different parts of your body. The core pieces are jackets and liners, which are designed as a mid-layer to be worn beneath your regular riding jacket, not as a replacement for it. Vests and pant liners provide focused warmth for your torso and legs. Heated gloves are crucial for keeping your hands functional, and some riders opt for heated grips as an alternative or supplement. Heated socks are also available for cold feet. The heating elements inside these garments are typically made from durable materials like steel fibers. For the best heat transfer, these liners do not need to be worn snug against your skin; a small gap between you and the garment can actually be beneficial.
How Heated Gear Improves Riding Safety
Staying warm is a direct contributor to motorcycle safety. Cold hands lose dexterity, making it difficult to operate controls smoothly and effectively. When your core body temperature drops, your focus shifts from the road to your own discomfort, leading to distraction and mental fatigue. Physical fatigue from shivering also sets in faster. Heated gear combats this by maintaining a comfortable temperature, which allows you to keep your attention on riding. Remember the wind chill effect; even in moderately cool weather, riding at speed can create a much colder environment. By preventing the cold from sapping your energy and concentration, heated clothing helps you stay alert and in control for the duration of your ride.
Frequently Asked Questions
Is heated motorcycle gear safe?
Yes, when installed and used according to the manufacturer’s instructions. The circuits include fuses, and connectors are designed to prevent short circuits. The primary risk comes from incorrect installation, using undersized wires, tapping into the wrong power source, or overloading the bike’s electrical system. Follow the manual.
How do I connect heated gear to my motorcycle?
You install a dedicated battery harness. This involves connecting a fused positive wire and a negative wire directly to your motorcycle’s battery terminals. You must disconnect the battery (negative cable first) before starting. The harness plug then hangs out under the seat for you to plug your gear into. Never use an existing battery tender harness for power.
Can I wear heated gear in the rain?
Most heated gear is water-resistant or has waterproof models (like Harley-Davidson’s overpants). The electrical elements are insulated and sealed within the fabric. However, the connector where you plug in is often not waterproof. Keep that connection under your seat or inside a waterproof bag. Don’t submerge the controller.
What’s the difference between heated grips and heated gloves?
It’s a heated grips vs gloves choice. Heated grips warm your palms from the inside out but do nothing for the backs of your fingers, which face the wind. Heated gloves warm the entire hand. The most effective solution is often both: grips for the palms, gloves for the tops of the hands, and handguards to block the wind entirely. For a full breakdown, see our guide on how to keep your hands warm.
How long does battery-powered heated gear last?
It depends on the battery capacity (measured in watt-hours or mAh) and the heat setting. A typical integrated battery jacket has a finite runtime that varies with the heat setting. You must recharge the battery between uses. These systems are best for short, predictable trips where you can recharge daily.
Before You Go
Heated gear turns electricity into warmth through a simple resistive circuit. The technology is straightforward. The challenge is matching it to your motorcycle’s finite electrical system.
Do the stator math first. Crack open your service manual, find the output at cruising RPM, and subtract your bike’s constant draws. That number is your truth. If your leftover amperage is less than the draw of the gear you want to use, it will drain the battery. Start with a lower-draw vest or focus on heated motorcycle grips versus gloves for your hands.
When you install, use the harness that came with the gear. Disconnect the battery negative terminal first. Connect the positive ring terminal to the positive battery post. Don’t pinch the wires under the seat. That’s the recipe that avoids fires and fried controllers.
For most riders extending their season, the answer is a bike-powered system. It’s an investment in miles. For the commuter or occasional chilly rider, a battery-powered vest might be the simpler, smarter buy. Either way, now you know the circuit that makes it work.
