
Types of Motorcycle Armor: CE Levels and Materials
This post contains affiliate links. As an Amazon Associate, we earn from qualifying purchases.
Motorcycle armor is protective padding certified to European (CE) standards, inserted into jackets, pants, and suits at key impact zones like shoulders, elbows, knees, and the back. The two main types are CE Level 1 (basic impact absorption) and Level 2 (higher absorption), made from materials like closed-cell foam or advanced viscoelastic polymers like D3O. The armor’s certification (EN 1621-1 for limbs, EN 1621-2 for back) and its integration into a certified garment (EN 17092 Class AAA, AA, A, B, or C) are separate but critical factors for real-world protection.
That separation between the pad and the garment it lives in is where most buying guides stop. They list the standards and materials, which is fine. But a certification label on a protector that slides into your armpit when you tuck into a riding position is a label on a useless piece of foam. The armor only works if it stays between you and the road.
What follows breaks down the labels, the physics, and the practical gaps. This section explains the CE levels and how their force transmission numbers relate to injury research, the garment classes from AAA to C, and the materials from basic foam to high-tech viscoelastic. The goal is to move past the marketing and into what you can actually trust when you lean into a corner.
Key Takeaways
- CE certification is the baseline, but Level 2 armor transmits less than 20 kN of force to limbs, a stricter standard than Level 1’s 35 kN limit.
- The EN 17092 garment class (AAA, AA, A, B, C) dictates overall abrasion and impact protection, separate from the CE level of the individual armor pads inside it.
- Closed-cell polyurethane foam is the most common armor material due to low cost, but advanced materials like D3O and similar viscoelastic polymers offer better flexibility at riding temperatures.
- Research cited in the Wikipedia entry on motorcycle armor notes that the allowable force in the CE standard may be too high to effectively prevent injury, highlighting a key gap between certification and real-world biomechanics.
- Armor has a finite lifespan and degrades with impacts, UV exposure, and sweat; inspect it annually and replace it if it’s cracked, hardened, or has been in a crash.
What Are the CE Armor Certification Levels?
The CE standards define how much force an armor pad can transmit to your body. For limb protectors (shoulders, elbows, knees, hips), the relevant standard is EN 1621-1:2012. It sets two performance levels.
CE Level 1 armor must transmit less than 35 kilonewtons (kN) of force, with no single test result exceeding 50 kN. CE Level 2 is stricter, requiring less than 20 kN transmitted, with no single test over 24 kN.
Where this goes sideways: Assuming Level 1 is “good enough.” The standard also requires a permanently affixed label on the protector detailing its performance. Level 2 is the better minimum.
This recognizes the spine’s vulnerability. The standard also requires a permanently affixed label on the protector detailing its performance.
Here’s the crucial bit the label doesn’t tell you: certification tests armor lying flat on a steel anvil. It doesn’t test how well your jacket keeps that pad over your elbow when you’re stretched out reaching for the handlebars. A Level 2 pad in the wrong place is a Level 0 pad.
| CE Level | Standard | Max Force Transmission (Limb) | Intended Use |
|---|---|---|---|
| Level 1 | EN 1621-1:2012 | < 35 kN | Basic impact protection for general street riding. |
| Level 2 | EN 1621-1:2012 | < 20 kN | Higher protection for sport, touring, or high-risk riding. |
| Level 1 | EN 1621-2:2014 (Back) | ≤ 18 kN | Basic back protection. |
| Level 2 | EN 1621-2:2014 (Back) | ≤ 9 kN | Superior spinal protection, often used in race suits. |
How Does Motorcycle Armor Work?
Armor doesn’t make you invincible. It manages energy. In a crash, your body decelerates violently when it hits the road or another object. Armor spreads the impact force over a larger area and a longer period of time, reducing the peak force that reaches your bones and tissues.
Think of it like the difference between stepping on a nail and stepping on a board with a nail in it. The nail focuses all the force on a tiny point. The board distributes it. Good armor is that board. It absorbs energy through material deformation—either by crushing (like foam) or by temporarily changing state (like viscoelastic materials).
The common closed-cell polyurethane foam armor works by permanently crushing its internal cell structure. You can sometimes hear a faint crunching sound when you squeeze a worn-out piece. Once crushed, it’s significantly less effective. More advanced materials are designed for multiple impacts.
The Main Types of Motorcycle Armor Materials
Not all padding is armor. The stuff that comes stock in a cheap jacket might be thin, open-cell foam that offers no meaningful certification. Real armor falls into a few material categories, each with trade-offs between protection, flexibility, cost, and breathability.
1. Foam Armor (Closed-Cell Polyurethane)
This is the default. The Motorcycle Minds safety publication notes it’s the most common type, made via an injection moulding process. It’s low-cost and reliable but can be bulky. To achieve higher protection levels (CE Level 2), the foam often needs to be quite thick, which can limit movement. Some versions now incorporate mesh structures for breathability, but the guide states these “are more suited to low-impact energy absorption.”
2. Viscoelastic Polymer Armor (e.g., D3O, SAS-TEC)
These are the “smart” materials. At rest, they’re soft and flexible, molding to your body for comfort. Upon a sharp impact, the material locks together and becomes rigid, absorbing and dispersing energy. After the impact, it returns to its flexible state. This gives you Level 2 protection in a slimmer, more comfortable package. The trade-off is often higher cost and sometimes sensitivity to temperature—some older formulations could stiffen in the cold.
3. Hard Shell Armor
This type combines a hard plastic outer shell with an inner foam layer. The shell’s job is to slide on the pavement, distributing abrasion and impact forces across its surface. It’s very effective at preventing focused point impacts (like hitting a curb edge) and is common in off-road knee guards and shoulder protectors. The downside is reduced flexibility and often more weight.
4. Inflatable Armor
It uses a gas cartridge or electronic trigger to inflate airbags around the neck, chest, and back within milliseconds of detecting a crash. It’s for supplemental protection and is astronomically more expensive, but it represents the high-end of impact protector technology.
| Material Type | How It Works | Pros | Cons | Best For |
|---|---|---|---|---|
| Foam (Closed-Cell) | Cells crush to absorb energy. | Inexpensive, reliable, good breathability in mesh designs. | Can be bulky for high protection, single-impact lifespan. | Budget gear, low-speed commuting. |
| Viscoelastic (D3O) | Molecules lock under impact. | Slim, flexible, multi-impact, high protection level. | More expensive, some temp sensitivity. | Everyday riding where comfort and protection are both priorities. |
| Hard Shell | Hard outer slides, foam inside absorbs. | Excellent abrasion and point-impact resistance. | Less flexible, heavier, can be noisy. | Off-road, adventure riding, sport riding. |
| Inflatable | Airbags deploy to cocoon areas. | Unmatched coverage and energy absorption for torso/neck. | Very high cost, single use, system complexity. | Touring riders seeking maximum supplemental protection. |
EN 17092 Garment Classes: From AAA to C
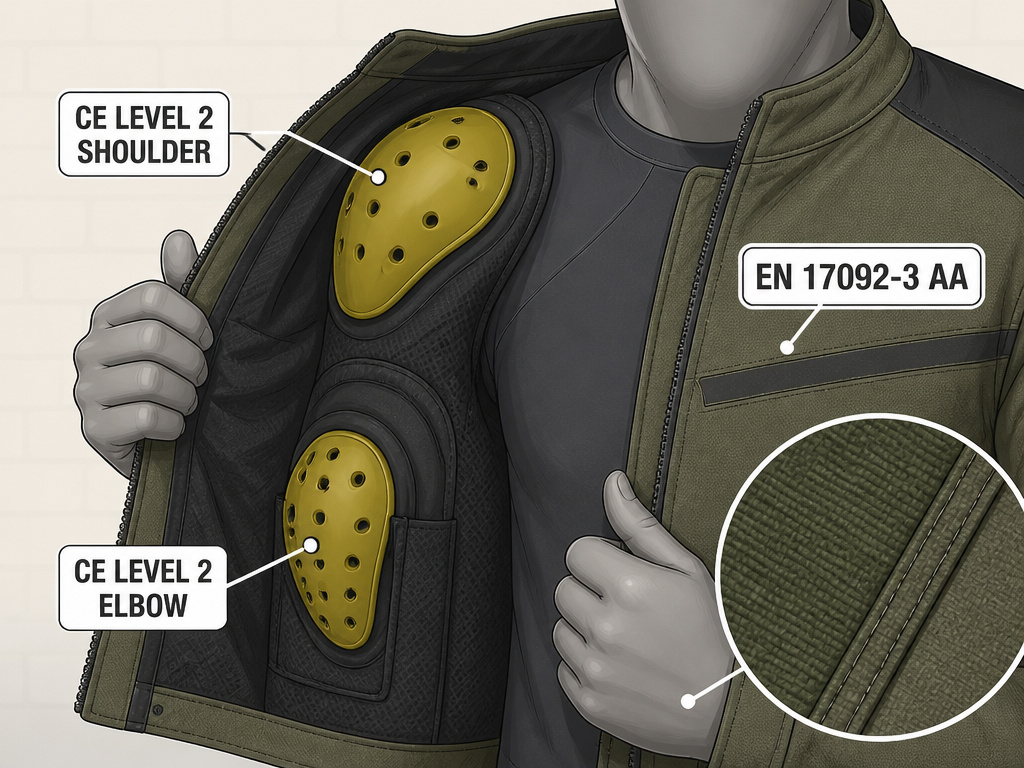
This is where people get confused. The CE level (1 or 2) rates the individual armor pad. The EN 17092 class (AAA, AA, A, B, C) rates the entire garment’s protective capability, including its abrasion resistance, seam strength, and how the armor is integrated.
Think of it this way: CE level is the bullet rating of the plates in a vest. The EN 17092 class is the rating of the whole vest, including the fabric that holds the plates. You need to understand both.
- Class AAA (EN 17092-2): The highest level. Think one-piece race suits or heavy-duty two-piece suits. The standard says they “may have limiting ergonomic, weight and thermal penalties.” This is maximum protection for high-risk environments.
- Class AA (EN 17092-3): The performance sweet spot for many riders. Offers high protection with “lower ergonomic and weight penalties than Class AAA garments.” Most quality standalone jackets and pants aim for AA.
- Class A (EN 17092-4): The minimum necessary degree of protection for a garment to be certified as Personal Protective Equipment (PPE). It has the “least ergonomic and weight penalties.” Good for casual or warm-weather riding where you still want certified protection.
- Class B (EN 17092-5): A specialized class. These garments offer the abrasion resistance of a Class A garment but contain no impact protectors. The standard recommends wearing them with separate EN 1621-1 shoulder, elbow, or knee protectors. It’s for modular layering systems.
- Class C (EN 17092-6): This isn’t a jacket you wear alone. Class C garments are “specialized non-shell” items like armor vests or shirts “designed only to hold one or more impact protectors in place.” They provide “supplemental impact protection only” and must be worn under or over another garment. They offer no standalone abrasion protection.
Common mistake: Buying a Class B jacket and thinking you’re fully protected. Without adding separate shoulder and elbow impact protectors, you have zero certified impact protection. The garment is just abrasion-resistant fabric.
Where Should Armor Be Placed? Understanding Risk Zones
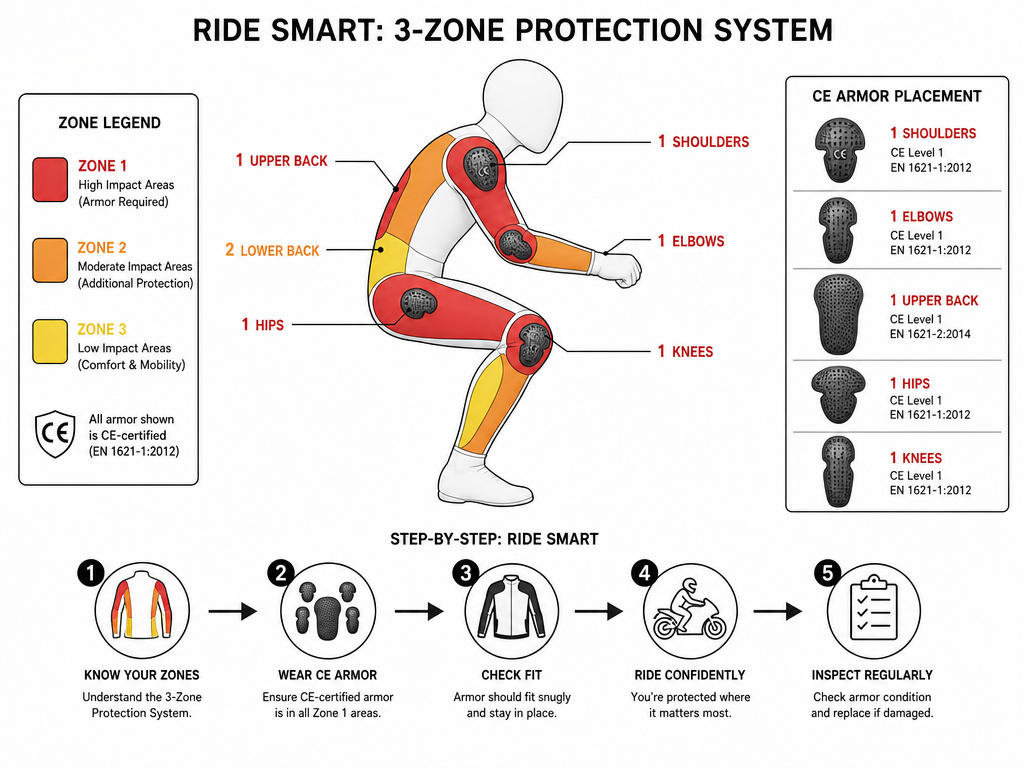
The EN 17092 standards use a “risk category zoning” principle. Zones are defined by the likelihood an area will suffer mechanical stress in a crash. Armor placement prioritizes Zone 1.
- Zone 1 (High Risk): Shoulders, elbows, knees, hips, and the spine. These are the primary impact points in a typical motorcycle fall. Any certified garment must have armor here, or have pockets for it.
- Zone 2 (Moderate Risk): Areas like the forearms, shins, and upper back/shoulder blades. Damage here is more likely from abrasion and tearing than direct impact.
- Zone 3 (Low Risk): Areas with minimal expected contact, like the lower back (below the spine) or the sides of the calves. You rarely see armor here.
Your chest protectors are a special case. While not always required by the garment class, they protect a vital Zone 1 area. Standards for them exist (EN 1621-3), and they are increasingly common in adventure and sport riding gear.
How to Choose and Maintain Your Armor
Choosing among the types of motorcycle armor isn’t just about picking the highest level. It’s about system integration and honest self-assessment.
First, fit is essential. The fanciest Level 2 D3O motorcycle armor is worthless if it migrates off your knee cap. Sit on your bike in a riding position. Can you feel the pad centered on your elbow? Does your back protector sit squarely along your spine from your tailbone to your neck? If not, adjust the straps or pockets. Our guide on achieving the correct fit for motorcycle armor dives deeper into this.
Second, match the armor to your garment’s class. Upgrading the flimsy foam in a Class A jacket to Level 2 viscoelastic pads is one of the best cost-to-protection upgrades you can make. Conversely, putting Level 1 foam into a premium Class AA jacket is a downgrade.
Third, know the lifespan. Armor degrades. Sunlight, sweat, and temperature cycles break down plastics and foams. More critically, foam armor is designed for a single major impact. After a crash, even if it looks okay, its internal structure is likely compromised.
- Inspect annually: Look for cracks, hardening, or permanent deformation. Flex the pad. Does it feel brittle or crumbly?
- Replace after any impact: If you go down, budget for new armor. It’s cheaper than a broken joint.
- Follow care labels: Don’t machine wash armor unless the manufacturer specifically says you can. Wipe it down with a damp cloth.
For specific product recommendations, our roundup of the best CE-rated motorcycle armor options compares top choices from brands like Knox, Forcefield, and others.
How do I choose armor for my riding style?
Your riding style dictates the level and type of protection you need when you compare the types of motorcycle armor. For street riding, consider the full spectrum of garment classes. Class AA garments generally offer protection against the risks of the greatest diversity of riding activities, and they may have lower ergonomic and weight penalties than Class AAA garments. Foam impact protectors with mesh structures are more suited to low-impact energy absorption, as they become quite thick and less flexible when used for high energy absorption. Remember, no protective garments can offer complete protection against all injuries, especially from high-energy impacts.
Frequently Asked Questions
What are the different levels of motorcycle armor?
There are two primary levels defined by the CE standards: Level 1 and Level 2. Level 1 armor (EN 1621-1) for limbs transmits less than 35 kN of force, while Level 2 transmits less than 20 kN, offering significantly higher impact absorption. Back protectors (EN 1621-2) have separate, stricter limits: Level 1 at ≤18 kN and Level 2 at ≤9 kN.
What is the best type of armor for motorcycles?
There’s no single “best” type—it depends on your riding and priorities. For most street riders seeking a balance of protection, comfort, and cost, CE Level 2 viscoelastic armor (like D3O or similar) is the leading choice. It provides high-level protection in a slim, flexible format. For off-road or adventure riding where abrasion and point impacts are a bigger concern, hard shell armor is often preferable.
Is CE Level 1 armor safe?
CE Level 1 armor is certified and provides a baseline of protection, making it safer than wearing no armor. However, peer-reviewed biomechanical research suggests the force transmission limits for Level 1 may still be too high to reliably prevent fractures in some impacts. For this reason, Level 2 armor is widely considered a more reliable minimum for serious riding.
How often should I replace my motorcycle armor?
You should inspect your armor at least once a year and replace it immediately after any crash where it absorbed an impact. Even without a crash, replace armor that shows signs of degradation: cracking, hardening, crumbling, or if the foam has become permanently compressed. Armor degrades with impacts, UV exposure, and sweat; inspect it annually and replace it if it’s cracked, hardened, or has been in a crash.
Can I upgrade the armor in my jacket?
In most cases, yes. If your jacket has removable armor pockets, upgrading from stock foam to aftermarket CE Level 2 pads is one of the most effective safety upgrades you can make. Ensure the new pads are the correct size and shape for your jacket’s pockets so they don’t shift. This is especially valuable for hip protectors and elbow guards, which often come with basic foam in mid-tier jackets.
The Bottom Line
Motorcycle armor is a system of certified components, not a marketing term. The hierarchy is clear: first, ensure your garment has pockets for armor in all critical Zone 1 areas. Second, fill those pockets with the highest level of CE-certified protection you can afford and that fits correctly—prioritize Level 2. Third, understand that the CE standard’s force limits are a regulatory minimum, not a biomechanical guarantee.
The research conflict is real. The standards certify armor that transmits forces peer-reviewed studies suggest could still cause injury. Your best defense is to treat Level 2 as your true baseline, not an upgrade. Then, focus obsessively on fit and placement. A perfectly fitted, mid-tier pad beats a misaligned flagship protector every time. Finally, don’t set and forget it. Check the placement before every long ride, and swap out pads that have seen too much sun, sweat, or one bad day. Your joints will thank you.
