
How Should Motorcycle Armor Fit: The Two-Point Test
This post contains affiliate links. As an Amazon Associate, we earn from qualifying purchases.
Motorcycle armor fits correctly when it passes two tests: it stays exactly over the joint it protects while you sit in your riding posture, and it lets you move through your bike’s full control range without shifting. The armor’s CE label is meaningless if the pad slides off your elbow or your knee guard blocks the shifter. This is not about comfort, it’s about crash geometry.
That “stays over the joint” clause is where most riders fail first. You check the fit standing up. The armor looks centered. Then you sit on the bike, tuck into position, and the shoulder pad has drifted two inches toward your bicep. This is a perfect example of how should motorcycle armor fit in real riding positions. In a slide, that two-inch gap is where the impact lands.
What follows: the OEM fitting protocols from the manuals, the hard numbers behind Level 1 and Level 2 protection, and the one mistake that turns a back protector into a helmet hazard.
Key Takeaways
- Armor must stay in place over the bone. If it slides when you move your limb, it’s too big or the pocket is wrong.
- Fit in riding posture. Leather needs a snug, almost uncomfortable fit standing up that relaxes on the bike; textile needs room for a midlayer.
- Check for interference. A back protector that is too tall can hit your helmet in a crash, creating a dangerous lever point against your spine.
- Replace armor every three years. Per Leatt’s manual, the foam and plastics degrade with normal use, sweat, and UV exposure.
- Level 2 is not always better. A bulky, ill-fitting Level 2 pad that you avoid wearing provides zero protection. A snug Level 1 pad you always wear is safer.
The Two-Point Fit Test (Step-by-Step)
Forget “snug but not restrictive.” That’s every article ever written. Here is the sequence from the Alpinestars CE manual that actually works.
Put on the full gear you ride in, your base layer, your jacket, your pants, your boots, your gloves. If you use a back protector, wear it now. Zip and fasten everything. For cuffs and ankles, the manual specifies: fasten the internal hook-and-loop strap first, then close the outer zip. Do it in that order. The strap sets the anchor; the zip seals it.
Now, sit on your motorcycle. Assume your normal riding position. This is essential for leather, and it’s the best practice for textile. Stay there for a few minutes. The Alpinestars manual says areas of discomfort may not be immediately noticeable.
While seated, run the two-point check.
Point One: Coverage. Visually and physically check each armor pad, shoulders, elbows, back, hips, knees. Is the hard part of the pad centered on the bony part of the joint? For a knee guard, the Leatt manual says it must be positioned centrally on the knee cap and along the line of your shin. Press on the pad and move your limb. Does the pad stay put, or does it drift toward the softer meat of your arm or leg? If it drifts, it fails.
Point Two: Mobility. Can you operate your controls? Can you look over your shoulder? Can you stand on the pegs? The Leatt knee guard manual is blunt: check that you are able to safely operate your vehicle’s controls with the guard in place. If the armor binds, blocks, or restricts the motion you need to ride, it’s wrong.
Where this goes sideways: Checking fit while standing upright. A leather jacket that feels tight standing will feel tailored on the bike. A textile jacket that feels perfect standing will be too tight with a winter layer. You miss both failures.
If a pad fails, you have three options: adjust the straps (many are adjustable), move the pad within its pocket (some jackets allow this), or replace the pad with a different size or style. The goal is a pad that forgets it’s there until you need it.
Decoding the Labels: What Level 1, Level 2, and CE Really Mean
You see the CE mark and the Level 1 or 2 shield on the tag. That’s a certification, not a performance guarantee for your body. The numbers behind those labels tell you what they bought.
The standards are EN 1621-2:2014 for back protectors and EN 1621-3:2018 for chest protectors. Here’s what the levels translate to in force:
| Protector Type | Level | Performance Requirement (Per Standard) | What It Feels Like |
|---|---|---|---|
| Back Protector | 1 | Average transmitted force ≤ 18 kN; no single impact > 24 kN | Lighter, more flexible, often softer foam. |
| Back Protector | 2 | Average transmitted force ≤ 9 kN; no single impact > 12 kN | Heavier, stiffer, often has a hard plastic shell. |
| Chest Protector | 1 | Soft material, impact attenuation only. | Flexible, often memory foam like D3O. |
| Chest Protector | 2 | Rigid material, impact attenuation and distribution. | Hard plastic shell with foam backing. |
A Level 2 back protector transmits an average force of ≤9 kN, compared to ≤18 kN for Level 1. That’s a big difference. But Level 2 protectors often have a hard plastic shell and can be heavier and less flexible.
The choice isn’t “always buy Level 2.” It’s buy the highest level that you will wear and that fits your gear, which is the core answer to how should motorcycle armor fit. A massive Level 2 back protector that makes you slouch and gets left in the closet is useless. A slim, comfortable Level 1 that’s always between you and the road is doing its job.
Technical Note: These standards define test methods. A protector meeting EN 1621-2:2014 Level 2 has been hit with a 50-joule impact in a lab, and the force measured through it averaged below 9 kilonewtons. Real-world crashes involve more variables, but this is the verified baseline.
Leather vs. Textile: Two Different Rules
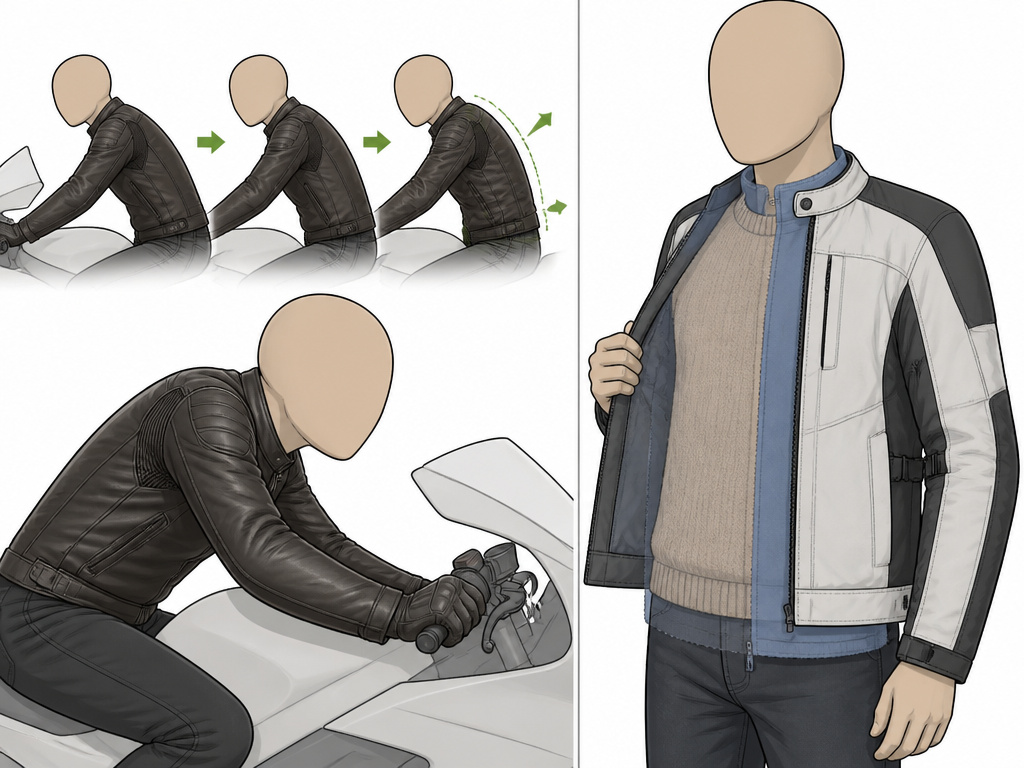
The fit philosophy splits here. The Alpinestars manual, referencing the EN 17092 garment standard, gives different instructions for leather and textile. This is the most missed detail in fitting guides.
Leather garments should have a suitably snug fit optimal for a sport riding position. The manual states they may be uncomfortable in an upright standing position and must be fitted while sitting on the motorcycle. In the riding posture, there should be no excessive pressure points, and apart from the stomach area, no loose material.
Here’s the critical line: “Leather garments become looser over time, so it is better to have a slightly tighter garment which will then relax to a perfect fit.”
You buy leather tight. It will stretch and mold, which is a key principle for how should motorcycle armor fit in leather. If it’s comfortable in the shop, it will be baggy in a year. The gentle pressure you feel across the shoulders and arms standing up should ease when you tuck into riding position.
Textile garments should fit close to the body, but sufficiently loose such that it permits thicker midlayers. You’re planning for layers, a sweater, a fleece, a heated vest. The armor must account for that extra bulk. The fit should be comfortable with your thickest intended layer underneath, not just a t-shirt.
| Garment Type | Initial Fit Feeling | Key Fitting Posture | Long-Term Change |
|---|---|---|---|
| Leather | Snug, possibly tight standing. | Sitting on bike in riding position. | Will stretch and relax (up to 1/2 size). |
| Textile | Comfortable with thickest planned layer on. | Standing and seated, checking for layer bulk. | Minimal stretch; fit is stable. |
This is why borrowing a friend’s jacket rarely works. Their stretched-in leather will be loose on you. Their textile jacket sized for their winter liner will swim on you in summer.
Sizing Traps: Numeric vs. Alphabetic and Limb Lengths
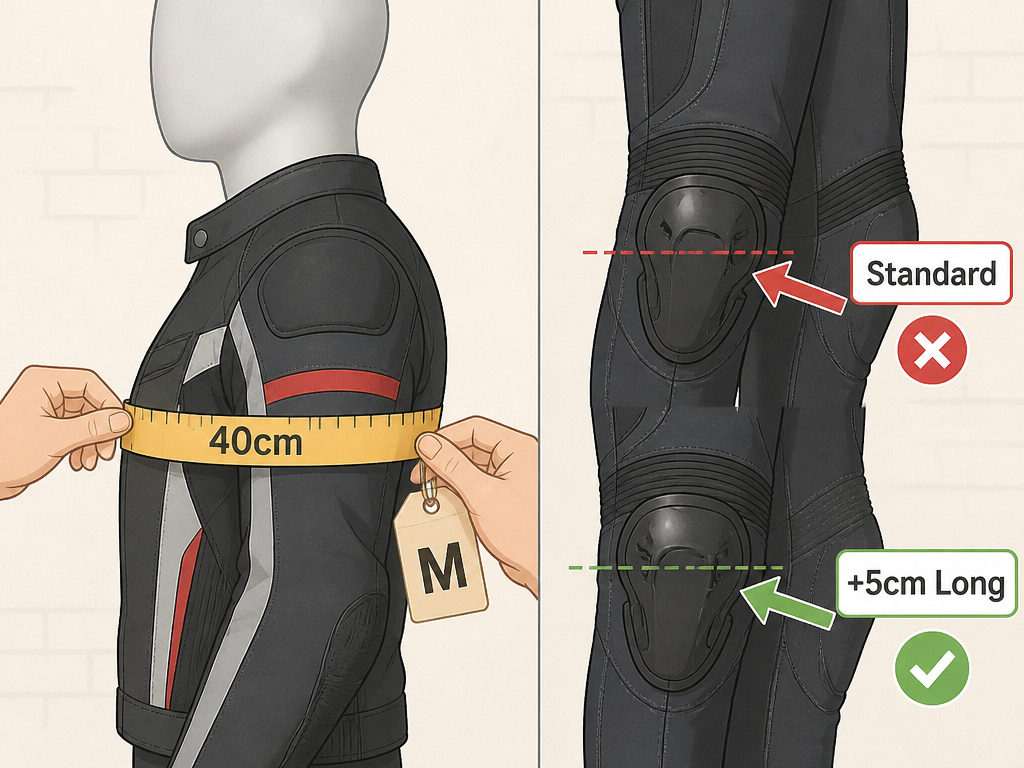
You wear a size 40 jacket or a Medium. Those are not the same thing, and the manual points out the trap.
For CE-certified gear, numeric sizes (40, 42, 44) correspond to half of the chest circumference in centimeters. The measuring limits for a numeric size fall within a “specified range.”
Alphabetic sizes (S, M, L) have a wider range for measuring limits. A Medium might cover a range that could fit a numeric 40 or a 42 body. There’s more slop in the system. If you are between sizes, a numeric size is more likely to get you a precise fit.
The other trap is limb length. Some brands, like Alpinestars, offer certain pant models in short or long leg lengths (+5 cm leg length). A knee guard in a standard-length pant can sit too high or too low if your legs are shorter or longer than the norm. If the hard cup isn’t centered on your knee cap, it’s not protecting your knee.
Always check the manufacturer’s specific size chart, not just the S/M/L label. Look for numeric chest/belly/hip measurements and, if available, separate limb length options.
Specific Zone Checks: Shoulders, Elbows, Back, Knees
Shoulder & Elbow Armor
The pad should cover the acromion bone (the bony tip of your shoulder). In riding position, roll your shoulders forward and back. The pad should not migrate toward your arm. Elbow armor should center on the point of your elbow. Bend your arm to 90 degrees. The pad should stay on the joint, not slide down toward your forearm.
Many jackets have adjustable Velcro tabs inside the armor pocket. Use them to lock the pad in the right spot before your first ride. I learned this after a new jacket’s shoulder pad slid and rubbed my arm raw on a long ride. Now I adjust and confirm the alignment in the garage.
Back Protector
This is the most critical and most dangerous fit. The Leatt manual says the lower edge should end “as close to the base of the spine as is comfortable.” It must not dig into your tailbone when you sit.
The major risk here is helmet interference. Both the generic protector manual and Leatt warn that a back protector that is too big “could interfere with the helmet creating dangerous driving conditions.” In a rear impact, a tall protector can hit the back of your helmet, torquing your neck. Your back protector should not touch your helmet when you look up.
Common mistake: Choosing the largest, highest-level back protector possible. If it pushes your helmet forward or contacts it, you’ve added a risk.
Knee Guards & Shin Protection
Knee guards are the most personal. The Leatt Knee & Shin Guard Dual Axis comes in three sizes based on upper and lower leg circumference (e.g., S/M: Upper Leg 33-41 cm, Lower Leg 25-33 cm). You must measure.
The guard must be of a snug fit to the body. The manual warns: “avoid choosing too big a protector because it can result in a dangerous riding condition.” A loose guard will rotate around your leg, placing the hard cup to the side of your knee in a crash.
When fitted, it should allow the full range of normal leg movements. Can you shift gears? Can you dab a foot? Can you squat? If not, try a different size or model.
When to Upgrade, Adjust, or Replace
Stock armor in many mid-price jackets is basic. It’s often a simple foam pad that meets Level 1. Upgrading to a better-fitting, higher-performance pad is the most cost-effective safety move you can make.
Upgrade when: The stock armor swims in the pocket, the material is thin and unsupportive, or you want a higher protection level (e.g., moving from Level 1 to Level 2). Brands like D3O offer aftermarket armor pads that fit standard pockets.
Replace when: The manual is clear. Leatt Corporation recommends that the Leatt product is replaced every three (3) years under normal use conditions. Sweat, UV light, and temperature cycles degrade the foams and plastics. The protector also must be replaced after any crash or if you see cracking, deformation, or padding deterioration.
Think of armor as a helmet for your joints. It has a shelf life. That set of CE-rated armor inserts from 2018 isn’t doing what the label says anymore.
How Jacket Fit and Cut Vary for Different Riding Styles
The intended riding style dictates the ideal jacket fit and cut. For sport riding, leather garments should have a suitably snug fit optimal for a sport riding position. They may feel uncomfortable in an upright standing position, so they must be fitted while sitting on the motorcycle. In the riding posture, there should be no excessive pressure points, and apart from the stomach area, no areas of loose material. For touring or adventure riding, textile garments should fit close to the body but be sufficiently loose to permit thicker midlayers like a sweater or fleece to be worn underneath for versatility across conditions.
Frequently Asked Questions
Should a motorcycle jacket be tight?
For leather, yes, initially tight while standing, then tailored in the riding position. It will stretch. For textile, it should be comfortably snug with your thickest riding layer on, allowing full movement without bulk.
What is the difference between Level 1 and Level 2 armor?
Level 2 armor transmits significantly less impact force to your body (e.g., ≤9 kN average vs. ≤18 kN for back protectors). It is often heavier and stiffer. Level 1 is lighter and more flexible. Choose the highest level that fits your gear and that you’ll wear consistently.
How do I stop my shoulder armor from moving?
Most jacket armor pockets have internal Velcro adjustment tabs. Position the pad correctly over your shoulder bone, then use the tabs to secure it to the jacket lining. Check this fit in your riding posture.
Can I add better armor to my existing jacket?
Yes. This is a highly recommended upgrade. Check the pocket dimensions in your jacket and purchase aftermarket armor that is CE-rated from brands like Forcefield, Knox, or D3O and sized to fit. Replacing thin stock foam with quality inserts is a massive safety boost.
The Bottom Line
Fit your armor on the bike, not in the mirror. The test is simple: does it stay put over the bone, and can you move like you need to move? If yes, you’re protected. If no, you’re wearing decoration.
Leather wants to be bought tight. Textile wants room for layers. Your back protector should never meet your helmet. And every pad in your gear has a three-year timer, mark the calendar.
The best armor in the world is the armor that fits you right now. Not the ideal set in a drawer, or the bulky one that makes you leave it at home. Get the fit right first. The protection follows.
