
How to Keep Warm in a Motorcycle Helmet in Winter
This post contains affiliate links. As an Amazon Associate, we earn from qualifying purchases.
To keep warm in a motorcycle helmet in winter, you need to manage three systems already built into your gear: the seal around your neck, the insulation of the liner, and the control of airflow through the vents. This is about using what you have correctly, not buying more stuff. The Schuberth C3 Pro manual, for example, specifies using fabric flaps inside the crown liner to block ventilation channels, while the Scorpion CX950 V2 Snow manual instructs using slide levers on the exterior vent doors. Mismanage any one of these, and cold air wins.
The difference between those OEM instructions is the whole game. One brand says block airflow inside the helmet; another says restrict it at the source. Both are right for their design, and guessing wrong leaves you either fogged up or freezing. Understanding how to keep warm in a motorcycle helmet in winter depends on this principle.
What follows is the factory manual approach to the how to keep warm in a motorcycle helmet in winter question, not generic tips. We’ll walk through sealing the bottom, choosing the right liner, and operating your specific vent system, plus when to add a balaclava or heated gear without wrecking the fit.
Key Takeaways
- Seal the bottom first. A neck gaiter or helmet skirt stops the chimney effect that pulls heat out of your helmet more than any other single fix.
- Your liner is a tool, not a fixture. The Schuberth C3 Pro and E2 Carbon have fabric flaps in the crown liner you must fold out for winter; the Scorpion AT960 Snow‘s KwikWick lining is designed to feel warm in cool weather.
- Vents are for fog, not just airflow. The Scorpion CX950 V2 manual ties its chin vent operation directly to fog removal, close it for warmth, crack it open to clear your visor.
- Add heat, not bulk. A thin heated vest under your jacket warms your core, which in turn warms the blood reaching your head, without compromising helmet fit.
- Fit is essential. A winter balaclava that’s too thick changes your helmet’s safety geometry; always re-check fit after adding any layer.
The 3 Heat Systems Your Helmet Already Has
Your helmet is a climate system with three levers: the seal at your neck, the insulation around your head, and the vents you can open or close. Most riders only fiddle with the vents and wonder why they’re still cold.
The seal is the most important. Cold air rushes in through the bottom, hits your warm head, and creates a chimney effect that sucks all the warm air out. You can have the best insulation in the world, but if you have a draft at your neck, you’ll lose. A simple neck gaiter that seals that gap is a bigger upgrade than a new helmet.
A helmet’s warmth is governed by three factors in order of impact: the integrity of the neck seal, the thermal properties and adjustability of the interior lining, and the precise control of intake and exhaust ventilation. Manufacturer manuals for models like the Schuberth C3 Pro and Scorpion CX950 V2 provide model-specific procedures for adjusting the latter two systems for cold weather operation.
The liner is next. This isn’t just padding. On some helmets, it’s a seasonal adjustment tool. The insulation works by trapping your body heat in tiny air pockets within the fabric or foam. When you add a thick balaclava, you compress that foam, reducing its ability to trap air and actually making you colder. That’s why the right material matters.
Finally, the vents. They are not just on/off switches for “air.” In winter, their job is moisture management. Your breath contains water vapor that will fog your visor the second it hits a cold surface. Vents, especially the chin vent, are there to direct that moist air out before it can cause trouble.
How to Adjust Your Helmet for Winter (The OEM Way)
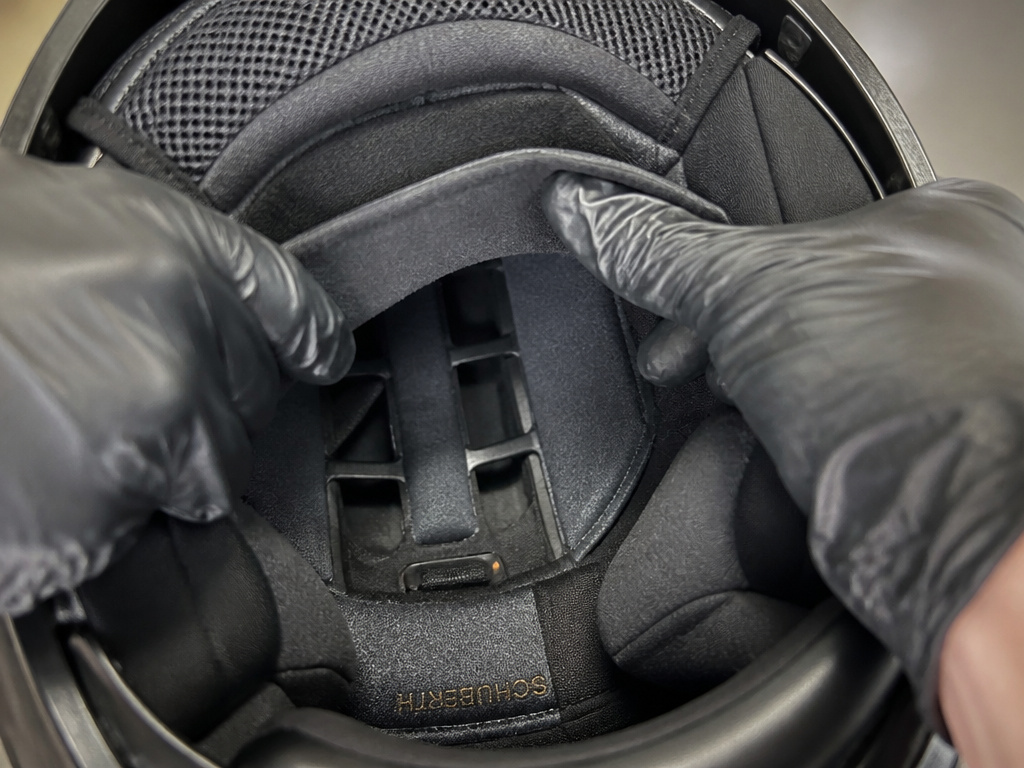
Don’t guess. Your helmet’s manual has the answer, and manufacturers don’t agree on the best method. Here’s the split straight from the source documents.
The Schuberth Method: Block the Air Inside
For the Schuberth C3 Pro and E2 Carbon, the manual is explicit. You don’t close an external vent. Instead, you access the crown liner.
- Raise the middle section of the crown liner slightly.
- Fold out the fabric flaps located behind the front section.
- These flaps physically cover the internal ventilation channels.
The theory is sound. You’re stopping cold air that has already entered the helmet from circulating over your head. The Schuberth C3 Pro manual even notes that the chin vent shape provides fresh air from 30 kph, so you aren’t suffocating. This is a surgical approach.
The Scorpion Method: Control the Air at the Source
Contrast that with the Scorpion CX950 V2 Snow. Its manual has a different focus: a slide lever on the chin vent.
- To open the vent hole, slide the vent door lever down.
- To close it, slide the lever up.
This is direct source control. But the manual adds a critical winter note: “In cold weather, the vent may need to be opened/closed specifically to remove fog caused from breath or sweat.” So for Scorpion, this vent is your primary anti-fog tool. You close it for warmth, but you must be prepared to open it momentarily to clear moisture.
| Brand & Model | Cold-Weather Adjustment Method | Primary Purpose | Key Consideration |
|---|---|---|---|
| Schuberth C3 Pro / E2 Carbon | Fold out fabric flaps inside crown liner. | Block internal airflow channels. | Maintains minimum fresh air via chin vent design. |
| Scorpion CX950 V2 Snow | Slide chin vent lever up (closed) or down (open). | Control intake at source; manage fog. | Lever must be used actively to clear breath moisture. |
| Scorpion AT960 Snow | Utilize KwikWick liner material properties. | Liner feels warm in cool weather passively. | No mechanical adjustment; relies on material science. |
The Material Science Option
Some helmets skip mechanical adjustments altogether. The Scorpion AT960 Snow manual highlights its KwikWick liner material rather than mechanical adjustments for warmth. Instead, it highlights its KwikWick C liner, a “moisture-wicking lining material [that] feels cool to the touch in warm weather and warm in cool weather.” This is a passive approach. The material itself is engineered to provide a warmer sensation as the ambient temperature drops. You don’t do anything; the helmet does it for you. The trade-off is less direct control.
Sealing the Draft: Neck Gaiters, Skirts, and Balaclavas
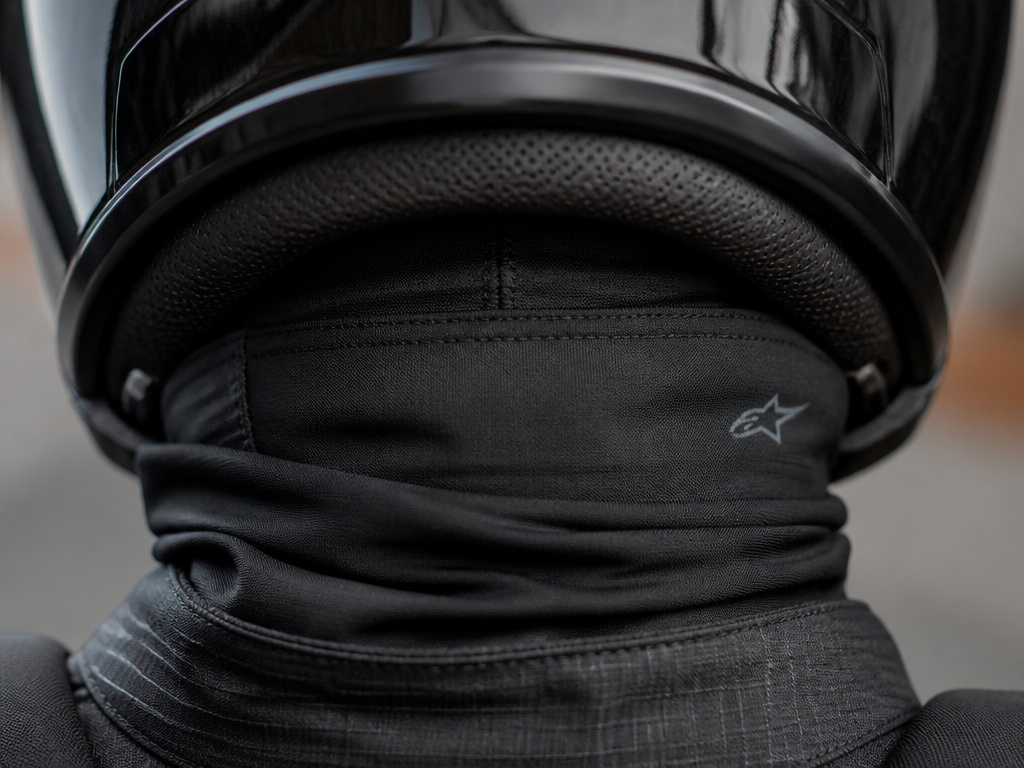
If your helmet’s neck roll doesn’t seal tightly, you’re heating the great outdoors. This is where aftermarket gear comes in, but it must work with your helmet, not against it.
Neck Gaiters vs. Helmet Skirts
A neck gaiter is a simple tube of fabric. A neck gaiter seals the gap without bulk. A helmet skirt is a more specialized piece that attaches to the bottom of your helmet shell with adhesive or a magnetic strip, creating a physical barrier that drapes over your shoulders.
- Gaiter Pro: More versatile, can be pulled up over mouth, usually cheaper.
- Skirt Pro: More effective seal, less likely to shift while riding.
- The Catch: A poorly attached skirt can create noise or even detach. Test it in the driveway before a long ride.
The Balaclava Dilemma
A balaclava seems like the obvious answer. It covers your head and neck. But here’s where most riders fail: they buy one that’s too thick.
Common mistake: Using a bulky ski balaclava under a motorcycle helmet. By compressing the helmet’s engineered foam liner, you reduce its insulating air pockets and can actually feel colder while also compromising the helmet’s protective fit.
The right motorcycle balaclava is thin, windproof, and moisture-wicking. Its job is to create a warm, dry micro-climate on your skin and block wind from reaching your neck, not to add inches of insulation. Before you buy any balaclava, put your helmet on over it after checking its fit. If you feel significant new pressure points or the helmet rotates easily on your head, it’s too thick.
Managing Moisture and Fog: The Real Winter Battle
Staying warm is pointless if you can’t see. Fog forms when your warm, moist breath hits the cold surface of your visor. You combat it by keeping the visor warm or keeping the moisture away.
Pinlock is Non-Negotiable
If your helmet has a Pinlock-ready visor, insert the insert. It creates a double-pane thermal barrier. The inner pane stays closer to the temperature of your face, so breath moisture doesn’t condense on it. It’s the single most effective anti-fog device ever invented for motorcycling. No cloth, spray, or hack works as well or as reliably.
Breath Deflectors and Vent Strategy
Your helmet’s chin curtain or breath deflector isn’t just for comfort. It routes your breath down and out through the chin vent, away from the visor. Make sure yours is installed correctly. The Scorpion CX950 V2 manual shows to install the chin curtain by inserting its hole onto a post hidden inside the lower edge of the chin bar. If you start to fog, don’t panic and open all the vents. Crack the chin vent first. As the Scorpion manual notes, that’s its designated job. Open it just enough to create an outflow for your moist breath, then close it again once the visor clears.
When to Add External Heat
When the temperature drops into the 30s Fahrenheit and below, active heating becomes the smart play. The goal is to warm your core, not just your head.
Heated Gear Strategy
A heated vest is the foundation. By warming your torso, you warm the blood circulating to your extremities and head. This allows you to wear thinner layers overall, which preserves your helmet’s fit. Run the wire from the vest controller out the bottom of your jacket, not up near your neck where it can interfere with the helmet seal. Heated gloves are the next logical addition. Cold hands make you miserable and distract you from riding. They also cause you to tense up, which fatigues you faster.
The Helmet-Specific Heated Liner
A few companies make thin, flexible heated liners that replace your helmet’s stock crown liner. These are a more direct solution but come with caveats:
- Fit is critical. It must be the exact model for your helmet.
- Wiring is fiddly. You’ll have a wire running from your helmet to a battery pack.
- It’s a single-point solution. It only heats your head, not your core. For most riders, a heated vest and good gloves are a simpler, more effective system.
How to Layer Clothing Under a Motorcycle Helmet
Your body’s insulation is the first line of defense. Start with a thermal base layer that wicks moisture away from your skin; some helmet linings are made from material that feels warm in cool weather and works with this principle. Over this, add insulating mid-layers to trap heat. The key is to avoid bulk that compromises the helmet’s snug, safe fit. A thin balaclava designed for riding can add critical warmth around the neck and jaw without interfering with the helmet’s interior pads or safety systems. Ensure all layers are smooth to prevent pressure points and maintain the helmet’s intended protective geometry.
How to Block Wind on a Motorcycle
Wind is the primary thief of warmth. External fairings on your bike deflect the main blast, but sealing yourself is crucial. Use gear with a waterproof and windproof outer shell to stop convective heat loss. For the helmet itself, manage its built-in wind protection. Some models have fabric flaps inside the crown liner that you can fold out to cover internal ventilation channels, drastically reducing cold air intake. Ensure your jacket collar seals tightly around the helmet’s neck roll, and consider adding a chin curtain if your helmet is designed to accept one, as this blocks updrafts. Close all external vent doors using their slide levers in cold conditions.
Why a Waterproof Outer Shell Matters for Warmth
A waterproof outer shell on your riding gear is required for winter warmth. Water conducts heat away from the body far faster than air, so staying dry is paramount. This shell acts as the final barrier against rain, sleet, and road spray. More than just keeping you dry, it must also be windproof to prevent the wind chill effect from stripping away the warm air trapped by your inner layers. For your helmet, a faceshield in good condition is part of this shell; do not ride with a scratched faceshield as it can distort vision and compromise the seal. The integrity of this outer layer keeps your core insulation effective.
Frequently Asked Questions
What is the best motorcycle helmet for winter riding?
The “best” helmet is one that fits you perfectly and has effective, adjustable ventilation you can close. Look for models with sealed chin curtains, Pinlock-ready visors, and well-insulated neck rolls. Some, like the Scorpion AT960 Snow, feature liners designed for cooler weather. A quiet helmet also reduces fatigue, which keeps you warmer longer.
How do I stop my visor from fogging in cold weather?
Install a Pinlock insert. Full stop. If your helmet isn’t Pinlock-ready, use a full-face helmet with a breath deflector and learn to use the chin vent strategically, crack it open at stops or when you feel the first hint of fog, then close it. Never ride with a scratched faceshield, as imperfections give moisture a place to cling.
Is a balaclava or neck gaiter better for warmth?
Neck gaiter is better for sealing the primary draft point without altering helmet fit. A thin balaclava is better if you also need to keep your entire head and ears warm, but you must be meticulous about fit. For most, starting with a neck gaiter and adding a balaclava only if needed is the safer approach.
What temperature is too cold for motorcycle riding?
There’s no universal number, as wind chill is the real factor. A cold day at highway speeds can have a wind chill below freezing. The practical limit is when your gear can no longer manage the cold. If you’re shivering uncontrollably, losing feeling in your fingers, or your visor is constantly fogging despite correct technique, it’s too cold. Heated gear dramatically extends your comfortable range.
Can I add insulation to the inside of my helmet?
Do not glue, tape, or modify the interior shock-absorbing liner. This voids warranties and can compromise safety. The only safe additions are manufacturer-approved cheek pads or crown liners, or a properly fitted, thin balaclava. Schuberth manuals explicitly warn against applying paint, stickers, or solvents, which includes adhesives.
Before You Go
Winter riding warmth is a precise operation of the three systems you already own: seal, insulate, ventilate. Start by fixing the draft at your neck with a gaiter. Then, open your helmet’s manual, literally, and perform the winter adjustment it specifies, whether that’s folding flaps or sliding a lever.
If you’re still cold, add heat to your core with a vest before you stuff more fabric into your helmet. And if fog is your enemy, surrender to Pinlock. It’s the one piece of technology that works exactly as advertised.
The line is different for everyone, but you’ll know you’ve crossed it when you’re thinking more about your numb chin than the curve ahead. That’s your signal to turn up the heat or turn for home. Everything above assumes a helmet in good condition; if yours is past its manufacturer-recommended replacement timeline or shows any damage, no amount of tuning will make it safe. Start from a solid foundation, then dial in the climate.
