
How to Check Motorcycle Fuses: Visual & Multimeter Methods
This post contains affiliate links. As an Amazon Associate, we earn from qualifying purchases.
To check a motorcycle fuse, visually inspect the thin metal strip inside its plastic window. A blown fuse shows a broken or melted strip. For a definitive test, use a multimeter set to continuity (the beep symbol). Touch the meter’s probes to each metal tab on the fuse; a beep means it’s good, silence or ‘OL’ means it’s blown.
That visual check only works on fuses you can see through. The real diagnostic power comes from a simple tool that costs less than a tank of gas and tells you exactly what’s dead and what’s live. Knowing how to check motorcycle fuses with a multimeter is the key.
What follows is the step-by-step walkthrough you’d get from a shop manual, plus the brand-specific quirks the generic guides skip, like where Harley hides its main fuse and why Triumph issued a bulletin to swap a specific 7.5A fuse for a 10A. By the end, you’ll know how to test with a meter, what to do if you don’t have one, and why a fuse blows in the first place when you compare a how to check motorcycle fuses.
Key Takeaways
- Visually inspect first. A clear plastic fuse with a broken metal strip inside is blown.
- Test with a multimeter on continuity. A beep or near-zero resistance reading means the fuse is good. Silence or an ‘OL’ (open loop) reading means it’s blown.
- Check the fuse box under the seat first. Most Japanese and European bikes, like the Yamaha MT-09, keep the main fuse box there.
- Always replace with the correct amperage. Swapping a 10A fuse for a 15A fuse can melt wiring before the fuse blows.
- If a new fuse blows immediately, stop. You have a short circuit. Further testing without fixing the short just burns more fuses.
The Two-Second Visual Check (What a Blown Fuse Actually Looks Like)
Before you touch a tool, look. Most modern motorcycle fuses are the plastic blade type with a clear window. The job is simple: find the thin metal strip running between the two blade terminals. If that strip is intact, the fuse is likely good. If it’s visibly broken, melted, or has a cloudy smudge inside the window, it’s blown.
Common mistake: Assuming a fuse is good because it looks fine. Internal corrosion or a hairline crack you can’t see will still kill the circuit.
The visual check has one major limit: you can’t see through opaque ceramic or glass tube fuses on older bikes, which is a key part of how to check motorcycle fuses. For those, and to be 100% sure on any fuse, you need a meter.
How to Check a Fuse with a Multimeter (Step-by-Step)
A multimeter turns a guess into a fact. You don’t need a fancy one; a basic digital multimeter from any hardware store does the job. Here’s the exact sequence.
- Set the multimeter to continuity. Turn the dial to the symbol that looks like a sound wave or a ‘diode’ symbol. This mode causes the meter to beep when it detects a complete electrical path.
- Test the meter. Touch the two metal probes together. You should hear a continuous beep. This confirms the meter is working.
- Test the fuse. With the fuse removed from the bike, touch one probe to each of the fuse’s metal blades. It doesn’t matter which probe goes where.
- Interpret the result. A continuous beep means the fuse has continuity, it’s good. Silence means the fuse is blown and has no continuity.
If your meter doesn’t have a continuity mode, use the resistance setting (Ω). Set it to the lowest range (often 200Ω). Touch the probes to the fuse blades. A good fuse will show a resistance reading very close to zero (like 0.2Ω). A blown fuse will show ‘OL’ (Open Loop) or ‘1’, meaning infinite resistance.
Where to Find Your Motorcycle’s Fuse Box
You can’t test what you can’t find. While the under-seat location is common, manufacturers love to tuck secondary boxes in odd spots.
| Brand / Model Type | Common Fuse Box Location | Notable Quirk |
|---|---|---|
| Most Yamaha, Honda, Kawasaki, Suzuki | Under the rider’s seat | The Yamaha MT-09 owner’s manual explicitly states the fuse box is under the seat. |
| Harley-Davidson V-Rod / VRSC | Primary box under seat; 40A main fuse in a rubber holder behind the right side cover | This separate main fuse holder is a classic Harley edge case. |
| Triumph Rocket 3 (2023) | Under the rider’s seat | Subject to Service Bulletin 607 for a battery fuse swap. |
| Many Adventure Touring Bikes | Under the seat, plus a second box near the battery or behind a side panel | Waterproofing is better, but access is tighter. |
| Older European Bikes | Under the fuel tank or behind a side cover | May require removing bodywork. |
The factory service manual is the final word. If you’re stuck, a quick search for “[Your motorcycle model] fuse box location” usually turns up a forum post with a picture.
Testing Without a Multimeter (The Swapping Method)
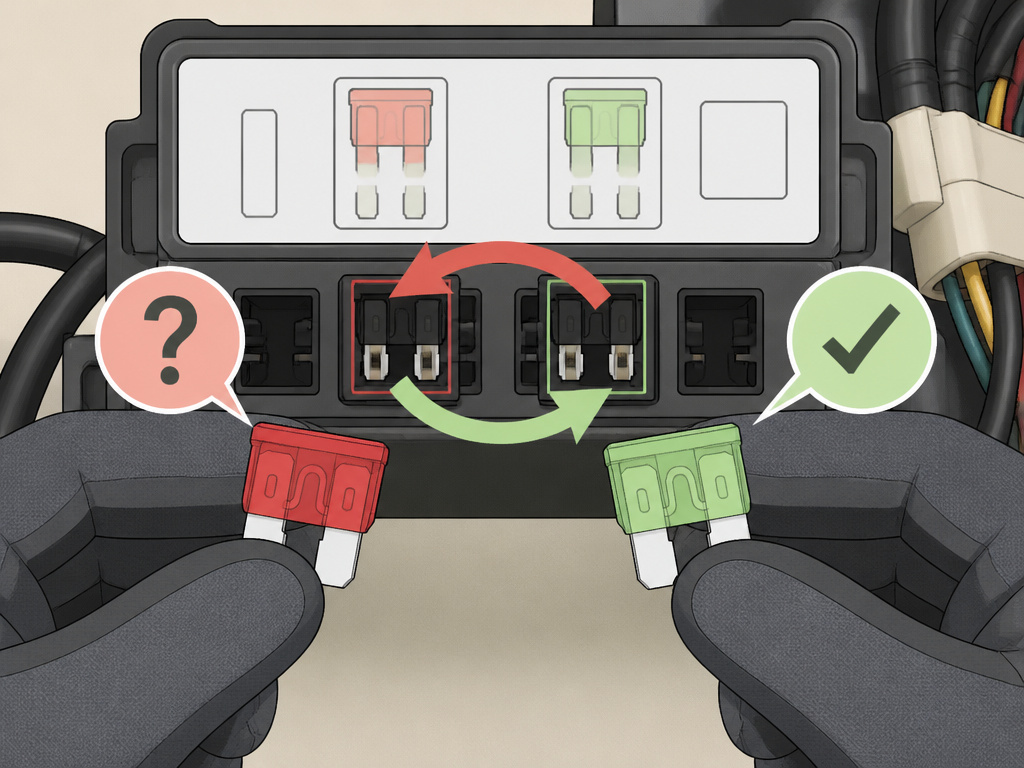
No multimeter in the garage? You can still diagnose. This method uses a known-good fuse from a non-critical circuit as a tester.
Worth knowing before you start: This only works if you have an identical, spare fuse of the same amperage. Never borrow a fuse from your bike’s ignition or fuel pump circuit for testing.
- Identify a suspect fuse and a donor fuse of the exact same amperage from a working circuit (like an accessory socket).
- Safely disconnect the battery. Many manufacturers, like Triumph, specify disconnecting the negative (black) cable first. This prevents accidental shorts while you’re handling fuses.
- Swap the suspect fuse with the known-good donor fuse.
- Reconnect the battery. For procedures like Triumph’s, reconnect the positive (red) cable first, then turn the key. If the dead circuit now works, the original fuse was blown. If it’s still dead, the problem is elsewhere in the circuit.
It’s a crude test, but it works in a pinch.
Fuse Amperage and Why Getting It Right Matters
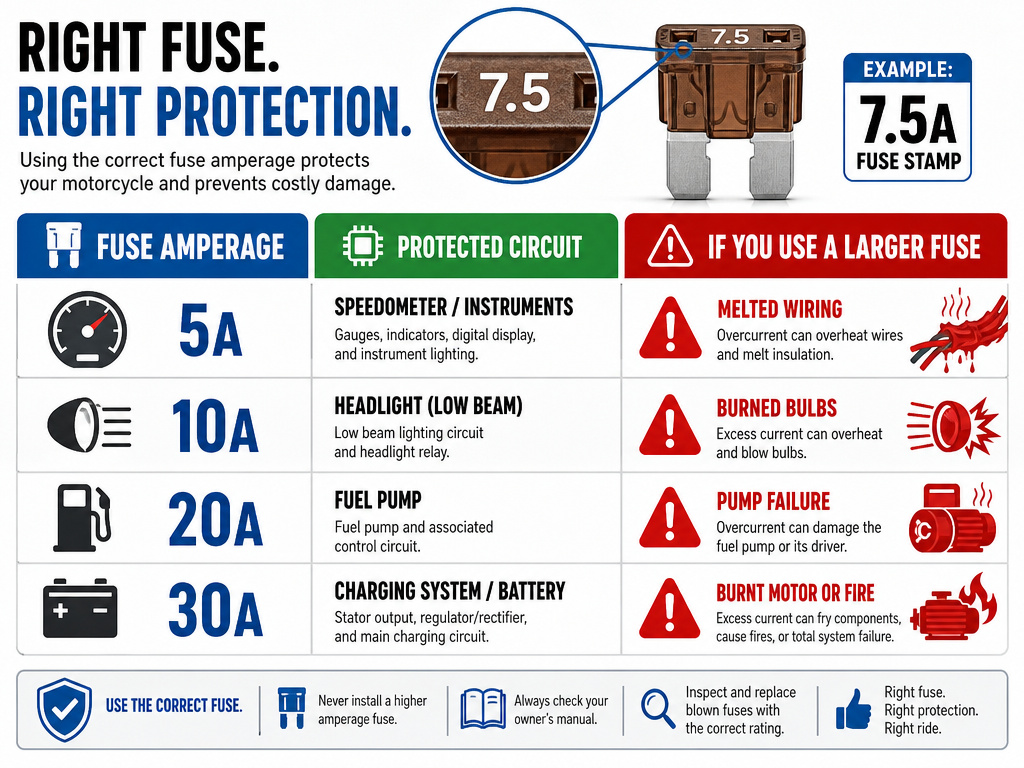
The number stamped on the fuse is its amperage rating, the maximum current it can carry before melting to protect the wiring. This isn’t a suggestion.
| Common Amperage | Typical Motorcycle Circuits | What Happens If You Go Bigger |
|---|---|---|
| 5A – 7.5A | Instrument panel, ECU backup, tail lights | Using a 10A fuse may not blow before the thin wiring for the gauges overheats and melts its insulation. |
| 10A – 15A | Headlights, horn, auxiliary power ports | A 20A fuse might allow enough current to fry a headlight wiring harness during a short. |
| 20A – 30A | Fuel pump, cooling fan, ABS pump | Upsizing here can let a failing pump motor draw fatal current, burning out the motor instead of blowing the fuse. |
| 30A – 40A (Main) | Protects the entire electrical system from the battery | A larger main fuse could allow a major short to melt the main wiring harness or cause a battery fire. |
The NHTSA service bulletin 607 for certain Triumph Rocket 3 models is a perfect case study. It instructs dealers to replace the 7.5A battery fuse (position 5 in the fuse box) with a supplied 10A fuse and update the fuse box label. This isn’t a generic upgrade, it’s a manufacturer-specified correction for a specific model. Never make such a change on your own bike without official documentation.
What to Do When a New Fuse Blows Immediately
This is the real test. A fuse that pops the moment you turn the key is screaming that you have a direct short to ground. Do not keep installing fuses.
- Disconnect everything you just added. Did you just install new lights, a charger, or a heated grip? Disconnect it. If the fuse holds now, the new accessory is wired incorrectly.
- Inspect the wiring. Inspect the wiring along its route. Check for spots where insulation is rubbed through against the frame, a pinched wire under the tank, or a corroded, shorted connector.
- Isolate components. For complex circuits (like a lighting circuit), you can try disconnecting individual components (one turn signal at a time) to see if the short disappears.
- Use a multimeter for diagnosis. This is where a deeper guide to motorcycle electrical troubleshooting becomes essential. You’ll need to test for continuity between the circuit’s wire and the motorcycle’s frame (ground) with the fuse removed.
If you’re here, you’ve moved past simple fuse checking and into full electrical fault diagnosis. This often intersects with troubleshooting a motorcycle that won’t start scenario, where a blown main fuse or ignition fuse is the symptom, not the cause.
Motorcycle Fuse Types and Replacements
Not all fuses are the same. Using the wrong physical type can lead to a poor connection, which creates heat and resistance.
- Blade Fuses (ATO/ATC): The standard for most bikes from the 1980s onward. Color-coded by amperage (orange = 5A, red = 10A, blue = 15A, yellow = 20A). Always use “automotive type” replacements as specified by Harley-Davidson’s service info.
- Glass Tube Fuses: Found on older classics. The wire inside is the fusible element. They are fragile and harder to inspect visually.
- Mini Blade Fuses: A smaller version of the standard blade fuse. Common on modern bikes with compact fuse boxes. The Triumph parts kit (T2504239) for Bulletin 607 contains a mini blade fuse.
- Micro Blade Fuses: Even smaller. Less common on motorcycles but appearing on some newer models. Don’t force a mini fuse into a micro slot.
When in doubt, take the old fuse to the auto parts store and match it exactly. A fuse that doesn’t snap firmly into the holder is the wrong type.
Before You Start: The Non-Negotiable Safety Steps
Working around electricity and gasoline requires a specific order of operations. Skipping this is how small jobs turn into expensive or dangerous ones.
- Park on a level surface and turn the ignition OFF. Engage the sidestand.
- Disconnect the battery. Always remove the negative (black) terminal first. This prevents a short if your wrench accidentally touches the frame while on the positive terminal. The Triumph bulletin explicitly states “negative (black) lead first.”
- Note your rider settings. Modern bikes with ride modes, trip computers, or clock settings can lose their memory when power is cut. The Triumph procedure warns to “note and record the rider’s settings” before disconnecting the battery.
- Work methodically. Test one fuse at a time. Don’t pile removed fuses on the seat where they can fall into the bike.
- Reconnect the battery last. After all fuses are confirmed good and seated, reconnect the positive (red) terminal first, then the negative. Triumph’s bulletin reverses the order for reconnection: “positive (red) lead first.”
- Reset your settings. Restore any ride modes or clock settings you noted in step 3.
This process also applies to deeper electrical work, like when you need to test the stator or test regulator rectifier. It always starts at the battery.
How to Test a Fuse Without Pulling It Out
You can check a fuse while it’s still in the fuse box. Set your multimeter to the DC voltage setting. Turn the motorcycle’s ignition to the ‘ON’ position. Place the black probe on a ground point, like the motorcycle’s frame or the battery’s negative terminal. Touch the red probe to each of the metal tabs on the top of the fuse you can see in the fuse box. You should get a voltage reading on both sides. If you have voltage on only one side, the fuse is blown. This method is quick and avoids disturbing the fuse or its connections.
Frequently Asked Questions
How can I tell if a fuse is bad by just looking at it?
Look through the clear plastic window at the thin metal strip connecting the two metal blades. If the strip is broken, melted, or has a cloudy/burnt spot, the fuse is blown. If the strip looks intact, it might still be good, but you need a multimeter to be sure.
Do motorcycles use the same fuses as cars?
Most modern motorcycles use the same standard plastic blade fuses (ATO/ATC) as cars. The mini and micro blade sizes are also common to both. Amperage ratings are universal. You can typically use an automotive blade fuse as a temporary replacement on a motorcycle.
Can I check a fuse without removing it?
Yes, but you need a multimeter. Set it to DC Volts (V–). With the bike’s key ON, touch the black probe to a clean metal ground on the frame. Touch the red probe to each of the two metal tabs on the top of the fuse. You should read battery voltage (usually ~12.6V) on BOTH sides. If you have voltage on only one side, the fuse is blown.
Why does my motorcycle keep blowing the same fuse?
Fuse that blows repeatedly indicates a persistent overcurrent condition. The most common cause is a short circuit, a wire’s insulation has worn through and is touching the frame. It can also be a failing component, like a fuel pump or fan motor drawing too much amperage as it dies. Stop replacing the fuse and start tracing the circuit for damage.
Is a test light or multimeter better for checking fuses?
Multimeter is superior. A test light only tells you if power is present, not if the fuse is intact. You can have a bad fuse that still shows power on one side, fooling a test light. A multimeter’s continuity or resistance function gives a definitive pass/fail for the fuse itself, which is why it’s the tool recommended in many factory service manuals.
The Bottom Line
Checking a fuse is the first diagnostic step, not the last. A multimeter is the only tool that gives you a definitive answer, turning a mystery into a simple beep or no-beep. Start with the visual check under the seat, but know that a fuse can fail in a way you can’t see.
If a new fuse blows the instant you turn the key, your job changes. That’s the bike telling you there’s a short. Put the meter down and start visually tracing wires before you proceed. And always, always match the replacement fuse’s amperage exactly, the number stamped on it is a calculated safety limit, not a suggestion. Getting that wrong protects the fuse, not your wiring harness.
