
How to Use a Motorcycle Battery Tender: Step-by-Step
This post contains affiliate links. As an Amazon Associate, we earn from qualifying purchases.
To use a motorcycle battery tender, connect a smart, automatic charger to the battery using the correct terminals or a dedicated accessory port, following a specific safety sequence. Connect a battery tender during storage or if battery voltage drops below specification, using the accessory connector if equipped. For a removed battery, connect red to positive (+) first, then black to negative (-), turn the charger on, and let it cycle to a maintenance float mode. Never use a constant current trickle charger on a modern AGM battery.
That sequence is the only thing standing between you and a dead battery next spring. The difference between a tender that extends battery life and one that cooks it comes down to three specs: charger type, amperage, and connection order. Get one wrong and the battery sulfates, swells, or simply never reaches a full charge. Understanding how to use a motorcycle battery tender is therefore critical.
What follows is the procedure pulled from Harley-Davidson and Indian Motorcycle service manuals, not generic web advice. We’ll cover the tangible warning signs a battery needs a tender, the exact tools you need, and the how to use a motorcycle battery tender question of how to troubleshoot when the charger lights don’t behave.
Key Takeaways
- Use only an automatic, smart battery tender—constant current “trickle” chargers damage AGM batteries and void warranties.
- Connect to an accessory port if equipped; otherwise, connect red to positive first, then black to negative or chassis ground.
- Harley-Davidson states a fully charged battery reads 12.7 volts, while Indian Motorcycle states it should read a minimum of 12.5 volts after resting one to two hours.
- For long-term storage, connect the tender if the security system is armed; disconnect the battery if it is not.
- Check battery voltage every month if stored in cool conditions (below 60°F), and more often in warmer environments.
Why a Tender Isn’t Optional
A motorcycle battery dies from neglect, not age. The parasitic draw from a bike’s computer and security system, combined with natural self-discharge, can drain a battery below 12.6 volts. That’s the threshold Harley-Davidson sets for needing a charge.
Below that voltage, lead-sulfate crystals begin forming on the battery plates—a process called sulfation which reduces capacity. They reduce the battery’s capacity and, eventually, its ability to accept a charge at all. A tender prevents this by maintaining a full charge, which keeps the chemistry stable.
My own lesson was a cheap trickle charger. I left it on an AGM battery all winter. By spring, the battery case had swelled slightly and it wouldn’t hold 12 volts. It was cooked. The charger never switched to a float mode; it just kept pushing current. That’s the difference between a “tender” and a “trickle charger”—one monitors and maintains, the other just pushes.
Common mistake: Using a constant current trickle charger on a sealed AGM battery. Harley-Davidson’s manual states this “can damage AGM batteries” and cause “dry-out and premature battery failure.” This isn’t a minor point—it’s the number one way to kill a modern battery during storage.
Choosing the Right Battery Tender
Not all battery maintainers are equal. The official specs from manufacturers don’t leave much wiggle room, and choosing wrong can void your battery’s warranty.
You need a smart charger. This means an automatic, constant-monitoring battery tender/maintainer. It should have a microprocessor that checks battery voltage, delivers a bulk charge, then switches to an absorption phase, and finally a float/maintenance mode. The lights will tell you which stage it’s in.
The critical spec is the charging rate, measured in amps. Here’s where manufacturers disagree, and you need to match your charger to their specific guidance.
| Manufacturer | Recommended Charger Type | Max Charging Rate | Notes |
|---|---|---|---|
| Harley-Davidson | Automatic, constant monitoring | 5 amps or less | Must operate at less than 14.6 volts for AGM batteries. |
| Indian Motorcycle (Polaris) | 12V battery charger | 1.8 amps maximum | Charge for approx. 10 hours at 1.8A for a full charge. |
Harley’ 5-amp ceiling is for their larger batteries. For most sport bikes and smaller batteries, a charger with an appropriate amperage rating is a common choice. It’s slow, safe, and has a proven track record. Indian Motorcycle recommends a maximum charging rate of 1.8 amps, while Harley-Davidson allows up to 5 amps for AGM batteries.
Common brands of smart chargers include several well-regarded options. They all make smart chargers with the necessary safety profiles. Your choice between them often comes down to connector preference and indicator light clarity.
For a detailed breakdown of models and features, see our reviews of available battery tender models.
Safety Gear and Setup Non-Negotiables
Battery acid and hydrogen gas are the two silent hazards here. The manuals are not subtle about the precautions.
- Ventilation: Always charge in a well-ventilated area. Hydrogen gas is explosive and escapes during charging.
- Eye and Skin Protection: Wear a protective face shield and rubberized gloves. Sulfuric acid can cause severe burns.
- No Sparks: Keep open flames, electrical sparks, and smoking materials away from the battery. Connect and disconnect with the charger turned off and unplugged.
Before you even touch the charger, make sure the ignition and all electrical accessories on the bike are turned off. This prevents a voltage spike that could damage the bike’s electronics.
WARNING: Batteries contain sulfuric acid, which could cause severe burns to eyes and skin. Wear a protective face shield, rubberized gloves and protective clothing when working with batteries. Charge battery in a well-ventilated area. Keep open flames, electrical sparks and smoking materials away from battery at all times. – Harley-Davidson Service Manual
The 7-Step Connection Procedure (With Battery Installed)
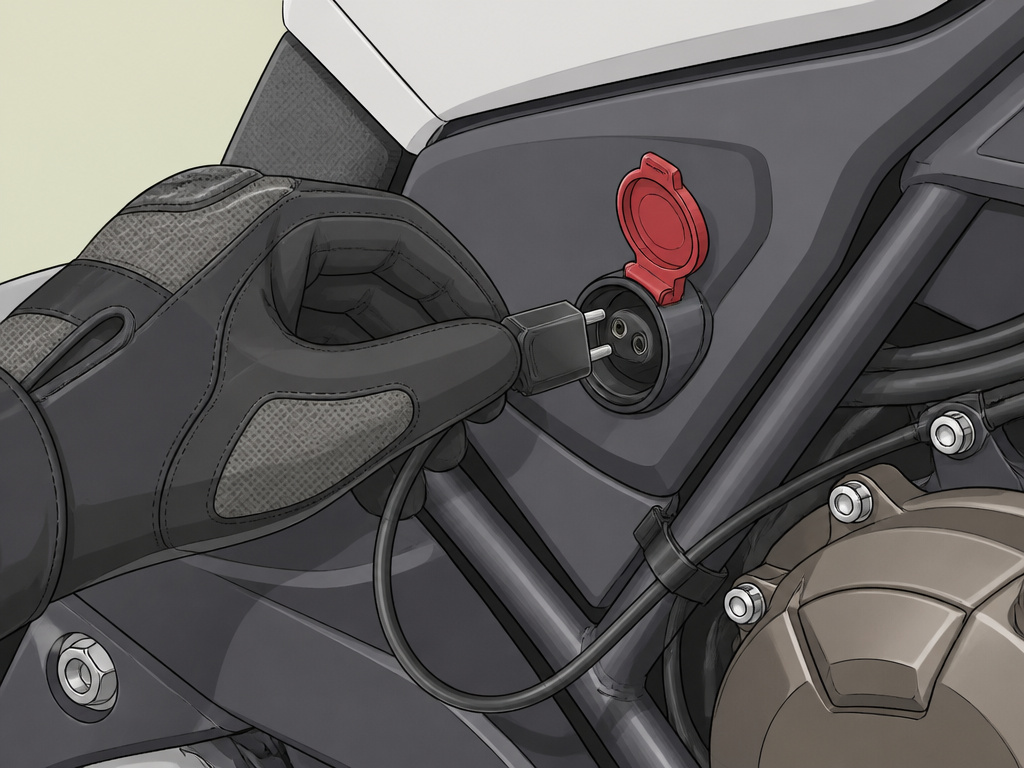
Most modern bikes have a dedicated accessory port for a battery tender, often located under the seat or on the side of the battery box. Using this port is always the safest and easiest method.
- Locate the Accessory Port. Remove the seat or side cover as needed. The port is a two-pin connector, usually with a rubber cap.
- Check the Port. Ensure the connector and surrounding area are clean and dry. Dirt can cause a poor connection.
- Plug in the Tender. Connect the tender’s output lead directly to the accessory port. You should hear a firm click.
- Route the Cable Safely. Run the cable away from hot or sharp surfaces like the engine, exhaust, or moving parts. Secure it so it won’t dangle.
- Connect to Power. Plug the tender into a standard wall outlet.
- Read the Lights. A smart tender will have indicator lights. Typically, red means charging, green means float/maintenance. Consult your tender’s manual.
- Disconnect in Reverse. When you’re ready to ride, unplug the tender from the wall, then disconnect it from the bike’s accessory port. Replace the rubber cap.
If your bike doesn’t have a port, you’ll connect directly to the battery terminals. The sequence is everything.
Connecting Directly to Battery Terminals
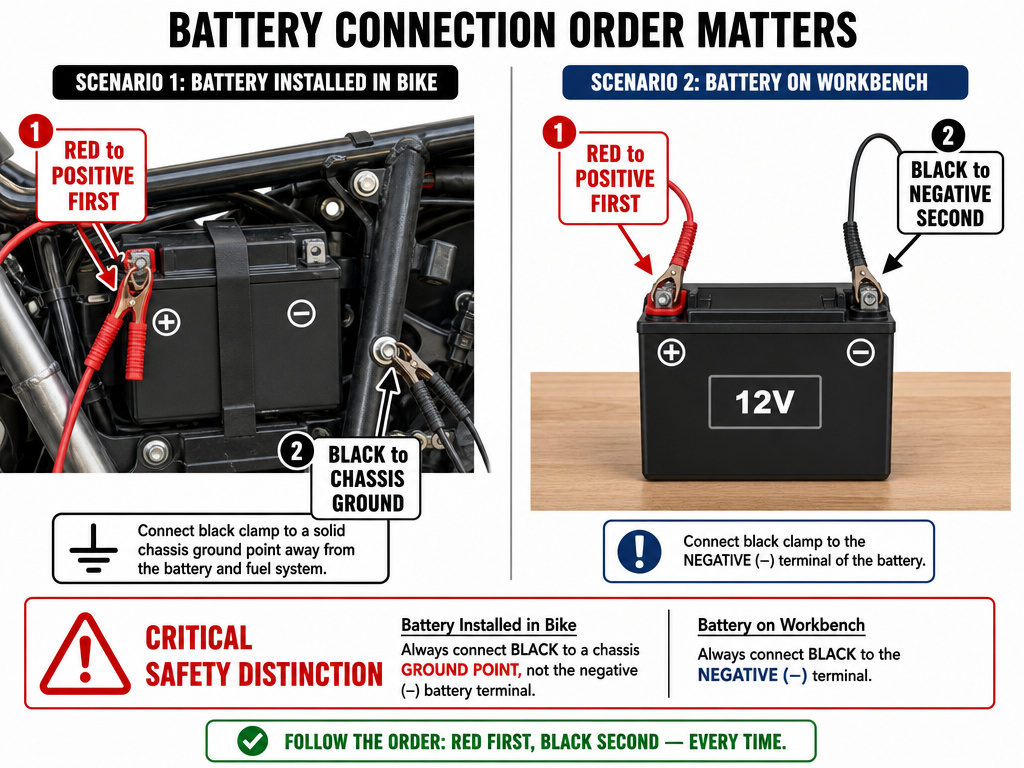
This is required for older bikes or if you’ve removed the battery for storage. The key is order: connect positive first, disconnect negative first. Reversing this can cause a spark at the battery terminal, which could ignite hydrogen gas.
For a Battery Installed in the Bike:
- Identify the positive (+) terminal (usually red, marked POS or +).
- Connect the tender’s RED clamp to the positive terminal.
- Connect the tender’s BLACK clamp to a solid, unpainted metal point on the motorcycle’s frame or engine (a chassis ground). When the battery is installed, connect the negative charger lead to the chassis ground.
- Turn on the charger.
- To disconnect, turn off and unplug the charger, remove the BLACK clamp from the chassis, then the RED clamp from the battery.
For a Battery Removed from the Bike:
- Place the battery on a stable, non-conductive surface in a well-ventilated area.
- Connect the RED clamp to the positive (+) terminal.
- Connect the BLACK clamp to the negative (-) terminal.
- Turn on the charger.
- To disconnect, turn off the charger, remove the BLACK clamp, then the RED clamp.
Where this goes sideways: Connecting the black clamp to the negative terminal on an installed battery. An incorrect connection can create a dangerous short circuit. Using a chassis ground isolates that risk.
How Long to Leave a Battery Tender Connected
You can leave an automatic, constant monitoring battery charger/tender connected for the duration of storage. That’s its entire purpose. Once the battery reaches full charge, the tender switches to a float or “maintenance” mode that delivers a tiny, periodic charge to counteract self-discharge.
For a charging session to recover a low battery, time depends on the battery’s capacity (Amp-hours) and the charger’s output. Harley-Davidson provides a clear table for a 28 Ah battery using a 3-amp charger:
- At 75% charge (12.6V): 2.5 hours
- At 50% charge (12.3V): 5 hours
- At 25% charge (12.0V): 7.5 hours
- At 0% charge (11.8V): 10 hours
A deeply discharged battery is a problem. The electrolyte in a discharged battery can freeze, cracking the case. If your battery is this low, a tender may not recover it. You might need a manual charger with a repair mode, or more likely, a new battery from our recommended list.
Interpreting Charger Lights and Troubleshooting
The indicator lights on your tender are its communication system. While colors vary by brand, many smart chargers follow a similar general pattern.
| Light Pattern | Likely Meaning | Action |
|---|---|---|
| Solid Red | Charging / Bulk Phase | Normal. Wait. |
| Flashing Red | Battery voltage is too low to start charging. | Confirm connections. Battery may be deeply discharged or faulty. |
| Flashing Red/Green | Absorption / Analysis Phase | Normal. Charger is topping off and testing. |
| Solid Green | Float / Maintenance Mode | Battery is fully charged. Tender is maintaining. |
| No Lights | No power, or faulty connection. | Check wall outlet, fuse in tender plug, and battery connections. |
If your charger flashes red and never progresses, the battery voltage is likely below the charger’s start threshold. Double-check your connections with a multimeter. If the battery reads very low, it may be unrecoverable. A proper test with a multimeter is your next step.
Long-Term Storage: Tender vs. Disconnect
Storage strategy depends on one thing: does your bike have a factory security system that will remain armed?
Storage WITH Security System Armed (e.g., Harley-Davidson H-D® Security):
You cannot disconnect the battery, or the alarm will trigger. The official instruction is clear: “connect a 750MA SUPERSMART BATTERY TENDER (Part Number 94654-98B) to maintain battery charge.” The tender must remain plugged in for the entire storage period.
Storage WITHOUT Security System:
The simpler method is to fully charge the battery, then disconnect the negative (-) cable from the battery terminal. This eliminates all parasitic drain. Store the battery in a cool, dry place. Even disconnected, batteries self-discharge. Harley-Davidson recommends charging a stored battery every month if temperatures are below 60°F (16°C), and more frequently if warmer, while other sources suggest a monthly charge regardless of temperature.
For a full seasonal shutdown routine, our guide on motorcycle winterization steps covers fuel, tires, and corrosion protection.
Battery Types: AGM vs. Lithium
This procedure is written for the most common type: sealed Absorbed Glass Mat (AGM) batteries. If you have a lithium (LiFePO4) battery, the rules change.
- Charger Must Be Lithium-Compatible: Never use an AGM-profile charger on a lithium battery. You need a charger with a specific lithium mode.
- Different Voltage Thresholds: A fully charged lithium battery reads a higher voltage than a lead-acid battery.
- Cold Weather Caution: Most lithium batteries cannot be charged if their internal temperature is below freezing (32°F/0°C).
If you’re unsure which battery you have, check the label. The debate between lithium and lead-acid battery types involves weight, power, and cost, but the charging requirement is fixed.
Frequently Asked Questions
How do I use a Battery Tender for my motorcycle?
Plug the tender’s output lead into your bike’s dedicated accessory port, or connect the red clamp to the battery’s positive (+) terminal and the black clamp to a chassis ground (if battery is installed) or the negative (-) terminal (if battery is removed). Then plug the tender into a wall outlet. The smart charger handles the rest.
How long do you leave a Battery Tender on a motorcycle?
You can leave a smart battery tender connected indefinitely during storage. It will switch to a maintenance mode once the battery is full. For charging a low battery, expect 2-10 hours depending on how discharged it is.
Can you start your motorcycle while it’s on a Battery Tender?
No. Always disconnect the tender before starting the engine. Starting draws a huge current surge (100+ amps) that the tender is not designed to handle and could damage it.
Should I keep my motorcycle on a Battery Tender?
Yes, if the motorcycle will be parked for more than two weeks, or if it has an armed security system. Keeping it on a tender prevents sulfation and ensures the battery is always ready. For a complete seasonal plan, follow our steps for winter motorcycle storage.
What if my battery tender stays on red light?
Solid red light for more than 24 hours suggests the battery is not accepting a full charge. It could be old, sulfated, or damaged. A flashing red light usually means the battery voltage is too low for the charger to begin its cycle. In both cases, check connections and test the battery voltage with a multimeter.
Before You Go
The rule is simpler than most make it: match the tender to the battery type, connect it in the right order, and then leave it alone. A quality smart maintainer is a tool you buy once.
If your battery is already reading very low, the tender may not recover it. Test it first. And if you’re storing the bike, the choice between tender and disconnect hinges entirely on that security system light. Get that wrong, and you’ll hear the alarm long before you ever turn the key.
Everything above assumes a standard AGM battery. If you’ve upgraded to lithium, the entire charging profile shifts—your tender must have a lithium setting. That’s the one place where generic advice will wreck your gear faster than neglect.
