
How to Clean a Motorcycle Chain: Step-by-Step
This post contains affiliate links. As an Amazon Associate, we earn from qualifying purchases.
Clean your motorcycle chain by first identifying its type. O-ring, X-ring, or standard, because the cleaning agent changes with each. For modern sealed chains, Ducati recommends a jet of water and compressed air dry, while KTM advises using lots of water and no brushes or cleaning liquids for X-ring chains. For unsealed chains, a fireproof solvent is required. The goal is to remove abrasive grit without damaging internal seals, then lubricate while the chain is still warm.
What follows is the process split by chain type, the official warnings most riders miss, and the specific tools that make the job fast without a mess. A key part of this is knowing how to clean a motorcycle chain correctly. You’ll also get the numbers that matter: how much slack is too much, how long to wait after lubing, and when a clean chain is actually a worn-out chain.
Key Takeaways
- Identify your chain type first. Using water on a non-sealed chain or solvent on an X-ring chain can cause immediate damage.
- Dry with compressed air from 12 inches. Ducati’s service bulletins insist on this step to prevent water from sitting in rollers; skip it and you invite rust.
- Lubricate a warm chain every 400 km. Apply lube right after a ride, not when the chain is cold, so it penetrates the O-rings before the solvents evaporate.
- Wait 10–15 minutes after lubing. Let the spray lubricant’s carriers evaporate and the oil wick into the pins before you wipe off the excess and ride.
- 20,000 km is the benchmark lifespan. Ducati states a chain lasts about 20,000 km with proper care, neglect significantly reduces its lifespan.
The First Question: What Kind of Chain Do You Have?
This is about construction, not brand loyalty. Look at the side plates of your chain. If you see a small black rubber ring seated in the gap between the inner and outer plates, you have an O-ring or X-ring chain. If you see only metal, you have a standard, unsealed chain.
That rubber ring is a seal, and it’s the whole game. Its job is to keep factory grease in and road grit out. The wrong cleaner swells, degrades, or outright dissolves that seal. Once it’s gone, the internal grease washes out in your first wet ride, and wear accelerates exponentially.
KTM’s manual draws the line plainly: chains without X-rings get cleaned in fireproof solvent. X-ring chains get cleaned with lots of water, no brushes, no cleaning liquids. Ducati’s latest bulletins mandate a jet of water for all their chains, warning against solvents entirely. Some other manufacturers have historically called for kerosene. These are engineering directives based on seal material, not minor preferences.
If you don’t know, assume it’s sealed. Most street bikes from the last 25 years run O-ring or X-ring chains. If you ride a dirt bike or a vintage machine, check.
The Controversy: Water vs. Solvent
Here is the honest take on how to clean a motorcycle chain. The internet is a warzone between the “kerosene only” and “water only” camps because both are right for different chains. The confusion happens when people treat all chains as the same.
For standard, unsealed chains, a fireproof solvent is the correct tool according to KTM. It cuts through built-up grease and flushes out grit from between the pins and rollers. KTM specifies a “fireproof solvent.” The goal is a deep clean because there’s no internal seal to protect. After the solvent, you must re-lubricate thoroughly, the chain has zero internal lubrication left.
Where this goes sideways: Using a stiff brush on a sealed chain. You might scrub dirt off the plates, but you’re also grinding that grit against the soft O-rings, wearing tiny grooves that compromise the seal. Use water pressure and a gentle rag instead.
| Chain Type | Recommended Cleaner | Why It Works | Absolute Don’t |
|---|---|---|---|
| O-ring / X-ring | Jet of water | Removes abrasive dirt without damaging rubber seals. | Harsh solvents, stiff wire brushes, high-pressure washers aimed directly at seals. |
| Standard (Unsealed) | Kerosene or fireproof solvent | Dissolves old grease and flushes grit from internal gaps. | Letting solvent soak into wheel bearings or onto tires. |
| All Types | Dedicated chain cleaners (formulated for seals) | Balanced chemistry designed to clean without swelling O-rings. | Using gasoline, brake cleaner, or WD-40 as a cleaner. |
The Step-by-Step Cleaning Process

Gather your tools first. You’ll need a rear stand, a source of water (hose with spray nozzle or a pump sprayer), a can of compressed air or an air compressor with a blow gun, clean rags, and your chosen cleaner. A dedicated chain cleaning kits can keep the mess contained.
- Secure the bike on a rear stand. This allows the rear wheel to spin freely. Put the bike in neutral.
- Spin and inspect. Rotate the wheel by hand. Look for stiff links, rust spots, or obvious damage. This is also the time to check chain wear before you clean.
- Apply your cleaner.
- For water cleaning: Use a gentle spray from a hose or spray bottle. Soak the chain thoroughly, focusing on the side plates and rollers where grit collects. The goal is to rinse, not blast.
- For solvent cleaning: Apply kerosene or a dedicated cleaner to a rag or brush. Wipe/scrub the chain while rotating the wheel. Avoid spraying solvent everywhere.
- Agitate gently. Use a soft-bristle brush or a rag to wipe down the side plates. Don’t attack the O-ring area. For heavy grime, repeat the cleaner application.
- Rinse (if using water). Give the chain a final clean water rinse to remove any loosened dirt residue.
- Dry immediately, this is critical. This is the step that prevents flash rust. Per Ducati’s NHTSA motorcycle technical service bulletin: “immediately dry the chain using compressed air, blown from a distance of at least 12 in/30 cm.” Hold the air nozzle a foot away and blast along the entire chain, forcing water out of the rollers and crevices. Wipe any remaining moisture with a dry rag.
A properly dried chain should have no visible moisture. Let the chain sit for a few minutes to ensure it’s completely dry to the touch before the next step.
Drying: The Make-or-Break Minute
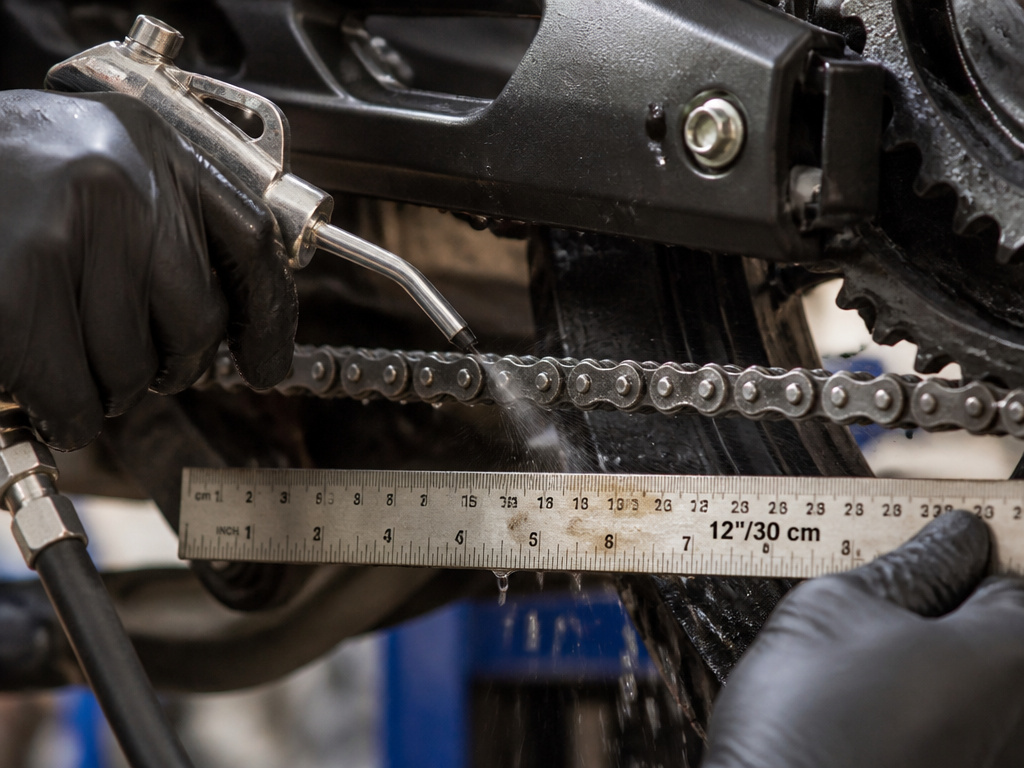
Water left inside the chain roller will find the steel pin and start oxidizing. You’ll see surface rust in a day, especially in humid climates. Using compressed air is essential.
However, there’s a caveat from other manufacturers. Yamaha’s manuals have warned against using “high-pressure water or air,” arguing it could force contaminants past seals. This is where distance matters. Ducati says “from a distance of at least 12 in/30 cm.” That gives you enough pressure to blow water out without being so intense it risks damaging the O-rings. If you’re using a shop compressor, maintain a distance of at least 12 in/30 cm.
No compressor? A can of compressed air for electronics works in a pinch for a final dry, but it’s not ideal for the whole chain. The next best option is a thorough, aggressive wipe with a very absorbent microfiber towel followed by a short ride to evaporate residual moisture, but go directly to lubrication first.
Lubrication: Timing and Technique
The chain is clean and dry. Now you add fresh lubricant. The factory data has two specific rules most riders ignore.
First, lubricate a warm chain. Ducati states: “Lubricate the chain without waiting for it to cool down after use.” A warm chain has expanded slightly, allowing the new lubricant to penetrate deeper around the pins and O-rings before the carriers evaporate.
Second, apply lubricant to the inside. The goal is to get oil between the inner link plates and the pin, where the actual rotating friction happens. Don’t just spray the top of the chain.
Here’s the method for spray lube:
- Keep the bike on the stand.
- Spin the rear wheel backwards (opposite the direction of travel).
- Aim the spray at the inside of the lower chain run, just before it meets the rear sprocket. Centrifugal force will draw the lubricant into the chain as it wraps onto the sprocket.
- Go slowly. One full rotation of the chain is enough.
When lubrication is completed, wait 10-15 minutes to allow the lubricant to spread on the internal and external surfaces of the chain and then remove any excess lubricant with a clean cloth. . Ducati Service Bulletin
This waiting period is crucial. The spray you use is mostly a solvent that carries the lubricating oil. If you immediately wipe it off or go for a ride, you wipe or fling off the oil before it has time to stick. Wait 10-15 minutes, then wipe the excess off the side plates with a rag. This prevents fling-off, which is what makes a mess of your wheel.
The debate between chain wax vs lube is real. Use mineral oil SAE 80W-90 or specific chain lubricants, ensuring they do not contain additives that might damage O-rings. For most street riders, a spray lube like Motul Chain Paste or a dedicated chain wax works fine. The key is consistency, not the brand.
The Off-Road and High-Stress Edge Case
The standard cleaning guide assumes street riding. Off-road use introduces a brutal variable: the chain guide shoe.
Ducati’s bulletins highlight a specific failure mode for off-road bikes: “friction from the chain guide shoe can cause chain overheating that would alter the heat treatment of the links.” This overheating can make the metal brittle, leading to vertical link failure where a crack starts at the base of the link plate. You won’t see this coming with a casual glance.
If you ride off-road, cleaning is about inspecting for this kind of stress as much as removing dirt. After cleaning, look for any discoloration (bluish tints) on the chain links near the guide, which indicates overheating. Check for unusual stiffness. This is a case where more frequent cleaning and meticulous attention to chain lubrication is a diagnostic tool, not just maintenance.
How Often and When to Stop Cleaning
Frequency is dictated by use, not the calendar. Ducati’s baseline for how to clean a motorcycle chain is every 400 km (250 miles). That interval shortens if you ride in high ambient temperature (over 40°C / 105°F), after long highway trips, or in wet/grimey conditions. A quick visual check after every ride is the best guide, if you see built-up grime, it’s time.
But cleaning can’t fix wear. Ducati states the average service life of a final drive chain is about 20,000 km, only if periodically maintained. Cleaning a chain that’s already past its stretch limit is a waste of time. Before you clean, always check tension and measure for stretch. If chain wear exceeds the specified limit, replacement is the next step, not a deep clean.
Also, chains and sprockets wear as a set. KTM advises that if you mount a new chain, the sprockets should also be replaced. A worn sprocket will destroy a new chain in short order.
How to clean motorcycle sprockets
When cleaning your chain, the front and rear sprockets need attention too. Built-up grime on sprocket teeth can accelerate wear on both the sprockets and the chain itself. Use the same method you use for your chain. If you are using a jet of water to clean the chain, direct it at the sprockets to wash away caked-on dirt and old lubricant. For a thorough job, manually wipe the sprocket teeth after cleaning to remove any remaining debris. This ensures the chain can mesh cleanly with the sprockets. Remember that worn sprockets will damage a new chain, so inspect their teeth for a hooked shape during cleaning.
What not to use to clean a motorcycle chain
Avoid using household cleaners or general-purpose lubricants on your chain. Solvents like gasoline, kerosene, or strong degreasers can damage the vital rubber O-rings or X-rings inside a sealed chain, drying them out and causing them to crack. For these sealed chains, manufacturer guidance specifically warns against using brushes or cleaning liquids, recommending water only. Even for unsealed chains, only a fireproof solvent is mentioned as appropriate. Never use products like WD-40 as a chain cleaner or lubricant, as they are not designed for this purpose and can compromise the chain’s internal lubrication and seals.
How to dispose of motorcycle chain cleaner waste
Properly handling the waste from cleaning is a key part of the job. The dirty runoff from cleaning your chain contains grease, grime, and chemical residues. This mixture should never be washed directly into a storm drain, onto the ground, or into your household sink. Instead, contain the waste. A common method is to place a large drip pan or disposable tray underneath the chain and sprockets during cleaning to catch all the fluid. Once the cleaning is done, transfer the captured waste to a sealed container. Take this container to a local hazardous waste disposal facility or an auto shop that accepts used oil and solvents for recycling.
Frequently Asked Questions
Can I use WD-40 to clean my motorcycle chain?
No. WD-40 is a water displacer and light penetrant, not a cleaner or a lubricant. It can actually penetrate and wash out the grease inside O-ring chains. It also leaves a film that prevents proper chain lube from adhering. Stick to the recommended cleaners: water for sealed chains, kerosene for unsealed.
Is it okay to use a pressure washer?
Not directly on the chain. The intense pressure from a pressure washer can force water past the O-ring seals, into the swingarm bearings, and into electrical connections. If you must use one to clean the bike, keep it at a wide angle and a safe distance from the chain, wheel bearings, and sprocket seals.
How do I clean a motorcycle chain without removing it?
You almost never need to remove the chain to clean it. The entire process outlined above is done with the chain on the bike, using a rear stand to allow rotation. Removing the chain is only necessary for replacement or if you need to soak a severely corroded, unsealed chain.
What’s the best lubricant for a motorcycle chain?
For sealed (O-ring/X-ring) chains, use a lubricant specifically formulated for motorcycle chains. These are designed to penetrate the seals without damaging them. Ducati mentions using “mineral oil SAE 80W-90 or specific chain lubricants.” A quality chain grease or spray lube from brands like Motul, Maxima, or DuPont is a reliable choice. The “best” one is the one you apply correctly and consistently.
Why does my chain rust after I clean it?
The most likely cause is insufficient drying. Water was trapped inside the rollers or between the links. This is why the compressed air step is so important. Another cause could be applying lubricant to a damp chain, the water gets sealed under the oil. Always ensure the chain is bone dry before applying any lube.
Before You Go
One rule cuts through the noise: match your method to your chain’s seals. Water for O-rings, solvent for bare metal. Get that wrong and you’re accelerating wear, not preventing it.
The 10-minute wait after lubing is the difference between a chain that stays quiet for weeks and one that slings grease on the first ride. It’s a small time investment with a direct payoff.
Finally, view cleaning as an inspection ritual. The time you spend wiping grime away is your best chance to spot a stiff link, a cracked O-ring, or a sprocket tooth starting to hook. A clean chain is a transparent and happy one. You can see what’s actually going on back there.
