
Motorcycle Camping Guide: The Packing & Survival Strategy
This post contains affiliate links. As an Amazon Associate, we earn from qualifying purchases.
Motorcycle camping turns a road trip into a story. You aren’t just visiting places; you’re sleeping in them. It’s the ultimate blend of riding freedom and backcountry independence, but it demands a specific kind of planning. A bike packed wrong handles like a drunk bear, and a poorly chosen campsite can turn a night into a misery marathon.
A motorcycle camping guide is a plan for self-sufficiency on two wheels. It combines gear selection, strategic packing that respects your bike’s weight limits, and route planning that prioritizes finding safe, legal places to sleep. Success hinges on understanding three things: your motorcycle’s cargo capacity, how to keep the center of gravity low, and that your bike is both your transport and your lifeline.
The top-ranking articles will tell you to buy a tent and pack light. That’s the commodity answer. The non-commodity part, as any good motorcycle camping guide will stress, is the physics and the manufacturer specs most riders never check. Your Gold Wing’s saddlebag has a 20-pound limit per side. Your V-Strom’s manual says to check the drive chain daily. Harley defines dusty environments as a severe-use condition requiring more frequent maintenance. That’s the baseline, this guide builds from there.
What follows is the system from this motorcycle camping guide: how to match your gear to your bike’s actual limits, where to put every pound so the bike still flicks into a corner, and how to secure your whole setup when you’re asleep or grabbing a burger. This is less about buying the perfect kit and more about making the kit you have, or will buy, work safely on the machine you ride.
Key Takeaways
- Packing is physics. Follow the “Golden Triangle” rule: keep heavy gear low between the saddlebags and rear rack to maintain a low center of gravity. A top-heavy bike is unstable and exhausting to ride.
- Your bike’s manual is law. Adhere to the specific cargo weight limits for saddlebags, top boxes, and total capacity listed in your owner’s manual (e.g., Honda Gold Wing F6B: 51 lb max cargo).
- Security is a layered system. Use a disc lock plus a motion alarm and a cable lock for valuables. Never rely on a single lock at a remote campsite.
- Dryness is essential. Use individual roll-top dry bags for your sleep system and tent, even inside “waterproof” panniers. A wet sleeping bag ends a trip.
- Plan for electronics failure. Always carry a detailed paper map as a backup to your GPS or phone, and know how to navigate with it.
The Golden Triangle of Packing
Forget stuffing gear wherever it fits. Your bike’s handling lives or dies by weight distribution. Think of your luggage points, the two saddlebags and the rear rack, as a triangle. Your goal is to place the heaviest items at the bottom of this triangle, as close to the bike’s center as possible.
The Golden Triangle packing rule: heaviest gear low and centered, lightest gear high and to the sides. This keeps the motorcycle’s center of gravity low, making it more stable, not less, under load.
I learned this the hard way on an early tour. I lashed a massive duffel high on a rear rack. On the first highway on-ramp, the front end felt vague and light. Every crosswind became a wrestling match. By moving that weight forward onto the pillion seat, the handling snapped back to normal. The difference wasn’t subtle.
Here’s how to apply it:
- Bottom of the Triangle (Heavy/Low): Tools, stove, water bladder, cookware. These go in the lowest part of your saddlebags or in a tank bag.
- Middle of the Triangle (Medium Weight): Tent (if poles are short), sleeping pad, food. Opposite pannier from your tools to balance side-to-side.
- Top/Apex of the Triangle (Light/High): Sleeping bag (compressed), clothing, rain gear. Can be strapped to the rear rack or in a top box.
This isn’t abstract advice. The handling experts at Cycle World note that weight centered over the rear axle prevents the front wheel from becoming flighty at speed. A bike packed using the Golden Triangle will feel planted and predictable, even when fully loaded.
Shelter and Sleep: Choosing What Actually Fits
Your shelter dictates everything else. A large expedition tent like the Redverz Atacama Expedition Tent demands a bike with serious luggage capacity and often a rear rack. A minimalist one-person backpacking tent changes the math completely.
The first question isn’t “what’s the best tent?” It’s “what fits my bike and my style?” Pole length is the critical spec everyone misses. A tent with 12-inch pack-short poles can lay flat in a saddlebag. A tent with 22-inch poles becomes a long, rigid object you must strap across the rear rack, affecting your weight triangle.
| Tent Type | Best For | Packing Consideration | Example |
|---|---|---|---|
| Expedition / Garage | Long tours, riders wanting bike cover, two-up camping | Heavy, long poles. Requires sturdy racks. | Redverz Atacama |
| Backpacking / Bikepacking | Solo riders, off-road trips, weight-conscious packers | Light, short poles. Fits in a pannier. | Big Agnes Copper Spur HV UL2 Bikepack |
| Standard Backpacking | Most solo or duo riders, general touring | Moderate weight, medium pole length. Often strapped to rack. | The North Face Stormbreak 2 |
For your sleep system, compress your bag and pad into a single, small dry bag. This creates a dense, waterproof block that’s easy to place low in your triangle. Down bags pack smaller but fail when wet; synthetic bags are bulkier but more forgiving. Your choice.
Your Motorcycle’s Limits Are Not Suggestions
This is where most guides stop and reality begins. Your bike has hard numbers printed in the manual. Exceed them, and you’re asking for handling problems, accelerated wear, or component failure.
The Honda Gold Wing F6B manual is brutally specific: a max cargo weight of 51 lb, with no more than 20 lb per saddlebag. It also states that added accessories, like a GPS mount or extra lights, count toward that 51 lb total. The manual also imposes an 80 mph speed limit when carrying cargo.
The Suzuki V-Strom 1050 DE manual reminds owners to check drive chain tension and condition each day before riding. This is critical on a loaded bike.
Harley-Davidson defines severe riding conditions, which include the dusty roads and mountainous terrain common to camping trips, as requiring more frequent maintenance. If your trip fits that description, a pre-trip service is not a luxury.
Before you start: Overloading your motorcycle changes its braking distance, suspension performance, and stability. It also voids warranty coverage for related failures. Weigh your packed bags on a bathroom scale before they go on the bike.
How to Pack a Motorcycle for Touring
The process is a deliberate, step-by-step load test. Here’s the sequence that prevents last-minute chaos:
- Lay Everything Out. Empty all your gear on the floor, including your motorcycle camping essentials. This visual inventory prevents forgotten items.
- Sort by Weight and Priority. Use the Golden Triangle framework. Tools, water, stove are Priority 1 (heavy/low). Tent and sleep system are Priority 2. Clothing is Priority 3 (light/high).
- Pack the Panniers. Place your heaviest Priority 1 items at the very bottom of each saddlebag. Balance the weight side-to-side. A well-designed touring packing list will have this built in.
- Secure the Rear Load. If you have items for the rack, use non-stretch straps like Rok Straps. Cross them over the load in an X-pattern to prevent fore-aft movement. Bungee cords allow shift and are a safety hazard.
- Perform the Grab Test. Try to violently shake, lift, or pull every bag off the bike. If it moves, tighten the strap. Vibration will loosen things in the first 20 miles.
- Check Clearances. Ensure no bag contacts the exhaust, tire, or chain. Run your hand around each bag to confirm a safe gap.
This methodical approach to packing your motorcycle for a trip turns a precarious chore into a repeatable, safe ritual.
Power, Navigation, and the Inevitable Failure
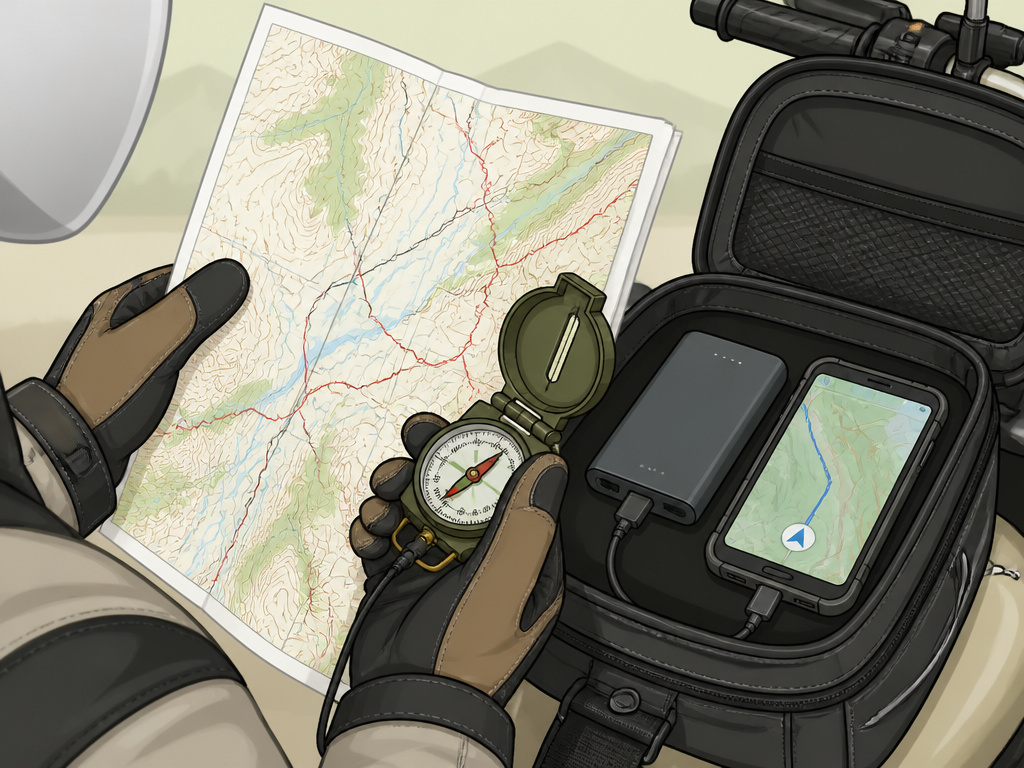
Your phone is your map, camera, and communicator. Your GPS might be your guide. A dead battery in either is more than an inconvenience; it’s a potential safety issue. Motorcycle camping requires a deliberate power strategy.
Start with a high-capacity power bank kept in a tank bag or top case for easy access while riding. Use it to top up your devices during the day. For longer trips, a USB port wired directly to your bike’s battery (with a proper fuse) makes a major difference, allowing you to charge while you ride.
Where this goes sideways: Relying solely on digital navigation. Phones overheat in tank bags, GPS units fail, and service disappears in the best camping areas. Always carry a detailed paper map of your region and know your basic location on it.
A paper map doesn’t need a signal, won’t overheat, and works as a planning tool when you’re sitting by the fire. It’s the ultimate backup system. Pair this with a simple compass, and you have a fail-safe navigation kit that fits in a jacket pocket. This kind of redundancy is a core part of learning how to plan a successful motorcycle road trip that doesn’t leave you stranded.
Campsite Security: Sleeping While Your Bike Sits Outside
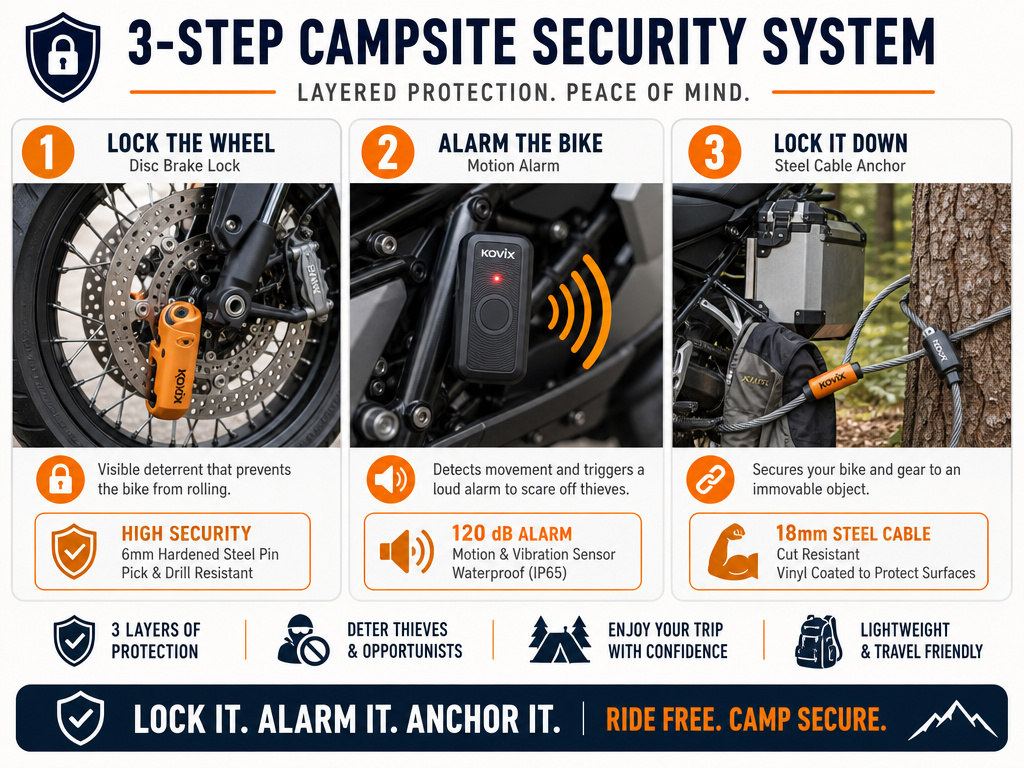
You can’t bring your motorcycle into the tent. Securing your bike and gear at a campsite, especially a dispersed site away from others, is a multi-lock process.
- The Visual Deterrent: A brightly colored disc lock on the front rotor is the first line of defense. It’s highly visible and physically prevents the bike from rolling.
- The Alarm: A simple motion-sensitive alarm attached to the bike frame will scare off curious animals or opportunistic humans. The loud chirp is often enough.
- The Cable Lock: Run a long, thick cable through the frames of your luggage, through your jacket sleeve, and around a fixed object like a tree or picnic table. Use secure motorcycle luggage with sturdy attachment points. This makes a quick grab-and-go theft much harder.
The Ducati Multistrada V4 manual warns against using padlocks or other locks designed to prevent motorcycle motion, such as brake disc locks, noting they are dangerous and may impair operation and safety. That’s a valid point, always use a brightly colored reminder cord attached to your handlebar if you use a disc lock.
The goal isn’t to make your bike theft-proof (nothing is), but to make it a more difficult target than the next unattended bike in a campground parking lot. Your peace of mind is worth the extra minute it takes to set up.
Leave No Trace, Even on Two Wheels
Motorcycle campers have a special responsibility. We often access remote, beautiful places that are fragile. Leaving no trace means our campsite should look untouched when we leave.
- Pack It In, Pack It Out. This includes all trash, food scraps, and even biodegradable items like fruit peels. Animals can get sick from them, and they alter the local ecology.
- Camp on Durable Surfaces. Use established campsites when possible. If dispersed camping, choose a spot on rock, gravel, dry grass, or snow, not on soft, vegetated soil.
- Manage Your Fire. Use existing fire rings. Keep fires small, burn only downed wood you can break by hand, and drown them completely until the ashes are cold to the touch. Many public lands have seasonal fire bans; check first.
- Respect Wildlife. Store all food, trash, and scented items (toothpaste, soap) in a secure bag, locked in your hard pannier or hung in a tree away from camp. You’re in their home.
Adventure riders have a saying: “Tread lightly.” On a motorcycle, that applies to our tires, our camps, and our impact.
How to Pack a Motorcycle for Two-Up Camping
Adding a passenger dramatically changes your bike’s weight and balance. Your first task is to know your motorcycle’s total weight capacity and its separate cargo limit. The weight of both riders, their gear, and any accessories must not exceed the total limit. Remember, the weight of added accessories like a top case or crash bars counts against your cargo limit, reducing the weight available for your camping gear. Pack the heaviest items low and centered, distributing weight evenly between left and right saddlebags. Always respect reduced speed limits for loaded motorcycles to maintain control and safety.
Frequently Asked Questions
What are the must-haves for motorcycle camping?
The five essentials are: a shelter (tent, hammock, or bivy), a sleep system (bag and pad), a cooking method (stove or no-cook food), a water supply and purification method, and a basic tool kit for bike repairs. Everything else is comfort or contingency.
How do you keep your gear dry on a motorcycle?
Use a two-layer system. First, pack your sleep system and tent into individual, roll-top dry bags. Then, place those dry bags inside your panniers or other motorcycle packs. Never trust the waterproof rating of your luggage alone over a multi-day trip in variable weather.
What is the best way to secure a motorcycle at a campsite?
Use a layered approach: a disc lock on the front wheel for visual deterrence, a motion alarm on the frame, and a cable lock threaded through your gear and around a fixed object. This combination addresses rolling theft, tampering, and grab-and-go scenarios.
Can I use my backpacking gear for motorcycle camping?
Yes, and you should start there. Backpacking gear is designed to be light and packable, which translates well to a bike. The main difference is you can often carry a slightly heavier, more comfortable item (like a chair or larger stove) since you’re not carrying it on your back.
What should I look for in a motorcycle camping tent?
Prioritize pack size over absolute weight. Short pole length (under 16 inches) is more valuable than saving 8 ounces, as short poles let you pack the tent low in a pannier. Also, look for a tent with a simple, fast pitch, setting up in a rainstorm or high wind is stressful enough without a complex tent.
Before You Go
The real secret to motorcycle camping isn’t a magical piece of gear. It’s the test run. Load your bike exactly how you plan to for the trip and ride for a full day, or at least a few hours. Feel how the bike handles, where the weight settles, and what you desperately wish you could access.
That shakedown ride reveals everything the parking lot test hides. You’ll learn if your chosen motorcycle camping tent actually fits, if your luggage system works, and if your chosen daily mileage is realistic. It’s the single most valuable step you can take.
One final, contrarian stance: the perfect trip often comes from embracing a constraint. Limit yourself to 200-250 miles a day. Force yourself to camp within walking distance of your bike. Restrict your gear to one saddlebag. These limits reduce decision fatigue, increase safety, and leave more mental space for the experience itself, which is, after all, the whole point.
