
Motorcycle Blind Spot Radar Systems Explained
This post contains affiliate links. As an Amazon Associate, we earn from qualifying purchases.
A motorcycle blind spot radar system uses a rear-facing radar sensor to monitor the lanes beside and behind the bike, alerting the rider with lights on the mirrors or display when a vehicle enters a defined warning zone. These systems only activate above a set speed, often 10 mph, and have critical blind spots of their own, including high relative passing speeds and sensor obstructions.
The key spec is the conditions where the system stays silent, not the maximum range. A sensor covered by road grime or a tail bag sees nothing. A bike passing a truck 10 mph faster gets no warning. That gap between the marketing promise and the physical reality is where these systems live or die. This is the core challenge of motorcycle blind spot radar systems explained.
What follows is a breakdown of the radar tech, the hard numbers from manufacturer manuals on when it works and when it doesn’t, and the installation mistakes that turn a safety aid into expensive dead weight, a key part of the motorcycle blind spot radar systems explained.
Key Takeaways
- Blind spot radar only activates above 10 mph (16 km/h) on systems like Polaris’s, and may not warn you if you’re passing another vehicle faster than 8 mph (13 km/h) relative speed.
- A dirty or obstructed rear radar sensor is a critical failure point; cleaning requires only soapy water and a soft sponge, as abrasive materials can damage the cover.
- Mounting height and angle are critical; an aftermarket radar must be installed horizontally within the height range specified by its manual (e.g., CHIGEE recommends 30–100 cm, while a 77GHz kit recommends 400-1000mm), or it may generate false alerts or miss targets.
- These systems are driver aids, not replacements for mirror checks and head turns; every OEM manual states the rider is always responsible for detecting other vehicles.
- For integration with other bike electronics, an OEM system like Ducati’s is calibrated to the bike’s CAN bus, while an aftermarket kit requires a clean 12V DC power source away from magnetic interference.
How Motorcycle Blind Spot Radar Actually Works
The system is simpler than the jargon suggests in a typical motorcycle blind spot radar systems explained. A small radar sensor, usually mounted at the rear under the tail, sends out radio waves. When those waves bounce off a vehicle in an adjacent lane, the sensor calculates its distance, speed, and direction.
A motorcycle blind spot radar system consists of a rear-mounted radar sensor, a control unit, and alert indicators (typically LEDs on the mirrors or a display). The sensor typically operates at 77GHz frequencies, with detection ranges varying by system; one aftermarket kit notes a detection distance that can reach up to 50 meters for lane change proximity warnings. The system triggers visual alerts when a vehicle occupies the defined blind spot zone.
The magic word is “defined.” The radar monitors a specific, narrow zone rather than painting a full picture of the world behind you. For the CHIGEE SR-1 system, that’s a warning zone about 10 meters behind the bike in the left and right lanes. Another aftermarket kit defines its horizontal detection as 4.4 meters on each side of the bike’s centerline.
The system then follows a simple logic chain: object in zone + object moving at a relevant speed = alert. The alert is almost always a solid or flashing amber light on the corresponding mirror. If you then signal to change lanes, the alert often intensifies, the icon on your display might flash.
But here’s the part nobody mentions. That calculation takes time. At higher speeds, the Polaris manual explicitly states riders “may be warned with a delay, or not at all.” The radar’s brain needs milliseconds to process, and at 70 mph, those milliseconds translate to dozens of feet of road where a warning never comes.
OEM Systems vs. Aftermarket Kits: The Integration Gap
You have two paths: a system built into a new bike from Polaris or Ducati, or a kit you add yourself from Garmin, CHIGEE, or others. The difference lies in how deep the system ties into your motorcycle’s nervous system, not just in price.
An OEM system is part of the bike’s CAN bus network. It knows your speed, your lean angle, your suspension preload. The Polaris system uses this data to adjust its logic. The manual warns that incorrectly set rear suspension preload can affect the radar’s performance. The system can also be disabled through the bike’s main menu.
Aftermarket kits are strangers to the bike’s computer. They need their own power, tapped directly to the battery. The 77GHz BSD Kit manual is clear: “Power supply pins require a separate 12V DC regulated power supply.” They also warn to install the radar “as far away as possible from locations with strong magnetic interference,” like starter motors. This is a real, tangible gap in capability. The OEM system is tuned for that specific motorcycle’s geometry and electrical noise. The aftermarket kit is guessing.
| Aspect | OEM System (e.g., Polaris, Ducati) | Aftermarket Kit (e.g., Garmin, 77GHz Kit) |
|---|---|---|
| Integration | Built into motorcycle CAN bus; knows speed, lean, suspension. | Standalone; requires separate 12V power connection. |
| Calibration | Factory-calibrated for specific bike model and sensor location. | Requires manual horizontal mounting at a set height (30-100cm). |
| Maintenance | May require dealer-level tools for sensor recalibration after impact. | User-cleanable sensor; no recalibration tools typically available. |
| Alert Disabling | Can be enabled/disabled via the motorcycle’s instrument display. | Often requires accessing a physical button or wiring harness. |
The wiring lesson from my driveway walk-around applies here. Trace the force path, but for electrons. For an aftermarket kit, you start at the battery terminals and follow the wires to the sensor and the indicator lights. Any break, any loose connection in that simple loop, and the whole system goes dark. An OEM system’s path is woven through the bike’s main wiring harness, more complex, but protected and managed.
Common Installation Pitfalls (And How to Avoid Them)
Installing an aftermarket radar is a matter of geometry and cleanliness, not just bolting on a gadget. Get these wrong, and the system will lie to you.
First, height. The manuals don’t agree on a single number, but they give a tight range for a reason. The CHIGEE SR-1 manual says 30–100 cm above the ground. The 77GHz kit says 400-1000mm (which is the same 40-100 cm). Mount outside this band, and the radar’s beam points at the pavement or the sky, missing cars entirely.
Second, horizontality. The 77GHz kit manual states one rule: “Keep the radar mounted horizontally.” A sensor tilted even a few degrees skews its detection zone, potentially shifting your blind spot warning into the next lane over. Use a small level.
Third, and most critical, is sensor obscuration. Every single manual screams this in bold. The Polaris manual warns that performance may be affected by sensor obstructions, listing “accessories, luggage, or passenger’s items” as things that must not cover the sensor. A tail bag sitting too far back is all it takes to block the field of view. The cleaning instruction is specific: only soapy water and a soft sponge. No chemicals, no abrasive cloths, no pressure washers.
Where this goes sideways: Tapping power from a random accessory wire instead of the battery. The radar needs a clean, stable 12V supply. A wire that switches off with the ignition or carries noise from a fuel pump will cause the system to reboot or behave erratically while riding.
Here’s a checklist to run through before you finalize the install:
- Height Check: Sensor is mounted between 12 and 40 inches (30-100 cm) from the ground.
- Level Check: Sensor is perfectly horizontal left-to-right and front-to-back.
- Sight Line: No part of the motorcycle body, luggage, or passenger gear blocks the sensor’s rearward view.
- Power Source: Wired directly to the battery with an in-line fuse, or to a dedicated, clean 12V circuit.
- Connection Security: All wiring connectors are clicked firmly together and secured from vibration with zip-ties or loom.
Limitations, False Alerts, and What the Radar Misses
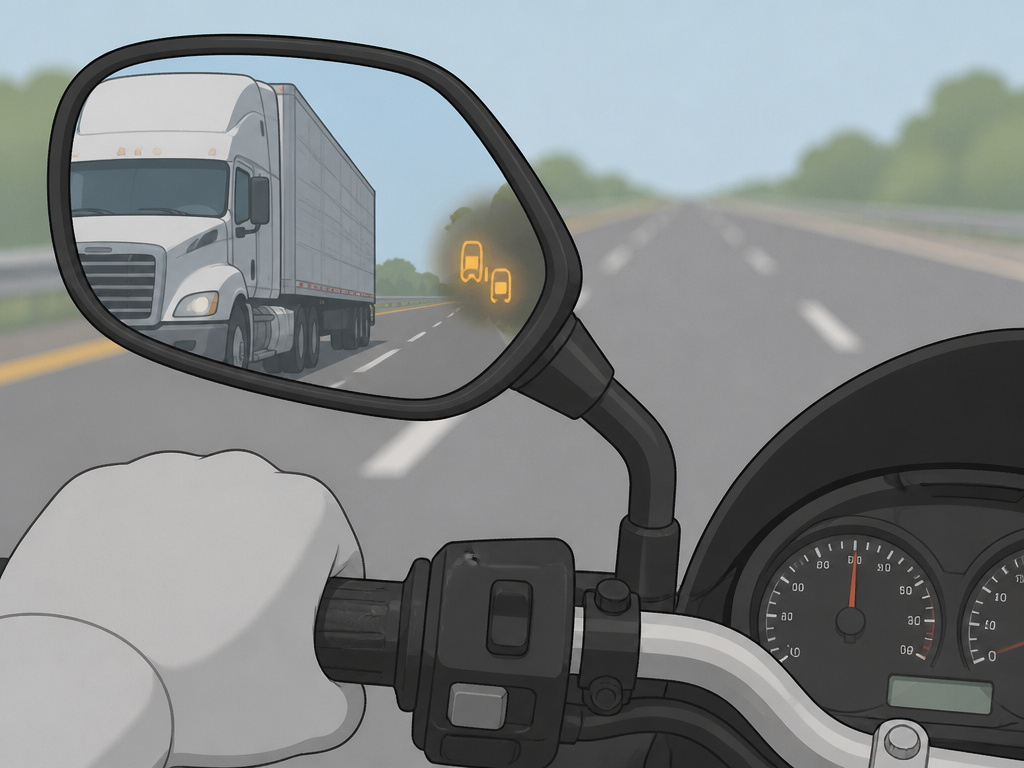
Trust the system, but verify. Always. The manuals are unanimous on this being an aid, not an authority. The Ducati Multistrada V4S manual puts it bluntly: “The rider must not rely solely or unreasonably on the ‘ability’ of the system.”
The radar has physical blind spots. The Polaris system notes its performance “may be affected by smaller vehicles such as bicycles or motorcycles, or vehicles with large flat surfaces such as trailers.” A bicycle’s narrow profile or a trailer’s sheer, flat side can confuse the radar’s return signal.
More critically, there are scenario-based blind spots. The most important one is high relative speed. The Polaris system states: “A Blind Spot Warning will not appear if the motorcycle is passing another vehicle faster than 8 mph (13 km/h) relative to the other vehicle.” If you’re in the left lane coming up on a semi 15 mph faster, the system may not see it in time to warn you before you start your lane change.
| Scenario | Will the Radar Alert? | Why or Why Not? |
|---|---|---|
| Car in adjacent lane, matching your speed | Yes. This is the primary detection scenario. | The vehicle is within the defined zone and at a low relative speed. |
| You passing a car 10+ mph faster | Possibly not (per Polaris spec). | Relative speed exceeds the system’s 8 mph (13 km/h) warning threshold. |
| Motorcycle or bicycle in blind spot | Maybe, with reduced reliability. | Smaller vehicle profiles return a weaker radar signal that may be filtered out. |
| Sensor covered by road grime | No. The system is effectively blind. | Radar waves cannot penetrate a layer of dirt, mud, or ice on the sensor cover. |
| Heavy rain or snow | Performance degraded, alerts delayed. | Precipitation scatters and absorbs radar waves, reducing effective range. |
Then there’s the delay. At city speeds, it’s negligible. But the Polaris manual cautions that at highway speeds, processing delay means you “may be warned with a delay, or not at all.” This is a physical limit of the processor’s calculation time, not a malfunction.
Every owner’s manual states this: the rider’s eyes and head check are the final authority. The radar is a useful cross-check, not a replacement.
Key technical specifications (range, coverage angle, frequency)
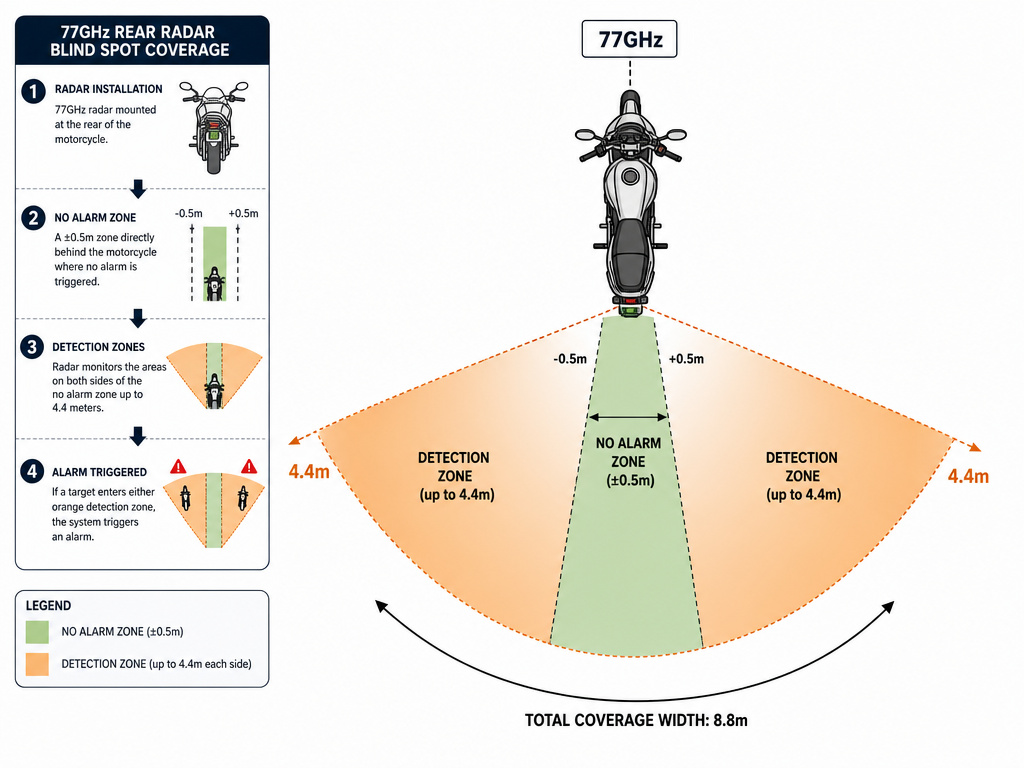
Blind spot radar systems typically operate on a 77GHz frequency. The detection area is defined by a specific range and lateral zones. One aftermarket kit divides its measurement area into two sections: 4.4m on the left and right, with no alarm in the middle ±0.5m.
Comparison of major brands/models (e.g., Garmin, CHIGEE, INNOVV)
Factory and aftermarket systems share core principles but differ in implementation and installation advice. Garmin strongly recommends professional installation by an experienced installer familiar with motorcycle electrical systems and stresses secure, stable mounting. CHIGEE provides specific wiring instructions, connecting red and black wires directly to the battery terminals, and notes its display will disable visual detection when the radar is active. A generic 77GHz kit advises keeping the radar surface clean by wiping it with a soft damp cloth and letting it dry naturally, and mounting it horizontally away from sources of strong magnetic interference. All manufacturers agree these systems are aids, not replacements for a rider’s own checks and judgement.
Market trends and adoption
The adoption of motorcycle blind spot radar is growing, moving from high-end factory options to aftermarket kits. This expansion means riders must understand that system performance is not uniform. Factory systems on models like those from Polaris have specific operational limits, such as only activating above a certain speed and potentially providing delayed or no warnings at higher speeds due to processing time. Aftermarket kits offer more universal fitment but require careful installation regarding height, horizontal alignment, and power supply. The common trend across all systems is a critical rider advisory: the technology is an assistive tool, and the rider must never rely on it solely, maintaining constant control and awareness.
Frequently Asked Questions
What is the best blind spot detection system for motorcycles?
There isn’t a single “best” system. For riders buying a new bike, an integrated OEM system from Polaris or Ducati offers the cleanest installation and deepest integration. For adding to an existing bike, the Garmin zūmo R1 is a well-supported aftermarket option, while kits like the 77GHz BSD Kit offer a more budget-conscious path. The “best” one is the one you install correctly and maintain.
What is the 12 second rule on a motorcycle?
The “12-second rule” is a visual lead-time riding technique, not a radar function. It means scanning the road ahead 12 seconds of travel time to identify potential hazards early. A blind spot radar system deals with the immediate 1-10 second range beside and behind you. They are complementary skills, the 12-second rule for forward planning, the radar for immediate proximity alerts.
What is the 4-second rule for motorcycles?
The “4-second rule” is a following distance guideline. You should stay at least 4 seconds behind the vehicle in front of you to allow enough time to react and stop. This is unrelated to blind spot radar, which monitors the areas to your sides, not the car directly ahead.
Can I install a blind spot radar system myself?
Yes, but with a major caveat. Garmin “strongly recommends having an experienced installer with the proper knowledge of electrical systems install the device.” If you are comfortable with basic motorcycle wiring, following the manual’s height, level, and power instructions precisely, a DIY install is possible. If you’re unsure about wiring directly to the battery or drilling mounting holes, professional installation is a wise investment for safety and functionality.
Before You Go
A blind spot radar is a tool that extends your senses, not a force field. Its value is entirely conditional on a correct installation and a clear understanding of its limits. The most important numbers to remember are the 8 mph relative speed threshold and the 30-100 cm mounting height, not the 50-meter range. Miss those, and you’ve bought a false sense of security.
If you’re considering one, start with the manual for the specific kit you want. If the installation steps give you pause, that’s your answer, get help. This isn’t like adding a dash cam or an anti-theft system, where placement is flexible. The radar’s position is a fixed, critical specification that decides whether it works or doesn’t.
For tech that integrates more smoothly, you might look at smart helmets with built-in visual alerts. But for a dedicated, radar-based system, the rule is simple: install it by the book, keep the sensor clean, and never let its light replace a look over your shoulder.
