
How to Sync Motorcycle Throttle Bodies: Step-by-Step
This post contains affiliate links. As an Amazon Associate, we earn from qualifying purchases.
To sync motorcycle throttle bodies, you need a vacuum gauge or manometer, a fully warmed engine, and the factory service manual. The process connects the gauge to vacuum ports on the throttle bodies, sets the engine to the specified idle speed, and adjusts the bypass screws on all non-reference cylinders until their vacuum readings match the designated reference cylinder within the tolerance specified in your manual.
The factory service manual is the primary authority on which cylinder is the reference and what the target idle speed should be. Those two specs vary wildly between models, and getting them wrong means your sync is just a guess. A key step is learning how to sync motorcycle throttle bodies correctly. This isn’t about chasing a perfect number; it’s about making every cylinder pull the same amount of air at idle.
What follows: the tools that actually work, the seven steps that apply to any bike when you compare a how to sync motorcycle throttle bodies guide, and the critical model-specific differences that the factory manuals spell out but most forum guides gloss over. By the end, you’ll know how to read your gauges, what to adjust, and how to confirm the job was done right.
Key Takeaways
- Always sync to the factory-specified reference cylinder. For example, on a Yamaha Tracer MT09TRA it’s the one with the white-painted screw, and on an FJR1300 it’s cylinder #3. The general rule is to never adjust the reference cylinder.
- Engine temperature is critical. Run it until the cooling fan cycles at least once, or the coolant hits 80–100°C (176–212°F) for models like the Suzuki GSX-R 1000.
- The sync screws balance vacuum, not idle speed. For most bikes, use the single, separate idle adjuster to set the RPM after the cylinders are balanced. Note that the Yamaha FJR1300(N) manual specifically states not to use the throttle valve adjusting screws for synchronization.
- Cap every vacuum port before starting the engine. An open port is a massive air leak that makes synchronization impossible and can damage the engine.
- If the screws won’t balance the cylinders, the bypass air passages are likely clogged. Remove, clean with carburetor cleaner, and reinstall the screws, noting the number of turns for correct resetting.
What Does a Throttle Body Sync Actually Fix?
A throttle body sync fixes an imbalance in air delivery. Each cylinder has a throttle butterfly valve that lets air in. Over time, wear in the linkage and cables can cause these butterflies to drift out of alignment. One cylinder ends up sucking a bit more air at idle than its neighbors.
The engine’s computer (ECU) can’t see this. It injects fuel based on assumptions of equal air. So the cylinder pulling more air runs lean, the one pulling less runs rich. The engine fights itself, creating a lumpy, hunting idle and a snatchy, on-off feel when you first crack the throttle open. At a steady cruise, this imbalance turns into a persistent buzz through the bars and pegs that wears you out. Syncing brings the butterflies back into mechanical harmony so each cylinder gets equal air, letting the ECU’s fuel map work as intended.
The goal is equal vacuum, not a specific number. Absolute vacuum readings vary with engine design, camshaft profile, and altitude. What matters is that every cylinder reads the same as the reference, within the tolerance your manual states.
What You’ll Need (And What to Skip)
You don’t need a shop full of tools, but you do need the right ones.
The Essential Tool: A vacuum gauge set or manometer. A four-gauge set like those from Motion Pro is straightforward. A mercury-free manometer like the Morgan Carbtune Pro is a popular option.
The Critical Accessory: Model-specific vacuum port adapters. Your bike’s vacuum ports might be screw-in plugs or rubber-capped spigots. You need the right adapters to connect your gauge hoses securely. A leaking connection gives a false reading.
Supporting Cast:
- Service Manual: Not a suggestion. You need it for the reference cylinder location, target idle speed, and sync tolerance. Digital versions are fine.
- Basic Hand Tools: Metric sockets and hex keys to lift the fuel tank.
- Fuel Line Extension: A length of proper fuel hose and clamps to safely supply fuel with the tank lifted.
- Silicone Vacuum Caps: A spare assortment. Old, hardened caps crack and cause air leaks.
- Small Screwdriver: Often a long, thin flat-head or Phillips to reach the recessed bypass screws.
What to Skip: Fancy diagnostic software for this job, unless you own a modern Suzuki like a GSX-R 1000. For most bikes, a physical gauge is the right tool. Also skip any “carb sync” fluid that claims to clean as you adjust; it’s a gimmick.
Before You Start: The Non-Negotiable Prep
This is where most DIY jobs go wrong. Rushing the prep guarantees a bad sync or a dangerous situation.
Before you start: You are working on a hot engine with an open fuel line. The cooling fan can start without warning, and gasoline vapors are present. Work outdoors or in a well-ventilated space, keep a fire extinguisher handy, and never let the engine run in a closed garage.
1. Fix the Fundamentals First. Syncing won’t cure a misfire from bad plugs or a vacuum leak from a cracked boot. Check and replace the air filter, spark plugs, and inspect every inch of the intake tract and vacuum hoses for cracks. Ensure valve clearances are in spec, a tight exhaust valve can mimic a sync problem.
2. Achieve Full Operating Temperature. This is a sensory checkpoint. Start the engine and let it idle until the radiator fan cycles at least once. For the Suzuki GSX-R 1000, the manual is explicit: coolant must be between 80–100°C (176–212°F).
3. Lift the Fuel Tank Safely. Disconnect the fuel line and electrical connections, then prop the tank up or remove it. Connect your fuel line extension, double-check every clamp, and look for any weeping before you start the engine. An auxiliary fuel bottle works too.
4. Find and Label Your Ports. Consult your manual for the exact location of the vacuum take-off points on each throttle body. They are usually on the intake manifolds between the throttle body and cylinder head. Remove the blanking screws or rubber caps. Attach your gauge hoses and label each one clearly (#1, #2, etc.).
| Common Motorcycle | Reference Cylinder | Idle Speed for Sync (RPM) | Sync Tolerance |
|---|---|---|---|
| Yamaha Tracer MT09TRA | White-painted screw | 1100–1300 | ≤1.33 kPa (10 mmHg) |
| Yamaha FJR1300(N) | Cylinder #3 | 1000–1100 | ≤1.33 kPa (10 mmHg) |
| Suzuki GSX-R 1000 | See manual | ~1150 | See manual |
| Suzuki DL650 (K4-K6) | See manual | 1300–1400 (fast idle) | 14–18 cmHg |
The 7-Step Synchronization Process
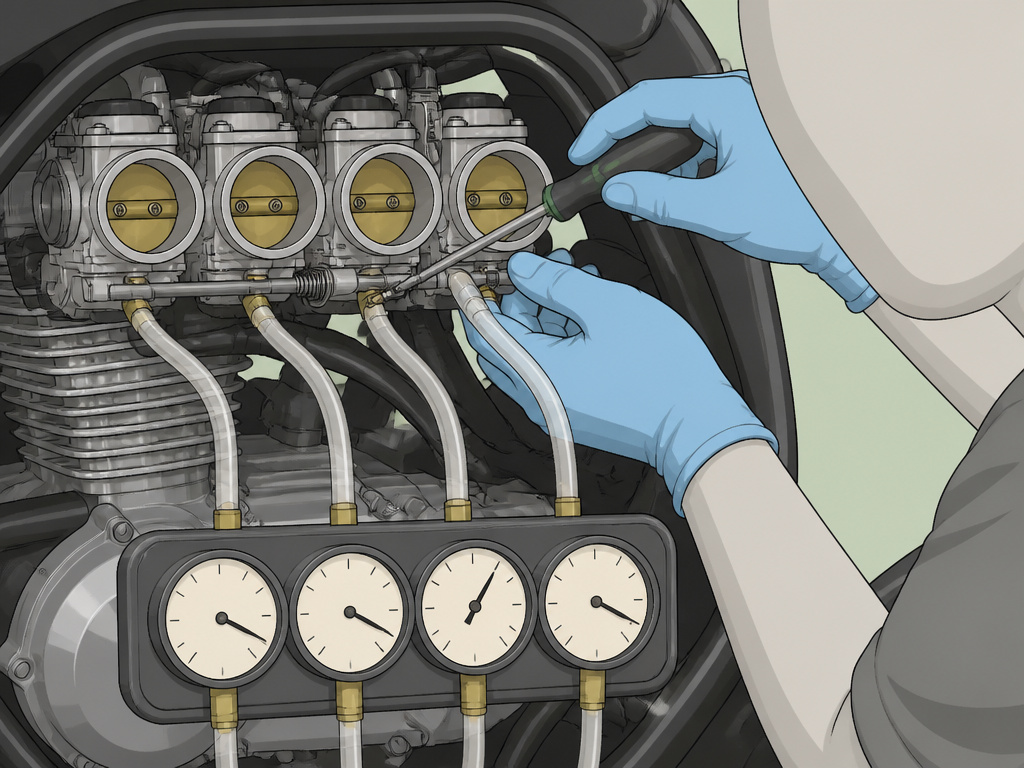
Follow this sequence. The goal is methodical adjustment, not frantic turning.
1. Connect and Calibrate. With all gauge hoses connected to their respective cylinders, start the engine. Let it idle.
2. Set the Idle Speed. Using the bike’s dedicated idle speed adjuster (usually a knob or screw near the throttle linkage), set the engine speed to the exact RPM specified in your manual. This is critical. Do not use the sync screws for this.
3. Identify the Reference. Note which cylinder your manual says is the non-adjustable reference. Do not touch its sync screw. On the Yamaha Tracer MT09TRA, it’s the throttle body with the bypass air screw marked with white paint. On the Yamaha FJR1300, it’s cylinder #3.
4. Adjust the Non-Reference Cylinders. Look at your gauges. Adjust the sync screw on the highest-reading cylinder (closest to the reference) first. Turn it in (clockwise) in tiny increments to lower its vacuum reading toward the reference.
5. Blip and Settle. After each adjustment, gently blip the throttle to about 3000–4000 RPM and release. Let the engine settle back to a steady idle before reading the gauges again. This ensures the throttle plates and linkage have recentered.
6. Repeat and Refine. Move to the next cylinder, always bringing it toward the reference. Work in small steps. The process is iterative; adjusting one cylinder can slightly affect another. The Yamaha manual procedure is explicit: after each step, rev the engine two or three times, each for less than a second, and re-check.
7. Verify at Idle and Off-Idle. Once all cylinders are within tolerance at idle, blip the throttle again. Watch the gauges as the revs fall, they should all move together in unison. If one drops or rises out of sync with the pack, there may still be a slight imbalance or a sticky linkage.
Model-Specific Quirks That Change the Game
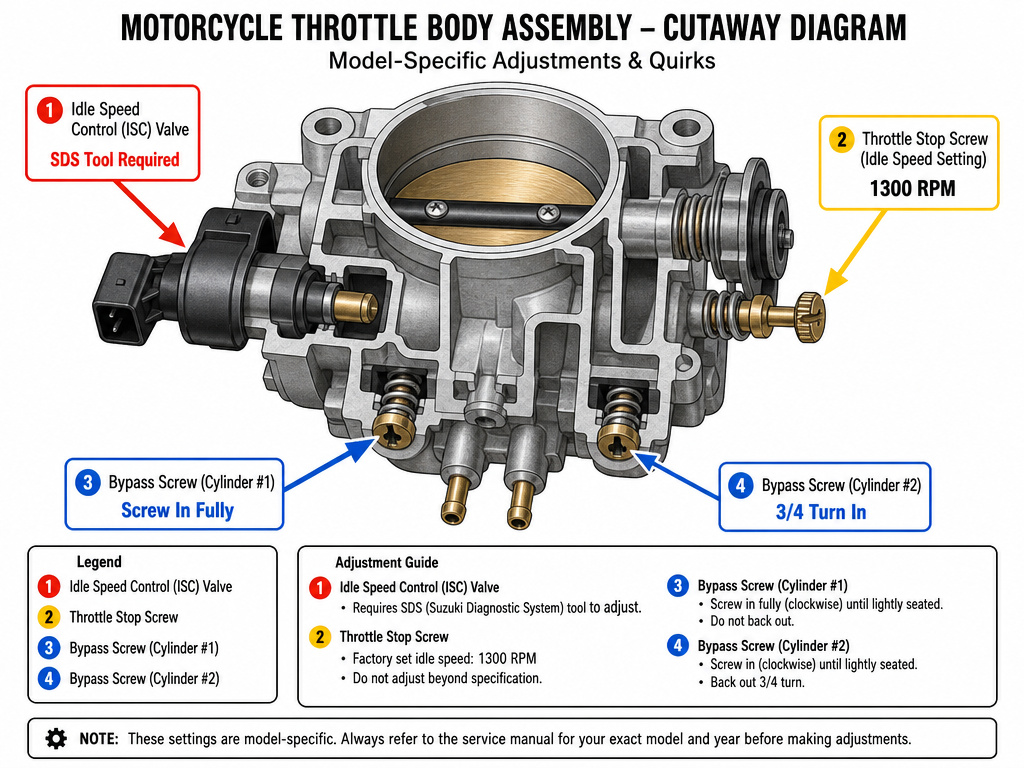
Your bike isn’t a generic inline-four. Factory manuals reveal major differences that generic guides miss.
Modern Suzukis Need a Computer. For bikes like the GSX-R 1000, the manual states you must use the SDS diagnostic tool to fix the Idle Speed Control (ISC) valve position at “approx 48 step” before you even connect gauges. Trying to sync without this step is futile. After syncing, you must also clear diagnostic trouble codes and reset the ISC learned value with the same tool.
The “Fast Idle” Method. The community guide for the Suzuki DL650 V-Strom specifies a different tactic: use the throttle stop screw to set a “fast idle” of 1300–1400 RPM for the synchronization process itself.
When Screws Are Removed. If you need to remove a bypass air screw to clean it, the re-installation spec differs by model. For the Yamaha Tracer MT09TRA, turn the screw in fully. For the Yamaha FJR1300(N), turn it 3/4 of a turn in. Getting this wrong sets your baseline adjustment far out of range.
To Remove the Air Box or Not? The Suzuki service manual for the DL650 says to remove the air box for access. The experienced-based community guide flatly disagrees: “From experience, this has not been found necessary.” This is a case where documented owner experience contradicts the factory manual.
Where This Goes Sideways: Common Mistakes
These minor oops moments can waste an afternoon or create a new problem.
Syncing a Cold Engine. Metal expands with heat. Throttle cables, linkage, and the bodies themselves change dimension. A sync performed on a cool engine will be wrong the moment the bike reaches true operating temperature. Wait for the fan.
Chasing a Forum Number. “My bike reads 25 cmHg on all cylinders” is useless to you. Your engine, your camshafts, your altitude, they all change the absolute vacuum number. Equalize the cylinders to your reference. That’s the only number that matters.
Using Sync Screws to Set Idle. This is the most common error. The sync screws balance the relationship between cylinders. The idle speed screw controls the baseline position of all throttle plates together. If idle speed drifts low after syncing, use the idle speed adjuster, not the sync screws, to correct it.
Leaving a Port Open. You took off four vacuum caps. You must put four back on, securely. An uncapped port is a huge air leak directly into that cylinder. The engine will run terribly, and you’ll have to start over. Count them off, count them back on.
Not Blipping the Throttle. Adjusting a screw changes tension in the linkage. A quick throttle blip relieves that binding and allows the plates to settle into their true, neutral position. If you don’t blip, you’re adjusting against a false reading.
What to Do If the Screws Won’t Balance
You’re turning the screws, but one cylinder stubbornly reads high or low and won’t move. Don’t force it. The manual has a direct answer.
Both Yamaha and Suzuki procedures state the same fix: if synchronization cannot be achieved by adjustment, the bypass air screws or passages are clogged. Shut everything down and let the engine cool. Remove the offending air screw(s). Spray them and the passages clean with carburetor cleaner. For Suzuki, the manual adds a critical note: “Make a note of how many turns were made so the screw can be reset correctly after cleaning.” Reinstall the screw to its baseline position (fully in or 3/4 turn in, per your model), then restart the sync process from the beginning.
If cleaning doesn’t work, the manual’s next step is clear: clean or replace the throttle bodies themselves. At that point, you’re likely dealing with internal wear or damage beyond a simple maintenance sync.
After the Sync: Verification and Test Ride
A sync is confirmed by feel, not just gauge needles.
1. Audible Idle. The idle should settle into a single, steady beat instead of a loping hunt. The exhaust note becomes even and regular.
2. Throttle Response. The first half-inch of throttle twist from a closed position should be smooth and linear. The snatchy, jerky feeling should be gone.
3. Cruise Vibration. Take the bike for a test ride. Focus on the vibration through the footpegs and handlebars at a steady cruising RPM. The annoying high-frequency buzz should be significantly reduced.
4. Check for Leaks. After the test ride, shut the bike off and let it cool. Re-inspect all your vacuum connections and the fuel line for any signs of seepage. A small air leak can undo your work in a few miles.
This is also the time to ensure other basic settings are correct. Check your throttle cable free play and confirm the throttle snaps shut crisply with the handlebars at full lock in both directions. A sticky cable can pull a throttle plate slightly open, ruining your sync.
Using Diagnostic Software for Throttle Body Sync
For some modern motorcycles, diagnostic software can be used as an alternative to traditional vacuum gauges in the process of how to sync motorcycle throttle bodies. This method often involves connecting a computer or device to the bike’s diagnostic port. The software can read live data from the engine control unit, including parameters that relate to air intake balance. On certain models, the software is required to lock components like idle speed control valves into a fixed position before manual adjustment can even begin. After completing the physical adjustments, the software is typically needed again to clear diagnostic trouble codes and reset the engine’s learned values for the system to operate correctly.
Frequently Asked Questions
What are the symptoms of an out-of-sync throttle body?
Lumpy, hunting idle that won’t settle. A snatchy, on-off feeling when you first open the throttle, making low-speed maneuvering frustrating. Increased vibration through the handlebars and footpegs at a steady cruise. Sometimes, slightly worse fuel economy and more engine heat.
Can I sync the throttle bodies myself?
Yes, if you are methodical, have the correct tools, and follow the factory service manual for your specific model. It’s a mechanical adjustment, not black magic. The biggest barrier is usually gaining safe access to the vacuum ports, which often requires lifting the fuel tank.
How often should throttle bodies be synced?
Consult your motorcycle’s service manual for the recommended interval; a general guide suggests around every 12,000-16,000 miles. Always sync the throttle bodies after they have been removed or disturbed for any service, and after adjusting valve clearances. Some riders perform a sync annually as part of spring tune-up.
What’s the difference between a vacuum gauge and a manometer?
Both measure vacuum. A multi-gauge set shows a needle for each cylinder and is easy to read. A manometer (like a liquid column or the Morgan Carbtune’s sliding rods) is often more sensitive and has no mechanical parts to calibrate.
My bike has a ride-by-wire throttle. Does it need syncing?
Maybe. Many ride-by-wire systems still have multiple throttle bodies with mechanical linkage between them that can fall out of adjustment. The procedure is often similar, but you must put the ECU into a dealer or “service” mode to manually control the throttle plates. Consult your factory manual, it’s not a job to guess at.
Can a bad sync damage my engine?
Not directly, but it stresses it. Running with cylinders severely out of balance means some are working harder than others, creating uneven heat and wear. More critically, attempting a sync without following safety procedures (open fuel lines, hot exhaust) can definitely lead to fires or injury.
The Bottom Line
A throttle body sync is straightforward maintenance, but it demands respect for the specifics. Your bike’s factory manual is the definitive law for the reference cylinder and idle speed. Warm the engine fully, use a gauge, and adjust in tiny steps, blipping the throttle between each one.
The payoff is immediate: a smoother idle, crisp throttle response, and less buzz on the highway. If you hit a wall because the screws won’t adjust, the manual’s next step is always the same: remove and clean them. That usually solves it.
For bikes with modern fuel injection that still run rough after a sync, look upstream. A clogged injector or a faulty sensor might be the real culprit, and a quality fuel injector cleaner in the gas tank is a logical next diagnostic step before more invasive repairs.
