
How to Change a Motorcycle Tire at Home: A DIY Guide
This post contains affiliate links. As an Amazon Associate, we earn from qualifying purchases.
To change a motorcycle tire at home, you need three core tools: tire irons (two minimum, three recommended), a bead breaker, and an air-drying tire lubricant like soapy water. The process involves breaking the tire bead from the rim, prying the old tire off, lubricating and installing the new one, seating the bead with air pressure not exceeding 40 psi if the manufacturer’s spec is unknown, and then balancing the wheel. For tubed tires, you must match a new tube to the tire size, and for models with TPMS, the sensor is located 180° from the valve stem.
This is not a casual Saturday project for everyone. Michelin explicitly states it’s not recommended for road tires due to the complexity and need for balancing, while other OEMs like Sherco provide owner instructions. The difference comes down to your tolerance for risk, your tool investment, and whether you can verify the final assembly is safe. A key factor is knowing how to change a motorcycle tire at home correctly.
What follows is the full procedure for how to change a motorcycle tire at home as documented by manufacturers and the Tire Industry Association. We’ll cover the mandatory safety warnings, the tool trade-offs, the step-by-step swap, and the final checks that decide whether your DIY job is road-ready or a trip to the shop.
Key Takeaways
- Use air-drying lubricant only (soapy water); never use grease, antifreeze, or petroleum-based products, which can damage rubber and cause rim slip.
- Match tube and valve type exactly; for tubeless, Harley-Davidson specifies valve stem torque of 12-15 in·lbs (1.4-1.7 Nm) and mandates OEM valves to prevent failure.
- Never exceed 40 psi to seat a bead unless the tire manufacturer specifies a higher limit; overpressure can rupture the assembly explosively.
- Check lateral and radial runout after mounting; both should be under 0.090 in (2.29 mm) per Harley-Davidson, or the tire must be remounted or replaced.
- Balance the wheel to within 0.5 oz (14 g).
The 3 Non-Negotiable Safety Rules Before You Start
Before you start: This procedure involves stored kinetic energy. A tire bead seated under excessive pressure or a wheel assembly that fails during inflation can explode with enough force to cause serious injury or death. Follow these three rules without exception.
First, eye protection is not optional. The USTIRES bulletin mandates approved eye protection while servicing any tire-wheel assembly. Metal tire irons can slip, sealant can spray, and a snapping bead wire is a projectile.
Second, you need a way to stand clear during inflation. The industry standard is an extension air hose with a clip-on chuck and an in-line valve with a gauge. This allows you to inflate the tire from several feet away, outside the potential blast radius. Never lean over the assembly while air is going in.
Third, contain the wheel if your changer doesn’t have a positive lock-down. If you’re using a simple stand or doing this on the floor, the wheel must be inside an approved safety cage during bead seating. A tire can jump off the rim or the whole assembly can be propelled with surprising force.
Tools You Actually Need vs. What You Can Improvise
You have two paths: buy the right tools or fight the tire for three hours. The right tools are not a luxury.
The core kit is small. Michelin lists two tire spoons (three is better), tire mounting lubricant, and a pressure gauge. Add a bead breaker—this is the tool most home attempts fail without. You can buy a dedicated motorcycle bead breaker, use a modified hydraulic jack, or even a sturdy C-clamp with a block of wood. Trying to pry a stiff, modern tire bead over the rim flange with just irons is how you gouge aluminum rims and pinch tubes.
For lubricant, sources offer specific guidance: Michelin recommends an air-drying lubricant like soapy water and advises against grease, while the USTIRES bulletin bans antifreeze, silicones, and petroleum-based lubricants.
A valve core tool is useful for deflating tubes completely. Rim protectors can help protect the wheel’s finish during tire changes.
I tested a few homemade bead breaker designs so you don’t have to guess. A large C-clamp works if the tire is moderately worn. For a stiff, new touring tire, it just flexes and slips. The dedicated tire change tools like a manual press are worth the investment if you plan to do this more than once.
Where can you improvise? The mounting stand. You can do this on a clean floor over a piece of carpet or cardboard to protect the wheel’s underside. Just ensure the wheel is secured in a safety cage for inflation. A portable tire changers is better, but the cage is essential.
Tubeless vs. Tube-Type: Where the Procedure Splits
This is the first decision point. The removal steps are similar, but installation and inspection differ dramatically.
Tubeless tires are the modern standard for most street bikes. The tire seals directly against the rim. The valve stem is part of the wheel. The key is not damaging that seal during removal or installation. You’ll also need to locate the TPMS sensor on equipped bikes; Polaris/Indian notes it’s 180° from the valve stem, so you must break the bead at the valve first, then at 90° and 270° to avoid crushing it.
Tube-type tires are common on classic bikes, dirt bikes, and some cruisers. Here, the tube holds the air, and the tire is just a carcass. Polaris/Indian has a firm rule for its models: inner tubes MUST be replaced with new ones when tires are replaced. Other procedures, like that from USTIRES, involve steps for reusing a tube, implying replacement is not always mandatory. It has stretched and fatigued. A new tube costs $20; a roadside failure costs more.
The USTIRES procedure adds a critical step for tubes: after the beads are seated, remove the valve core to completely deflate the tube, then re-inflate. This eliminates folds and wrinkles that lead to immediate flats.
| Aspect | Tubeless Tire | Tube-Type Tire |
|---|---|---|
| Air Seal | Tire bead to rim | Inner tube |
| Valve Stem | Integrated into rim (torque to 12-15 in·lbs) | Part of the tube |
| Post-Installation | Check bead seal with soapy water | Deflate fully via valve core to remove tube wrinkles |
| TPMS Consideration | Sensor 180° from valve stem | Not applicable |
| Mandatory Replacement | Valve stem if damaged | Inner tube every time |
For spoked wheels, especially off-road, you have a rim lock. This is a small bracket that bolts through the rim to physically stop the tire from rotating on the rim under hard acceleration or braking. The USTIRES bulletin says to check and tighten any rim locks after inflation. Skip this, and the tire can spin on the rim, shearing the valve stem off.
Step-by-Step: Demounting the Old Tire
Step 1: Remove the Wheel from the Bike
Consult your service manual. This usually involves supporting the bike securely, removing the axle nut, and sliding the axle out. Label any spacers and note their order. For the rear wheel, you’ll need to loosen the chain or belt tension. Consult your service manual for wheel removal, as procedures vary by motorcycle.
Step 2: Deflate Completely
Remove the valve core to let all air out. For tubeless, this breaks the initial seal. For tube-type, it’s essential.
Step 3: Break the Bead
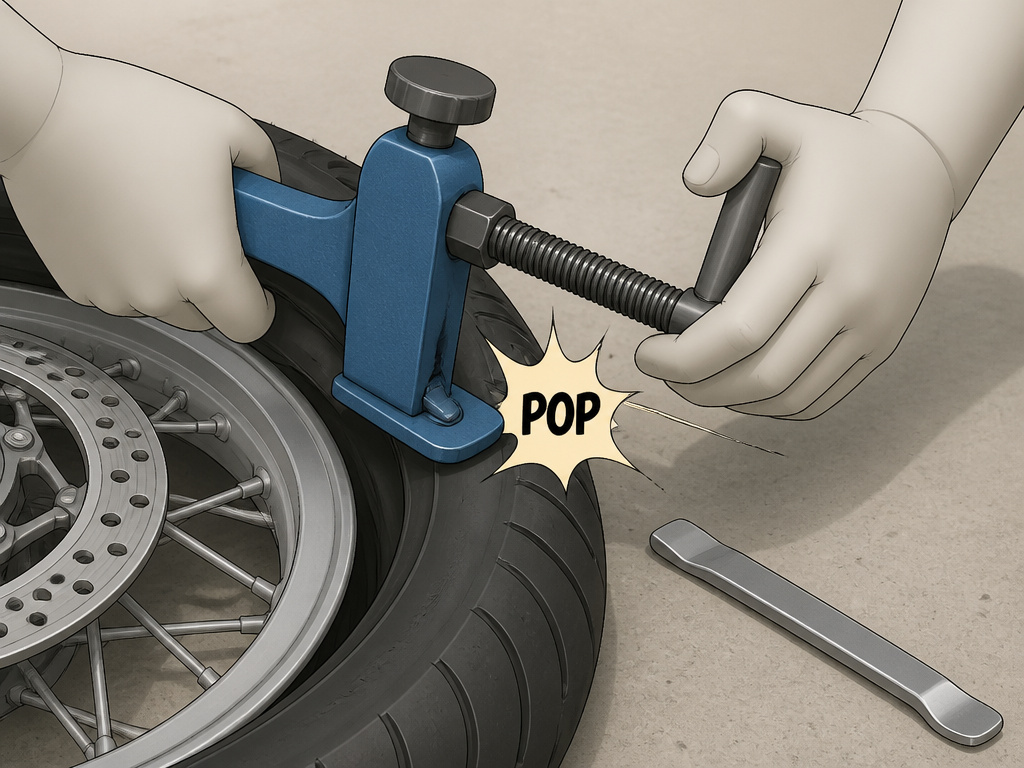
This is where muscle meets technique. Position the wheel so the tire is off the ground. Place your bead breaker tool (commercial or homemade) so its foot is on the tire sidewall, close to the rim. Apply steady pressure until you hear a loud POP—that’s the bead separating from the rim. Work your way around the wheel, breaking both the top and bottom beads on both sides.
Where this goes sideways: Using a pry bar or screwdriver to “break” the bead. This can crack the rim’s bead seat, creating a leak path that no tire will ever seal against. Use a tool designed to apply force to the tire, not the rim.
Step 4: Prying the Tire Off
Liberally apply your approved lubricant to the tire bead and rim flange. Insert a tire iron between the tire bead and the rim, using a rim protector. Hook the iron under a spoke (if present) or against the changer. Slide a second iron in a few inches away and lever a section of the bead up and over the rim. Work your way around until one entire side of the tire is off the rim. Flip the wheel and repeat for the other side.
Step-by-Step: Mounting and Seating the New Tire

Step 5: Inspect and Prepare the Rim
With the old tire off, clean the rim thoroughly. Check the bead seat area for scratches, dents, or corrosion. Any imperfection here can cause a tubeless tire to leak. Inspect the rim for any damage that could affect sealing. If your wheel has alignment dots, note them. Harley-Davidson specifies: if a yellow dot sticker is on the rim, orient the tire’s white dot opposite it; if a green dot sticker is present, align the white dot with it.
Step 6: Lubricate and Install First Bead
Apply lubricant to the new tire’s bead and the rim flange. Place the tire on the rim, ensuring any directional arrows (pointing in the direction of forward rotation) are correct. Using your hands, work as much of the first bead into the rim’s drop center and over the edge as possible. Work as much of the first bead onto the rim by hand as possible. For the last tight section, use tire irons with protectors, prying the bead over gradually. Avoid pinching the tube if you’re installing one.
Step 7: Install the Tube or Prep for Tubeless
For tube-type: place the new tube inside the tire, ensuring it is not twisted, and tuck the valve stem through the rim hole. Ensure the tube is not twisted or pinched under the tire bead. For tubeless: install a new valve stem. Harley-Davidson warns to only install original equipment tire valves and caps. Torque the nut to 12-15 in·lbs (1.4-1.7 Nm) for tubeless stems.
Step 8: Seating the Bead and Inflating
This is the critical moment. Apply lubricant to the second bead and rim flange. Work the second bead onto the rim by hand as far as possible, then use irons for the final portion. Ensure the tire is centered in the rim.
Now, with the wheel secured in a safety cage and using your extension hose, inflate. The Tire Industry Association’s tire maintenance standards bulletin is clear: follow the tire maker’s maximum bead seating pressure, otherwise do not exceed 40 psi. You will hear two distinct POPS or BANGS as the beads snap into place against the rim seats.
Common mistake: Cranking the pressure to 60 or 80 psi to force a stubborn bead. This is how assemblies burst. If the bead won’t seat by 40 psi, deflate, relubricate heavily, ensure the tire is centered in the drop center, and try again.
Once seated, adjust the pressure to the motorcycle’s specified cold pressure. For tube-type, remember to remove the valve core, deflate fully, and re-inflate to remove tube wrinkles.
Post-Installation: The Checks That Matter Most
Mounting the tire is only half the job. A wobbly or unbalanced wheel is unsafe at any speed.
Check Runout. Before you even think about balancing, check lateral and radial runout. Per the Harley-Davidson manual, neither should exceed 0.090 in (2.29 mm). Check lateral and radial runout using an appropriate measuring tool. High runout can be caused by a poorly seated tire (re-lubricate and re-seat) or a defective tire.
Balance the Wheel. This is the step that makes Michelin hesitant about DIY road tire changes. You need a static balancer or a set of balancing stands. The goal is to add adhesive weights to the rim until the wheel has no heavy spot. Harley-Davidson’s spec is to balance to within 0.5 oz (14 g). If you need more than that, break the bead, rotate the tire 180 degrees on the rim, and start over. Our guide on how to balance a tire walks through the static method.
Final Torque and Inspection. Tighten the rim lock if equipped. Ensure the valve stem nut is snug (12-15 in·lbs for tubeless). Install a sealing valve cap. Before reinstalling the wheel on the bike, spray a soapy water solution around both beads and the valve stem to check for leaks. Look for steady bubbling.
Reinstall the wheel on the motorcycle, torquing the axle to the manufacturer’s specification. Do a final visual check that the tire is mounted in the correct rotational direction.
DIY vs. Professional Service: The Real Cost Breakdown
This is the question every forum thread asks. The answer isn’t just about money.
Professional service costs vary; obtain quotes from local shops.
The required tools for a home setup include a bead breaker, tire irons, lubricant, and a pressure gauge, among others. The time required for a DIY tire change varies based on experience and tools.
So financially, you break even after two or three tire changes. The real calculus is about risk and confidence. A professional has a tire machine, a dynamic balancer, and has done the job thousands of times. Their result is almost guaranteed to be correct.
Your home job depends on your diligence with runout checks, balancing, and torque specs when learning how to change a motorcycle tire at home. If you are meticulous and treat the safety warnings as law, you can achieve a safe result. If you are rushing or skipping steps to save an hour, you are building a hazard.
For off-road or dirt bike tires, which are smaller and more flexible, the DIY argument is stronger. The tools are cheaper, and the tools for dirt bike tires are often simpler. For high-performance street tires going on a bike you ride at highway speeds, the margin for error is thinner.
How to Balance a Motorcycle Tire at Home
A tire that isn’t balanced will cause vibrations, especially at higher speeds, and can wear unevenly. After mounting the tire, you must balance the wheel assembly. The goal is to add small weights to the rim to counteract any heavy spots on the tire. The goal is to balance the wheel to within 0.5 oz (14 g). You’ll need a static balancing stand that supports the axle. Spin the wheel and let it settle; the heavy spot will rotate to the bottom.
Frequently Asked Questions
Can I change my motorcycle tire myself?
Yes, but with major caveats. It is physically possible with the right tools and strict adherence to safety procedures. However, major tire manufacturer Michelin recommends against DIY for road tires due to the required wheel balancing. Your success depends on your mechanical skill, willingness to invest in tools, and commitment to the final safety checks for runout and balance.
What if I don’t have a bead breaker?
You must break the bead to remove the tire. Without a dedicated tool, you can use a large C-clamp with a block of wood on the tire sidewall, a modified hydraulic jack, or even carefully use a sturdy pry bar against the tire (never the rim). These methods are less controlled and riskier. For frequent work, a bead breaker is a fundamental tool, not an accessory.
How do I know if I seated the bead correctly?
Properly seated bead will sit uniformly in the rim’s bead seat around the entire circumference on both sides. Visually inspect it before and after inflation. Once inflated to operating pressure, spray soapy water around the bead interface. No bubbles should appear. A tell-tale sign of a partially seated bead is a visible “step” or ridge where the tire rubber meets the rim.
Can I repair a punctured tire instead of replacing it?
For tubeless tires, Harley-Davidson’s manual states you can repair tread punctures of 1/4 inch (6.4 mm) or smaller, but the repair must be a combination patch and plug applied from inside the tire. Speed is limited to 50 mph (80 km/h) for the first 24 hours and the tire should never exceed 80 mph (130 km/h) thereafter. For larger damage or sidewall punctures, replacement is mandatory. Always carry a portable tire repair kit for roadside emergencies.
Do I need to balance a dirt bike tire?
For low-speed, off-road riding, static balancing is often sufficient and many riders skip it. For any sustained road riding or higher-speed desert racing, balancing reduces vibration and improves handling. The process is the same as for a street tire, using a static balancer.
Before You Go
Changing a tire at home is a test of procedure, not strength. The safety rules—eye protection, an extension hose, a containment cage—are written in response to documented failures. Ignoring one because “it’s just this once” is how accidents happen.
If you take nothing else away, remember the 40 psi limit for bead seating and the 0.090 inch runout tolerance. Those two numbers are your quantitative pass/fail line. A tire that vibrates above 45 mph likely failed one of them.
The tool investment pays off if you ride older bikes, have multiple machines, or simply want the knowledge. For a one-time change on a modern sportbike, the convenience and guarantee of a professional might be the better purchase. Either way, now you know what the job actually entails, not just the simplified version. That is what gives you the ability to choose.
