
How to Balance a Motorcycle Tire: Step-by-Step
This post contains affiliate links. As an Amazon Associate, we earn from qualifying purchases.
To balance a motorcycle tire, you need to find the wheel’s heavy spot and add weight directly opposite it. The two main methods are static balancing with a balancer stand and weights, or using internal balancing beads. For wheels with TPMS sensors, you must use adhesive weights and avoid liquid balancers.
That heavy spot is almost always at the valve stem. The valve, its core, and the extra rubber for the hole add a surprising amount of mass. If you don’t counter it, you can feel a wobble through the bars or seat at highway speeds. A key part of how to balance a motorcycle tire is addressing this imbalance.
What follows is the garage method. We’ll cover the tools, the step-by-step for a static balance, when beads make sense, and the manufacturer rules that break the standard advice—especially if your bike has a Tire Pressure Monitoring System.
Key Takeaways
- The valve stem is the default heavy spot; start your search there and add weight 180 degrees opposite.
- For wheels with TPMS sensors, only use adhesive (stick-on) weights and never use liquid balancers.
- Always balance with tires set to the correct cold pressure, which changes with ambient temperature per the OEM table.
- A DIY balancer using jack stands and a smooth axle works if you lack a commercial stand.
- Clip-on weights can damage TPMS sensors and spoke wheels; adhesive weights are the safer default.
Why Balancing Isn’t Optional
You feel an unbalanced tire as vibration through the handlebars or seat. The seat tingles. On a long sweep, the bike feels like it’s fighting a gentle, persistent tug.
An unbalanced tire and wheel is a documented cause of irregular handling, per Harley-Davidson’s service manual troubleshooting guide. It loads the suspension unevenly, accelerates tire wear like cupping, and stresses wheel bearings.
The fix isn’t about luxury; it’s about restoring the design. The wheel should be a perfect circle of mass spinning around its center. An imbalance turns it into an off-center hammer, pounding with every revolution.
Tools You’ll Need (And One You Must Avoid)
You can do this with a modest kit. The core tool is a way to let the wheel spin freely and find its heavy spot.
- A Balancer: A dedicated motorcycle static balancer is ideal. A dedicated motorcycle static balancer or even a cheaper cone-style stand works. For a DIY approach, two sturdy jack stands and a perfectly smooth steel rod (like a rear axle) can substitute.
- Weights: You need wheel weights. Adhesive weights (stick-on) are the universal choice, especially for modern alloy wheels and any wheel with a TPMS. Clip-on weights fit the lip of certain steel or older alloy rims but can damage paint and are forbidden on TPMS wheels.
- Tire Gauge: A dial or digital gauge. This is critical. Balancing a tire at the wrong pressure is a waste of time.
- Cleaner & Rag: Rubbing alcohol to clean the rim where adhesive weights will stick.
- The Forbidden Tool: Liquid tire balancers or sealing agents. Harley-Davidson explicitly prohibits these in wheels with a TPMS sensor, as they can damage the sensor. Don’t use them.
If you’re planning a full tire change, your tool list expands. You’ll need a bead breaker, tire irons, and a mounting stand. Our guide on best motorcycle tire change tools breaks down the options. For balancing specifically, investing in a dedicated motorcycle tire balancer saves frustration over the DIY axle method.
The Non-Negotiable First Step: Cold, Correct Pressure
Skip this and your balance will be wrong. Tire pressure is the foundation.
“Cold” means the bike hasn’t been ridden recently. Tires can stay warm for up to two hours after riding. Pressure rises as tires warm, so a “hot” reading is useless for setting balance.
Manufacturers provide cold pressure specs, but they also give adjustment tables for ambient temperature. For a 2024 Harley-Davidson FLHX/FLTRX with the specified Dunlop tires and cold tires at 20°C (68°F) or less, front tire pressure should be 36 psi and rear should be 26 psi. If the bike hasn’t been ridden for two hours and it’s 88°F (31°C) outside, you add 2 psi. If you’ve just ridden in and it’s 88°F, you add 7 psi.
| Ambient Temperature | Bike Parked 2+ Hours (Add PSI) | Bike Recently Ridden (Add PSI) |
|---|---|---|
| 88°F (31°C) | 2 | 7 |
Check your owner’s manual for your bike’s specific table. Then, use your gauge and set both tires to the exact, calculated cold pressure. Our motorcycle tire pressure guide has more on finding and interpreting these specs.
How to Find the Heavy Spot Without a Commercial Balancer
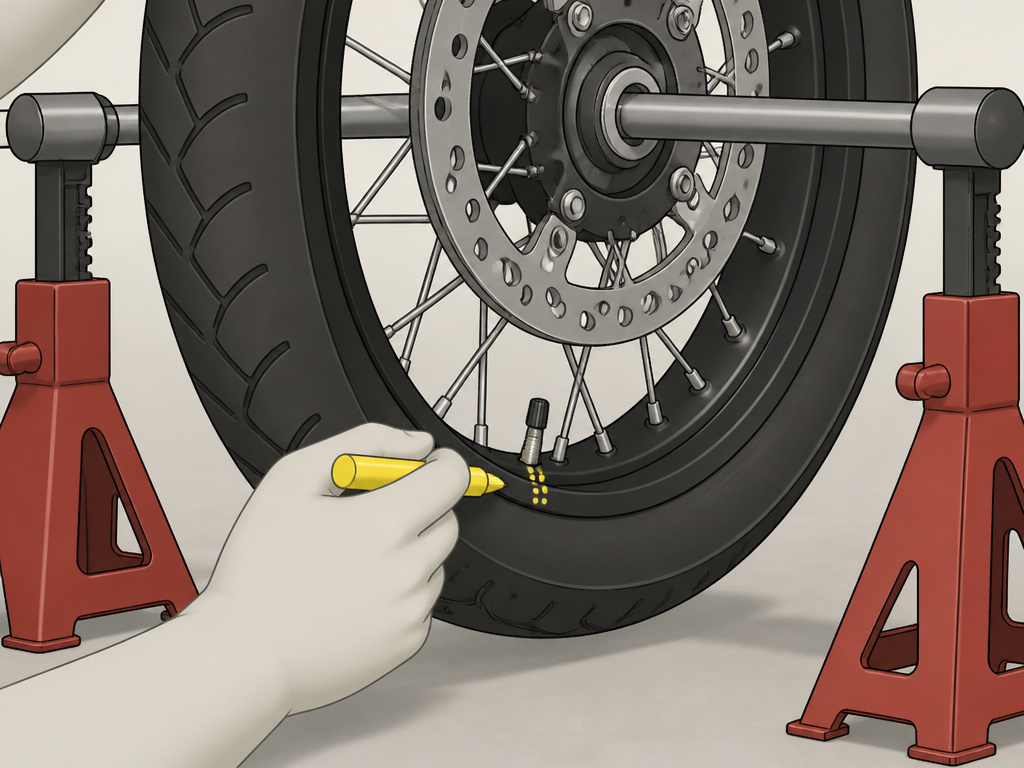
No balancer stand? You can still find the imbalance. This is the gap in most forum advice.
Mount the wheel on a rear axle or a long, smooth steel rod. Rest the ends of the rod on two level jack stands. The wheel must spin freely with almost no friction.
- Give the wheel a gentle spin. Let it coast to a stop.
- Mark the spot at the very bottom (6 o’clock) with chalk or a grease pencil.
- Spin it again. Let it stop. Mark the bottom again.
- Repeat this 5-6 times.
The marks will cluster in one or two areas of the rim. The center of that cluster is the wheel’s heavy spot. It will almost always include the valve stem. The weight of the valve assembly pulls that section down.
Common mistake: Spinning the wheel too hard. It needs to coast to a stop naturally. A hard spin will cause it to bounce past the true heavy spot.
Step-by-Step Static Balancing
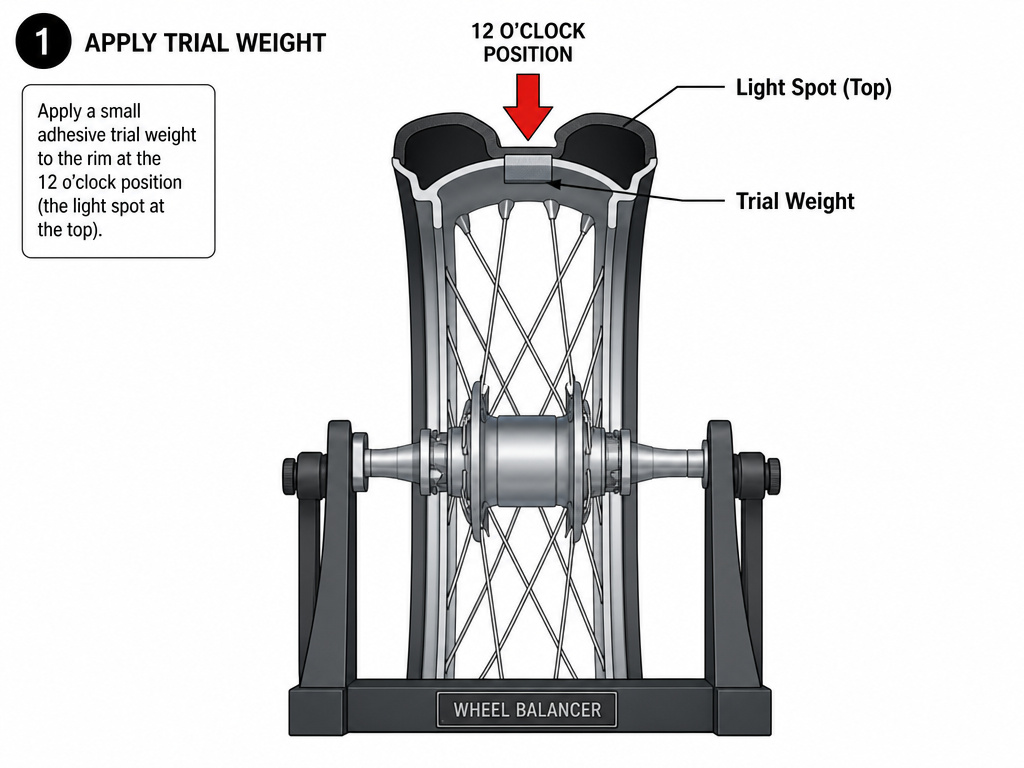
With your balancer stand (or axle setup) ready and correct pressure set, follow this sequence.
1. Mount the Wheel: Seat the wheel squarely on the balancer cones or on your axle. Ensure it’s level and can spin without touching anything.
2. Find the Imbalance: Let the wheel settle. The heavy spot will rotate to the bottom. The light spot is now at the top. This is where you add weight.
3. Add Trial Weight: Start with a modest adhesive weight (e.g., 1/4 oz or 5g). Stick it to the rim at the top (12 o’clock position). Spin the wheel again.
- If the wheel settles with the same spot at the bottom, the weight wasn’t enough. Add another increment of weight at the same spot.
- If the heavy spot moves 180 degrees opposite (now the weight is at the bottom), you’ve added too much weight. Reduce it.
- The goal is for the wheel to settle in a different, random position each time you spin it. That means it’s in static balance.
4. Finalize Weight Placement: Once you’ve found the correct weight amount, the final placement should be centered on the light spot. For the cleanest look, you can split the total weight into two smaller weights placed an equal distance left and right of the centerline. Keep them within an inch or two of the center.
5. Secure and Verify: Press the adhesive weights on firmly. Clean the rim with alcohol first for maximum hold. Give the wheel a final spin. It should have no preferred stopping point.
The TPMS Rule That Changes Everything
If your motorcycle has Tire Pressure Monitoring System sensors, the standard playbook has two major edits.
1. No Liquid Balancers. Ever. Harley-Davidson’s service information is absolute: “Do not use liquid tire balancers or sealing agents in wheels with a TPMS sensor. Damage to the sensor can result.” The liquid can coat and foul the sensor.
2. Adhesive Weights Only. You cannot use clip-on weights. The clip can interfere with the sensor mounted on the valve stem base or damage its wiring. The entire balance must be achieved with stick-on weights placed on the rim’s flat surface.
The process is the same, but your material choices are locked down. This is why a selection of adhesive weights is essential for modern bike maintenance.
Balancing Beads: The Internal Alternative
Balancing beads are tiny ceramic or glass spheres poured into the tire through the valve stem. As the wheel spins, centrifugal force distributes them to counteract imbalance.
| Method | Best For | Biggest Risk |
|---|---|---|
| Static Balancing (Weights) | Precision, TPMS wheels, any tire change | Incorrect weight placement or amount |
| Balancing Beads | Dual-sport/tube-type tires, riders who change terrain often | Clogging valve stems, not recommended for TPMS |
When beads make sense: For tube-type tires on adventure or dirt bikes, where weights can fall off from vibration or impact. They can also compensate for balance changes as tread wears or mud accumulates.
When to avoid them: For any wheel with a TPMS (see the prohibition above). Also, if you have a slow leak, beads can clump and create a drastic imbalance. You must remove the valve core to install them, which requires a tire change level of comfort.
Where this goes sideways: Using the wrong bead amount. Too few won’t balance; too many create their own imbalance. Follow the manufacturer’s chart based on tire size.
Where DIY Balancing Goes Wrong (And How to Fix It)
You followed the steps but the bike still vibrates. Here are the likely culprits.
- Wrong Pressure: You balanced it warm, or at the wrong spec. Re-check with a cold tire using the adjusted table. This is the most common error.
- Wheel Runout: The wheel or tire isn’t round. Before balancing, spin the wheel and watch for side-to-side (lateral) or up-and-down (radial) wobble. Significant runout needs correction first; you can’t balance it out.
- Poor Weight Adhesion: The weights fell off. Clean the rim thoroughly with alcohol before applying. On spoke wheels, ensure the surface is flat enough for the adhesive to grip.
- Ignored Spoke Tension: On spoked wheels, a loose spoke will cause immediate and progressive imbalance. Check tension as a prerequisite.
- Underlying Wear: The tire itself may be the cause. Severe tire cupping or scalloped wear creates an imbalance that weights can’t fix. The tire needs replacement.
If you’ve checked all this and vibration persists, the issue may be beyond simple static balance. A dynamic balancer at a shop can account for tire and wheel width, catching imbalances that a static balancer misses. Our review of types of wheel balancers explains the difference.
Balancing Weights vs Balancing Beads
Two common methods exist for the how to balance a motorcycle tire question: adhesive weights and dynamic balancing beads. Weights are the traditional choice, stuck to the wheel rim to offset a heavy spot found on a static balancer. Balancing beads are small pellets poured into the tire; as the wheel spins, they distribute themselves to counteract imbalance. Beads can adjust to minor changes in tire wear, but a key manufacturer rule applies: do not use liquid tire balancers or sealing agents in wheels equipped with a Tire Pressure Monitoring System (TPMS), as they can damage the sensor. The choice often comes down to your setup and whether you need a self-adjusting solution.
Why Tires Become Unbalanced
An unbalanced tire is a common culprit for irregular handling. The initial balance from a new tire installation, a core part of how to balance a motorcycle tire, can be lost over time. Normal wear is rarely perfectly even; a tire may develop flat spots or wear more on one side, shifting its weight distribution. Impacts from potholes or curbs can bend a wheel rim slightly, creating a new heavy spot. Even a small loss of tread rubber or a patch repair adds a weight change. A manufacturer specifically lists tire and wheel imbalance as a potential cause of handling issues, confirming that balance is a dynamic condition that needs occasional checking.
Frequently Asked Questions
Can you balance a motorcycle tire yourself?
Yes. With a static balancer stand or a DIY axle setup, adhesive weights, and patience, you can achieve a professional-grade static balance. Dynamic balancing requires a more expensive machine, but static balance solves 95% of vibration issues.
Are you supposed to balance motorcycle tires?
Yes. All new tire installations should be balanced. An unbalanced tire causes vibration, accelerates uneven wear like cupping, and adds stress to wheel bearings and suspension components.
How do you balance a motorcycle wheel with a new tire?
The process is identical. After mounting the new tire, set it to the correct cold pressure. Then, find the heavy spot (still often at the valve) and add adhesive weights opposite until the wheel spins freely and stops randomly.
Can I use balancing beads with TPMS?
No. Harley-Davidson’s service directive explicitly prohibits liquid balancers and sealing agents in TPMS wheels. Balancing beads fall into this category and risk damaging the sensor. Use adhesive weights only.
The Bottom Line
Balance with the tire cold and at its pressure-corrected-for-temperature spec. For TPMS wheels, that means adhesive weights and zero liquid products. The valve stem is your starting point for the heavy spot.
If you get it wrong, the bike will tell you by 50 mph. If you get it right, the only thing you’ll feel is the road.
For the majority of street riders, a one-time investment in a balancing stand and a box of weights pays for itself after two tire changes. It turns a mysterious shop fee into a 20-minute garage task with a guaranteed result.
