
How Should Motorcycle Boots Fit: CE Manual Rules Explained
This post contains affiliate links. As an Amazon Associate, we earn from qualifying purchases.
Motorcycle boots should fit closely with zero heel slip, toe tips that never touch the boot end in any position, and no restriction of foot movements needed to operate the controls. This is the fit standard outlined in OEM user manuals for CE-certified boots. A boot that fails any of these three points is uncomfortable and fails to provide the certified level of crash protection.
That zero-heel-slip rule is the line between gear that works and gear that fails in a slide. The certification manuals are explicit: the boot must not slip off the heel, not even partially. If it does, the ankle cup and armor panels can’t stay aligned with your bones on impact. The rest is about keeping you in control, toes need room to shift weight, but not so much that your foot twists inside the shell.
What follows is the checklist from the rulebooks, the measurements that actually matter (foot length is the least of it), and the two places where even good advice goes wrong. By the end you’ll know how to read a boot’s fit against its job, not against how a sneaker feels, which is the core of the how should motorcycle boots fit question.
Key Takeaways
-
Zero heel slip is essential. If the heel lifts when you walk, the ankle armor won’t stay in place during a crash, voiding the boot’s certified protection. .
-
Toes must not touch the boot end in any position, sitting, standing, or walking. A gap of roughly one centimeter or a thumb’s width is a common practical target, but the OEM manual rule is that the tips of the toes do not touch the end of the boot. .
-
Measure your calf if the boot shaft goes above the ankle. A too-tight shaft is a common reason for returns on tall boots., and brands like Alt-Berg offer a made-to-measure service for wide or narrow calves. .
-
Boot sizing is not standardized across brands. Your foot measurement in millimeters, matched to the specific brand’s size chart, is the only reliable starting point. .
-
Manufacturers disagree on replacement intervals: one OEM manual recommends replacement after 5 years under normal storage conditions, while Leatt recommends replacement every 3 years under normal use conditions.
The Three Non-Negotiable Fit Points (CE Manual Rules)
The standard OEM user manual for CE-certified boots lays out three mandatory fit rules, which define exactly how motorcycle boots should fit. They are the conditions under which the boot passed its certification tests. Fail one, and you’re wearing a shell that hasn’t been proven to work.
First, the boot should fit the foot closely but leave sufficient mobility for the toes. All foot movements necessary for control should not be impaired. That means you need to feel the boot wrapped around your foot, but you can still flex your toes and roll your ankle to work the shifter and rear brake. If you can’t, the boot is too tight or the wrong last shape for your foot.
Second, the length of the boots should be such that, whether sitting, standing or walking, the tips of the toes do not touch the end of the boot. This rule is about keeping your toes intact in a forward impact, not just comfort on a long ride. If your toes jam against the front on a hard stop or crash, that’s a crush injury the boot is supposed to mitigate.
Where this goes sideways: Buying a boot a half-size too long for “room to grow.” Your foot will slide forward under braking, your toes will hit the end, and the heel will lift, breaking both of the first two rules at once.
Third, and most critical: Under no circumstances is the boot allowed to slip off the heel, not even partially. Heel slip is the single clearest sign of a bad fit. In a slide, your foot will twist inside the boot, pulling the ankle protection away from the bone it’s meant to shield. A little slip walking around means a lot of slip at 30 miles per hour on asphalt.
Why Zero Heel Slip Is a Safety Spec, Not a Comfort Note
The heel lock is what keeps the boot’s internal structure aligned with your skeleton. The armor panels at the ankle and shin are positioned assuming your heel is seated firmly in the cup. If it isn’t, those panels rotate away from the impact zones they’re certified to protect. You’re not just getting a blister. You’re wearing uncertified gear.
How to Measure for a Fit That Actually Works
Forget your shoe size. Boot sizing isn’t standardized. As Renegade Classics notes, there’s no single U.S. Or EU boot size specification that every manufacturer follows. A size 10 from one brand can fit like a 10.5 from another. Your foot’s millimeter measurement is the only reliable starting point.
The part nobody mentions:
The Three Measurements That Matter (and One That Doesn’t)
Most guides tell you to measure foot length. That’s the baseline, but it’s the least likely to cause a return. The problems come from the other two.
- Foot Width. This decides whether the boot feels like a vise or a glove across the ball of your foot. Motorcycle boots don’t flex like sneakers; a too-narrow fit will pinch on every ride and never break in. Brands like Alt-Berg account for this in their lasts, and many list width options (M for medium, W for wide) right on the size chart.
- Calf Circumference. For any boot that goes above the ankle, most adventure, sport, and tall touring boots, this is critical. Measure around the widest part of your calf with your riding socks on. If you wear leathers or pants inside the boot, measure with them on, as Alt-Berg advises. Similarly, Renegade Classics recommends trying boots on with the same socks and riding pants you used for measurement. A shaft that’s too tight will cut off circulation; one that’s too loose will flap and let debris in.
- Instep Height. Often overlooked. A high instep can make a boot impossible to close properly over the top of your foot, leaving the closure system loose and the fit insecure.
| Measurement | How to Get It Right | What Happens If You Skip It |
|---|---|---|
| Foot Length | Measure heel to longest toe, standing, in mm. Compare to brand’s size chart. | Toes touch front, heel slips, or both. Boot fails its safety premise. |
| Foot Width | Measure around the ball of the foot. Look for width-specific sizing (M/W). | Constant pinching, hot spots, and eventual numbness on long rides. |
| Calf Circumference | Measure around calf with riding socks (and pants if worn inside). Check brand’s shaft dimensions. | Boot won’t zip/close, or cuts off blood flow. Top cause of returns for tall boots. |
| Instep Height | Feel for pressure when fastening closures. If you must leave them loose, the fit is wrong. | Closures can’t secure the foot, leading to overall slop and loss of protection. |
The Riding Position Test: Why the Shop Floor Lies
A boot can feel perfect standing in your living room and fail completely on the bike. Your foot changes shape when you sit, the arch flattens, the toes may splay. More importantly, you need to know if you can operate the controls.
Here’s the test from the manual: Put the boots on, close all the closure systems, and squat as if sitting on a motorcycle. Better yet, if you can, sit on your bike or a similar one. Work the shifter and rear brake through their full range.
Common mistake: Trying boots on with casual socks and jeans. You must use the same socks and riding pants you measured with. A thick motocross sock or a leather pant leg takes up significant volume inside the boot.
What you’re checking for:
- Does the toe box bend uncomfortably when you pivot your foot to shift?
- Does the ankle cup dig into your leg when your foot is on the peg?
- Can you feel the rear brake lever clearly through the sole?
If the answer is no to the last one, the sole is too thick or too stiff. That’s a trade-off, a super-stiff sole offers great impact protection but terrible feel. You have to choose based on your riding.
Where the Standard Advice Gets It Wrong
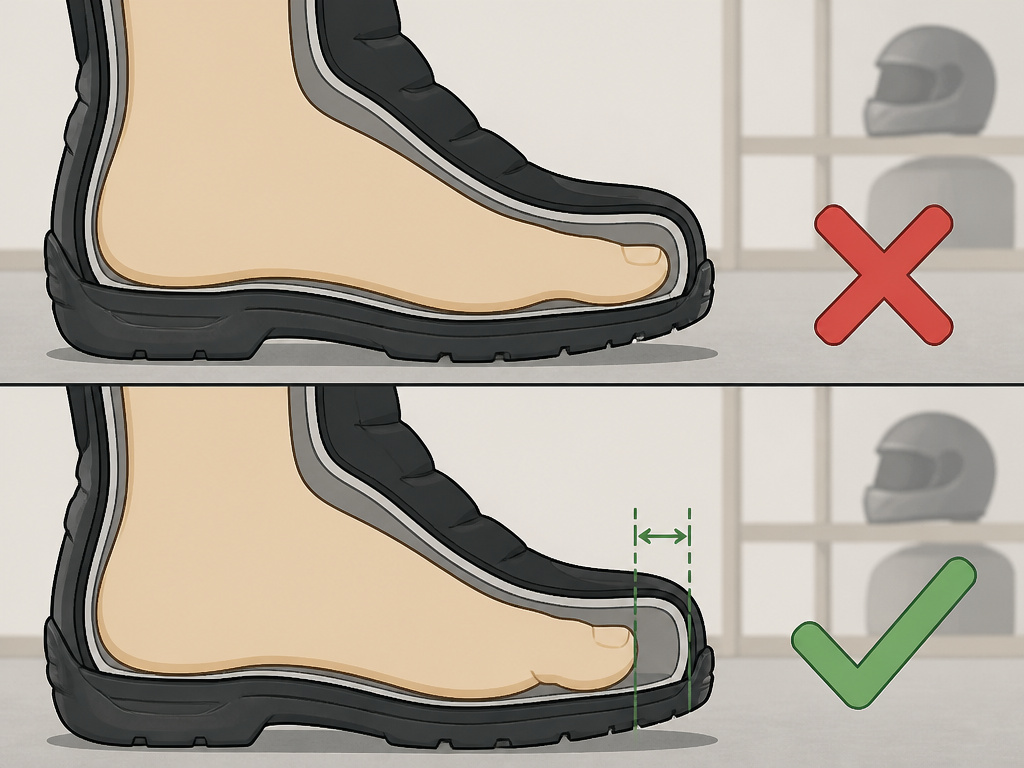
Two pieces of common fitting wisdom need a hard look. One involves a number, the other involves time.
The “Thumb’s Width” vs. “One Centimeter” Gap
Most articles and fitters say to leave a gap about the width of your thumb between your longest toe and the boot’s end. The AutomationVehicles article specifies approximately one centimeter. Both are good practical targets.
But the CE manual doesn’t give a number. It states the absolute rule: the tips of the toes do not touch the end of the boot. The thumb-width is a proxy for that rule. If you have exceptionally long toes or a peculiar foot shape, the thumb test might still leave you touching the front when you crouch on the pegs. The rule is the rule: no contact.
The 5-Year vs. 3-Year Replacement Disagreement
How long do unused, stored boots last? The sources disagree, and it’s a perfect example of why you can’t treat manufacturer advice as universal law.
- One general OEM manual states: “It is recommended to replace boots that are stored under normal conditions (temperature, relative humidity) after 5 years.”
- Another manual says the same, but adds “from the date of purchase.”
- Leatt’s manual for its moto boots recommends replacement “every three (3) years under normal use conditions.”
Manufacturers disagree. One says stored boots are good for 5 years. Another says replace every 3 years, period. Both agree: visible damage means replace now.
So who’s right? Both are, for their own products. Materials and construction differ. The takeaway is to check your specific boot’s manual and, more importantly, inspect the boot itself, not to average it to four years. Are the seams intact? Is the leather cracked or dried? Does the closure system work firmly? Storage life is a guideline; condition is the law.
When the Size Chart Isn’t Enough: Calf Fit and Custom Options
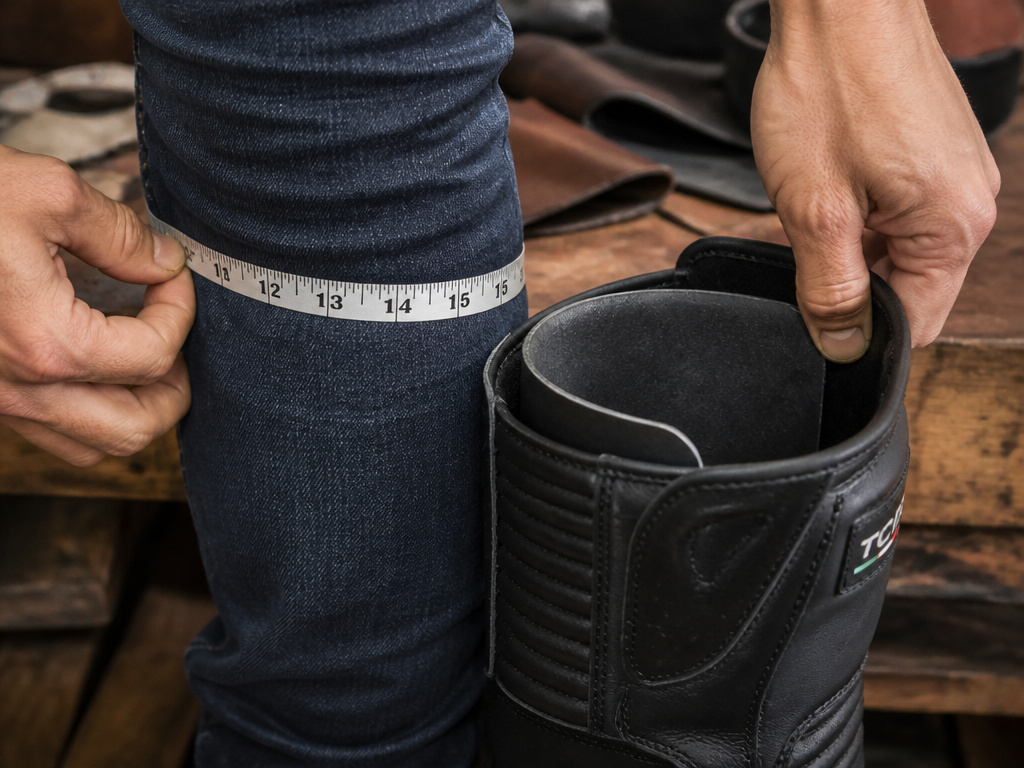
You’ve measured perfectly, matched the chart, and the boot still doesn’t fit. For tall boots, the culprit is almost always the calf. The shaft is a cylinder; your calf is not. A difference of more than a small amount can’t be fixed by breaking in.
This is where off-the-rack hits its limit. Brands know this. Alt-Berg offers a hand-cut ‘made to measure’ service for bikers with extra wide or extra narrow calves at their Richmond factory. It’s a solution for a problem mass production can’t solve.
For the rest of us, the options are:
- Look for brands with multiple shaft fittings. Some adventure boots come in different calf sizes.
- Consider a shorter boot. If the calf is the deal-breaker, a boot that stops at the ankle (a ‘shorty’ or cruiser boot) removes the variable entirely. Just know you’re sacrificing shin protection.
- Try a different last. European and Asian brands often have different width and volume assumptions. A Japanese brand might fit a narrower calf and foot better than an Italian one.
What Your Boots Can’t Do (The Protection Limitation)
Even a perfectly fitted CE-certified boot has limits. The manuals are blunt about this. Reading this section is as important as getting the fit right.
According to the certification documents, these boots cannot guarantee protection against traumas caused by bending, twisting, torsions or against traumas provoked by extreme movements. They also cannot prevent crushing as the result of striking an object.
To put it plainly. Your boots are tested for impact abrasion (sliding), impact cut (sharp edges), and transverse rigidity (side crush). They are not tested to prevent your ankle from breaking if it gets twisted under the bike in a low-side, or to stop your foot from being crushed if a car tire rolls over it. They mitigate; they don’t make you invincible.
This is why fit is the foundation. A boot that’s loose will twist easier. A boot that’s too long gives your foot room to accelerate before a toe-crushing impact. Good fit keeps the protection where it was designed to be.
How should motorcycle boots fit for different riding styles?
The core fit rules apply to all boots: no heel slip, toes not touching the end in any position, and close fit without impairing control movements. The differences lie in the priorities for each style. Street and touring boots often prioritize comfort for walking and longer wear, so they may have more flexible materials around the ankle while still meeting the protective standards. Sport boots are built for maximum support during aggressive riding, leading to a stiffer, more enveloping fit that can feel restrictive off the bike. Dirt boots have the highest, stiffest construction to prevent hyperextension and impacts from debris; they require careful attention to calf circumference for a secure closure. Always try on the specific boot type with the socks and any inner gear you will actually ride in.
Frequently Asked Questions
Should I buy motorcycle boots a size bigger?
No. Sizing up creates heel slip and allows your foot to move inside the boot, which misaligns the armor. Any extra room should be in the width or the toe box, not the overall length. Use the brand’s size chart based on your foot measurement in millimeters.
How tight should motorcycle boots be?
They should be snug with zero heel slip, but not so tight that they restrict blood flow or cause immediate pain. You should be able to wiggle your toes slightly, and the boot should wrap your foot and ankle closely without pinching. The break-in period will relieve initial snugness, not fix outright tightness.
Can I wear thick socks for a better fit?
No. You should always fit boots with the socks you intend to ride in. Using thicker socks to take up space is a patch for a bad fit. The boot will be loose when you wear proper riding socks, leading to heel slip and lost protection.
Why do my boots fit differently on the bike?
Your foot posture changes when you sit. Your arch flattens and your foot may slide forward slightly. This is why you must test boots in a riding position, squatting or sitting on a motorcycle, to check for toe contact and control operation.
How long does it take to break in motorcycle boots?
Leather boots may take several short rides to mold to your foot. Textile or synthetic boots break in very little. The “break-in” should only relieve initial snugness, not correct major fit issues like width or length. If a boot is painfully tight everywhere on day one, it’s the wrong size.
Before You Go
Fit first, features second. A $50 boot that fits perfectly is safer than a $500 boot that doesn’t. The rules aren’t complicated: no heel slip, toes never touch the end, and you can work the controls. Everything else is fine-tuning.
Measure your foot in millimeters, not shoe sizes. Ignore the hype about waterproofing or extra armor if the boot doesn’t pass the three-point check. And when you find a pair that does, remember what it can’t do, no boot is a magic shield. It’s a layer of calculated protection that only works if it’s attached to you correctly.
Start with your actual measurements. Then go sit on a bike.
