
Heated Motorcycle Gear Temperature Controller Explained
This post contains affiliate links. As an Amazon Associate, we earn from qualifying purchases.
A heated motorcycle gear temperature controller is a simple on/off switch that pulses power to the heating elements to regulate warmth. It doesn’t measure your body temperature; it varies the electrical current flowing through the wires. Most systems use a three-setting dial (High, Medium, Low) to adjust this pulse rate, with the gear designed to work best between 45°F and 70°F (7°C and 21°C).
That’s the core job of a heated motorcycle gear temperature controller explained. The real questions start when you plug in a second piece of gear, when the heat flickers, or when the whole system shuts down on a cold ride. Those problems relate to the electrical system the controller is attached to, not to the controller being broken.
This guide walks through what the controller does, the different types you’ll find, and the critical steps to wire it so your gear works when you need it most, which is the heated motorcycle gear temperature controller explained in practical terms. This guide explains the common co-ax 2555 plug, how to calculate your bike’s electrical budget, and what to do when the heat cuts out without blowing a fuse.
Key Takeaways
- The controller is a simple pulse switch, not a thermostat. High sends more frequent power pulses than Low.
- Always calculate your total amperage draw based on your gear’s specifications. Consult your motorcycle’s manual or a dealer to understand your system’s capacity.
- For multiple gear items, you may need a Y-plug splitter or a dual-channel controller to manage them independently. For example, to use a specific Harley-Davidson Heated Vest Liner with both the Pant Liner and Gloves, the ‘Y’-Plug Splitter, part number 98539-04V, is necessary.
- Use a fuse appropriate for your total calculated amperage draw, and never exceed the rating of your power supply wire.
- A proper connection uses a co-ax 2555 plug for the gear, wired with sufficient gauge to avoid voltage drop and shutdowns.
How a Temperature Controller Actually Works
You turn a dial from Low to High and feel more warmth. The mechanism behind that isn’t magic; it’s a timed circuit.
A Built-In Temperature Controller (BTC) uses pulse width modulation (PWM). It rapidly cycles full battery power to the heating elements on and off. The “High” setting keeps the power on for longer pulses each cycle; “Low” uses shorter pulses. The average power delivered changes, but the voltage stays constant.
This is different from a true thermostat, which would use a sensor to maintain a specific temperature. Your gear doesn’t know if it’s 30°F or 50°F outside. It only knows to pulse power based on the dial’s setting. This is why manufacturers like Harley-Davidson specify an optimal range—their Carbon Nano-Core™ heating elements are engineered to provide comfortable warmth within that 45°F to 70°F window using this pulsing method.
The controller itself is just a switch in the circuit. On Harley’s BTC jacket liner, it’s on a fold-down flap. On the BTC overpant, it’s on the left leg. The gloves plug into the jacket, borrowing its controller. If you want to use the gloves alone, you need the separate BTC 12V Switch.
Types of Controllers: Built-In, Separate, and Dual-Channel
You’ll encounter three main setups. Your choice dictates your wiring and how much you can fine-tune.
Built-In Controllers (BTC) are the simplest. They’re attached to the garment, like the Harley-Davidson system. You get the three preset pulses. There’s no separate unit to lose, but you also can’t upgrade or replace the controller without replacing the garment. The warranty reflects this: Harley offers a 3-year warranty on electrical components, 1 year on the rest.
Separate Wired Controllers are aftermarket units you plug between the battery and the gear. Brands like Warm & Safe and Gerbing use these. They often offer more than three settings—sometimes a rheostat dial for infinite adjustment. The advantage is upgradeability and the ability to mix and match gear from different generations. The disadvantage is another box to mount on your bike or person.
Dual-Channel Controllers are the solution for running multiple items with independent heat settings. If you want your jacket on medium but your gloves on high, you need two channels. These controllers have two dials and two output plugs. They’re essential for a full suit setup. GEARS sells a standalone Dual Temperature Controller for this exact reason.
| Controller Type | Best For | Limitation |
|---|---|---|
| Built-In (BTC) | Single-piece simplicity, OEM setups | Fixed settings; can’t control multiple items independently |
| Separate Wired | Aftermarket gear, finer heat adjustment | Adds another component to wire and manage |
| Dual-Channel | Riders using jacket + gloves or pants | More complex wiring; higher cost |
The right pick depends entirely on your gear bundle. Buying a jacket with a built-in controller locks you into that ecosystem. Going aftermarket with a separate controller gives you flexibility but requires more planning.
Wiring and Power: Avoiding the Shutdown
This is where garage theory meets the road. A controller is just a gatekeeper for electricity. If the electrical system can’t deliver, the gate slams shut.
The most common failure is a voltage drop, which can occur when the combined electrical load is too high for the wiring or charging system. The combined load dragged the system voltage down so low that the jacket’s built-in smart protection circuit cut power to prevent damage. It’s a silent failure.
Where this goes sideways: Wiring multiple heated items to a single accessory plug without checking the wire gauge. The OEM plug wiring (often 18-gauge) may be too light for the combined draw, causing enough voltage drop to trigger a shutdown long before the fuse blows.
To avoid this, you need to do two calculations: the total amperage draw of your gear, and the capacity of your bike’s charging system.
First, find the draw. Use the maximum amperage figures, and crucially, use the 14-volt number. Your motorcycle’s charging system runs between 13.8V and 14.1V when the engine is on. Amperage draw increases as voltage increases. A jacket that pulls 6.9A at 12V can pull 7.6A at 14.1V.
Second, know your bike’s spare capacity. Check your owner’s manual for your motorcycle’s stator output. Then subtract the amperage used by the bike’s core systems (lights, ECU, fuel pump). What’s left is what you can safely use for accessories like heated gear. If your combined gear draw exceeds this spare capacity, you will drain the battery, especially at idle.
Fuse sizing has two schools of thought. One approach, found in a Harley-Davidson Battery Harness Guide example, is to calculate the total draw and use the nearest standard fuse value above it (e.g., 9.1A → 10A). The RevZilla guide advises to use the next-larger fuse on your power supply wire, without exceeding the amperage of the fuse that was installed in the lead. If your wiring harness has a 15-amp fuse, you can go up to a 15-amp fuse for your gear. Never install a 20-amp fuse on a wire rated for 15 amps.
The safest path is to wire your gear directly to the battery with a proper harness, using a fuse matched to your calculated 14V draw. For a jacket and gloves, a 10-amp fuse is the standard starting point.
Connectors and Installation: Getting the Plug Right
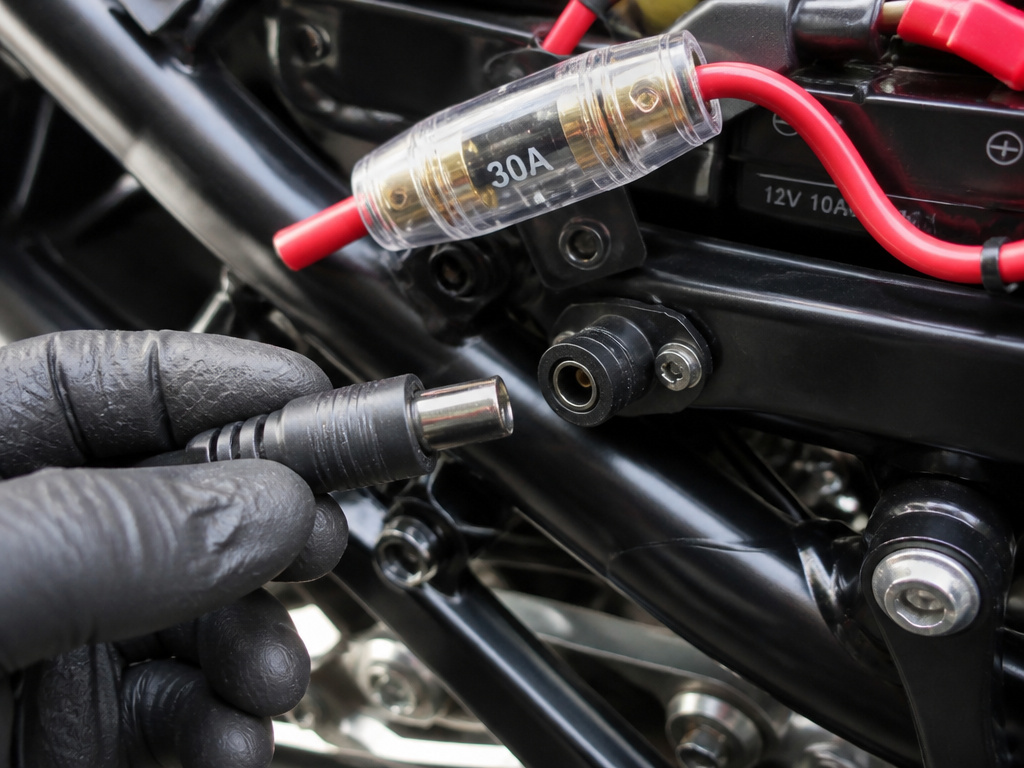
The connector is the handshake between your bike and your gear. Get it wrong, and you get no heat, or worse, a short.
The industry standard for the gear itself is the co-ax 2555 plug. It’s a barrel connector designed to be weather-resistant and difficult to hook up backwards. A common rule, as noted by RevZilla, is that anything that receives power is usually male, and anything that gives power is typically female.
You have three main wiring options: 1. Direct to Battery with a Harness: This is the most robust method. You run a dedicated, sufficiently heavy-gauge wire from the battery terminals to a convenient location, protected by an inline fuse. You terminate it with a female co-ax socket. This gives you the cleanest power.
- To an Accessory Plug: Many bikes have a pre-wired accessory plug, often under the seat. The problem is the wire gauge. As noted in an Indian Motorcycle forum, the OEM 18-gauge wiring might be “possibly too light” for running a full heated suit. It’s fine for a single item, but for multiple pieces, you risk voltage drop.
- To a Switched Circuit: You can wire your harness to a circuit that only has power when the ignition is on (like a tail light wire). This prevents you from accidentally leaving your gear on and draining the battery. This requires more electrical know-how.
Easy to miss: The cord is not a handle. Harley-Davidson’s instructions explicitly warn against using it to pull on the gear, as it can damage the internal wiring where it meets the connector.
Once your bike-side connection is ready, plugging in is simple. Connect the gear, start the bike, and turn the controller to low to start. Let the elements warm up for a minute before cranking it up. This gentle start is easier on the electrical system.
Troubleshooting Common Controller Problems
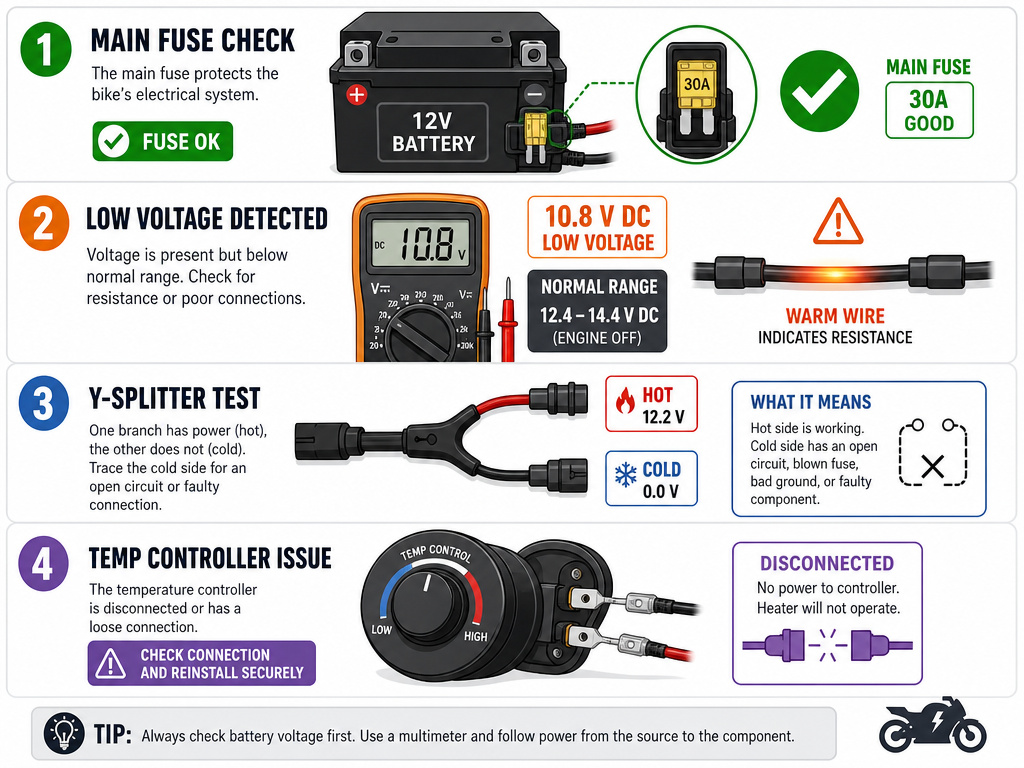
When heat fails, work through this list before you blame the controller.
No heat at all:
- Check the fuse on your battery harness first. It’s the most common point of failure.
- Verify the connection is fully seated. The co-ax plug can feel connected but not be twisted all the way in.
- Ensure your bike is running or the battery is fully charged. The draw at startup on a weak battery can be enough to cause issues.
Heat cuts out after a few minutes (fuse intact):
- This is the classic voltage drop/shutdown. Feel the battery harness wire after a few minutes of use. If it’s warm to the touch, the wire gauge is too small for the load.
- Are you running other high-draw accessories like heated grips or a high-output headlight? Your total load may be exceeding the stator’s output, especially at idle. Try turning off other accessories.
- Check your battery’s health and the charging system’s output with a multimeter. A properly functioning charging system and battery are essential for running heated gear.
Only one piece of gear in a set gets hot:
- If you’re using a Y-splitter, the problem could be in the splitter itself or one branch of the wiring. Test each gear item individually by plugging it directly into the bike.
- For gloves plugged into a jacket, ensure the glove connector is fully seated in the jacket’s outlet port. These can work loose.
Controller dial feels loose or doesn’t click:
- The physical switch can fail. If it’s a separate controller, you can replace it. If it’s built into a garment, you’re looking at a warranty claim for the electrical components.
Controller “failures” can often be traced to power supply issues within the motorcycle’s electrical system.
Why Your Heated Gear Controller Feels Imprecise
Many riders find their gear’s temperature controller frustrating. The most common complaint is the lack of a true thermostat. Your controller doesn’t sense the outside air or your body temperature. It simply pulses power at different rates based on a preset High, Medium, or Low switch. This means you must manually adjust it as conditions change, which can be distracting while riding. Another annoyance comes from managing multiple pieces of gear. If your jacket liner, pant liner, and gloves each have their own controller with separate knobs, you’re left fiddling with several settings instead of enjoying a unified warmth. For simpler control, some systems allow gloves to plug into a jacket’s single controller, eliminating one extra knob to manage.
Frequently Asked Questions
What’s the difference between PWM and a thermostat controller?
Pulse Width Modulation (PWM) is what almost all motorcycle heated gear uses. It pulses full power on and off to vary average heat. A true thermostat measures temperature and adjusts power to hold a set point. Thermostats are more common in home heating systems; they’re more complex and expensive, which is why they’re rare on motorcycle gear.
Can I use a car heated gear controller on my motorcycle?
You can, but you shouldn’t. Car systems often run at a different voltage or use different connectors. Motorcycle controllers are designed for the vibrations, moisture, and electrical environment of a bike. Stick with a controller designed for powersports use.
Why does my heated gear have three heat settings instead of a variable dial?
Three settings (High, Medium, Low) are simpler, more reliable, and cheaper to manufacture. They represent three different PWM duty cycles (e.g., High=80% on, Medium=50%, Low=30%). A variable dial offers more control but adds cost and another potential failure point. For most riders, three settings are sufficient.
Is it safe to wire heated gear directly to the battery?
Yes, it’s the recommended method for a clean, high-current connection. The critical step is installing an inline fuse holder within a few inches of the battery terminal on the positive wire. This fuse protects the wiring in case of a short circuit. Without it, you risk a fire.
How do I choose between a single and dual-channel controller?
Count your independent heat zones. If you only wear a heated jacket liner, a single-channel controller is fine. If you wear a jacket and gloves and want to set their heat levels separately, you need a dual-channel controller. For a full suit (jacket, pants, gloves), a dual-channel is essential to manage the different loads and comfort needs.
Before You Go
The controller acts as the throttle for your heated gear. Your motorcycle’s electrical system is the engine. You can have the best throttle in the world, but if the engine can’t deliver the power, you’re going nowhere.
So before you buy that extra piece of gear, do the math. Add up the amperage draw at 14 volts, not 12. Look at your stator’s output. And when you wire it up, use heavy-gauge wire and a proper fuse. That Goldwing rider’s shutdown story is the rule, not the exception. It happens when the system is asked for more than it can give.
Start with a base layer and a wind-blocking outer shell. Heat should supplement that, not replace it. If your core is cold, pumping wattage into a jacket liner is a losing battle. Get the fundamentals right first—then let the controller do its simple, pulsing job.
