
How to Dry Wet Motorcycle Boots: The Right Way
This post contains affiliate links. As an Amazon Associate, we earn from qualifying purchases.
To dry wet motorcycle boots safely, stuff them with newspaper or use a boot dryer at room temperature, stand them sole-up, and never apply direct heat from a heater, hair dryer, or sunlight. Heat cracks leather and destroys waterproof membranes within a few cycles.
That “never” is direct from Daytona’s care sheet. It contradicts common garage tips, such as using a hair dryer on low, which some riders suggest to accelerate drying. The difference marks the line between boots that last five seasons and boots that get stiff and leaky by year two. Understanding how to dry wet motorcycle boots correctly is therefore critical, and the same principles apply to your drying motorcycle gear.
What follows: the manufacturer-approved sequence for how to dry wet motorcycle boots, why heat is the enemy, how to handle Gore-Tex, and what to do when you’re on a trip and can’t wait overnight. We’ll also cover the one field test that reframes the entire “fast dry” debate.
Key Takeaways
- Stuff with newspaper or use a room-temperature dryer. This absorbs internal moisture without damaging the leather’s oils. Heat from any source, sun, heater, hair dryer, dries out the natural fats and leads to cracks.
- Stand the boots sole-up. Moisture trapped between the inner lining and outer shell needs a vertical escape path. Laying them on their side keeps that water pool intact.
- Condition immediately after they are dry. Rain washes protective oils and dyes out of the leather. A pass with a conditioner like Daytona Aqua Stop restores water resistance before the next ride.
- For Gore-Tex boots, use low-fat cleaners. Standard oil-rich conditioners clog the membrane’s micropores, killing its breathability. Daytona’s Special Leather cleaner is formulated for this.
- If they smell musty, they weren’t dry. Mold starts in the damp padding between the inner and outer layers. A true dry takes 12-24 hours at room temperature, not two hours near a vent.
Why Heat is the One Rule You Can’t Bend
Daytona’s manual says it plainly: “Never dry boots on a heater or in direct sunlight.” Indian Motorcycle’s rider manual echoes it for leather care: “Heat from the sun will dry the leather, potentially causing it to crack.”
This isn’t a gentle suggestion. Leather isn’t just wet skin; it’s a network of collagen fibers held together by natural oils and fats. Water swells those fibers. Heat, even the “low” setting on a hair dryer, evaporates the water so fast it pulls the oils out with it. The fibers then shrink and bind tight against each other. That’s the stiffness you feel the next morning. Repeated heat drying causes the bonds to break. Those are the micro-cracks that become a leak.
The same physics kills waterproof membranes. Gore-Tex and its clones work by having pores smaller than a water droplet but larger than a vapor molecule, a key feature in the best waterproof motorcycle boots. Heat can melt or distort those ultra-thin layers, fusing the pores shut. A boot that “breathes” on day one can lose its breathability over time. You’ll feel it as hot, sweaty feet even on cool rides.
The goal is completeness without damage.
The Newspaper & Air-Dry Method (Step-by-Step)

This is the method Daytona specifies: “Wet boots are best stuffed with newspaper or dried on a stretcher at room temperature.” It’s boring, it’s slow, and it works every time without fail.
Step 1: Pull the insoles and loosen everything. Take out the footbeds. Open all zippers, Velcro straps, and buckles as wide as they go. This maximizes air flow to the deepest pockets. If the boots have laces, pull them completely out.
Step 2: Stuff firmly with newspaper. Crumple sheets of newspaper into loose balls. Pack them into the toe box, then the ankle, then the shaft. Pack firmly, but don’t force it, you want contact, not expansion. The newsprint acts as a blotter, pulling moisture from the lining into its fibers. Change the paper periodically if you’re home; it will be saturated and cold to the touch.
Step 3: Stand the boots sole-up. This is the detail most people miss. Daytona says: “Stand the boots with the sole upwards to dry, so moisture between the layers can escape more easily.” Water that soaks through the outer leather gets trapped in the padding between the inner and outer layers. Gravity pulls that pool down and out if the sole is the highest point. If you lay the boots on their side, that water stays put.
Step 4: Pick a cool, airy spot. A room-temperature room with a ceiling fan on low is ideal. A garage bench works if it’s not humid. Avoid closets, bathrooms, or any enclosed space. This isn’t a two-hour job. Plan on sufficient time for a truly soaked boot to dry.
Where this goes sideways: Using a hair dryer on the “cool” setting. That setting is still above room temperature and can start pulling oils from the leather. The outer surface might feel dry in 20 minutes, but the interlayer padding will still be damp, and you’ve already started the damage clock.
| Do This | Why It Works | Skip This | What Breaks |
|---|---|---|---|
| Stuff with newspaper | Absorbs moisture from the lining via capillary action | Hair dryer, even on “cool” | Evaporates water too fast, pulling out oils |
| Stand boots sole-up | Lets gravity drain moisture from between material layers | Lay boots on their side | Traps a water pool in the padding |
| Dry at room temperature | Preserves leather’s natural oils and membrane integrity | Place near a heater or vent | Heat cracks leather, melts membrane pores |
| Change newspaper periodically | Maintains absorption rate; shows progress | Leave same paper for 24 hrs | Saturated paper stops working, slows dry time |
The short version: patience is the tool here. If you rush it, you replace the boots.
What About Boot Dryers and Fans?
A dedicated boot dryer is a worthwhile investment if you ride in wet climates regularly. But not all dryers are equal. The safe ones use room-temperature air, circulated by a small fan. The dangerous ones add a heating element.
Look for a dryer that explicitly says “no heat” or “cold air.” Some boot dryers use ambient air moved by convection, not a fan or heater. The newer electric fan-driven models are fine if they don’t have a heat switch. The moment you see a “low/medium/high” heat setting, walk away. That’s a heater, not a dryer.
A simple box fan pointed at the boots from a few feet away can also work. It moves a large volume of air over the surface, which accelerates evaporation without raising temperature. This is a middle ground between passive room-air and a dedicated device. Just make sure the boots are still stuffed and sole-up, or the fan will only dry the outside.
A box fan on low, positioned at a distance, can help cut the dry time. It won’t cook the leather. A hair dryer six inches away, even on low, will.
Forced-Air vs. Natural Dry Timelines
| Drying Method | Estimated Time for Soaked Boot | Risk Factor | Best For |
|---|---|---|---|
| Newspaper + room air | 18-24 hours | None (manufacturer method) | Home, overnight, any boot type |
| Cold-air boot dryer (fan) | — | Low (if no heat) | Frequent wet riders, daily use |
| Box fan (ambient air) | 12-18 hours | Low | Speeding up the newspaper method |
| Hair dryer (any setting) | 1-2 hours (surface only) | High — leather cracks in <5 cycles | Damaging your boots quickly |
| Heater vent / direct sun | 3-4 hours | Very high — guaranteed damage | Ruining boots in one afternoon |
The timeline for a forced-air dryer isn’t listed because it varies wildly by boot construction. A single-layer textile adventure boot might dry in 8 hours on a cold-air dryer. A thick, leather touring boot with a waterproof liner might still take 16. The rule stays the same: if the air coming out feels warm against your hand, it’s too warm for the boot.
Handling Gore-Tex and Waterproof Boots
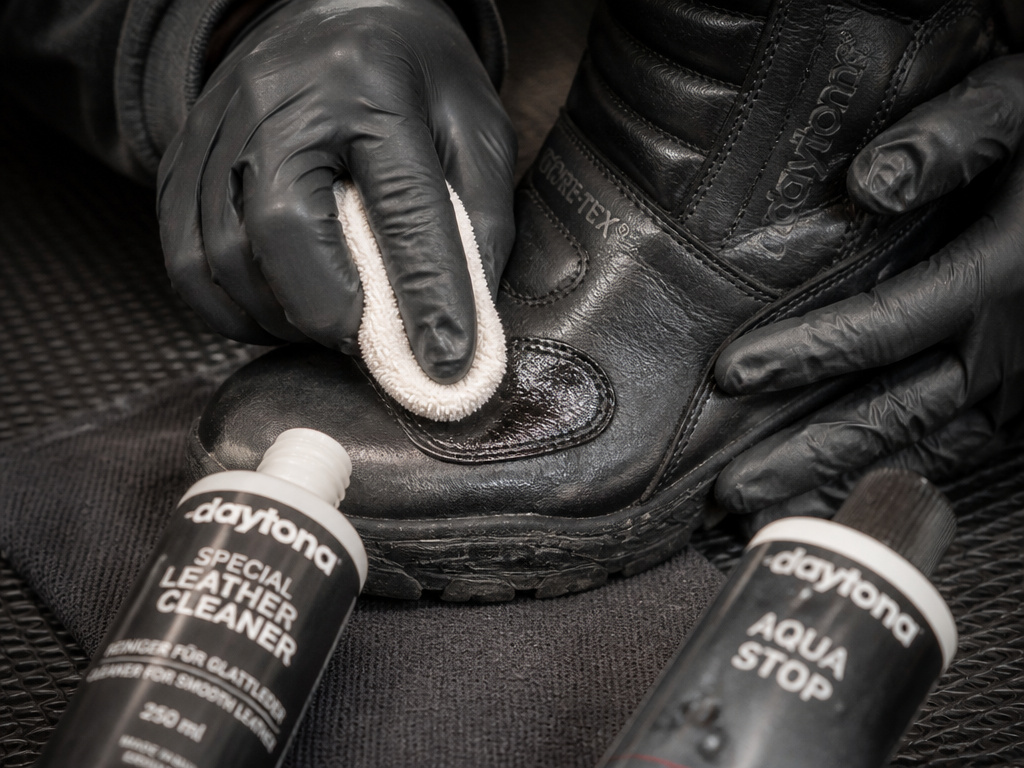
Gore-Tex boots dry with the same rules, plus one critical addition: you must use care products labeled as compatible. Daytona notes: “Gore-Tex® boots need special care products that are low in fat or oil to keep them breathable.” They recommend their “daytona® Special Leather cleaner.”
Why? The waterproof membrane is a microscopic mesh. Oil-based conditioners and cleaners can coat those pores, blocking vapor escape. Your feet stay dry from rain but swim in sweat. The boot loses its reason to exist.
After a wet ride, the process is:
- Dry completely using the newspaper or cold-air method.
- Clean with a dedicated, low-fat cleaner like Daytona Special Leather cleaner (applied with a soft cloth).
- Re-impregnate with a membrane-safe product like Daytona Aqua Stop. Apply it evenly with the supplied sponge and let it dry overnight. This restores the durable water repellency (DWR) on the outer leather without gumming up the works inside.
Common mistake: Using a standard leather conditioner on Gore-Tex boots. It might make the outer leather look great, but it will slowly smother the membrane. Within a season, the boots feel clammy no matter the weather.
On the Road: Quick Drying When You Can’t Wait
Sometimes you’re on a multi-day tour and your boots are soaked tonight, with another 300 miles of rain forecast for tomorrow. The perfect method isn’t available. Here’s the damage-control triage.
First, get as much water out as you can. Remove the insoles. Wring out any removable liners if possible. Use a hotel towel to blot the interior lining aggressively, don’t rub, press and soak. Stuff with whatever absorbent material you have: paper towels, hotel laundry bag, even dry socks. The goal is to reduce the total water volume before the dry phase.
Second, create airflow. Use the hotel room’s air conditioner or a ceiling fan. Position the boots sole-up in front of the AC vent (but not on the vent, where the air is coldest). The cool, moving air will evaporate moisture. If you have a portable 12V fan, that’s even better.
Third, accept the compromise. They won’t be fully dry by morning. Pack a spare pair of dry socks and plan to stop mid-morning to change them and maybe repeat the blotting. Riding in damp boots is miserable, but it’s better than cooking them with a hair dryer from the gas station and having them fail permanently.
I’ve been there, trying to dry a pair of touring boots in a Utah hotel room with only a wall-mounted heater. I used the “low” setting, six feet away. The outer leather felt dry and flexible the next morning. That was the heat pulling the oils, even from a distance. Now I pack a small microfibre towel and a plastic bag for wet gear, and I just deal with damp feet for a day.
Cleaning Before Drying (The Often-Skipped Step)
Mud and road grime hold moisture against the leather. If you dry a dirty boot, you’re baking that dirt into the pores. Daytona’s rule is clear: “Do not remove dirt with a high pressure cleaner – that makes leather brittle.” This contradicts common garage practices where some riders use pressure washers on gear.
The right way:
- Let the mud dry to a crust.
- Brush it off with a soft-bristle brush (a horsehair shoe brush is perfect).
- For stubborn spots, use a damp cloth, not a soaked one, and wipe gently.
- For the zipper, Daytona says compressed air “can sometimes be used solely for the zip.” A quick blast at the gas station air pump can clear grit from the teeth.
Then proceed to dry. This keeps the leather’s surface intact so it can absorb conditioner later.
Signs You’ve Done Damage (And How to Fix It)
If you’ve already used heat, here’s how to assess the fallout and possibly salvage the boots.
Stiff, creaky leather: This is the first sign. The oils are depleted. Fix: Apply a leather conditioner like Daytona Leather Care generously, which the manufacturer recommends for conditioning after using their Leather Black product. Let it soak in overnight. It might not restore the original suppleness, but it will improve it. Repeat conditioning every few rides.
Faded black leather: Daytona has a fix: “If black leather is faded, apply daytona® Leather Black, and a day later use daytona® Leather Care.” This is a dye-and-condition two-step process that can revive the color.
The boot leaks in the same spot every time: This is likely a crack in the leather or a seam failure from repeated heat stress. This is structural damage. You can try a leather sealant from a cobber, but the repair is temporary. The boot’s waterproof life is compromised.
A musty smell that won’t go away: This is mold in the lining, meaning the boot never truly dried internally. Once mold is in the padding, it’s almost impossible to eradicate. You can try a boot disinfectant spray, but the smell often returns with humidity. This is a functional failure.
If the boots are cracked, leaking, or perpetually smelly, the fix is a new pair. The cost of repeated conditioning and repairs exceeds the value of the boot.
How to dry motorcycle boots overnight
The correct method for drying wet boots overnight is a passive, room-temperature process. Stuff the boots firmly with crumpled newspaper or place them on a boot stretcher. Position the boots with their soles facing upward, which allows moisture trapped between the inner and outer layers to escape more effectively. Leave them in a dry spot at normal room temperature. Never place them on a heater, radiator, or in direct sunlight, as this heat will dry out the leather too quickly, making it brittle and prone to cracking. By morning, the newspaper will have absorbed much of the internal moisture, leaving the boots dry and ready for a conditioning treatment.
Frequently Asked Questions
How long does it take to dry motorcycle boots?
Cold-air boot dryer can reduce that to 12-16 hours. Surface dryness is not complete dryness, the padding between layers takes the longest.
Can I use rice to dry my boots?
You can, but newspaper is better. Rice is a desiccant, pulling moisture from the air inside the boot. Newspaper acts as a wick, touching the lining and pulling moisture directly into its fibers. Rice also tends to leave dust and small grains inside the boot. If it’s all you have, use it, but stuff it in a sock first.
Are my boots ruined if they get wet?
No. Boots are designed to get wet. They are ruined by how they are dried. Repeated heat drying (heaters, hair dryers, sun) will crack leather and damage membranes. Proper, patient drying at room temperature, followed by conditioning, will keep them in service for years.
Is WD-40 good for waterproofing boots?
No. WD-40 is a water-displacing penetrant and light lubricant, not a leather conditioner or waterproofing agent. It will not restore the leather’s natural oils or replenish a DWR coating. It can actually degrade some synthetic materials and is not recommended by any boot manufacturer.
How do I dry boots fast without damage?
“Fast” and “without damage” are in tension. The safest acceleration is to use a cold-air boot dryer or a room-temperature fan to increase airflow while still using the newspaper-stuffing method. This can cut the time by a few hours. Any method that adds heat adds risk.
Before You Go
One rule most guides skip: if your boots remain damp for an extended period, mold growth is likely. At that point, drying them is just revealing the smell. It’s faster to start shopping for a replacement.
The rest is straightforward. Stuff them, stand them sole-up, and leave them in a cool corner overnight. Condition them the next day with the right product for the material. It’s a boring ritual. It’s also the only one that works for longer than a single season.
Your boots are wet and represent an investment sitting in water. Treat the drying process like you would any other critical maintenance, with the manual’s instructions in one hand and patience in the other. The alternative is a bill for a new pair much sooner than you planned.
