
How to Add Knee Armor to Motorcycle Pants: Step-by-Step
This post contains affiliate links. As an Amazon Associate, we earn from qualifying purchases.
To add knee armor to motorcycle pants, you install a CE-rated armor insert into a dedicated pocket or attach it externally. The process requires matching three things: the armor’s size and certification, the correct seated position on the bike, and a secure attachment method—either sewn-in pockets, hook-and-loop panels, or removable armor sleeves.
Most riders think this is about buying a pad and stuffing it in. It isn’t. The difference between a pad that stays over your knee and one that slides to your inner thigh during a ride comes down to a few millimeters of placement and the right kind of stitch or fastener, which is the core of how to add knee armor to motorcycle pants. Get it wrong and you’re wearing a decoration.
What follows: the two main attachment paths, the tools you need for each, the exact seated-positioning rule, and the manufacturer warnings most DIY guides skip.
Key Takeaways
- Armor placement is checked while seated on your bike, not standing. This is the single biggest mistake.
- For permanent installs, a sewn-in pocket beats hook-and-loop for security, but you must commit to that armor size.
- The Bohn SC-1/43K (5.25×12 inches, CE-Level 2) is designed specifically to fit Bohn ‘Original’ pants; the Leatt Knee & Shin Guard Dual Axis is a standalone guard.
- Bohn Armor warns that extreme cold in addition to stress on the protector (i.e., bending when cold) can cause the pieces to crack, while Leatt recommends storing the product away from temperature extremes.
Why Add Knee Armor?
Your knees hit the ground first in most slides. Factory armor in budget pants is often thin, floating foam that shifts out of place. Aftermarket CE-rated armor, like Level 2 pieces, is tested to limit transmitted force to the body.
The European standard EN 1621-1:2012 is what you’re looking for on the label. That certification means the protector has been tested per EN 1621-1:2012, a standard for limb joint impact protectors intended to reduce the severity of soft tissue injuries. A “CE” mark denotes compliance with the Personal Protective Equipment Regulation (EU) 2016/425; the EN 1621-1:2012 number indicates it is a standard for motorcyclists’ limb joint impact protectors.
Where this goes sideways: Assuming any hard pad is safe. Foam costume pads and untested plastic are not certified to meet the requirements of standards like EN 1621-1:2012.
The goal is to upgrade or replace. Maybe your armored pants have worn-out pads. Maybe you want to add protection to a sturdy pair of work pants, which is a common reason for learning how to add knee armor to motorcycle pants. The principle is the same: keep the armor fixed over the knee cap and the top of the shin.
The Two Main Paths: Sewn-In vs. Hook-and-Loop
You have two basic attachment methods. Your choice decides the tools, the difficulty, and how permanent the upgrade is.
Sewn-In Pockets are the professional, permanent solution. You create a fabric pocket inside the pant leg, sized exactly for your armor insert. The armor cannot shift. This is the method used in high-end motorcycle pants with built-in armor. The downside is commitment. Once sewn, that pocket fits that specific armor size.
Hook-and-Loop (Velcro) Panels are the modular, reversible choice. You sew a loop panel inside the pant and attach hook backing to the armor. This allows you to change armor or take it out for laundry. It’s a modular method used by some brands. The risk is that the bond can fail in a slide if the panel isn’t large enough or the adhesive backing weakens.
| Method | Best For | Risk If Done Poorly |
|---|---|---|
| Sewn-In Pocket | Permanent upgrades, textile pants | Armor is trapped if sizing is wrong; poor stitching rips in a slide. |
| Hook-and-Loop Panel | Modular systems, leather pants | Panel too small lets armor peel off; adhesive backing degrades with heat. |
| External Sleeve (Separate Guard) | Testing fit, maximum protection | Can slide down leg if straps loosen; adds bulk under pants. |
Tools and Materials You’ll Actually Need
Skip the generic “sewing kit” list. Here is what you use for a clean job on denim or textile.
- Heavy-Duty Thread: Upholstery thread (V-69 or heavier). All-purpose thread snaps under tension.
- Sharp Needles: Leather needles for denim or leather; universal point for textile. A dull needle pushes fabric instead of piercing it.
- Fabric for the Pocket: Scrap abrasion-resistant material from an old riding jacket is ideal. Heavy-duty nylon (500D or 1000D Cordura) is a safe buy.
- Hook-and-Loop Tape: 2-inch wide, adhesive-backed. Get the heavy-duty stuff, not the craft-section version.
- Fabric Marking Pen or Tailor’s Chalk
- Sharp Scissors or a Rotary Cutter
- Ruler or Measuring Tape
- Sewing Machine: A home machine can handle this if it can sew through 4 layers of denim. Test on a scrap first.
You do not need a industrial machine. You do need patience. The first side will look messy. The second will be straight.
Common mistake: Using lightweight thread on heavyweight fabric. The seam holds until the first tug, then the threads pop one by one. The repair is harder than the original install.
Finding the Correct Position (The Seated Rule)
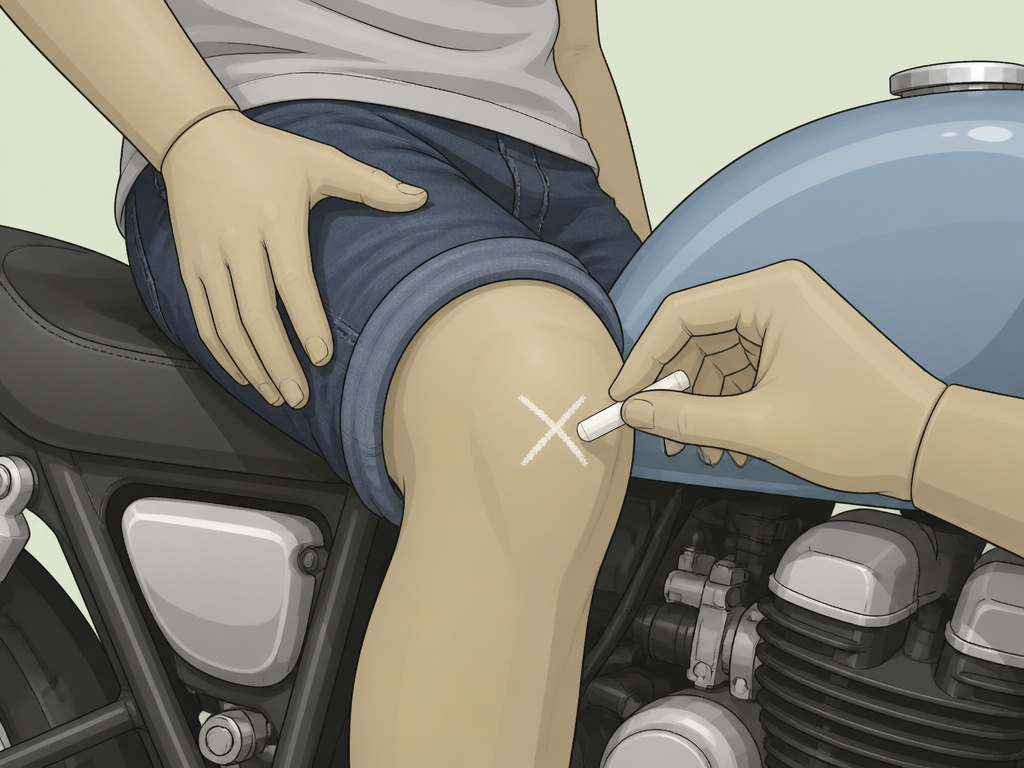
This step cannot be rushed. Put on the pants you’re modifying and sit on your motorcycle in your normal riding position. Have a friend mark the center of your knee cap with the chalk or pen. Then mark points above and below that center point to define the vertical line for the armor.
That vertical line is where the center of your armor must sit. If your armor has a shin extension, like the Leatt guard, the lower mark is for the bottom edge.
Now stand up. See how the marks shift? When standing, the marked position for the knee center may shift compared to the seated position. If you place armor using standing marks, it will sit too low on the bike. It will protect your shin, not your knee joint.
This is why so many riders complain about armor sliding to their inner leg. It was never positioned for the riding posture. For a deep dive on this, see our guide on how armor should fit.
The 5-Step Process for Adding a Sewn-In Pocket
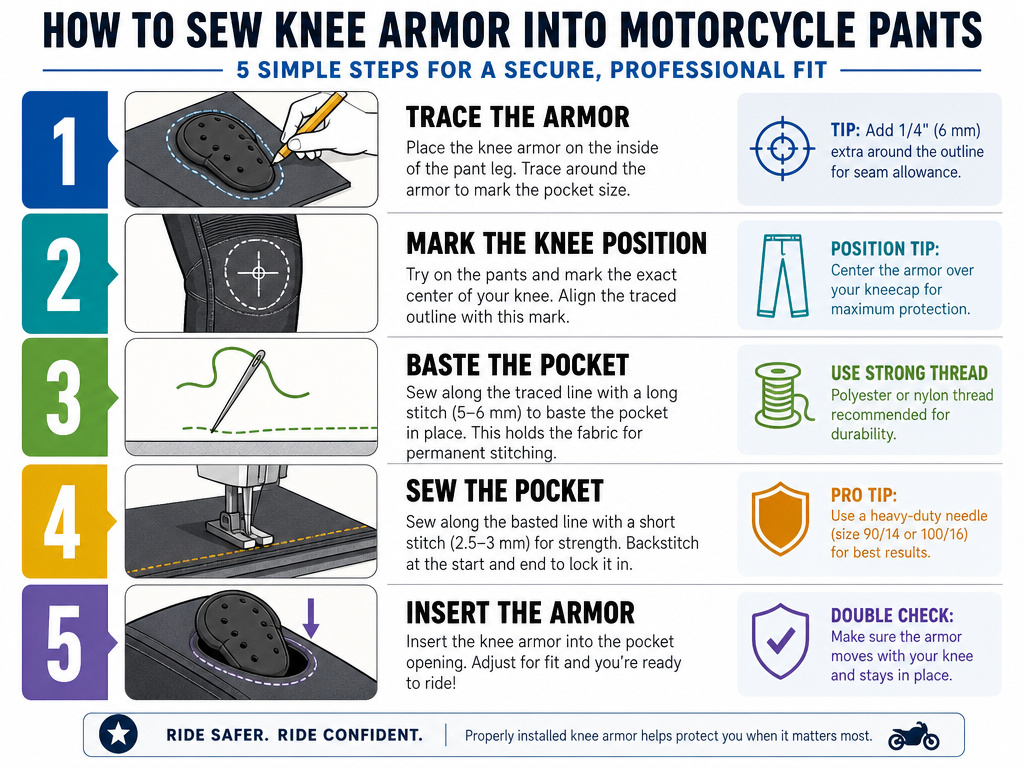
Follow this sequence. It works for textile pants and heavy denim.
- Trace and Cut the Pocket Fabric. Place your armor piece on your pocket fabric. Trace around it, adding a seam allowance on all sides. Cut out two identical pieces.
- Mark the Pocket Position. With the pants on and seated on the bike, mark the final armor position on the pants’ lining (inside layer). If there’s no lining, mark the inside of the outer shell carefully.
- Pin and Baste. Place one pocket piece inside the pant, aligning it with your marks. Pin it in place. Use a hand-sewn basting stitch (long, temporary stitches) to secure it. This stops the fabric from shifting during machine sewing.
- Sew the Pocket. Using your machine, sew around three sides of the pocket piece, leaving the top open. Use a straight stitch and go slowly over thick seams. Reinforce the top corners with a few backstitches.
- Insert Armor and Close. Slide your armor into the new pocket. If the fit is snug, you’re done. If you want to fully close it, pin the second pocket piece over the opening (right sides together) and sew it shut, creating a fully enclosed pouch.
The short version: Baste first, then sew. Skipping the basting step is how pockets end up crooked.
How to Add a Hook-and-Loop Panel
This method is better for leather pants where unpicking stitches is a nightmare.
- Prepare the Armor. Cut a piece of hook tape to fit the back of your armor. Adhere it firmly, following the adhesive instructions. Some brands recommend also stitching the tape perimeter for absolute security.
- Mark and Attach the Loop Panel. Determine the final armor position (using the seated method). Cut a piece of loop tape to attach inside the pants. Adhere the loop panel inside the pants at the marked position.
- Reinforce the Panel. This is the critical step. Using your machine and heavy thread, stitch around the entire perimeter of the loop panel. Stitch a second line, about 1/4-inch inside the first, creating a box. This prevents the panel from peeling off under shear force.
- Test and Adjust. Attach the armor. Sit on the bike. Check placement. The hook-and-loop allows a few millimeters of adjustment, which is its main advantage.
Manufacturer Warnings Most Guides Skip
The DIY community often treats armor like craft foam. The manufacturers who certify it to safety standards have strict—and conflicting—rules.
Can You Cut or Trim Armor?
- Bohn Armor states its limb armor “can be trimmed to fit.”
- Leatt Corporation explicitly prohibits modifications: “Do not drill holes, paint, cut, heat, bend, apply decals or stickers, or make any other modifications to the knee guard.”
This is a direct conflict. Leatt’s stance is that any modification voids the certification and may create stress points that cause the material to fail. Bohn Armor states its limb armor can be trimmed to fit, while Leatt Corporation explicitly prohibits any cutting or modification.
How Long Does Armor Last?
- Leatt recommends replacing its protectors every three (3) years under normal use.
- Bohn Armor states limb armor has a typical expiration date of 5-10 years from manufacture, linking “crumbling” armor to that age.
Inspect the armor prior to each use and stop using it if components show signs of damage, wear, cracks, deformation, or if the inside padding has deteriorated. After a collision, return it for inspection or destroy and replace it.
Storage Matters.
Bohn warns that “extreme cold in addition to stress on the protector (i.e., bending of the armor when cold) can cause the pieces to crack.” Leaving armor in a freezing garage and then putting it on can crack it at the knee hinge. Bohn Armor recommends storing protectors in temperatures above 60 degrees, while Leatt recommends storing the product in a dry, well-ventilated environment away from temperature extremes.
Common Mistakes and How to Avoid Them
A few errors show up in every forum thread. Here’s how to sidestep them.
- Mistake: Placing armor too low. Fix: Use the seated-on-bike method. Every time.
- Mistake: Making the pocket too big. Fix: Use a precise seam allowance. Armor should be snug.
- Mistake: Sewing through both layers of the pant leg. Fix: Only sew through the inner lining or the inside of the outer shell. Catch the outer layer and you’ll see stitches on the outside and compromise weatherproofing.
When to Choose Standalone Knee Guards
Adding armor to pants isn’t always the right answer. For maximum protection, especially for off-road or adventure riding, a dedicated external guard is superior.
Products like the Leatt Knee & Shin Guard Dual Axis are certified as Type A Level 1 per EN 1621-1:2012 and are designed to stay in place with straps. They offer more coverage down the shin. The Leatt sizing chart is precise: S/M (Upper Leg 33-41cm, Lower Leg 25-33cm), L/XL (41-53cm, 33-44cm), XXL (53-58cm, 44-51cm).
These guards can address fit, as Leatt states no single size of knee guard can accommodate all body dimensions. They are also easier to transfer between different pairs of pants. See our roundup of the best motorcycle knee protectors for tested options.
How to Add Knee Armor to Motorcycle Pants
Start by selecting armor that fits. Leatt states no single size of knee guard can accommodate all body dimensions and instructs to position the guard centrally on the knee cap and along the line of the shin. Maximum protection only comes when the armor is correctly positioned and adequately secured. Before installing, inspect the armor for any damage. Use strong stitching, hook-and-loop panels, or a secure pocket system to keep the armor from shifting. After a collision or if the product shows any cracks or deformation, stop using it immediately.
Frequently Asked Questions
Can I add armor to any pants?
Technically, yes. Practically, it works best on pants with a sturdy outer shell and an inner lining you can sew to. Thin, stretchy jeans or pants with no interior access are very difficult to modify cleanly.
What is CE-Level 2 armor?
CE-Level 2 is a higher protection grade within standards like EN 1621-1. It means the armor has been tested to transmit less force to the body than Level 1 armor after an impact. For knees, Level 2 is the target for street riding.
How do I clean pants with added armor?
If the armor is in a sewn-in pocket, remove it before washing. Follow the pants’ care label. For hook-and-loop panels, you can usually wash the pants with the loop panel in place, but remove the armor with the hook backing first. Never machine wash the armor inserts themselves.
My armor slides to the inside of my knee. Why?
This is almost always a placement error. The armor was positioned for a standing posture, not a seated one. When you sit on the bike, your leg rotates, pulling the armor inward. Re-mark the position while seated and re-sew the pocket or panel.
Is it safe to use secondhand armor?
Only if you can verify its age and condition. Inspect it thoroughly for cracks, creases, or degraded foam. If it’s from an unknown source or older than five years, it’s safer to buy new. Protection degrades over time.
The Bottom Line
Adding knee armor is a solid way to upgrade older gear or customize protection. Correct seated positioning is essential. Between a sewn pocket and a hook-and-loop panel, the sewn pocket is more reliable if you’re confident in the armor size.
If you want one answer and you’re new to this: practice sewing a pocket on an old pair of jeans first. Then move to your riding pants with a Bohn SC-1/43K or similar CE-Level 2 piece.
For maximum protection with less commitment, start with a set of standalone knee pads. Their adjustable straps solve the fit equation that stumps most DIY pant projects. Fit first, features second.
