
How to Install Motorcycle Frame Sliders: Your Tool Kit
This post contains affiliate links. As an Amazon Associate, we earn from qualifying purchases.
How to install motorcycle frame sliders requires matching four things: the correct tools, the right torque specification, the proper order of operations, and an understanding of your specific bike’s design. The process ranges from a straightforward bolt-on for some Hondas to a multi-hour affair involving fairing work on modern sportbikes, a difference manufacturers like OES Accessories explicitly warn about.
That difference in procedure isn’t an accident—it’s dictated by how the bike is built. A naked standard like the Honda CB750 hides its frame bolts in the open, while a fully-faired Kawasaki ZX6R tucks its engine mount behind a labyrinth of plastic. The installation steps you follow in the how to install motorcycle frame sliders process are less about the slider and more about accessing your motorcycle’s skeleton.
What follows: the specific tools you cannot skip, the torque numbers pulled directly from manufacturer guides, the one step almost everyone gets wrong, and a final check that proves your work is road-ready. This is the practical sequence for installing motorcycle frame sliders to prevent a slider from becoming the first point of failure.
Key Takeaways
- Install one side at a time to prevent the engine from tilting within the frame, a step both Honda and OES Accessories mandate.
- For the OES Accessories kit on the 2009-2012 Kawasaki ZX6R, the frame slider-to-bracket torque is a specific 30 ft/lbs and requires Loctite on the threads.
- OES Accessories instructions for different ZX6R models agree that the castle-style nut on the right-side engine mount is an adjuster and should not be loosened during installation; the engine mount bolt runs through its hollow center.
- Always reference your specific bike’s factory service manual for the correct engine mount bolt torque, as values vary widely by manufacturer and model.
The Tool Kit You Actually Need
Forget the generic “use the right tools” advice. The right tools for this job are the ones that keep you from stripping a bolt head inside a tight fairing cavity or guessing at a critical torque value. You need a torque wrench rated for the values in your bike’s manual. A 3/8″ drive ratchet with a set of metric sockets and hex keys is essential. Add a small Phillips and flathead screwdriver for trim clips, and a tube of blue (medium-strength) Loctite.
The fact is this. A torque wrench isn’t a luxury. OES Accessories instructions flatly state installation “must be performed by a qualified motorcycle mechanic who is using the correct tools.” That language is there because a bolt tightened by feel can be too loose, leading to catastrophic failure, or too tight, stretching the threads and inviting a future break. The factory torque spec for an engine mount bolt defines the precise clamping force needed to hold the engine in place while enduring vibration and impact.
A torque wrench is the single most important tool for installing frame sliders. It is the only way to apply the precise force the manufacturer engineered the fastener to withstand, turning a guess into a guarantee.
Know Your Bike’s Specifics Before You Start
The single biggest time sink is the disassembly. Modern sportbikes wrap their frames in complex fairings, and each model has its own sequence of removal. Consult your service manual first. If you don’t have one, a model-specific forum or a detailed video tutorial can be invaluable for identifying the handful of screws that need to come out to flex the fairing enough for access.
OES Accessories notes that for their 2024-2026 ZX6R kit, “the installation of this particular set of frame sliders is more complex and takes longer than our typical sliders set.” They add a blunt warning: “If the bike needs to be ready to ride in the next couple of hours, do not start this job right now.” That’s not scare talk. It’s a realistic assessment of dealing with interlocking trim pieces and tight clearances.
For simpler bikes like many Hondas, the process is closer to a direct bolt-on. The instructions for the Honda CB750 simply show removing existing bolts and installing the slider assembly. The critical universal rule from Honda is to “not work on the left and right sides at the same time to avoid engine tilting.” This is a physical reality—removing both primary engine mount bolts can allow the powerplant to shift, complicating reinstallation and potentially stressing other components.
The 30 ft/lbs Rule for Frame Sliders
A slider rattling loose at speed is worse than having no slider at all. The connection between the slider puck and its mounting bracket has its own torque specification, separate from the engine mount bolt. For the OES Accessories kit on the 2009-2012 Kawasaki ZX6R, this value is explicitly 30 ft/lbs (40.7 N·m). Their instructions warn, “the slider IS NOT FINAL TORQUED and will fall off while riding if it is not tightened with Loctite on the threads.”
This is where first-hand observation matters. I’ve seen sliders that were hand-tightened vibrate to the point of spinning freely after a few hundred miles. The combination of a precise torque and thread-locker creates a joint that resorts vibration but can still be removed with effort later. Always ensure the washer is on the screw before installing the slider, as the instructions emphatically note. Skipping it changes the clamping force and can lead to premature loosening.
For other brands and models, you must find this spec. It may be in the slider’s instructions, or you may need to use general engineering principles for the bolt size (e.g., an M8 bolt has a typical torque range).
The Castle Nut Disagreement (And How to Navigate It)
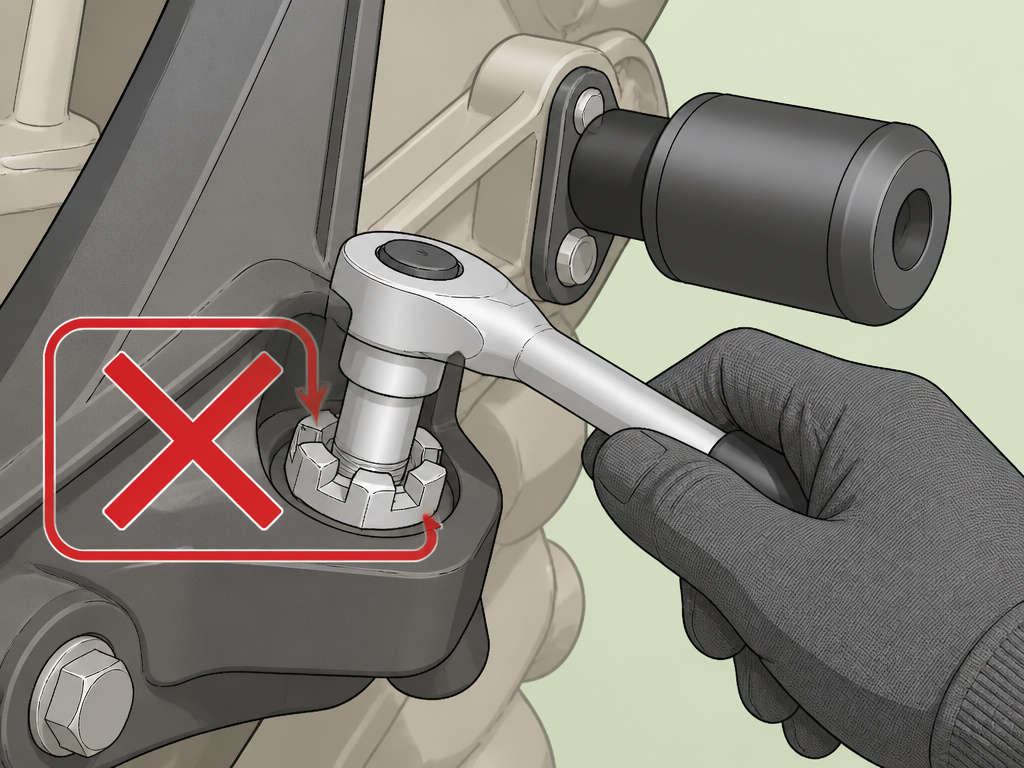
On many Kawasaki models, the right-side engine mount features a large castellated (castle) nut on a stud. A quick glance makes it look like you need to hold this nut to remove the engine mount bolt. This is where sources from the same manufacturer disagree, presenting a perfect case for why you must read your specific instructions.
| Instruction Source | Direction on Castle Nut | Key Reason |
|---|---|---|
| OES Accessories (2024-2026 ZX6R) | “The castle style nut is just an adjuster and DOES NOT GET LOOSENED.” | The engine mount bolt runs through the threaded hollow center of the adjuster stud. |
| OES Accessories (2009-2012 ZX6R) | “This is the lock nut for the engine mount adjuster and DOES NOT need to be loosened.” | The stud is hollow and the engine mount screw runs through it. Loosening it changes engine position. |
Both agree: do not turn that nut. The engine mount bolt threads directly into the frame through the hollow center of that stud. If you loosen the castle nut, you’re altering the engine’s position within the frame—a major adjustment that requires realignment. The correct procedure is to ignore the castle nut entirely. Use your socket on the engine mount bolt head and remove it straight out. This is a common source of installation problems, because our instincts are wrong.
A Step-by-Step Installation Walkthrough
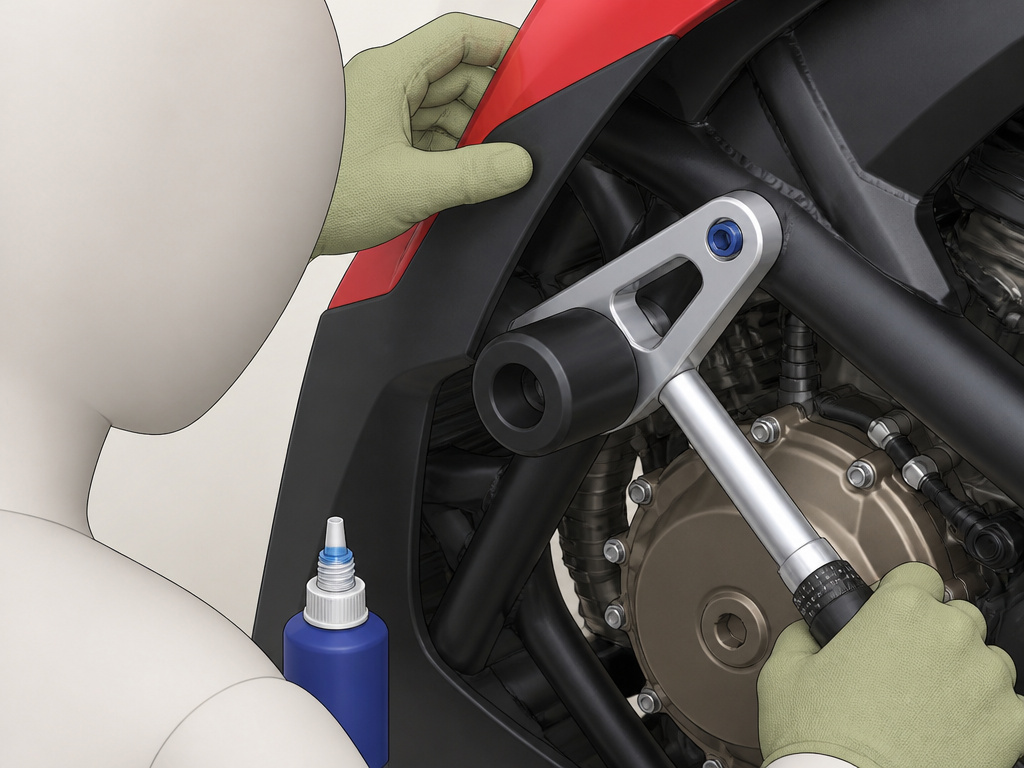
This sequence synthesizes the common steps from Honda and OES Accessories instructions. Treat it as a template and fill in the specifics for your bike.
- Prepare the Bike. Park on a stable, level surface. As Honda advises, “allow the engine, exhaust system, radiator, etc., to cool.” Disconnect the battery as a general safety precaution against short circuits.
- Gather Tools and Parts. Lay out your torque wrench, sockets, hex keys, Loctite, and the slider kit. Identify the left and right-side components if they are different. Check if your sliders are pre-assembled. OES notes that sliders ordered after 4/10/26 will already have Loctite and be fully torqued to the bracket upon receipt.
- Start on one side only. OES instructions for some models suggest starting on the right side, while others simply advise installing one side at a time. Remove only the fairing screws necessary to flex the plastic outward for clear access to the engine mount bolt. Do not remove both side engine mount bolts at the same time.
- Remove the Factory Engine Mount Bolt. Using the correct socket (often 14mm), remove the bolt. If you encounter a castle nut, do not loosen it. Set the factory bolt aside in a labeled bag.
- Dry-Fit the Bracket and Slider. Offer up the slider bracket assembly to the mounting point. Ensure it sits flush and the slider has clearance from the fairing, radiator, and other parts in full steering lock both ways. This may require minor trimming of a sub-fairing piece, as the OES 2009-2012 ZX6R instructions detail.
- Install with Thread Locker. Apply blue Loctite to the threads of the new or supplied bolt. For the slider-to-bracket connection, also apply Loctite unless pre-applied. Hand-tighten everything first.
- Torque to Specification. In two stages, torque the fasteners. First, tighten the engine mount bolt to your bike’s factory specification (found in the service manual). Then, torque the slider-to-bracket bolt (e.g., 30 ft/lbs for the OES kit).
- Reassemble the Fairing. Reinstall all fairing screws and trim pieces. Do not overtighten plastic fasteners.
- Repeat on the Other Side. Only after one side is fully torqued and reassembled, move to the opposite side and repeat the process.
Common mistake: Using the factory engine mount bolt on both sides. For some kits, like the OES 2009-2012 ZX6R, the left side uses a different supplied screw. Using the shorter factory bolt can result in insufficient thread engagement and failure.
The Final Safety Check and First Ride
The job isn’t done when the last fairing screw goes in. You’ve just changed the physical profile and weight distribution of your motorcycle, however slightly. An installation of frame sliders deserves a verification ride.
Start with a static check. With the bike upright, visually confirm the sliders are symmetrical. Grip each one firmly and try to wiggle it. There should be zero play. Listen for any odd creaking or cracking sounds when applying pressure. Next, slowly turn the handlebars lock-to-lock, watching for any contact between the slider and fairing, wiring, or cables. A faint touch at full lock might be acceptable, but any binding or hard contact is not.
Now, take a short, gentle ride around your neighborhood or an empty parking lot. Pay attention to steering feel. Does the bike pull to one side? Do you hear any new buzzing or rattling from the front end? After a few minutes, stop and carefully feel the slider bolts. Are they still cool? A bolt that is warm to the touch after a short ride could indicate friction from misalignment or overtightening. This check is as crucial as the installation itself, catching a problem before it becomes a roadside incident.
Frame Sliders vs. Other Protection
Frame sliders are one piece of the crash protection puzzle. They’re designed primarily for low-speed tip-overs and slides, projecting a hardened puck to take the abrasion instead of your expensive fairings and engine covers. For different types of impacts, especially on adventure bikes or in off-road scenarios, engine guards (often called crash bars) or axle sliders might be more appropriate. Crash bars create a cage around the engine, offering better protection in a higher-energy impact or a roll, but they are heavier and can significantly increase width.
The choice between them isn’t always either/or. Many riders combine frame sliders with axle sliders for complete coverage. Understanding the pros and cons of engine guards helps you build a protection scheme that matches your riding style and risks. A sportbike rider on pavement will prioritize frame sliders, while an adventure tourer will lean toward robust crash bars.
How to choose good frame sliders
Choosing a set starts with understanding the installation. Some kits are more complex and take longer to install than others. If your bike needs to be ready to ride soon, a simpler bolt-on design might be preferable. Look for kits where critical components like the slider puck are properly secured to its bracket from the factory, as some arrive not fully torqued and require you to apply thread locker. The design should integrate with your bike’s bodywork, potentially requiring minor modification to plastic pieces without affecting their function. A design that follows the factory’s torque specifications without requiring you to loosen non-adjuster components allows for a secure installation.
Frequently Asked Questions
Are motorcycle frame sliders worth it?
For most riders, yes. They are a relatively inexpensive way to protect expensive plastic fairings and engine cases from the scrapes and cracks of a simple parking lot drop. They won’t guarantee a walk-away from a high-speed crash, but for the most common low-speed incidents, they can save thousands in repair costs.
How do I know if my frame sliders are installed correctly?
Correct installation shows no visible gaps between the bracket and the frame mounting point, all fasteners are torqued to the proper specification with thread-locker, there is no contact between the slider and any other part at full steering lock, and there is absolutely no movement when you try to wiggle the slider by hand.
Can frame sliders cause more damage in a crash?
It’s a debated topic. The concern is that a long frame slider could catch on the pavement during a slide, potentially causing the bike to tumble instead of slide, which could transfer more energy to the frame. However, most quality sliders are designed to break away or bend upon significant impact to mitigate this risk. For street riding, the consensus is that the protection they offer in most common incidents outweighs this potential risk.
Do I need to cut my fairings to install frame sliders?
It depends entirely on your bike and the slider kit. Some sportbikes, like the 2009-2012 Kawasaki ZX6R with OES sliders, require a small, precise cut in an inner plastic piece for clearance. The instructions provide a template. Other bikes and kits are designed as direct bolt-ons with no cutting required. Always read the instructions for your specific model before starting.
Before You Go
One rule overrides every torque spec and installation step: if you are not confident, stop. The warnings from OES Accessories and Honda about qualified mechanics exist because this work involves critical structural fasteners. A mistake here doesn’t mean a loose mirror; it can mean a catastrophic failure at speed.
If you proceed, document your process. Take pictures before you remove the first bolt, especially of wiring and hose routing. Keep your factory fasteners organized. And when you’re done, that short test ride isn’t optional—it’s the final, functional proof that your installation is safe. The goal is to have sliders that are a reliable part of the bike, ready to do their job without a second thought.
