
How to Clean a Motorcycle Carburetor: Without Damage
This post contains affiliate links. As an Amazon Associate, we earn from qualifying purchases.
To clean a motorcycle carburetor, you must completely disassemble it, soak the metal components in a solvent safe for its materials, and mechanically clear every jet and passage. The job hinges on patience, the right tools, and verifying each passage is clear before reassembly. A shortcut here guarantees a return trip.
That verification step is where most guides stop short. They tell you to spray and blow, but not how to know a jet is truly clean, which is a key part of how to clean a motorcycle carburetor. A passage that looks clear can still be significantly blocked by a film you cannot see. What follows is the sequence that works, grounded in factory service manuals. We will describe the tools that prevent damage, the solvents that work without eating seals, and the two manufacturer disagreements that decide whether your cleaning method is safe or destructive.
Key Takeaways
- Fuel can deteriorate in as little as 3 to 4 weeks (Honda), turning to varnish that blocks jets, this is why seasonal bikes need stabilizer.
- Honda warns against using welding tip cleaners or stiff wires on brass jets, as they can alter the calibrated orifice size, while some community guides discuss using them with extreme care as an alternative.
- For storage of 2 months to 1 year, Honda’s procedure is to fill the tank with fresh gas, add stabilizer, and drain the carburetor float bowl.
- An ultrasonic cleaner is the most effective method for dissolving internal varnish without manual scrubbing, but you must remove all non-metal parts first.
- The factory service manual for your specific model is the final authority; community shortcuts often contradict OEM warnings for a reason.
Why Gasoline Turns Against Your Carburetor
Current gasoline formulations have a shelf life. When exposed to air and heat, the fuel in your tank and carburetor float bowl begins to oxidize. It turns into a varnish-like gum. This substance is sticky and hard. It restricts the tiny fuel passages and jets inside your carburetor.
Honda’s service manual documents the timeline: deterioration can start in as little as 3 to 4 weeks. Problems like hard starting or surging at full throttle may occur within a few months, or even sooner if the gas was not fresh when you filled the tank. Every carburetor float bowl is vented to the atmosphere, which allows this slow oxidation to happen even when the bike is parked.
The fix involves changing how you store the bike, not merely learning how to clean a motorcycle carburetor. For a layup of one to two months, Honda’s manual says to fill the tank with fresh gas and add a gasoline stabilizer. For two months to a year, you also need to drain the carburetor float bowl. This is the documented, mandatory procedure to prevent the problem you are now fixing.
Tools You Actually Need (And One You Should Avoid)
You need a clean workspace. A large, flat surface covered with a towel or cardboard allows you to lay out parts in order. Good lighting is essential. A headlamp is better than an overhead bulb for seeing into small passages.
Here is the basic kit:
- JIS screwdrivers: Many Japanese motorcycle carburetors use JIS (Japanese Industrial Standard) cross-head screws, not Phillips. A Phillips driver will cam out and strip the screw head. A set of JIS bits is cheap insurance.
- Needle-nose pliers & dental picks: For retrieving small parts and O-rings.
- Clean solvent tray: A plastic parts tray or old baking pan dedicated to this job.
- Soft-bristle brushes: Acid brushes with the bristles trimmed to ¼ inch are perfect for scrubbing without scratching.
- Compressed air source: A can of keyboard duster works, but a small compressor with a moisture trap and a regulator set to low pressure is ideal.
- Safety gear: Nitrile gloves and safety glasses. The solvents will irritate your skin and eyes.
Now for the controversial tool: jet cleaners. The Honda manual explicitly warns against using welding tip cleaners. They are hardened steel and will enlarge the soft brass orifice of a jet, changing its fuel flow. The manual mandates using their specific Honda Jet Cleaner Tool (07JPZ-001010B). The community guide for Honda DOHC-4 engines suggests a high E-string from an old guitar (approx. .012” diameter) as a gentler alternative. If you go that route, you are accepting risk the manufacturer does not. My stance is simple: if you cannot clear a jet with solvent and air, replace the jet. A new main jet costs less than a tank of gas.
Common mistake: Using a metal pick or wire to poke through a jet. You might get it clear, but you will alter its diameter. The bike will never run right again, and you will spend hours chasing an air/fuel mixture problem you created.
The Solvent Debate: What the Manuals Say vs. What Riders Do
You cannot learn how to clean a motorcycle carburetor with soap and water. You need a solvent that dissolves gasoline varnish and gum. This is where factory service manuals and common practice diverge, and you need to know why.
The Kawasaki KLX110 manual specifies using a “mild high flash-point cleaning solution safe for plastic parts,” and warns against “strong carburetor cleaning solution.” The Honda manual recommends their Honda Genuine Carburetor Cleaner (08732-CC000). The message is clear: OEMs are cautious about chemicals that can damage rubber seals, plastic floats, and diaphragm materials.
Meanwhile, a popular community guide for Honda CB750s mentions using aggressive, non-OEM solvents like Berryman Chem-Dip, with the strict caveat to remove all non-metal parts first. This is the core disagreement. The factory says pick a mild solvent that is safe for all materials. The community says use the strongest stuff you can find, but only on bare metal.
Who is right? For a beginner, the factory. It is safer. If you choose a potent soak-style cleaner, you must be meticulous. Every O-ring, every rubber tip on the float valve, every plastic or composite part must come out. Miss one, and it will turn to mush.
| Cleaning Method | Best For | Key Risk If Misused |
|---|---|---|
| Aerosol Spray Cleaner (e.g., Honda 08732-CC000) | Quick cleaning of external parts and passages during reassembly. | Does not dissolve heavy internal varnish; flammable. |
| Soak-Style Solvent (e.g., Berryman Chem-Dip) | Dissolving heavy gum and varnish inside metal bodies and bowls. | Will destroy rubber, plastic, and diaphragms in minutes. |
| Ultrasonic Cleaner (with water-based solution) | Cleaning complex internal passages without scrubbing. | Can damage non-metal parts if left in the tank; may not remove heavy carbon. |
Your choice defines your prep work. Pick the strong soak, and disassembly must be absolute.
The 7-Step Bump-Feed Replacement (and the One Step Nobody Skips)

This is the core sequence. It assumes you have already removed the carburetor from the motorcycle. If you are cleaning it on the bike, you are only doing half the job.
1. Document and Disassemble
Take photos. Lots of them. Before you turn a screw, snap a picture of the carburetor bank, cable routing, and hose connections. As you remove each part, lay it out on your towel in the order it came off. Use small containers or bags for the jets from each carburetor, they are often different sizes. For Honda CB550 PD46A carbs, the factory specs are Main jet #0, Air jet #130, Slow jet #38, and Slow air jet #150. Mixing them up guarantees a headache.
2. Strip Down to Bare Metal
Remove every non-metal component. This includes:
- Float pins and floats
- Float valve and its rubber tip
- All O-rings and gaskets
- Rubber diaphragms (if present)
- Plastic or composite vent tubes This is the step people skip because it is tedious. They leave the float valve seat in place, thinking the solvent will not hurt it. It will. The rubber tip swells and fails, causing the carb to flood. Do it right.
3. Soak the Metal Parts
Place the disassembled metal components, the carburetor bodies, float bowls, jets, and screws, into your chosen solvent. If using a harsh chemical dip, follow its time instructions precisely. Overnight soaking is often overkill. For an ultrasonic cleaner with a water-based solution, a cleaning cycle is usually sufficient. The solution turns cloudy as the varnish emulsifies.
4. Clean Every Orifice Mechanically
After soaking, use your soft brushes to scrub all surfaces. Then, for each jet and passage, perform the light test. Hold the jet up to a bright light. You should see a perfectly round, clear hole. If there is any distortion or film, it is not clean. Use your approved cleaning tool (guitar string, OEM tool) with a gentle twisting motion. Follow immediately with a blast of low-pressure air through the passage. You should hear and feel air moving freely.
5. Dry and Inspect
Blow every part dry with compressed air. Inspect all components. Check the float needle for a worn or grooved tip, replace it if you see any ridge. Look at the throttle slide for scratches that could cause it to stick. The Yamaha manual says to insert the slide into the carburetor body and check for free movement. If it sticks, the body or slide is worn.
6. Reassemble with New Seals
This is not a place to reuse old, hard gaskets. A carburetor rebuild kit is cheap insurance. Lightly lubricate O-rings with a dab of gasoline or a drop of oil to help them seat. Tighten screws snugly, but remember, you are threading into soft aluminum. Over-torquing strips threads instantly.
7. Bench Test Before Installation
Before you wrestle the carburetor back onto the bike, do a bench test. Reconnect the fuel line temporarily. Open the float bowl drain screw. Fuel should flow out steadily, then stop completely when you close the drain, this confirms the float valve is sealing. Any continuous drip means the valve is dirty or damaged.
Where this goes sideways: Reusing the old float bowl gasket because it “looks okay.” A slightly compressed gasket will leak fuel under vibration, creating a fire hazard. The leak starts as a faint smell of gas, then a wet spot on your engine case.
When Cleaning Isn’t Enough: The Rebuild Kit Threshold
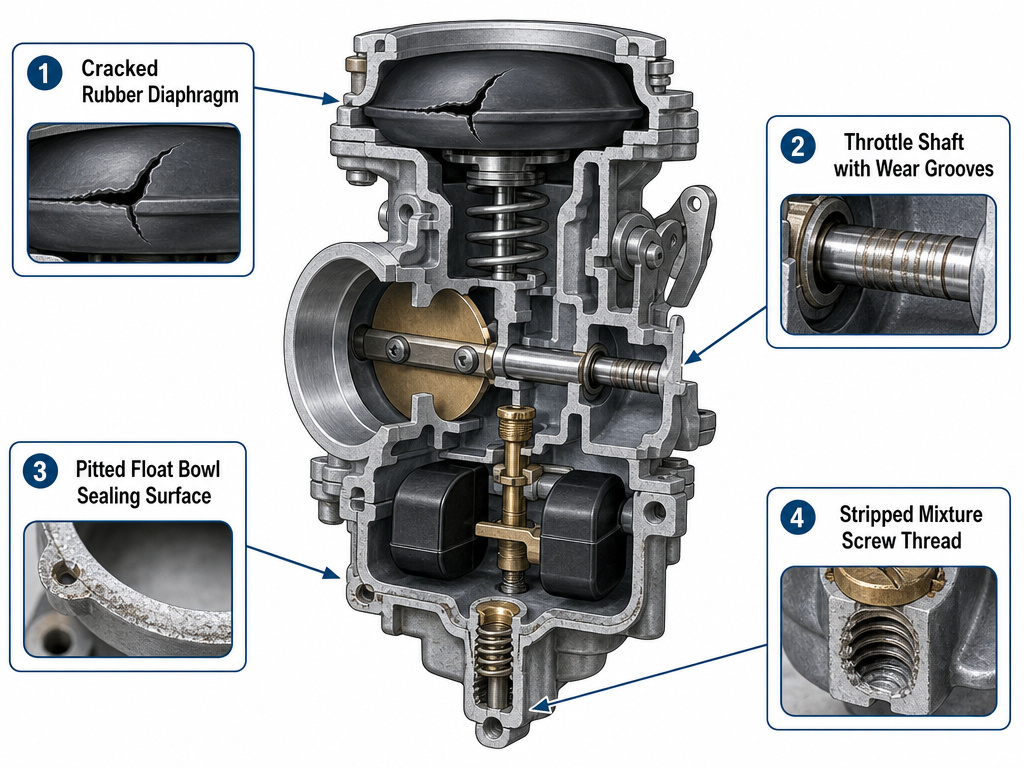
Cleaning fixes problems caused by gum and varnish. It does not fix wear. If your bike has high mileage or the carburetor has been neglected for years, dissolved deposits might reveal worn-out components.
You need a rebuild kit when you see:
- Hardened or cracked vacuum diaphragms: These will not hold vacuum, causing flat spots in your throttle response.
- Grooved throttle shaft bushings: This allows unmetered air to leak in, making idle impossible to set.
- Pitted or corroded float bowl surfaces: Corrosion can create pits that new gaskets cannot seal.
- Stripped or damaged threads: For jet or mixture screw housings.
Installing a rebuild kit is the logical next step after a thorough cleaning. It replaces all the perishable parts that cleaning cannot restore. Think of cleaning as surgery to remove a blockage, and the rebuild kit as the sutures and bandages that ensure proper healing.
Navigating Manufacturer Disagreements
Factory manuals do not always agree. Your job is to know the conflicts so you can choose a side deliberately.
Conflict 1: Soaking the Float Bowl
The Mikuni manual for certain models states: “Fuel bowls… Should only be exposed to carburetor cleaner long enough to permit removal of gum… Prolonged exposure… Can damage internal seals.” Some Mikuni bowls have internal, non-removable O-rings. The Yamaha QT50 manual instructs: “Wash carburetor in petroleum base solvent. Wash all associated parts,” with no time limitation. The Takeaway: If you have Mikuni carbs, be cautious with soak times. For Yamaha, follow their more liberal instruction.
Conflict 2: Compressed Air on an Assembled Carb
The Kawasaki manual explicitly warns: “Do not use compressed air on an assembled carburetor, the float may be deformed by the pressure.” The Honda manual instructs to blow dry disassembled parts with “low pressure compressed air” but does not explicitly prohibit use on an assembled unit. The Takeaway: The Kawasaki rule is the safer one. Never blow air into a carburetor that still has its float and needle valve installed. The pressure can force the float against its pin, bending or breaking it.
These are specific warnings born from documented field failures. When sources disagree, the more conservative path is usually the one that prevents a broken part.
The Storage Fix That Prevents This Whole Job
Cleaning is a corrective action. Storage prep is preventive maintenance. Following the Honda storage table religiously will keep your carburetors clean.
| Storage Duration | Recommended Service Procedure |
|---|---|
| Less than 1 month | No preparation required. |
| 1 to 2 months | 1. Fill tank with fresh gasoline. 2. Add a fuel stabilizer. |
| 2 months to 1 year | 1. Fill tank with fresh gasoline. 2. Add stabilizer. 3. Drain the carburetor float bowl. |
| 1 year or more | 1. Drain the fuel tank and carburetor. 2. Change the engine oil. 3. Lubricate the cylinder. |
The most critical item for the average rider is the two-month to one-year procedure. Draining the float bowl removes the fuel that is most exposed to air and therefore most likely to turn to varnish. Adding a stabilizer to a full tank treats the bulk fuel, slowing oxidation. This two-part approach addresses both the tank and the carburetor, which have different failure modes. Using a fuel additive designed for ethanol-blended fuel can also help combat phase separation during storage.
Frequently Asked Questions
What is the best way to clean a motorcycle carburetor?
The most thorough method is complete disassembly, removal of all non-metal parts, soaking the metal components in an appropriate solvent, and using low-pressure compressed air to dry and verify all passages. An ultrasonic cleaner is highly effective for the soak phase. The “best” way is the one you do meticulously, following your bike’s factory service manual for specific warnings.
Can you clean a motorcycle carburetor without removing it?
You can perform a partial clean in place using aerosol carburetor cleaner sprayed into the intake or fuel line, but this is a band-aid. It might clear a minor blockage in the main jet but will not touch varnish in the float bowl, pilot circuit, or internal passages. For persistent issues like hard cold starts or rough idle, removal and full disassembly are necessary.
What are the signs that my motorcycle carburetor is dirty?
The classic symptoms are engine hard starting, a fluctuating or disappearing idle, hesitation or surging when you open the throttle, and generally low power. These occur because gummed-up jets restrict fuel flow, upsetting the precise air/fuel mixture. Before blaming the carburetor, ensure your air filter is clean and you have good spark.
Is it worth cleaning a carburetor or should I just replace it?
For most older motorcycles, a cleaning and rebuild is absolutely worth it. New carburetors, especially for classic bikes, are expensive and often poor-quality replicas. A cleaned original carburetor with new seals will outperform a cheap new one. The exception is if the carburetor body itself is physically damaged (cracked, severely corroded). Understanding the comparison of carburetor and EFI systems can also help contextualize the value of maintaining your carbureted setup.
The Bottom Line
Cleaning a carburetor is a straightforward mechanical job with one essential rule: verify every passage is clear. The complexity comes from the prep work and the need to respect material incompatibilities with solvents. Your factory service manual serves as a map of the minefield.
If your bike has been sitting for more than two months, assume the carburetor needs attention. Drain the bowl, add stabilizer, and run fresh gas through it before you declare victory. And when you reassemble, use new gaskets. That five-dollar parts kit saves you from doing the entire job twice next season.
