
How to Clean Motorcycle Brake Calipers: Step-by-Step
This post contains affiliate links. As an Amazon Associate, we earn from qualifying purchases.
Cleaning motorcycle brake calipers is a three-part job: remove the contaminants, avoid damaging the seals or friction material, and verify the system works before you ride. The process changes if you pull the caliper off or clean it in place, and the cleaning agent you choose depends on which manufacturer’s manual you trust.
The disagreement on cleaners is real, one major OEM bans commercial sprays while another mandates a branded version. That split tells you the goal isn’t a specific chemical. It’s removing grime without leaving residue that compromises the brake pad compound or the hydraulic seals. This is the core principle of how to clean motorcycle brake calipers.
What follows is the full breakdown of how to clean motorcycle brake calipers: when to pull the caliper, the two approved cleaning methods, the torque specs that keep things tight, and the simple test that finds a leak before your first stop.
Key Takeaways
- Honda’s manual states to never use an air hose or brush and to use an OSHA-approved vacuum cleaner, while Tesla’s manual instructs using a brush with approved cleaner.
- Manufacturers disagree on spray cleaners: Tesla mandates a branded brake cleaner, while Shimano’s bicycle manual prohibits all commercial sprays, the common ground is to avoid contaminating the pad friction material.
- Torque the caliper mounting bolt to 30 N·m on a Honda NHX110; it’s an ALOC bolt and must be replaced with a new one after removal.
- Always bleed the brakes if the system was opened or the lever feels spongy afterwards, as air is the most common cause of a soft pedal post-service.
- Bed in the pads after any cleaning that involved pad removal or piston retraction, as the fresh contact surface needs heat cycles to regain full stopping power.
When Your Brakes Tell You It’s Time for a Cleanup
You don’t clean calipers on a schedule. You clean them when they start talking. A faint grinding that isn’t the pads, a sticky lever return, or one wheel collecting more brake dust than the other, those are the cues. The most common trigger is a dragging brake. You’ll feel the bike pull slightly when you release the lever, or hear a constant light scraping after a ride. Heat is the giveaway. That wheel’s rotor will be noticeably warmer than the others at a rest stop.
Contamination is the other signal. Road salt, chain lube overspray, or just years of road grime building up on the caliper bracket and piston boots. That grime traps moisture, which leads to corrosion. The pistons seize in their bores, the sliding pins gum up, and the pad doesn’t retract fully. A visual check works here. If you can’t see the piston’s shiny surface behind a crust of dirt, it’s time.
Where this goes sideways: Letting a slightly sticky piston go for months. The constant drag overheats the fluid, boils the moisture in it, and by the time you feel a spongy lever, you’re looking at a full fluid flush and possibly new seals. Catch it when the wheel just feels warm.
The Toolkit: What You Actually Need
You can overcomplicate this with specialty tools. For a basic clean, you need a handful of items. A set of hex keys or sockets to remove the caliper bolts and the pads. A flathead screwdriver or dedicated pad spreader to retract the pistons. A bucket of soapy water (simple dish soap works) and a set of stiff-bristle brushes, one for grime, a softer one for the piston surfaces. You’ll need rags, but not the fluffy kind. Use lint-free shop towels.
The debate starts with the cleaning agent. The Honda NHX110 service manual explicitly states to never use an air hose or brush to clean brake assemblies. It mandates an OSHA-approved vacuum cleaner for dry dust. For a contaminated brake disc, Honda recommends cleaning it with a high quality brake degreasing agent. Conversely, the Tesla Model Y service manual instructs technicians to use “a brush and Tesla–approved brake cleaner.” Meanwhile, a Shimano bicycle brake service manual prohibits commercially-available brake cleansers entirely.
| Tool / Agent | Purpose | Manufacturer Stance |
|---|---|---|
| OSHA-approved vacuum | Removing dry brake dust | Honda: Required. Never use air/brush. |
| Brake cleaner spray | Degreasing oily contamination | Tesla: Mandates branded cleaner. Shimano: Prohibits all commercial sprays. |
| Stiff nylon & brass brushes | Scrubbing caliper bracket & hardware | Universal, but keep away from seals and pad material. |
| Lint-free shop towels | Drying & wiping | Universal — no fibers left behind. |
The takeaway isn’t confusion. It’s that the method must suit the contaminant when you compare a how to clean motorcycle brake calipers guide. Dry dust gets vacuumed. Oily grime gets dissolved with a cleaner that leaves no residue, and you must keep it off the brake pads and rubber seals. Your choice should lean on your bike’s manual. Have some fresh DOT 3 or DOT 4 brake fluid on hand too, from a sealed container. If you open the system to bleed it, you’ll need it.
The 4-Step Bump-Feed Replacement (and the One Step Nobody Skips)
This is the full monty, taking the caliper off the bike for a deep clean. It’s necessary if the pistons are sticky, the sliding pins are corroded, or the grime is caked on the back of the caliper body.
1. Remove the wheel and caliper. Unbolt the caliper from its mounting bracket or fork leg. Don’t let it hang by the brake hose; support it with a bungee or hook. If you’re just cleaning, you don’t need to disconnect the hydraulic line.
2. Remove the brake pads. Take out the retention pin or clips and slide the pads out. Keep them in order, inner and outer pads often wear differently. This is the perfect time to inspect the brake rotors for wear or scoring.
The part nobody mentions: Label your pads ‘inner’ and ‘outer’ with tape the second they come out. They develop a wear pattern matching the rotor. Swapping them during reassembly can cause noise and reduced bite until they re-seat.
3. Clean the caliper body and bracket. With the pads out, you can access the abutment flats (the shiny surfaces where the pad ears slide) and the piston boots. Spray your chosen cleaner on a rag or brush first, not directly onto the caliper, to avoid overspray onto the piston seals. Scrub the bracket, the sliding pins, and the anti-rattle springs. A brass brush is good for corrosion on metal parts. If you’re following the Honda rule, you would have vacuumed any dust first.
4. Clean and retract the pistons. This is the delicate part. Spray cleaner onto a rag and gently wipe the face of each piston. Do not scratch them. To retract them for reassembly, use a flat tool like a tire lever or a dedicated piston spreader. Push them evenly back into their bores. Forcing one side will cock the piston and damage the seal.
Reassembly is reverse order, with one critical addition. Before installing the pads, apply a thin coat of appropriate lubricant to the pad ears and the sliding pins. This prevents the sticky drag that started this whole process. When bolting the caliper back on, torque matters. For a Honda NHX110, the brake caliper mounting bolt torque is 30 N·m and it’s an ALOC (Adhesive-Locked) bolt, the manual says replace it with a new one.
Finally, pump the brake lever until it’s firm. The pistons will move out to take up the gap. Check the brake lever feel. If it’s spongy, you’ve introduced air and need to bleed the brakes.
Cleaning Without Removal: The Quick-Fix That Works

You don’t always need to pull the caliper. For light dust or surface grime, a quick in-place clean can restore smooth operation.
Leave the wheel on. Remove the pads. You must do this even for a quick clean. You need to see the pistons. With the pads out, use a vacuum with a narrow nozzle to suck dust from around the pistons and the caliper bridge. Then, with a brush dampened with cleaner (not dripping), scrub the visible parts of the piston faces and the pad abutment areas on the caliper. The goal is to remove the surface layer that might impede movement.
This method won’t fix a seized piston. But it will prevent one from seizing. It’s also the only safe way to deal with dust without spraying particulate everywhere. After brushing, wipe with a dry lint-free cloth. Reinstall the pads, grease the contact points, and you’re done. The whole job can be relatively quick.
Cleaning Agents: The One Rule That Splits Manufacturers
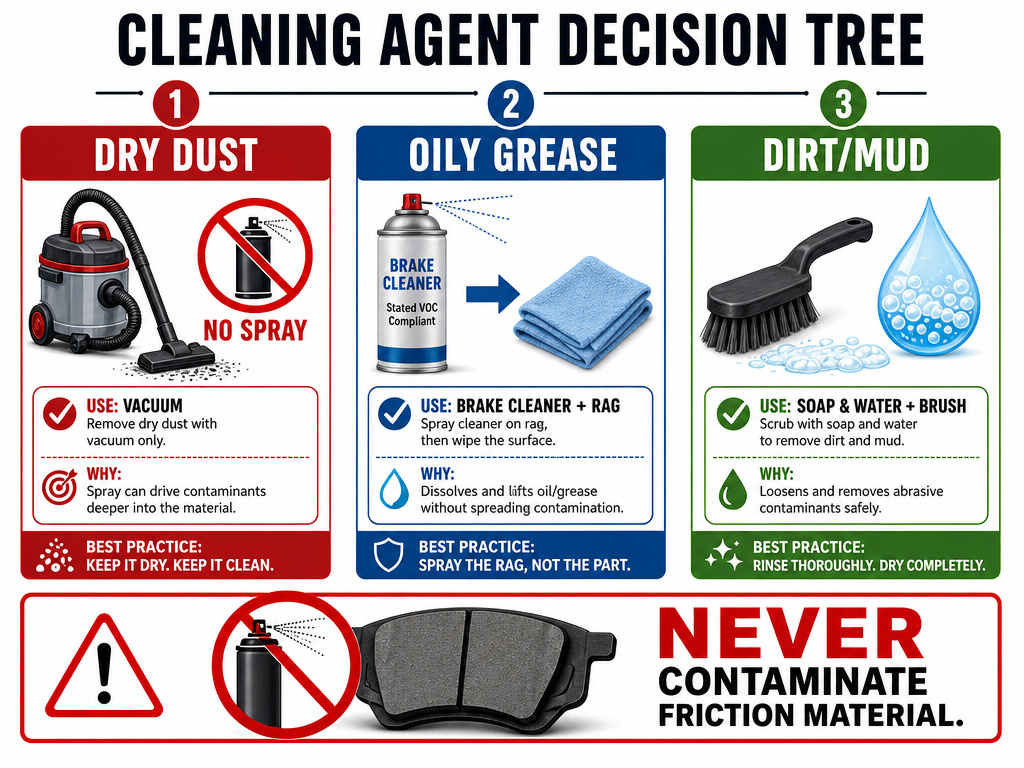
The manufacturer disagreement on cleaners isn’t a minor detail. It’s a core safety conflict. Honda’s vacuum-only rule for dust is about health, brake dust is hazardous to breathe. Their allowance for a “degreasing agent” for oil is vague. Tesla’s mandate for a “Tesla–approved” cleaner is about controlling chemical composition to protect specific seal materials and pad compounds. Shimano’s ban on all commercial sprays likely stems from solvents that can swell rubber seals or leave a film on rotors.
So what do you use? Follow this decision tree:
- Dry, dusty contamination: Use an OSHA-approved vacuum. Full stop.
- Oily, greasy contamination: Check your motorcycle’s service manual. If it says nothing, a high-quality, non-chlorinated brake cleaner is the consensus fallback. Spray it onto a rag or brush, not directly onto the caliper, to avoid soaking the seals.
- General grime (dirt/mud): Soapy water and a brush is often the safest, most universal option. Rinse thoroughly and dry completely to prevent corrosion.
Common mistake: Spraying brake cleaner directly onto a caliper with the pads still installed. The solvent will wash over the friction material, contaminating it and reducing stopping power. Contaminated pads must be discarded.
The golden rule across all manuals: do not contaminate the friction material. Whether you use soap, a branded spray, or just elbow grease, keep it off the pad surfaces. If any cleaner touches the pad, replace it. A contaminated pad will glaze, reduce braking power, and can transfer material onto the rotor, creating an uneven surface.
The Post-Cleanup Must-Do’s: Bedding and Bleeding
Cleaning isn’t the last step. Two critical procedures follow: bedding in the pads and checking for air.
Bedding in is essential if you removed the pads or retracted the pistons. You’ve disturbed the intimate contact between the pad and rotor. To re-establish it, you need a series of moderate stops to transfer a thin layer of pad material evenly onto the rotor. Find a safe, empty road. Perform a series of moderate stops to transfer a thin layer of pad material evenly onto the rotor, allowing time for cooling between stops. Avoid coming to a complete stop or holding the brakes at a standstill during this process. This bedding process ensures maximum stopping power and prevents noise.
Bleeding is required if your brake lever feels soft or spongy after reassembly. Any time you push pistons back, you can stir up air bubbles in the system. The Honda manual is clear: “Once the hydraulic system has been opened, or if the brake feels spongy, the system must be bled.” This isn’t optional. A spongy lever means air is compressing in the lines, drastically increasing stopping distance. Follow a proper step-by-step guide to bleeding motorcycle brakes. You’ll need that fresh, sealed container of DOT 3 or DOT 4 fluid. Never mix fluid types.
After bedding and bleeding, do a final static test. Squeeze the lever hard and hold it for 30 seconds. It should not slowly sink toward the bar. If it does, you have a leak. Check around the caliper pistons and the banjo bolts at the master cylinder.
The Special Case: Electric Vehicles and Aggressive Corrosion
Motorcycle riders in snowy climates already know about salt corrosion. But there’s a twist for electric vehicles, and it’s a warning for any rider whose bike sees little use. Tesla’s technical bulletins highlight a specific risk: regenerative braking.
In an EV, regen handles most slowing down, so the friction brakes are used less frequently and often don’t get hot enough to burn off moisture. Road salt and water sit on the calipers, accelerating corrosion. Tesla’s response includes a “clean and lubricate” procedure. The procedure is aggressive, it includes an escalation from nylon brushes to wire brushes to a brake file, and for severely stuck pads, authorizes the use of an air hammer with a blunt chisel.
The lesson for motorcyclists is straightforward. If you ride infrequently, or only for short trips in wet weather, your brakes never reach the temperature needed to stay dry and corrosion-free. A periodic caliper clean isn’t overkill; it’s preventative maintenance. Look for white, crusty deposits around the piston boots and pad pins. That’s salt.
How to Fix Sticky Brake Pistons
A sticky piston often causes a dragging brake. To address it, first remove the caliper and pads. Work on one piston at a time. Gently press the brake lever to push the piston out a small amount, being careful not to let it pop out completely. Clean the exposed piston surface and the surrounding caliper bore carefully with a cleaning brush and cleaner, avoiding any contamination of the friction material on the pads. Never use an air hose or brush to blow debris around; this can create hazardous dust. If the piston is corroded or pitted, it may need replacement. After cleaning, the piston should retract smoothly when pressed. If the hydraulic system was opened or the brake feels spongy afterward, the system must be bled with fresh fluid from a sealed container.
Frequently Asked Questions
What can I clean brake calipers with?
For dry brake dust, use an OSHA-approved vacuum as specified by Honda. For oily grime, a high-quality brake degreasing agent applied via a rag is the common recommendation, though manufacturers disagree on commercial sprays. Soapy water and a brush is a universal and safe option for general dirt, as it leaves no chemical residue.
Can I use WD-40 to clean calipers?
No. WD-40 is a water-displacing lubricant and penetrant, not a brake cleaner. It will leave an oily film on the brake pads and rotors, severely contaminating them and reducing stopping power. It can also damage rubber seals over time. It has no place in brake service.
Can I spray brake cleaner on caliper pistons?
You can apply brake cleaner to a lint-free cloth and then wipe the piston faces. Avoid spraying it directly onto the pistons, as the stream can force solvent past the piston seals into the hydraulic fluid, and overspray will contaminate the brake pads.
Do I need to bleed brakes after cleaning calipers?
You only need to bleed the brakes if you opened the hydraulic system (disconnected a line) or if the brake lever feels spongy after you’ve reassembled everything and pumped the lever firm. Retracting the pistons can sometimes introduce air, so a post-clean bleed is a good precaution.
The Bottom Line
Cleaning your brake calipers is more about prevention than correction. A 30-minute clean twice a season stops the slow creep of corrosion that leads to a sticky piston and a dragging brake. The method isn’t rigid, clean in place for upkeep, pull them for a cure, but the rules are.
Respect the dust, pick your cleaner based on your manual’s stance, and never let a chemical touch the pad surface. Torque the bolts to spec, with a new ALOC bolt if your manual demands it. Then, bed the pads and test the lever. If it’s soft, bleed it. That sequence turns a maintenance chore into a reliability upgrade. Your brakes are the one system on the bike you absolutely must trust. Keep them clean, and they’ll return the favor.
