
How to Bleed Motorcycle Brakes: With Safety Prep and Specs
This post contains affiliate links. As an Amazon Associate, we earn from qualifying purchases.
To bleed motorcycle brakes, you push old fluid and trapped air out of the hydraulic lines from the caliper up to the master cylinder. For a manual system, you use a wrench, clear tube, and a container of fresh DOT 4 fluid. For motorcycles with Anti-lock Braking Systems (ABS), you often need a manufacturer-specific digital diagnostic tool to cycle the pump and purge air from the hydraulic control unit, a step standard bleeding can miss.
The lever goes soft because air compresses and fluid degrades. That spongy feel isn’t just annoying—it’s extra inches of stopping distance when you need them least. The process isn’t magic, but missing one detail, like a manufacturer’s torque spec or a warning about sealed reservoirs, turns a simple job into a weekend of frustration or a safety hazard. This is why it’s critical to know how to bleed motorcycle brakes correctly.
What follows: the right fluid, the essential safety gear, the two bleeding sequences that actually work in how to bleed motorcycle brakes, and the digital tool requirement that stops most DIYers on modern bikes.
Key Takeaways
- Bleed brakes with fresh DOT 4 fluid from a sealed container; Harley-Davidson mandates its specific Platinum Label fluid, while Honda simply specifies DOT 3 or 4.
- Remove the master cylinder reservoir cap before using any pressure bleeding equipment; a sealed system can pressurize and rupture.
- For ABS-equipped bikes, a manufacturer-specific digital tool like Suzuki’s SDS-II or Harley’s Digital Technician II is often required to purge the hydraulic control unit.
- Tighten caliper mounting screws to 28-38 ft-lbs and pad pins to their specified torque (44-62 in-lbs front, 75-102 in-lbs rear) to prevent uneven pad wear and caliper movement.
- Test brakes at low speed first after any service; avoid hard stops for the first 100 miles (160 km) to properly bed in new pads.
Why Brakes Get Spongy (It’s Not Just Air)
A soft lever tells you the hydraulic system is no longer a solid column of fluid. Air is the usual suspect—it compresses under pressure where fluid does not. But degraded fluid is just as guilty. Brake fluid is hygroscopic, meaning it absorbs moisture from the air through the reservoir vent. Brake fluid should be replaced every two years or if moisture content is 3% or greater. Under hard braking, that wet fluid can vaporize, creating compressible gas pockets in the lines. The result feels identical to an air bubble.
The other culprit is mechanical. A worn master cylinder seal can leak pressure internally. Sticky caliper pistons won’t retract and apply evenly. Neither is fixed by bleeding. If you’ve bled the system twice and the lever still sinks to the bar, the problem is likely hardware, not hydraulics. Start by checking for leaks at fittings and inspecting brake lines, such as braided lines, for bulges.
The Tools You Actually Need
You can start with a basic kit: a box wrench that fits your bleeder valve (usually 8mm or 10mm), a length of clear vinyl tubing, and a clean container. For fluid, you need the correct type. This is where manufacturers disagree.
Harley-Davidson’s service manual explicitly calls for ‘Harley-Davidson Platinum Label DOT 4 Brake Fluid (41800xxx).’ Honda’s manual, by contrast, states ‘Use only DOT 3 or DOT 4 brake fluid from a sealed container’ with no brand mandate.
If you ride a Harley, the choice is made for you. For other brands, a high-quality DOT 4 fluid from a sealed container is a safe bet. You’ll also need shop rags and denatured alcohol for cleanup—Harley’s manual warns against mineral-based solvents like gasoline, which deteriorate rubber seals.
For a faster, one-person job, a vacuum bleeder or a pressure bleeder can be useful. But here’s the critical warning directly from a Harley-Davidson service bulletin:
Where this goes sideways: Using pressure bleeding equipment when the master cylinder reservoir is sealed with its cover and gasket in place. The cover must be removed so the system cannot pressurize. A sealed reservoir under pressure can rupture.
Finally, have a torque wrench on hand. Guessing caliper bolt tightness warps rotors and ruins pads.
Before You Start: The Non-Negotiable Safety Prep
Brake fluid is corrosive. It strips paint on contact and causes serious skin and eye irritation. The factory warnings are not subtle.
Before you start: DOT 4 brake fluid can have serious health effects. Wear nitrile gloves and safety glasses. If fluid contacts skin, rinse immediately with plenty of water for 15-20 minutes. If it gets in eyes, wash for at least 15 minutes under running water and seek medical attention.
Park the bike on a level stand, front wheel straight. Remove any bodywork needed to access the master cylinder reservoir. Have all tools and your container of fresh fluid ready and open. The moment you open the system, you’re on the clock to minimize air exposure.
The Manual Bleeding Sequence (Step-by-Step)
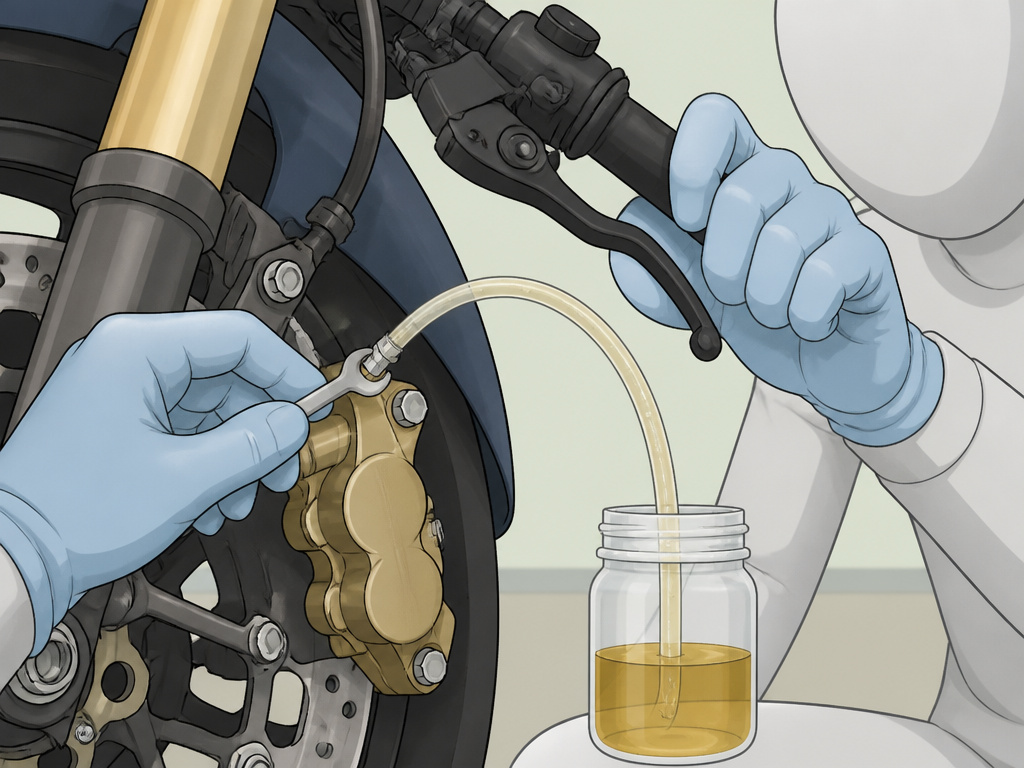
This is one common bleeding sequence (pump-hold-bleed-release). Sources like Honda describe this method, while Suzuki’s recall procedure describes squeezing the lever several times and then, while holding it, opening the bleed valve.
- Fill the Reservoir. Top the master cylinder with fresh fluid until the sight glass is dark. Check the sight glass: it is dark when full and lightens as the fluid level drops. Keep it full throughout the entire process. Letting it suck air means starting over.
- Attach the Tube. Slide your clear tubing onto the caliper’s bleeder valve. Submerge the other end in a jar with an inch of fresh fluid in the bottom. This creates a fluid seal that prevents air from being sucked back in.
- Pump and Hold. Squeeze the brake lever firmly several times and hold it squeezed on the final pump.
- Open, Close, Release. While holding the lever, open the bleeder valve about a quarter-turn with your wrench. You’ll see fluid (and possibly air bubbles) rush into the tube. Close the valve before releasing the lever. Release the lever slowly.
- Repeat and Refill. Repeat steps 3 and 4 until the fluid coming into the tube is clear and free of bubbles. Check the reservoir after every 4-5 pumps and top it off. Never let the fluid level drop so low that air can be drawn into the system.
| Bleeding Order | Rationale | Common Mistake |
|---|---|---|
| Rear Caliper (if single) | Farthest from the master cylinder. | Starting at the front pushes air toward the rear, trapping it. |
| Front Caliper (right side, then left) | On dual-disc setups, start with the caliper farthest from the master cylinder. | Bleeding both sides simultaneously; you can’t monitor fluid flow from two points at once. |
The fluid should be clean and free of bubbles. If it’s dark brown or black, you’re long overdue for a full brake fluid flush. After bleeding, ensure the lever is firm before moving the bike.
Bleeding ABS Systems: The Digital Step
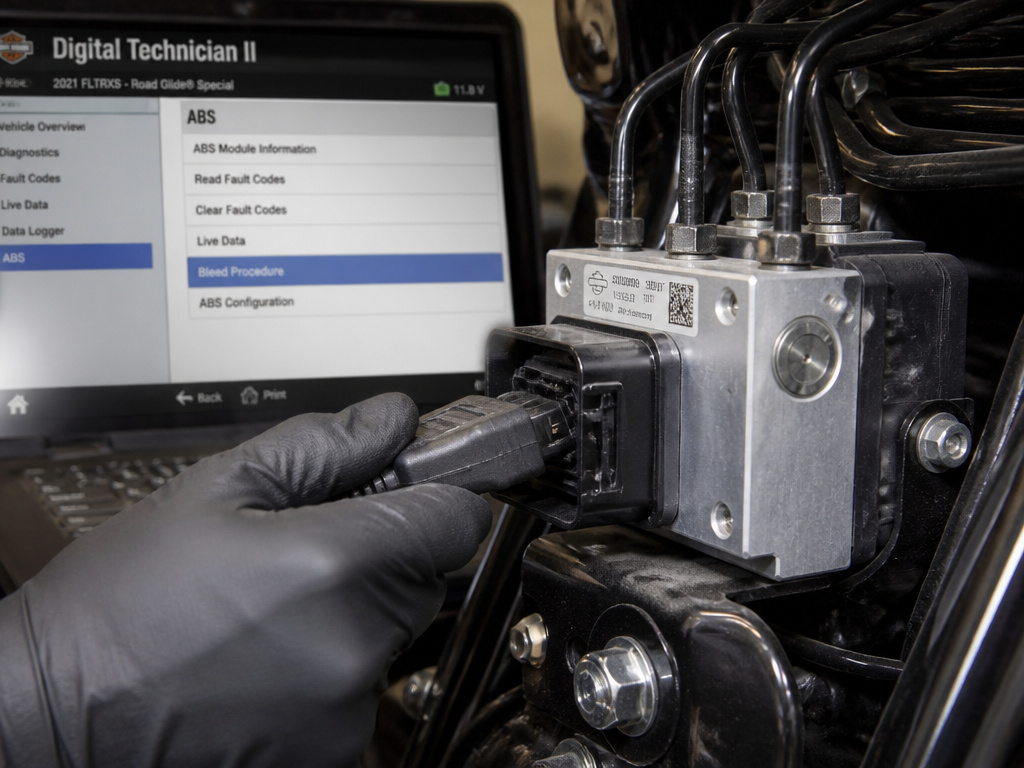
This is where DIY hits a wall. On a modern ABS bike, simply bleeding the calipers often leaves air trapped in the system’s hydraulic control unit (HCU). The HCU has tiny valves and passages that standard bleeding can’t clear.
The official word from manufacturers is clear. A Suzuki recall bulletin for the Hayabusa states: “If difficulty is encountered bleeding air from the brake system, you can use your dealership’s SDS-II Diagnostic Tool to operate the ABS pump motor to help purge air.” Harley-Davidson is even more direct: “When any hydraulic brake component, line or connection is loosened or replaced on an ABS motorcycle, Digital Technician II must be used during the brake bleeding procedure.”
| System | Tool Required | Purpose | Source |
|---|---|---|---|
| Suzuki ABS | SDS-II Diagnostic Tool | Operates ABS pump to purge HCU. | NHTSA safety recall campaign |
| Harley-Davidson ABS | Digital Technician II | Verifies all air is removed after component service. | Harley-Davidson RH1250S Service Manual |
What does this mean for you? If you have the factory tool and software, you follow its guided procedure for how to bleed motorcycle brakes. If you don’t, you have two choices: perform a standard manual bleed and hope for the best (the lever may still feel slightly soft), or take the bike to a dealer for the final HCU purge. For safety-critical work tied to a known defect, like the Suzuki recall, relying on the official NHTSA motorcycle recall notice procedure is the only responsible path.
The Tightening Specs Everyone Misses
Bleeding gets the fluid right, but reassembly gets the hardware right. Overtightening brake parts is as common as under-tightening them.
- Caliper Mounting Screws: 28-38 ft-lbs (38-52 N·m). This is a firm, critical torque. Loose calipers shift; overtightened bolts stretch or strip.
- Brake Pad Hanger Pins: Front: 44-62 in-lbs (5-7 N·m). Rear: 75-102 in-lbs (8.5-11.5 N·m). These are much lighter than caliper bolts. A pin that’s too tight binds the pads, causing drag and uneven wear.
- Brake Line Clamp Fastener: If you’ve replaced a line, the clamp bolt gets 3.4 N·m (30 in-lbs). This is a snug, pinky-finger tightness, not a crank.
Use a torque wrench. Your forearm calibration is not reliable for these values. After tightening, perform a brake caliper maintenance check to ensure the pistons and slides move freely.
After the Bleed: Bedding and Testing
Your job isn’t done when the lever feels firm in the garage. New fluid and pads need a break-in.
- Low-Speed Test: Before hitting the road, roll the bike forward and test the brakes at walking speed. Ensure they engage smoothly and the bike stops straight.
- The Bedding Ride: If you have installed new brake pads, avoid hard stops for the first 100 miles (160 km). Make a series of 8-10 moderate stops from 30 mph, allowing the brakes to cool between each. This transfers a thin layer of pad material onto the rotor, maximizing friction and preventing glaze.
- Final Check: Listen for any new noises. A faint, smooth scraping is normal pad contact. Any grinding or metallic screech means something is wrong—likely a pad issue or a sticking caliper. If the lever ever feels spongy again, you may have a lingering air bubble or a failing component.
If you’ve just installed new pads, following a specific brake pad bedding procedure is better than just taking it easy. The goal is even, predictable bite.
Frequently Asked Questions
Can I use any DOT 4 brake fluid?
Not exactly. All DOT 4 fluids meet a minimum boiling point standard, but manufacturers can have specific additives. Harley-Davidson requires its branded Platinum Label fluid. Most other brands (Kawasaki, Yamaha, Honda) approve any fresh DOT 3 or DOT 4 from a sealed container. Using the wrong fluid won’t cause immediate failure, but it voids warranty and may not play well with your bike’s specific seals long-term. When in doubt, check your owner’s manual or a guide to brake fluid comparison.
How do I know if my brake fluid is bad?
Check the color in the reservoir. Fresh fluid is clear with a slight yellow tint. Dark amber or brown means it’s oxidized and saturated with moisture. You can also test moisture content with an electronic tester; Harley specifies replacement at 3% moisture content, which typically happens around the two-year mark regardless of mileage.
Why is my brake lever still spongy after bleeding?
Persistent sponginess usually points to air trapped in a high point of the system (like an ABS unit), a worn master cylinder that’s leaking pressure internally, or a slightly warped rotor that’s pushing the pads and pistons back. If you have a non-ABS bike and you’ve bled it correctly, the master cylinder is the next suspect. Here’s a deeper guide on how to diagnose a spongy brake lever.
Can I bleed brakes by myself?
Yes, the manual method is a one-person job with the tube-in-bottle technique. Pressure bleeders and vacuum pumps also let you work solo. The complexity comes with ABS systems, which may require a second person to operate the brake lever while you manipulate a diagnostic tool, or simply require dealer equipment.
What’s the difference between bleeding and flushing?
Bleeding removes air from the system. Flushing replaces all the old fluid with new. A flush is essentially an extended bleed where you keep pushing new fluid through until what comes out is as clean as what’s going in. For a complete brake fluid change guide, a flush is the recommended procedure every two years.
The Bottom Line
Bleeding motorcycle brakes is a straightforward mechanical task hijacked by modern electronics. For a classic bike, it’s a 30-minute job with a wrench, a tube, and the right DOT 4 fluid. For any bike with ABS made in the last decade, assume you’ll need a factory scan tool to finish the job properly. That’s the line: non-ABS, do it tonight. ABS, do the manual bleed but be ready to visit a dealer with the right computer if the lever isn’t rock-solid.
Your takeaway isn’t the steps—it’s the specs. The 3% moisture rule, the 30 in-lbs on a line clamp, the mandate to remove the reservoir cap before pressure bleeding. Those numbers are what the manual actually says, and they’re the difference between a brake job that lasts and one that fails quietly. When the manual and a forum post disagree, trust the manual. Then go test it at walking speed before you trust it at sixty.
