
How to Change Motorcycle Brake Pads: Step-by-Step
This post contains affiliate links. As an Amazon Associate, we earn from qualifying purchases.
Changing motorcycle brake pads requires removing the caliper, pushing the pistons back, installing new pads with correct orientation, and torquing all fasteners to spec. The critical wear limit varies; Harley-Davidson specifies 1.0 mm in one manual and 1.6 mm in another, while Ducati specifies about 1 mm. Front and rear caliper designs differ — a Harley-Davidson rear caliper uses a pad pin, while some front calipers use a spring-clip and mounting plate.
The process sounds universal, but the manuals from Harley-Davidson and Ducati show two different realities. One procedure has you loosen a pin and use a drill bit as a temporary retainer. The other tells you to disassemble a spring-clip assembly where getting the loop direction wrong means starting over. This is why it’s crucial to consult your specific manual when learning how to change motorcycle brake pads.
What follows is the step-by-step that matches the manual for how to change motorcycle brake pads, not the generic blog post. This guide details the two wear limits Harley-Davidson publishes, the exact torque for pad pins and reservoir screws, and the orientation mistake that locks a caliper.
Key Takeaways
- Replace pads when friction material is at 1.0 mm or less, but check your manual — some Harley-Davidson models specify 1.6 mm.
- Always torque the pad pin to 131-173 in-lbs (14.7-19.6 Nm). For reservoir screws, Harley-Davidson sources specify different torques: one says 9-17 in-lbs (1.0-2.0 Nm) for cover screws, another says 0.7–0.9 N·m (6–8 in-lbs) for reservoir screws.
- Bed in new pads with gentle braking for the first 100 miles (160 km) to transfer material evenly to the disc.
- The rear caliper pad spring has a specific orientation; installing it backwards prevents the pad pin from seating.
- If the brake lever feels spongy after the job, the system likely needs a brake fluid flush to remove air introduced when retracting the pistons.
The 1.0 mm Rule That Decides It
You do not change pads based on a date or a hunch. You measure.
Replace brake pads if brake pad friction material on either the front or rear caliper is worn to 0.04 in (1.0 mm) or less above the backing plate. – Harley-Davidson Service Manual
That 1.0 mm is not a suggestion. It is the point where the steel backing plate is one hard stop away from contacting the rotor. Metal-on-metal grinding scores the disc, often requiring a costly replacement, and your braking power drops sharply.
Here is where it gets interesting. Another Harley-Davidson manual for different models says 0.063 in (1.6 mm). Ducati’s manual says to change pads if friction material thickness is about 1 mm. So which is right? Both. Your bike’s specific service manual holds the final answer. When in doubt, use the more conservative 1.0 mm limit.
| Manufacturer | Wear Limit (Friction Material) | Source |
|---|---|---|
| Harley-Davidson (Common) | 0.04 in (1.0 mm) | Service Manual 1874956595742416259 |
| Harley-Davidson (Specific Models) | 0.063 in (1.6 mm) | Service Manual 1874979049449432449 |
| Ducati | ~1 mm | Diavel Service Manual |
How do you check it? Some calipers have inspection windows. Others require you to look from the back or even remove the wheel for a clear view. A small ruler or a dedicated brake pad wear gauge is more accurate than eyeballing it. If one pad in a caliper is at the limit, replace both pads on that axle. Never replace just one.
Tools and Supplies You Actually Need
Skip the all-in-one “motorcycle tool kit.” You need a few specific items.
- Hex Keys or Sockets: To remove caliper mounting bolts and pad pins. Sizes vary by bike.
- Torque Wrench (in-lbs and ft-lbs): Non-negotiable. Caliper bolts and pad pins have precise torque values. Guessing strips threads or leaves things loose.
- Needle-Nose Pliers or Forceps: For handling small clips and springs.
- C-Clamp or Piston Press Tool: To gently retract the pistons back into the caliper bore.
- Clean Shop Towels and Brake Cleaner: For wiping down the caliper and rotor. Never use compressed air—it blows grime into the piston seals.
- New Brake Pads: A full axle set. Refer to our guide on choosing brake pads for compound advice.
- Brake Fluid: DOT 4 or DOT 5, as specified in your owner’s manual. They are not interchangeable.
Wear safety glasses and nitrile gloves. Brake fluid is corrosive. Harley-Davidson’s manual warns that contact with DOT 4 fluid can cause serious injury, and it strips paint instantly.
Before You Start: The Two Critical Safety Steps
Before you start: 1) Do not pull the brake lever with the caliper removed or the pads out. The piston will shoot out, requiring a full rebuild. 2) Brake fluid damages paint and eyes. Cover your tank and fender with a towel, and wear eye protection.
First, prop the bike up securely on a stand so the wheel spins freely. Remove the wheel if your bike’s design requires it for caliper access.
Second, open the brake fluid reservoir cap on the handlebar (front) or near the rear master cylinder. Lay a clean towel underneath. As you retract the pistons later, fluid will be displaced back up the line and can overflow. The Harley manual notes fluid may rise more than 1/4 inch (6.4 mm) below the reservoir top, requiring removal.
The Front vs. Rear Procedure Split
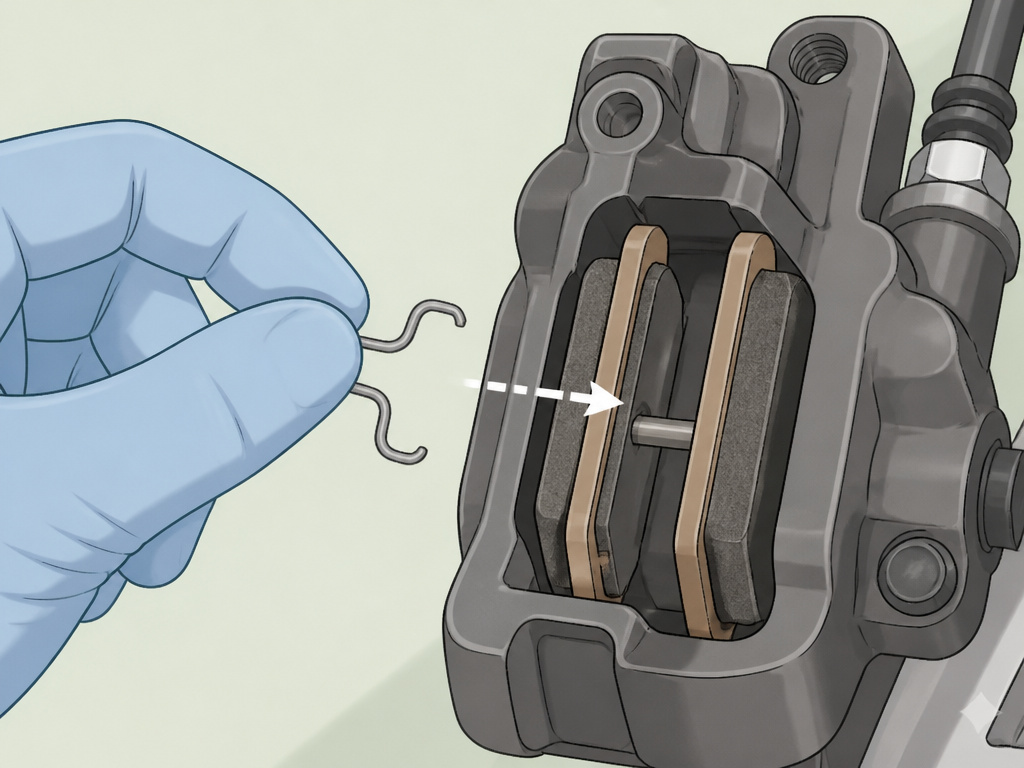
This is where generic guides for how to change motorcycle brake pads fail. Front and rear calipers often have different retention methods. Getting it wrong means the pad pin won’t go in or the pads won’t sit flat.
Most common front calipers on Japanese and European bikes are sliding-pin designs. You remove two bolts, slide the caliper off the rotor, then push out the pad retaining pins. Some Harley-Davidson front calipers use a spring-clip and mounting plate system that must be assembled in a precise order.
The rear brake often has a simpler pin-retained design, but with a critical twist: a small, curved pad spring that sits between the pads. The Harley manual emphasizes this spring’s orientation must match its diagram. If it falls out or is installed backwards, the pads won’t align and the pin binds.
Common mistake: Assuming front and rear pads are identical. The Harley-Davidson manual explicitly states the rear brake caliper does not use the same brake pad set as the front left and front right calipers.
When in doubt, take a phone picture before disassembling anything. That photo of the spring’s curve and which way the pad tabs point is your cheat sheet for reassembly.
Step-by-Step: The Pin-Type Caliper (Common Rear)
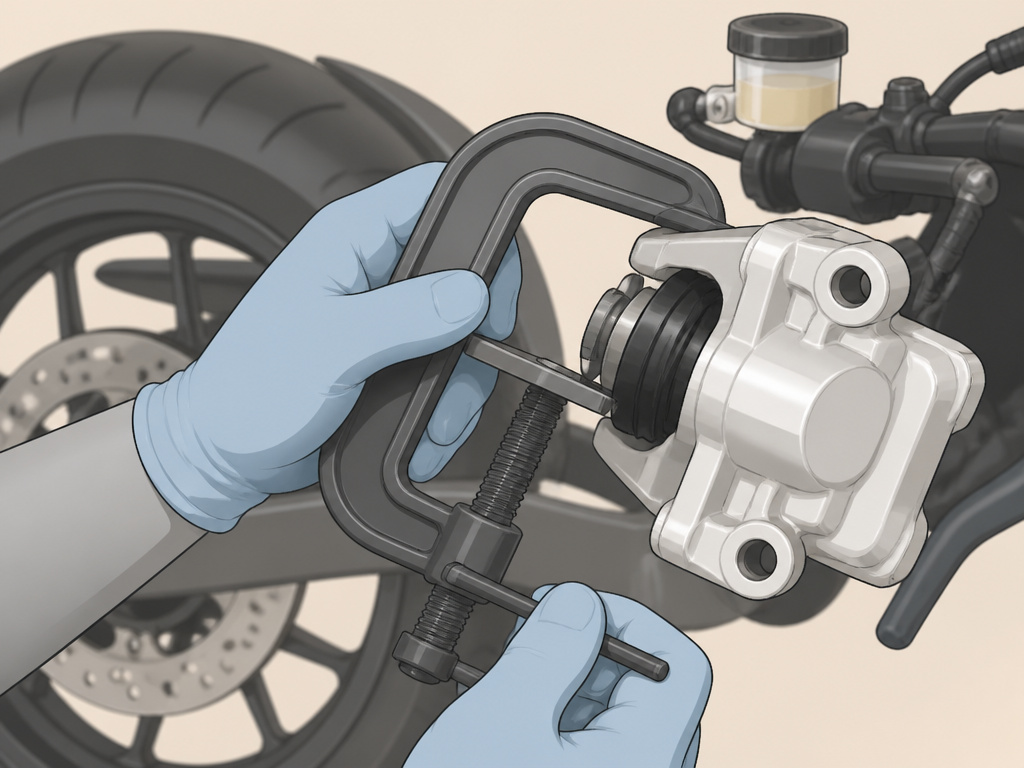
This procedure follows the Harley-Davidson manual for a typical pin-retained caliper, common on many rear brakes.
- Retract the Pistons: Before removing the pads, use a C-clamp or piston press tool to gently push the pistons back into their bores. Do this slowly. Watch the reservoir to prevent overflow.
- Remove the Pad Pin Plug: Find the small Allen-head plug on the outside of the caliper. Remove it.
- Loosen the Main Pad Pin: Loosen the main pad pin a few turns but do not remove it yet. The manual warns that removing it completely now can make reassembly difficult.
- Remove the Outer Pad: Once the pistons are retracted, pull the pad pin out just enough to release the outer pad. Let the pad drop out and note its orientation.
- Install the New Inner Pad: Slide the new inner pad into place, ensuring its front mounting tab is seated in the retainer clip in the mounting bracket. The friction material faces the rotor.
- Remove the Old Outer Pad: Hold the new inner pad in place, then pull the pad pin out completely and remove the old outer pad.
- Install the New Outer Pad & Secure: Insert the new outer pad. This is a pro trick that gives you two free hands.
- Inspect and Install the Pad Pin: Check the pad pin for grooves. Harley’s limit is wear over 0.011 in (0.28 mm). Remove the drill bit, press the pads firmly against the caliper pad spring, and insert the pin. Torque it to 131-173 in-lbs (14.7-19.6 Nm).
- Reinstall the Plug: Torque the small pad pin plug to 18-25 in-lbs (2.0-2.9 Nm).
Step-by-Step: The Spring-Clip Caliper (Some Fronts)
For some Harley-Davidson front calipers, the pad is part of a spring-clip and mounting plate assembly. The manual is meticulous here.
- Remove the Caliper: Unbolt the caliper from the fork leg or mounting bracket.
- Retract the Piston: Pry between the old pad and rotor to push the piston back.
- Disassemble the Pad Assembly: Remove the retainer screw, pad retainer, and inner pad. Then, remove the outer pad, spring clip, and mounting plate as one unit.
- Reassemble the New Outer Pad: Lay the mounting plate flat. Install the spring clip at the top. Press the new outer pad (the one with an insulator backing) onto the spring clip until it snaps firmly in place.
- Mind the Orientation: The manual has a hard rule: “The spring clip loop and friction material must always face away from the piston.” If this is wrong, you must remove the pad, reverse the mounting plate, and start over.
- Install the Inner Pad: Place the inner pad (no insulator) into the caliper’s recess. Position the pad retainer and install the self-tapping retainer screw. Torque it to 4.5–5.6 N·m (40–50 in-lbs).
- Remount the Caliper: Bolt the caliper back to the fork. Torque the mounting screws to 34–41 N·m (25–30 ft-lbs).
The Torque Table That Prevents Comebacks
Guessing on torque is how calipers come loose or threads get stripped. These numbers come straight from the factory manuals.
| Fastener | Torque Specification | Notes |
|---|---|---|
| Caliper Mounting Screws | 34–41 N·m (25–30 ft-lbs) | Harley-Davidson / Ducati specifies a torque for rear brake caliper retaining screws. |
| Pad Pin | 131-173 in-lbs (14.7-19.6 Nm) | Critical for pad alignment |
| Pad Pin Plug | 18-25 in-lbs (2.0-2.9 Nm) | Small but important seal |
| Reservoir Cover Screws | 9-17 in-lbs (1.0-2.0 Nm) | Over-tightening strips plastic threads |
| Self-Tapping Retainer Screw | 4.5–5.6 N·m (40–50 in-lbs) | For specific spring-clip calipers |
Use a torque wrench calibrated in the correct range. An inch-pound wrench for the small screws, a foot-pound wrench for the caliper bolts.
When Things Don’t Go to Plan: Stuck Pins and Pistons
The pads are worn, but the pin won’t budge. This is where riders reach for the hammer. Don’t.
First, apply a penetrating oil like PB Blaster to both ends of the pin and let it soak for 15 minutes. Then, use a correctly sized hex key and a hand-impact driver. A few sharp taps with a hammer on the impact driver usually breaks the corrosion free without rounding the Allen head.
If a piston is stuck and won’t retract evenly, you likely have corrosion or debris in the seal. Before forcing it, try cleaning the calipers with a dedicated brake cleaner and a soft brush. If one piston moves and the other doesn’t, you may need a caliper rebuild kit—a sign the brake system needs more thorough maintenance.
Where this goes sideways: Forcing a stuck piston with excessive clamp pressure. You can crack the piston or damage the caliper body, turning a $50 pad job into a $300 caliper replacement.
After any struggle with pistons, it’s wise to bleed the brakes to ensure no air entered the system. A spongy lever afterwards is the telltale sign.
After Installation: Bedding In and Final Checks
You have torqued everything. The pads are in. Now, the most critical phase begins.
- Pump the Lever: Before rolling the bike, pump the brake lever or pedal several times to move the pistons out and take up the slack. You should feel firm pressure build.
- Visual Check: Look through the caliper to ensure the new pads are centered on the rotor and not dragging excessively.
- Bedding In: Ride at low speed in a safe area. Apply the brakes gently from 30 mph to 10 mph a dozen times. Avoid coming to a complete stop or overheating the pads. This process transfers a thin layer of pad material onto the rotor, which is essential for optimal braking power and noise prevention. Ducati explicitly advises gentle use for the first 100 km.
- Rotor Check: While you are down there, inspect your motorcycle’s brake rotors. For Harley-Davidson, the maximum brake disc lateral runout and warpage is 0.008 in (0.2 mm) when measured near the outside diameter. A warped rotor will cause a pulsating brake lever.
If the brake lever feels soft or spongy brake feel persists after bedding, you likely have air in the line and need to bleed the system.
How to clean the brake rotor
Before installing new pads, clean the brake disc thoroughly. Any grease, oil, or brake fluid on the friction surface will contaminate the new pads and ruin braking performance. Use a clean rag and a brake cleaner spray designed for this purpose. Wipe the entire disc surface, including the area swept by the pads. Do not use compressed air to dry it, as this can blow contaminants back onto the clean surface. Allow it to air dry completely. Inspect the disc for deep grooves or scoring. While the disc is off, also check for excessive lateral runout or warpage as specified by your motorcycle’s manual, as this can cause pulsation and uneven pad wear.
Frequently Asked Questions
Is it easy to change brake pads on a motorcycle?
With the right tools, a service manual, and patience, it is a straightforward intermediate job. The complexity comes from varying caliper designs and the absolute necessity of correct torque and orientation. If you are uncomfortable retracting pistons or torquing small fasteners, have a shop do it.
Can I replace just one brake pad?
No. Always replace both pads on the same caliper as a set. Uneven pad material leads to unbalanced braking, increased rotor wear, and potential pulling to one side.
What is the 70/30 brake rule for motorcycles?
It’s a general guideline that 70% of your stopping power should come from the front brake and 30% from the rear. This influences pad wear—front pads typically wear out faster than rears. Understanding pad compound types helps you match pads to this usage.
My brakes squeal after changing pads. Did I do something wrong?
Not necessarily. Some noise during the initial bedding-in period is normal. Persistent loud squealing can indicate contamination (clean the rotor with brake cleaner), a missing anti-squeal shim, or a pad compound that doesn’t agree with your rotor. Ensure everything is torqued properly, as loose components vibrate and squeal.
How often should I change my motorcycle brake fluid?
Annually, or every two years at the absolute maximum. Brake fluid is hygroscopic, meaning it absorbs moisture from the air. This lowers its boiling point and promotes internal corrosion. A brake fluid flush is the single most underrated maintenance item for consistent brake feel.
The Bottom Line
Changing your own brake pads saves money and teaches you the anatomy of your bike’s most critical safety system. The job is less about force and more about precision: the 1.0 mm measurement, the 131 in-lbs on the pad pin, the specific curl of the pad spring.
Trust the factory manual over any online summary. If your manual gives two wear limits, use the stricter one. And never skip the bedding-in process—those first 100 miles of gentle stops determine the long-term performance and noise level of your new brake pad bedding process. When done right, the only thing you’ll feel is a firmer lever and more confident stops.
