
How to Shift Gears on a Motorcycle: Step-by-Step
This post contains affiliate links. As an Amazon Associate, we earn from qualifying purchases.
To shift gears on a motorcycle, you must coordinate the clutch, shift lever, and throttle. The universal pattern is “1 down, 5 up”: press down for first gear, lift up for neutral and the higher gears (second through fifth or sixth). For an upshift, methods vary: Polaris and Ducati advise closing the throttle, while Harley-Davidson recommends partially opening the throttle before clutch release to prevent engine drag. Downshifting techniques vary: Polaris advises simultaneously pulling the clutch and closing the throttle, while Ducati recommends releasing the throttle, pulling the clutch, blipping the throttle, then shifting and releasing the clutch.
That coordination is the physical skill, but the when and how are dictated by your bike’s manual. Manufacturers don’t agree on a single set of shift speeds or throttle techniques. A Harley-Davidson manual says to partially open the throttle before releasing the clutch on a downshift, while Polaris instructs you to close it completely. One Harley model says shift from third to fourth at 35 mph; another says 40 mph. The best way to learn how to shift gears on a motorcycle is to consult your specific owner’s manual.
These aren’t mistakes. They’re model-specific engineering decisions. Your job is to know your bike’s manual and understand the mechanical reasons behind the steps, so you can adapt when the road throws you a curve, literally.
What follows: the core four-step sequence, a breakdown of why each control matters, the real shift speeds from factory manuals, and how to handle the exceptions that beginner guides skip.
Key Takeaways
- The clutch must be fully disengaged before every shift. A partial pull causes grinding and wears the transmission.
- Shift based on feel and sound, not just speed. The factory speed tables are safe recommendations, but lugging (too low RPM) or over-revving (too high RPM) the engine feels and sounds wrong.
- Downshift before the corner, not in it. Shifting mid-corner can upset the bike’s balance and cause a loss of traction, especially in wet conditions.
- Find neutral before shutting off the engine. Shifting gears with the engine stopped can damage the shift mechanism.
- Electronic aids change the rules. A quickshifter allows clutchless upshifts, and a bike like the Honda DCT has no clutch lever at all.
The Basic Shifting Sequence: Clutch, Shift, Throttle
You have three controls to manage. Your left hand works the clutch lever. Your left foot operates the shift lever. Your right hand controls the throttle. The dance between them for how to shift gears on a motorcycle is simple once you break it down.
First, memorize the gear pattern. It’s almost always the same: one press down from neutral to first gear. Then, a half-lift up from first to find neutral (often indicated by a green “N” light on your dash). From neutral, a full lift up clicks into second gear. Subsequent lifts take you to third, fourth, fifth, and sometimes sixth. It’s called a “1 down, 5 up” pattern. If you’re ever lost, gently tap the lever down until it won’t go further, that’s first gear.
A proper shift fully disengages the clutch, moves the gear lever decisively to its stop, and smoothly re-engages the clutch while applying throttle. Rushing the clutch release is the single biggest cause of a jerky, lurching shift.
Now, for the step-by-step. We’ll begin by moving off from a stop.
- Start in Neutral. Squeeze the clutch lever all the way to the handlebar. Press the shift lever down firmly to its stop. You are now in first gear.
- Ease Out the Clutch. Very slowly release the clutch lever. You’ll feel the bike begin to pull forward, this is the friction zone. As you feel the engagement, gradually open the throttle with your right hand.
- Release and Accelerate. Once the clutch is fully out and you’re moving, continue applying throttle to accelerate.
The launch is the hardest part. It requires fine clutch control. Stalls often happen if the throttle isn’t opened sufficiently as the clutch engages.
When to Shift: RPM, Speed, and Feel
When should you shift up? Your ears and seat will tell you before any manual. The engine note rises from a low grumble to a busy whine. You feel the vibrations increase through the pegs and seat. That’s your cue. Shifting too early (“lugging”) strains the engine. Shifting too late can lead to excessive engine speed and reduced efficiency.
Manufacturers provide speed tables as a safe beginner guide. The problem is that they don’t agree. This table shows the conflict.
| Gear Change | Harley-Davidson (Source 1) | Harley-Davidson XB Model (Source 3) | Honda VFR1200 DCT (Source 4) |
|---|---|---|---|
| 1st -> 2nd | 15 mph (25 km/h) | 15 mph (25 km/h) | 16 mph (25 km/h) |
| 2nd -> 3rd | 25 mph (40 km/h) | 25 mph (40 km/h) | 22 mph (35 km/h) |
| 3rd -> 4th | 35 mph (55 km/h) | 40 mph (65 km/h) | 28 mph (45 km/h) |
| 4th -> 5th | 45 mph (70 km/h) | 50 mph (80 km/h) | 34 mph (55 km/h) |
See the difference for third to fourth gear? One Harley manual says 35 mph, another for a different model says 40 mph, and the Honda DCT shifts at 28 mph. The Honda VFR1200XD/XDA’s shift points are specific to its automatically controlled transmission design. The Harley XB model likely has a different power band, demanding a higher shift point.
The part nobody mentions: These tables are for level ground, under light acceleration. Add a passenger, a hill, or a headwind, and you need to shift later. The tables are a starting point, not a law.
The Upshift and Downshift Playbook
Now we will examine each type of shift. The actions for how to shift gears on a motorcycle are mirrors of each other, but the consequences for getting them wrong are different.
How to Upshift Smoothly
An upshift moves you to a higher gear (e.g., 2nd to 3rd) for faster cruising. The goal is a seamless transfer of power.
- Prepare the Throttle. Methods vary: Polaris and Ducati instruct to close the throttle, while Harley-Davidson recommends partially opening it before clutch release to prevent engine drag.
- Pull in the Clutch. Squeeze the clutch lever to the bar. For some manufacturers, like Polaris, this is done simultaneously with closing the throttle.
- Lift the Shift Lever. Use your left foot to lift the gear lever firmly up to its stop. Don’t tap it; a positive motion ensures the gear engages.
- Release and Roll On. Smoothly release the clutch lever while you gradually reopen the throttle.
Where this goes sideways: Releasing the clutch too fast after the shift. The engine speed (RPM) in the higher gear needs to match the slower wheel speed. A fast release can cause a jerky shift as the engine and transmission speeds synchronize abruptly. A smooth release allows the clutch plates to slip gently for synchronization.
How to Downshift Safely
Downshifting is for slowing down or preparing to accelerate, like before a pass. It’s where the most serious warnings apply, because a bad downshift can lock the rear wheel.
- Pull in the Clutch. Squeeze the clutch lever in.
- Press the Shift Lever Down. Use your foot to press the lever to its stop.
- “Blip” the Throttle. This is the critical step. As you’re moving the lever, quickly twist the throttle open slightly and then closed. This raises the engine RPM to match the higher RPM required for the lower gear.
- Release the Clutch. Smoothly let the clutch lever out.
Common mistake: Downshifting at too high a road speed. Harley-Davidson’s manual warns this can cause the rear wheel to lose traction and lead to a crash. Always reduce your speed before selecting a lower gear.
This rev matching technique prevents the rear tire from chirping or skidding. When you shift down, the engine must spin faster. If you don’t “blip” to raise the RPM, the engine drags the rear wheel speed down as the clutch engages. On a wet road, that can increase the risk of losing traction.
Neutral, Stopping, and Troubleshooting

Finding neutral can feel like a secret handshake for new riders. It’s a narrow spot between first and second gear.
With the bike running and stopped, squeeze the clutch. From first gear, lift the lever very gently, just a soft, half-hearted nudge up. If you push too hard, you’ll go straight into second. The green “N” light on your dash should glow. If it doesn’t catch, rock the bike slightly forward or backward while applying light pressure to the lever.
Always shift to neutral before turning off the engine. The Michigan Secretary of State motorcycle manual and every factory manual agree: forcing the gear mechanism to move without the engine running can damage internal parts.
What about when things go wrong?
- Grinding Noise When Shifting: You didn’t pull the clutch in all the way. The clutch must be fully disengaged. Check your cable adjustment or hydraulic fluid level.
- Bike Lurches or Jerks: You’re releasing the clutch too abruptly. Focus on a smoother, slower release, especially when starting from a stop.
- Can’t Find a Gear at All: You might be between gears. Roll the bike forward or backward a few inches while gently holding pressure on the shift lever.
- Bike Feels “Bogged Down” After a Shift: You shifted up too early. Downshift to a lower gear to get the RPM back into a power band.
These are the mechanical fixes. The real fix is practice in a parking lot. Drill the friction zone until you can inch the bike forward without using the throttle at all. Then practice upshifts and downshifts while rolling at 20 mph.
When the Standard Rules Don’t Apply
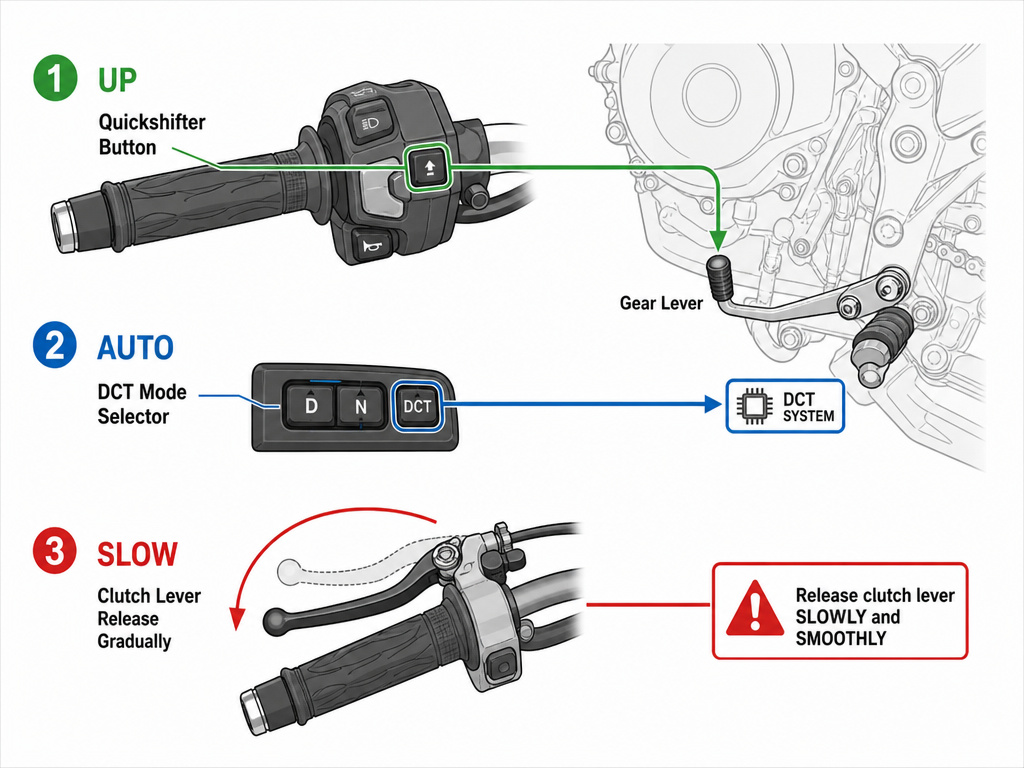
Motorcycle technology has created exceptions to the clutch-and-throttle ballet. Knowing them keeps you from fighting your own bike.
Quickshifters and DQS: Bikes like the Ducati Multistrada V4 have a Ducati Quick Shift (DQS) system. When you’re accelerating, you can upshift without using the clutch at all. Just keep the throttle open and lift the shift lever. The computer cuts ignition for milliseconds to unload the transmission. It is primarily designed for upshifts under acceleration. Understanding what a motorcycle quickshifter is helps you use it instead of being confused by it.
Automatic Transmissions (DCT): The Honda VFR1200XD has a Dual-Clutch Transmission. There is no clutch lever. You shift with buttons on the handlebar or let it shift automatically. The “shift points” in the table earlier are just the computer’s programmed points. Your role is to select the desired mode or gear; the system operates the clutch automatically.
Low-Traction Downshifts: The Polaris manual has a specific warning for rain, gravel, or snow: “Release the clutch lever very gradually in these conditions.” A smooth clutch release is always important, but on slick pavement, it is critically important to avoid loss of traction.
Downshifting in Corners: This is a firm “don’t.” The Polaris manual states it plainly: “Avoid downshifting in a curve. Downshift before entering the curve.” Shifting mid-corner can upset the chassis balance and cause a sudden change in drive to the rear wheel, breaking traction. Get your braking and downshifting done while the bike is upright and straight.
How to Downshift to a Stop
As you slow down for a stop, you must downshift through the gears to match your decreasing speed. Do not wait until you are nearly stopped to shift all the way down to first gear. Reduce your speed before each downshift and only shift to a lower gear when your speed is within the recommended range for that gear. Shifting to a lower gear at too high a speed can cause the rear wheel to lose traction. As you come to a complete stop, you will be in first gear. Before stopping the engine, shift the transmission into neutral. As Harley-Davidson notes, shifting gears while the engine is stopped can damage the shifting mechanism.
Frequently Asked Questions
What does “1 down, 5 up” mean?
It’s the standard motorcycle gear pattern. From neutral, you press the shift lever down once to engage first gear. To shift up, you lift the lever: a small half-lift finds neutral (between 1st and 2nd), and a full lift engages second gear. Subsequent full lifts engage third, fourth, fifth, and sometimes sixth gear.
Can you shift gears without using the clutch?
You can, but it’s an advanced technique that risks damaging components if done incorrectly. Some modern bikes have electronic quickshifters that allow seamless, clutchless upshifts under acceleration by momentarily cutting ignition. For clutchless downshifts or on bikes without a quickshifter, it requires precise matching of engine and wheel speed and is not recommended for street riding.
Why does my motorcycle jerk when I shift?
Jerky shift is almost always caused by releasing the clutch lever too quickly after the gear engages. The engine speed (RPM) needs to match the new gear’s ratio. Releasing the clutch smoothly allows the plates to slip slightly and synchronize the speeds gently. Jerkiness can also come from not rolling off the throttle completely before pulling in the clutch.
What gear should I be in when stopping?
As you slow down, downshift through the gears to match your speed. Aim to be in first or second gear by the time you come to a complete stop. Once fully stopped, you can shift down to first or search for neutral. Never coast to a stop in a high gear, as you may not be in the correct gear to accelerate if needed.
Is it bad to hold the clutch in while stopped?
It’s fine for short stops, but it’s better to shift into neutral and release the clutch lever. Holding the clutch in for extended periods can increase wear on clutch components.
Before You Go
Here is the honest take. The steps are simple. The coordination takes a weekend in a parking lot to feel natural. The real skill, the one that keeps the bike feeling crisp for years, is understanding the why behind each step. You pull the clutch fully to prevent grinding metal. You blip the throttle on a downshift to save your tire and your transmission. You find neutral before shutdown to avoid potential damage to the shift mechanism.
So grab your bike’s owner’s manual, the actual book or PDF from the manufacturer. Find the shift speed table and the warnings. They wrote it for your specific model. Then, go practice. Start with the primary controls in a safe lot. Drill the friction zone until it’s muscle memory. The confidence that comes from a perfect, seamless shift is worth every minute.
