
Motorcycle Gear Checklist for Beginners: Step-by-Step
This post contains affiliate links. As an Amazon Associate, we earn from qualifying purchases.
A motorcycle gear checklist for beginners starts with six items: helmet, jacket, gloves, boots, pants, and armor. The order matters, your hands hit the ground first, so gloves are more urgent than a flashy jacket. Every piece needs a specific safety certification: DOT or ECE 22.05 for helmets, EN 17092 for jackets and pants. Gear guides argue armor should be certified to EN 1621, while OEM manuals emphasize protective clothing but do not mandate certified armor inserts. Standard denim shreds in 0.6 seconds.
That 0.6-second figure is the pivot. It turns a shopping list into a survival kit. You are not buying clothes; you are buying time between your skin and the asphalt.
What follows is a step-by-step build. We walk through each of the six items, the certifications that are not just marketing, and the single most common mistake that voids your protection before you even start the engine.
Key Takeaways
- Buy gloves before a jacket. Your instinct to catch a fall makes hands the first point of impact, and road rash on palms ends careers.
- A helmet must have a safety-standard certification label inside; for the USA, Honda owner’s manuals direct riders to look for the DOT certification label. The DOT sticker is the legal minimum in the U.S., but ECE 22.05 is a more rigorous global standard.
- Regular jeans last 0.6 seconds in a slide. Certified motorcycle pants (EN 17092 AA or AAA) are the only fabric that buys you meaningful abrasion time.
- Gear fit is a safety feature. If a jacket is loose, its armor can move away from your elbow before an impact. A perfect-fitting mid-price item protects better than a loose premium one.
- Perform the MSF T-CLOCS pre-ride inspection before every ride.
The Helmet: Your Non-Negotiable First Layer
A motorcycle helmet is a single-use energy management system. Its outer shell distributes impact force, while the crushable EPS foam liner inside decelerates your head before it contacts your skull. Certification labels (DOT, ECE, Snell) verify it has passed standardized impact, penetration, and retention tests.
The certification label is the only thing that matters on day one. In the U.S., the Department of Transportation (DOT) standard is the legal minimum. Honda owner’s manuals direct American riders to look for that DOT label.
But sources disagree on what “adequate” means. Gear reviewers consistently call the DOT standard a baseline. They point to the ECE 22.05 (and newer 22.06) standard as more rigorous, with stricter testing for chin bar integrity and peripheral vision. The Snell Memorial Foundation certification is another tier, often sought for track use. My stance? If your budget allows, step up to an ECE 22.05 certified helmet. The testing protocol is simply better.
Fit is where most beginners waste money. A helmet should be snug, with no rotation when you grip the chin bar and try to twist it. Your cheeks should be compressed, but not painfully. After some time, that pressure often relaxes as the interior liner conforms.
Common mistake: Buying a helmet one size too large because it feels “comfortable” in the store. That extra space becomes impact travel in a crash, reducing the liner’s ability to decelerate your head.
The Jacket: Abrasion Resistance and Impact Armor
Your jacket is your primary shield for shoulders, elbows, and back. It needs to do two jobs: resist abrasion during a slide and cushion impacts.
For abrasion, materials rank like this: heavyweight leather is the benchmark, followed by technical textiles or multi-layer fabrics. A European standard, EN 17092, now classifies garments from AAA (highest) to C. Most riding jeans and street jackets fall into the AA or A class. Look for that label.
For impact, look for CE-certified armor at the elbows, shoulders, and back. The relevant standards are EN 1621-1:2012 for limbs and EN 1621-2:2014 for back protectors. This is not optional. A 2011 study by Australia’s George Institute for Good Health found that jackets with armor significantly reduced the risk of upper body injury and made riders less likely to be hospitalized.
| Jacket Feature | What To Look For | Why It Matters |
|---|---|---|
| Abrasion Rating | EN 17092 AA or AAA label | Verifies the fabric can survive a slide at speed. |
| Impact Armor | CE-certified (EN 1621) pads at elbows & shoulders | Cushions direct hits to bone. |
| Back Protector | CE Level 1 or 2 (EN 1621-2) pocket or insert | Protects the spine; often sold separately. |
| Closure | Main zipper plus waist adjusters | Prevents the jacket from riding up in a slide. |
| Fit | Snug when in riding posture, arms forward | Keeps armor positioned over your joints. |
Armor that floats away from your elbow is just dead weight.
The Gloves: Why They Should Be Your First Purchase
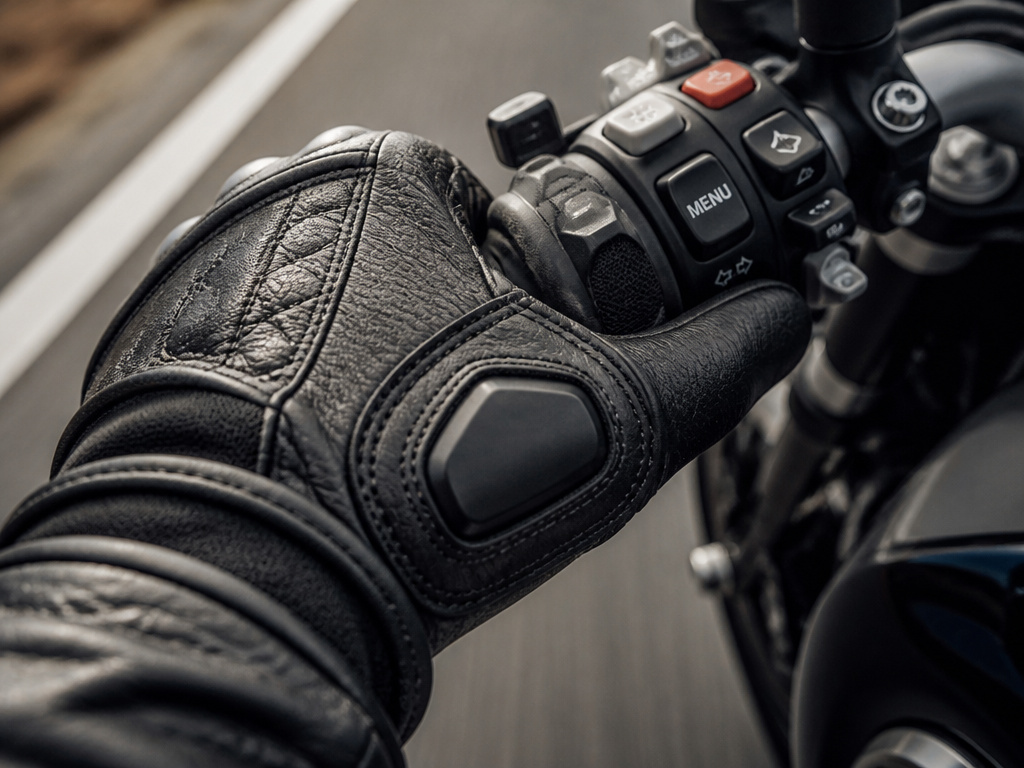
Your hands are the first thing you extend in a fall. It is a pure reflex. This makes gloves your most urgent piece of gear, not your third or fourth.
The numbers are brutal. Cardo Systems, citing a Gizmodo analysis, notes that 45 percent of all motorcycle accident impacts happen to the face or chin. While that argues for a full-face helmet, it also highlights how often the front end hits first, sending your hands into the fray. Road rash on your palms is a debilitating, slow-healing injury that can cost you your job if you work with your hands.
A protective motorcycle glove needs:
- Abrasion-resistant material on the palm (goatskin or reinforced synthetic).
- Reinforced stitching at the seams, especially between the fingers.
- Scaphoid protection, a padded cup over the bony bump at the base of your thumb.
- A secure closure (wrist strap or boa) to keep the glove on.
The best gloves, as reviewed in a guide to motorcycle gloves for beginners, balance protection with tactile feel, which is why they’re prioritized on a motorcycle gear checklist for beginners. You must still feel the clutch and brake levers.
Where this goes sideways: Choosing fashion gloves or mechanics’ gloves with no palm slider. In a slide, the seam bursts, and the glove disintegrates on contact, offering no more protection than bare skin.
Boots and Pants: Protecting Your Foundation
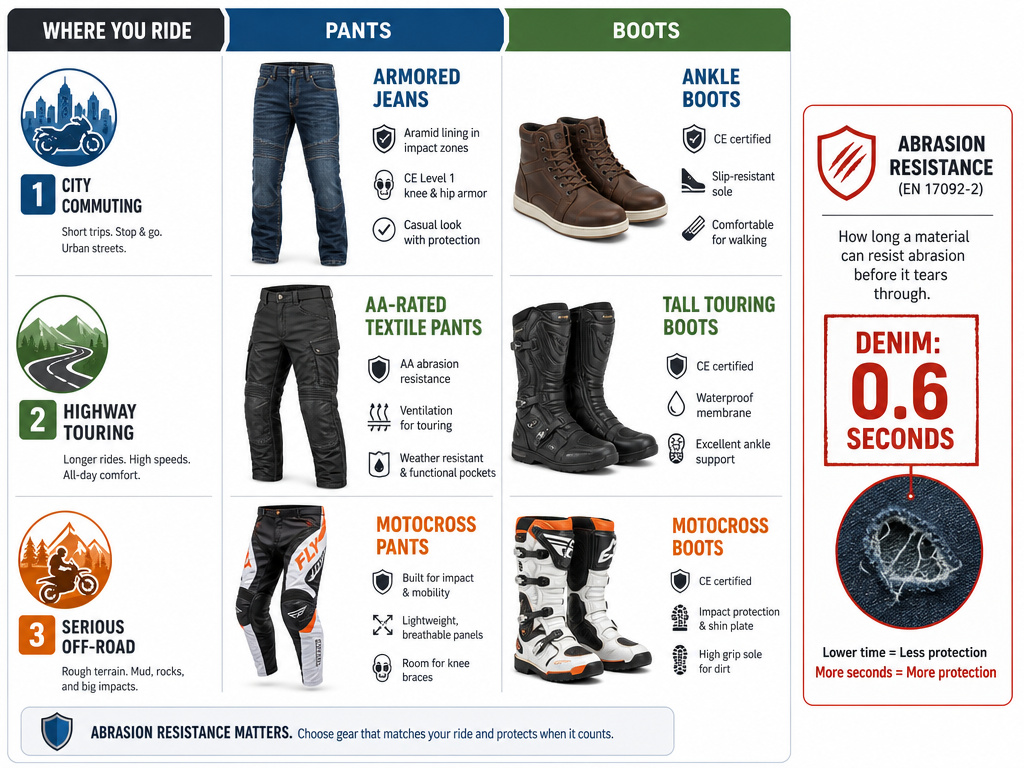
From the waist down, the goal is to keep your skin on your legs and your ankles intact. This is a two-part system.
Boots are about structure. A proper motorcycle boot has a rigid sole that won’t twist under the bike’s weight, a reinforced ankle cup, and a closure system (like a zipper with a strap) that won’t snag. Street boots should cover your ankle bone. For serious off-road riding, the Honda CRF1100D manual specifies you need off-road motorcycle boots with motocross-style soles and more shin protection.
Pants are about abrasion time. The fact sheet is unambiguous: standard denim provides just 0.6 seconds of abrasion resistance. After that, it’s you against the pavement.
Motorcycle-specific pants, whether leather or textile, are rated under the EN 17092 standard. Look for Class AA or A as a minimum. Many include pockets for CE knee (and sometimes hip) armor. This is the difference between a road rash and a broken patella.
| Scenario | Minimum Recommended Pants | Boots |
|---|---|---|
| City Commuting | EN 17092 A-rated jeans with knee armor pockets | Over-the-ankle leather or textile riding boots |
| Highway Touring | EN 17092 AA-rated textile pants with knee/hip armor | Full-height touring boots with ankle protection |
| Serious Off-Road | Motocross pants with knee braces & hip pads (per Honda manual) | Motocross boots with hinge & shin guard |
A detailed guide to choosing motorcycle pants should help you navigate these ratings. The short version: if it doesn’t have a rating, it’s a fashion item.
Armor and the “All The Gear” Mindset
ATGATT. All The Gear, All The Time, is a philosophy, not a checklist. It acknowledges that you cannot predict which part of you will hit the ground. The final layer of your kit is dedicated impact armor: chest protectors, back protectors, and hip pads.
For street riders, the most critical add-on is a CE Level 2 back protector. Many jackets include a flimsy foam pad; a proper back protector is a rigid, segmented plate that absorbs and distributes impact force, certified to EN 1621-2:2014. The standard to look for is EN 1621-2:2014.
For off-road or adventure riding, the gear list expands. The Honda manual is specific: serious off-road riding requires a chest/shoulder protector, a jersey with elbow pads, and riding pants with knee and hip pads. This is a different world from street commuting.
This is where understanding the difference between casual and technical riding gear becomes critical. Casual gear prioritizes style and comfort for short rides. Technical gear is built for consequences.
The Pre-Ride Inspection: T-CLOCS
Gear is useless if your motorcycle fails beneath you. The Motorcycle Safety Foundation’s T-CLOCS inspection is the industry standard for a reason. It’s a structured, top-to-bottom check you do before every ride. Honda and Ducati owner’s manuals mandate a version of it.
Here is the condensed sequence:
- Tires & Wheels: Check pressure (cold), look for cuts, check for loose spokes (‘thud’ vs. ‘ring’ sound).
- Controls: Verify throttle snaps back, levers operate smoothly, cables are not frayed.
- Lights & Electrics: Test headlight (high/low), brake light, turn signals, horn.
- Oil & Fluids: Check engine oil level (warm, on center stand or level ground as applicable, using dipstick or sight glass), coolant (cool only), brake fluid.
- Chassis: Look for frame cracks, check suspension for leaks, ensure all fasteners are tight.
- Stands: Confirm the center and side stands retract and lock fully.
Print the official Motorcycle Safety Foundation T-CLOCS checklist and keep it in your garage. It turns a vague worry into a repeatable habit.
Building Your Kit: A Prioritized Buying Plan
You do not need to buy everything at once. But you must buy in the right order. This plan spends your first dollars where they mitigate the most likely, most severe damage.
- First Purchase: Helmet (DOT/ECE) + Gloves. This protects your head and your hands, your two most vulnerable and critical assets.
- Second Purchase: Boots + Jacket. Now you have impact and abrasion coverage for your core and feet.
- Third Purchase: Pants + Back Protector. Your lower body is covered, and you upgrade your spine protection.
- Ongoing: Add specific armor, rain layers, or off-road gear as your riding style evolves.
A final note on used gear: jackets, pants, and boots can be secondhand if they are not damaged. Never buy a used helmet. You have no way to know if its internal foam is already compromised.
Budget / Cost Considerations for Beginners
Getting geared up can be expensive, but there are ways to manage costs without sacrificing essential protection. Begin with the essential items: a certified helmet, gloves, boots, and a jacket. For apparel, look for garments that meet recognized safety standards, as these are designed for impact and abrasion resistance. You can build your kit over time, prioritizing the helmet first. Consider last season’s models or closeout sales from reputable retailers, which often offer the same safety certifications at a lower price. Remember, regular street clothes like denim jeans offer almost no protection in a slide, so dedicated riding gear is a critical investment in your safety.
Buying New vs. Used (especially for helmets)
When building a gear collection on a budget, used jackets, pants, or boots can be a practical choice, provided they are in good condition with intact armor. However, a helmet is the one item you should always buy new. A helmet’s protective foam liner is designed to compress once during an impact, and any previous drop or crash can compromise its integrity in ways that are not visible. Helmet materials also degrade over time. Always ensure a new helmet carries a current safety certification label from a recognized standards body. This guarantees it hasn’t been compromised and meets the latest testing protocols.
Frequently Asked Questions
What is the bare minimum gear I need to start riding?
The absolute legal minimum in many U.S. States is a DOT-certified helmet. The practical survival minimum is a helmet, gloves, and over-the-ankle boots. This covers your head, your hands, and your ankles, the three most common impact points in low-speed drops. Do not ride in a t-shirt and sneakers.
How do I know if my gear fits correctly?
Helmet: It should be snug, with pressure on your cheeks. When you grip the chin bar and try to rotate the helmet left/right and up/down, your skin should move with it, not slide underneath.
Jacket: Sit on your bike or mimic the riding position. The sleeves should end at your wrist bone, and the armor should sit squarely on your elbow and shoulder. You should not be able to gather a handful of material at your belly.
Gloves: They should be snug without restricting finger movement. There should be no excess material at the fingertip.
Is expensive gear always better?
No. Expensive gear often buys better comfort, ventilation, and premium materials. A mid-priced glove with a CE certification and good stitching often provides 95% of the protection of a top-tier model. The key is to buy to the standard (DOT, ECE, EN 17092, CE) first, and to the feature list second. Fit trumps price every time.
What gear does a passenger need?
Passenger needs the same full kit as the rider: helmet, jacket, gloves, pants, and boots. Their risk is identical. Do not let a passenger ride in shorts, sandals, or without gloves. A good rule is that if you wouldn’t wear it in the crash, don’t let them wear it either.
How often should I replace my gear?
Replace your helmet every five years, or immediately after any impact. Replace other gear when it shows wear: worn-through palms on gloves, compromised stitching on jackets or pants, or soles that are no longer rigid on boots. Gear is a consumable safety item.
The Bottom Line
Start with gloves. That single change in priority, putting hand protection ahead of a stylish jacket, is what separates a thoughtful kit from a cosmetic one. Certifications are your evidence, not marketing. A DOT sticker, an EN 17092 label, a CE rating: these are verified performance thresholds.
Build your kit in this order: head and hands, core and feet, legs and spine. Use the T-CLOCS checklist before every ride. That 0.6-second abrasion window for denim is the clock you are racing against every time you swing a leg over the bike. Your gear is what resets it.
