
How to Wash a Motorcycle: Step-by-Step (Without Damage)
This post contains affiliate links. As an Amazon Associate, we earn from qualifying purchases.
To wash a motorcycle correctly, follow the sequence from official manuals: let the bike cool, use low-pressure water and a neutral-pH soap, avoid spraying bearings and electronics, rinse thoroughly, and dry completely with a soft towel or chamois. Post-wash, start the engine to dry moisture and, for off-road bikes, ride slowly to dry the brakes.
This sequence is an inspection routine, not just a cosmetic one. You are looking for leaks, cracks, and loose fasteners as each part comes clean. Most damage happens when the cleaning method breaks something, water forced into a bearing, soap residue left on alloy, or a stiff brush scratching paint.
What follows: the five-step process that three major manufacturers agree on for how to wash a motorcycle, the two specs where their manuals disagree (and how to resolve it), and the one field test that shows why a pressure washer at a car wash is a calculated risk, not an automatic no.
Key Takeaways
- Let the engine and exhaust cool completely before washing; spraying cold water on hot metal causes spots and thermal shock.
- Use low-pressure water from a garden hose; if a pressure washer is unavoidable, Indian Motorcycle advises keeping the nozzle at least 24 inches (60 cm) away, and all sources agree to avoid wheel bearings, brake components, and electrical connectors.
- Wash with a neutral-pH, non-abrasive soap; detergent residue corrodes alloy parts within days if not rinsed off.
- Dry every surface with a wet chamois or soft towel; air-drying leaves mineral spots and moisture inside bearings and pivots.
- After washing, start the engine and let it idle; the heat dries hidden moisture. For dirt bikes, ride slowly and apply the brakes several times to restore braking performance.
The 5-Step Washing Process (and the One Rule That Changes It)
The core steps for how to wash a motorcycle are similar for a Harley-Davidson, an Indian Scout, or a Honda CRF, though they differ on pressure washer use and rinsing direction. The one rule that changes is the paint cure period for a brand-new bike.
For the first 30 days on a new Indian Motorcycle, clean with a water rinse only. Do not wax for the first 60 days. The fresh clear coat needs time to fully cure, and wax or soap can trap solvents and ruin the gloss.
Start by letting the bike cool. Harley-Davidson’s guide is blunt: shocking a warm engine with cold water could cause damage. Park in the shade if you can. Hot sun bakes soap and water onto the paint before you can rinse it.
Gather your tools. You need a bucket, a hose with a spray nozzle, a wash mitt (microfiber or a dedicated bug sponge), a wheel brush with soft bristles, and a drying towel or synthetic chamois. A flashlight helps you inspect as you go.
Step 1: The Initial Rinse
Spray the bike with cool, low-pressure water to loosen surface dirt. Harley-Davidson’s service procedure says to rinse from the bottom up first, then from the top down, but other manufacturers do not specify a direction. This two-direction rinse floats grit off lower areas before the final top-down rinse sheets water off the paint. Avoid spraying directly into the air intake, exhaust outlets, or any electrical connectors you can see.
Step 2: Wash Top-Down with Neutral Soap
Fill your bucket with cool water and add a motorcycle-specific soap or a mild, neutral detergent. Some dish soaps are degreasers, which can strip wax and may dry out rubber over time. A dedicated motorcycle soap is formulated to be gentle.
Start washing at the top of the bike and work down. This keeps dirty water from running over clean paint. Use a separate mitt or brush for the wheels to avoid grinding brake dust into your tank’s finish.
Step 3: The Critical Rinse
Rinse thoroughly. Honda’s manual warns that detergent residue can corrode alloy parts. Let the water flow, don’t just mist it. This is where you check for any remaining grime, especially around the engine cases and swingarm.
Step 4: Dry Completely, No Exceptions
Do not let the bike air dry. Water spots are the least of your problems. Standing water hides in recesses around bearings and electrical plugs. Use a soft towel or a dampened synthetic chamois. Harley notes a wet chamois is more absorbent. Dry from the top down.
Step 5: The Post-Wash Ritual
Remove any bags you used to cover the exhaust pipes. Start the engine and let it idle for a few minutes. The heat evaporates moisture from the engine and exhaust. For an off-road bike like a Honda CRF, the manual adds two steps: lubricate the drive chain to prevent rust, then take a short, slow ride, applying the brakes several times to dry the pads and rotors.
Where Manufacturers Disagree (Pressure Washers, Rinsing)
No two owner’s manuals are identical. When they conflict, you follow the stricter rule for your bike. Here’s where the big three differ.
| Point of Contention | Indian Motorcycle | Honda | Harley-Davidson |
|---|---|---|---|
| Pressure Washer Stance | Do not use pressurized water. If unavoidable, keep nozzle ≥24 in (60 cm) away. | Recommends a low-pressure garden hose. If using high pressure, avoid specific areas (no distance given). | Avoid direct spray on electrical components, air filter, and seals (no distance given). |
| Rinsing Direction | Not specified. | Not specified. | Rinse twice: bottom-up, then top-down (service manual). Also: rinse bottom-up, then top-down (consumer article). |
| Post-Wash Engine Idle | Start engine, idle for a few minutes. | Start engine, idle for several minutes. | Not explicitly stated in sourced guides. |
The pressure washer debate is the loudest. Indian’s manual is the most conservative: just don’t. But it’s also the only one that gives a concrete safe distance, 24 inches, if you must. Honda and Harley list components to avoid but don’t quantify “safe.”
Where this goes sideways: The force from a pressure washer can penetrate the dust seals on suspension pivots and steering head bearings, washing grease out and driving dirt in. Honda calls this out specifically for off-road models, but the physics apply to any bike.
The rinsing direction conflict is inside Harley’s own publications. Their service procedure mandates a two-direction rinse (bottom-up, then top-down), while their consumer article suggests a simpler bottom-up then top-down.
If you’re at a self-service car wash and have no other option, use the low-pressure “rinse” setting, not “soap” or “wax.” Hold the wand at least two feet from the bike and never blast wheel hubs, brake calipers, or any visible wiring. It’s a calculated risk.
The Tools and Chemicals That Actually Work
You don’t need a garage full of specialty products, but using the right ones prevents damage. The wrong soap or brush costs you more in the long run.
Soap: Neutral pH is Non-Negotiable
Indian Motorcycle specifies soaps that are non-abrasive and have a neutral pH (non-acidic/non-alkaline). Why? Acidic cleaners etch aluminum and strip wax; alkaline soaps can haze clear coat. Dish soap is a degreaser, it works, but it leaves surfaces squeaky clean and unprotected. For regular washes, a dedicated motorcycle wash is worth it.
Brushes and Mitts: Soft Beats Stiff
The Indian manual warns against stiff bristle brushes, they scratch. Use a dedicated wash mitt for painted surfaces and a soft wheel brush for rims and tires. Harley-Davidson’s procedure calls for a dedicated sponge for bugs and a separate mitt for general washing. The two-bucket method (one for soapy water, one for rinse water) keeps grit out of your wash mitt.
Drying: A Wet Chamois Beats a Dry One
This is counterintuitive. Harley’s guide says to dampen your synthetic chamois in clean water and wring it out before drying the bike. A slightly wet chamois absorbs more water and glides more easily, reducing the chance of micro-scratches. A dry towel can drag dust across the paint.
For Quick Cleans Between Washes
A waterless wash or quick detailer is useful for removing light dust and fingerprints. Spray on, wipe off with a clean microfiber. Don’t use it on a heavily soiled bike, you’ll just grind dirt in.
Areas You Must Protect From Water (The Damage List)
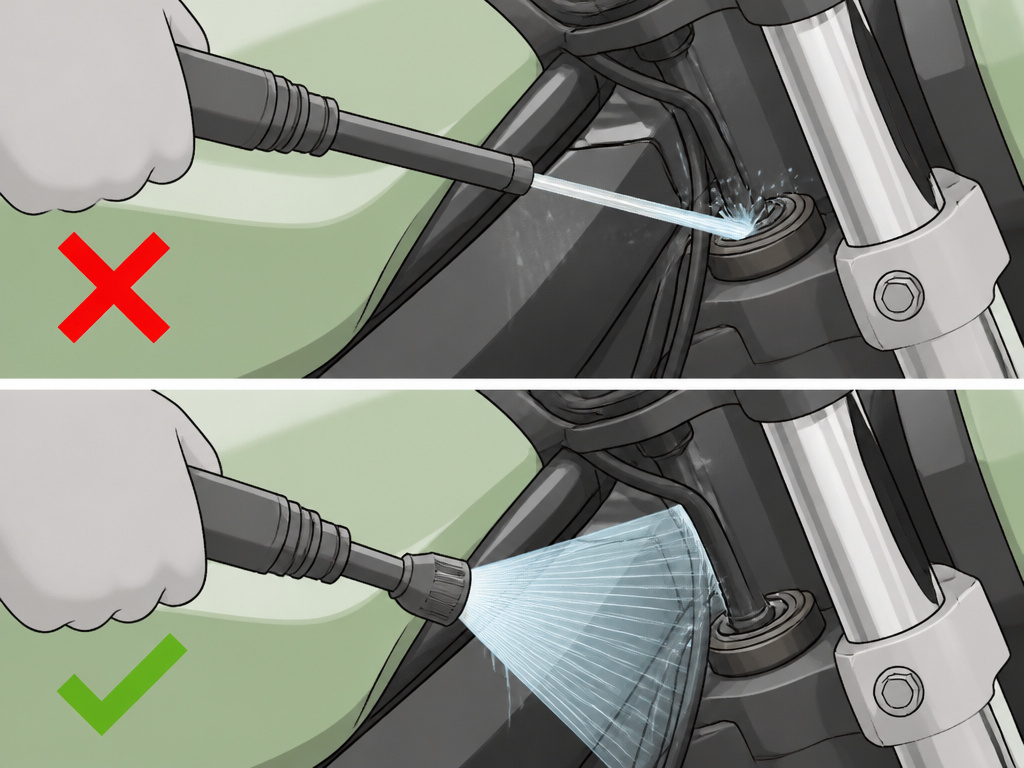
Spraying water here is how you create a repair bill. The manuals list the components explicitly.
Indian Motorcycle’s owner’s manual states that water may seep in and deteriorate:
- Wheel bearings
- Brake caliper assemblies
- Brake master cylinders
- Electrical connectors
- Steering head bearings
- Suspension pivots
- Forks, shocks
- Transmission seals
It also says not to direct any water stream at air intakes, exhaust outlets, electrical connectors, or audio system speakers. Before washing, cover each exhaust pipe opening with a plastic bag secured by a rubber band.
Honda’s list for high-pressure washers adds the throttle body, under the fuel tank, and under the seat. The principle is the same: these are areas where water can pool, corrode, or short-circuit something.
Easy to miss: The area around the steering stem and behind the front wheel is a direct shot for spray. That’s where the steering head bearings live. A direct blast with a pressure washer forces water past the seal, and the bearing will rust from the inside out. You won’t feel the notchiness in the steering until the next service.
The fix is simple. When rinsing, use a broad, gentle spray pattern. Imagine you’re watering a plant, not power-washing a driveway. If you’re hand-washing, wipe these critical areas with your wet mitt instead of spraying them directly.
Dealing With Bugs, Tar, and Road Salt
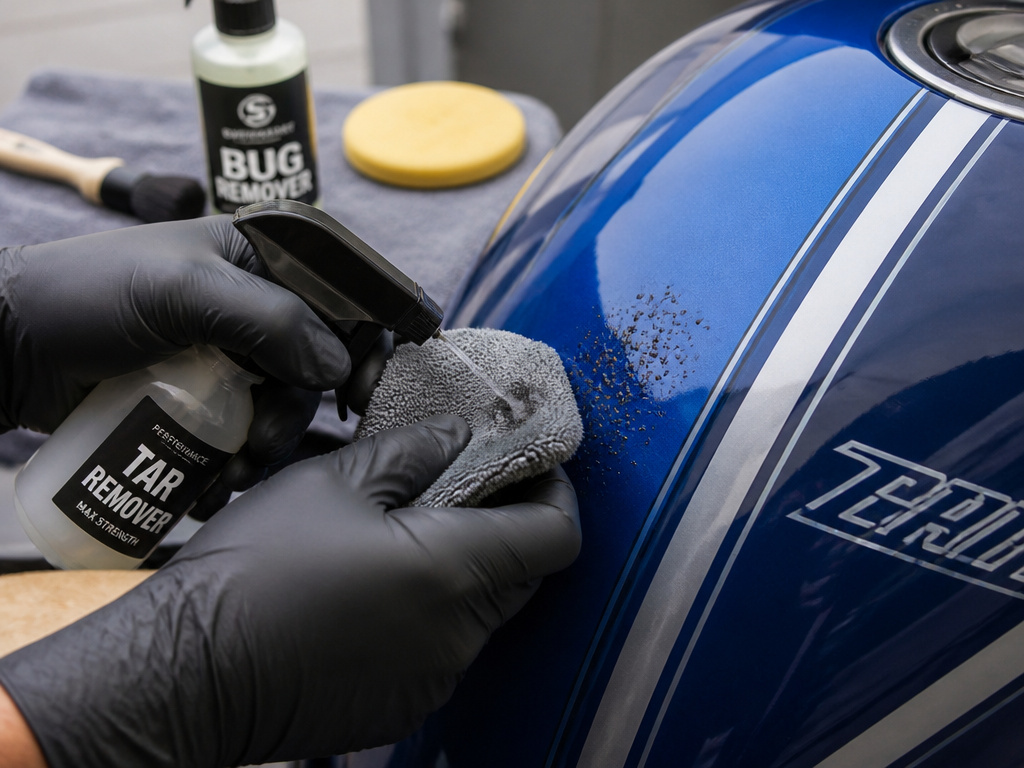
Standard soap and water won’t touch baked-on bugs or road tar. The wrong solvent will strip your paint.
Bug Splatter
Harley’s method is effective: spray a dedicated bug remover, wait one minute for it to penetrate, then wipe with a soft sponge. Don’t scrub dry bugs off, you’ll scratch the paint. For stubborn spots, soak a towel in the remover and lay it over the affected area for a few minutes to soften the mess.
Road Tar and Grease
Use a tar remover or a mild cleaner/degreaser made for motorcycles. Apply it to a microfiber towel and dab at the spot, don’t pour it on the paint. Rinse the area immediately after the tar is gone. Solvent-based solutions are banned by Indian’s guide; they can soften paint and plastics.
Winter Road Salt
This is corrosive. Wash the bike as soon as possible after riding on salted roads. Pay extra attention to the underside of the engine, the swingarm, and any exposed fasteners. For ice and snow, Indian’s rule is clear: always brush it away. Do not scrape. A plastic scraper can still mar the finish.
After dealing with any of these contaminants, re-wash the area with your neutral soap to remove any chemical residue. This is also a good time for a thorough wheel cleaning session, as brakes and wheels collect the most grime.
Post-Wash Inspection and Maintenance
A clean bike reveals problems. This is where washing pays off in reliability, not just looks.
Look For Leaks
With the bike dry and clean, look for fresh wet spots. Check under the engine for oil, under the forks for suspension fluid, and at brake line connections. A leak is easier to spot on a clean case than a dirty one.
Check the Chain
A clean chain lasts longer. After washing and drying, lubricate the drive chain. Honda calls this out specifically to prevent rust. If your chain is grimy, a proper chain cleaning is your next task. Never spray chain lube near the brake rotors or tire sidewall.
Test the Brakes
For off-road or heavily sprayed bikes, Honda’s final step is crucial. Ride at a slow speed in a safe area and apply the brakes gently several times. This dries the pads and rotors, restoring full braking power. You’ll feel the initial bite return after a few applications.
Protect the Finish
Once the bike is completely dry and cool, you can apply a protectant. For painted surfaces, a spray wax or sealant adds a layer against UV rays and contaminants. For a deeper shine and longer protection, follow a dedicated guide to waxing a motorcycle. Skip this step entirely if your bike has a denim, matte, or flat finish. Harley says to skip polishing and sealing for denim.
Frequently Asked Questions
Is it okay to wash a motorcycle at a carwash?
It’s a risk. The pressure washers are too powerful for safe use up close. If you must, use the low-pressure rinse setting only, hold the wand at least 24 inches away, and avoid all bearings, brakes, and electrical areas. A self-service bay is preferable to an automatic tunnel, which uses harsh chemicals and stiff brushes.
Is Dawn dish soap ok to wash a motorcycle?
Technically, yes, it’s a mild, neutral detergent, which Honda’s manual lists as an option. Practically, it’s a degreaser. It will strip any wax or sealant from your paint and can dry out rubber over time. For regular washing, use a soap formulated for vehicles.
Is it okay to wash a motorcycle with water?
Yes, water is essential. The key is pressure and temperature. Use low-pressure, cool or warm water. Do not use extremely hot water or pressurized streams. Always dry the bike completely afterward to prevent water spots and hidden moisture in bearings.
How often should I wash my motorcycle?
Wash it often if it’s exposed to salt, dust, or acidic pollutants (like industrial fallout). Indian Motorcycle specifically advises frequent washing in those environments. For a fair-weather bike, a wash every few weeks or after particularly dirty rides is sufficient. The goal is to prevent corrosive buildup, not just maintain shine.
The Bottom Line
Washing a motorcycle is straightforward if you follow the sequence and respect the physics of water under pressure. Let the bike cool, use gentle tools, avoid the dozen components the manuals tell you to protect, and dry it completely.
The one spec to remember if nothing else: if a pressure washer is your only option, Indian Motorcycle advises keeping it 24 inches away, while Honda and Harley caution against using one near critical components. Everything closer is guessing, and a ruined wheel bearing isn’t a guess you want to test.
After you wash, start the engine. That idle time does more than dry the pipes, it tells you the bike still runs right after getting wet. Then go for a short, slow ride. Feel the brakes. Listen for new noises. A clean bike that rides correctly is a bike that’s ready for the next trip, not the next repair.
