
How to Upgrade Motorcycle Jacket Armor: Step-by-Step
This post contains affiliate links. As an Amazon Associate, we earn from qualifying purchases.
Upgrading motorcycle jacket armor means swapping uncertified or low-level foam for CE-certified impact protectors that fit your existing pockets. The process is turn the jacket inside out, measure the pocket, match the new armor’s size and shape, and secure it with the closure. The upgrade is worth it if your jacket pockets are standard-sized and the outer shell isn’t worn out.
The catch is in the details. A pocket that is a half-inch too wide allows the armor to move around on a bumpy road. A back protector labeled Level 1 might be the wrong coverage type for your jacket’s pocket, leaving your spine exposed. It’s important to know how to upgrade motorcycle jacket armor correctly.
What follows is the measured approach to the how to upgrade motorcycle jacket armor question: how to verify your pockets will hold better armor, how to read the labels so you know what you’re buying, and the one argument for skipping the jacket upgrade entirely and going with an armored shirt instead.
Key Takeaways
- Check the old armor’s label first. If it doesn’t cite a standard like EN 1621-1 or EN 1621-2, it’s not certified impact protection, replacing it is your highest-value upgrade.
- Measure the pocket, not the old pad. Standard back protector pockets are roughly 25–30 cm tall by 18–22 cm wide. Shoulder and elbow pockets are typically 15–20 cm by 12–16 cm.
- Match the coverage type (Type A vs. Type B). A new insert that’s noticeably smaller than the pocket may be a reduced-coverage Type A protector in a jacket designed for full-coverage Type B, which compromises protection.
- Jacket fabric degrades separately from armor. Even with new armor, a jacket 5+ years old and showing fabric wear from UV, abrasion, or washes should be replaced.
- An armored shirt solves shifting armor. If your jacket pockets are oversized or poorly positioned, a dedicated armored shirt from a brand like Bohn keeps CE-Level 2 armor locked over your bones.
The First Step Everyone Misses
Don’t reach for a new armor insert yet. Turn your jacket inside out and find the pocket holding the old pad. Now read its label.
If the label says “CE-approved” without an EN standard number, or has no label at all, that pad is decoration. It hasn’t been independently tested to limit impact force. This is common in mid-tier jackets. If it lists a standard like EN 1621-2:2014 Level 1, you’ve confirmed it’s certified, but at the lower protection threshold.
That label tells you two things: you can upgrade, and you know exactly what you’re upgrading from. An uncertified pad to a CE Level 2 SAS-TEC insert is a massive leap. A Level 1 to Level 2 upgrade is a measured, worthwhile step up in impact absorption.
Common mistake: Assuming all “CE-approved” armor is equal. The EN standard number (e.g., EN 1621-2) is the proof of certification; without it, the armor’s performance is unverified.
The Pocket Sizing Puzzle
Armor only works if it stays in place. Your jacket’s pockets are the retention system. Generic advice says “most pockets are standard.” The real answer is in a tape measure.
According to armor manufacturer Stealth Armor, standard back protector pockets are between 25–30 cm tall and 18–22 cm wide. Shoulder and elbow pockets are typically 15–20 cm by 12–16 cm. Your new armor should match these dimensions closely.
| Pocket Type | Standard Size Range (cm) | What Happens If It’s Too Big |
|---|---|---|
| Back Protector | 25-30 tall × 18-22 wide | Armor shifts vertically, exposing spine. |
| Shoulder/Elbow | 15-20 × 12-16 | Pad rotates inward on arm, missing the joint. |
If your pocket is more than 2 cm larger than the new armor in any direction, retention will be poor. Some riders carefully trim closed-cell foam edges for a custom fit, but never cut the hard shell or visco-elastic core of a CE-rated pad, it voids the certification and likely ruins its impact performance.
The flip side is a pocket that’s too small. Forcing a pad in can warp it, create pressure points, and again compromise protection. If the pocket is non-standard, the upgrade path may be different.
CE Level 1 vs. Level 2: The Numbers Behind the Label
This isn’t marketing. The European EN 1621 standards set numeric thresholds for transmitted force. When a pad is certified, a lab has hit it with a 50 Joule impact and measured the force that comes through.
- CE Level 1 means the pad transmitted an average force below a certain kilonewton (kN) threshold.
- CE Level 2 means it transmitted even less force.
For back protectors (EN 1621-2:2014), Level 1 means below 18 kN. The Leatt Back Protector 2.5 FlexMesh, for example, recorded a mean transmitted force below 9 kN, well under the Level 1 limit. For chest protectors (EN 1621-3:2018), Level 2 is below 18 kN.
A Leatt protector back plate recorded a mean transmitted force of below 9kN from a 50 Joule impact (Level 1). A Leatt protector chest plate recorded a mean transmitted force of below 18kN from a 50 Joule impact (Level 2). Source: Leatt Corporation ADV 4.5 Jacket Protection Manual
The difference is real. In a crash, Level 2 armor absorbs more energy, leaving less to bruise or break your bones. Upgrading from an uncertified pad to Level 2 is the biggest win. Moving from Level 1 to Level 2 is a solid improvement, especially for high-risk zones like shoulders, elbows, and back.
The 5-Year vs. 3-Year Replacement Rule (and Why They Disagree)
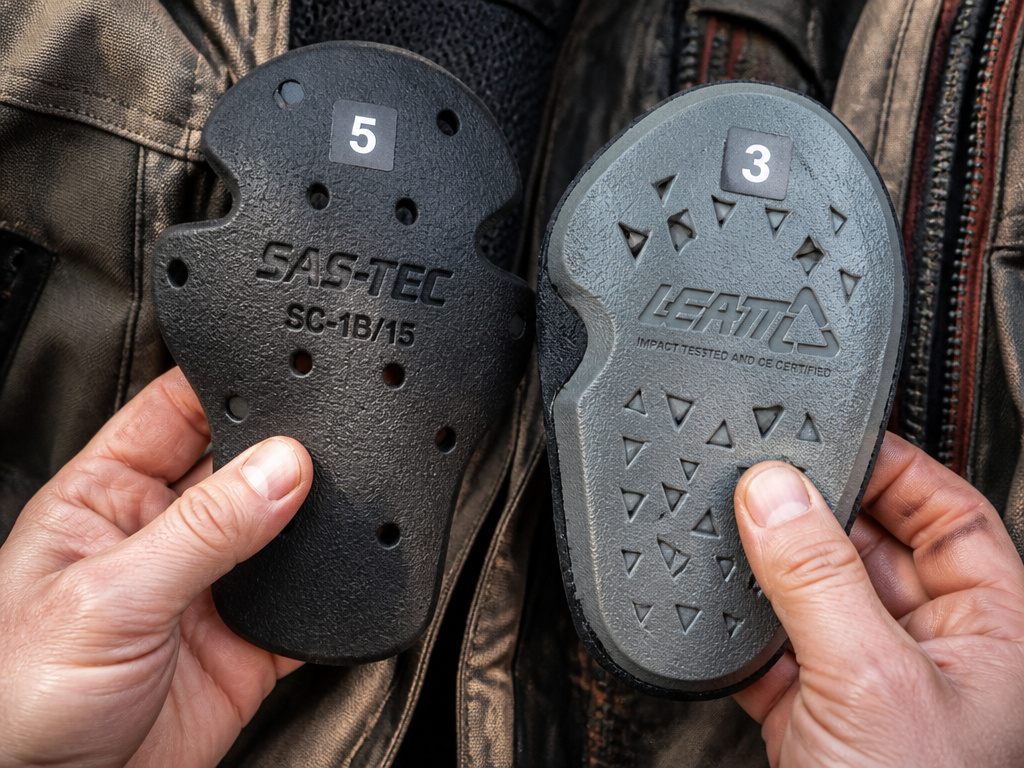
When should you replace armor, even if it hasn’t been crashed? Here the manufacturers don’t agree, and your article shouldn’t hide that.
- Stealth Armor recommends replacing SAS-TEC armor every 5 years, sooner in hot or humid environments.
- Leatt Corporation recommends replacing its 3.5 Body Protector every 3 years under normal use conditions.
This is a direct disagreement. Why? Different materials and testing philosophies. It means there’s no single rule.
| Source | Recommended Replacement Interval | Notes |
|---|---|---|
| Stealth Armor (SAS-TEC) | 5 years | Sooner in hot/humid climates. |
| Leatt Corporation | 3 years | For their 3.5 Body Protector under normal use. |
Given the disagreement, a conservative approach is to follow the shorter replacement interval if you ride frequently. Inspect armor annually for cracks, deep creases, or hardening. If the foam doesn’t rebound when you pinch it, it’s done.
Remember, the jacket itself ages separately. The fabric degrades from UV light, abrasion, and wash cycles. A jacket that’s 5+ years old and showing fabric wear should be replaced as a whole, regardless of the armor inside.
The Armored Shirt Alternative
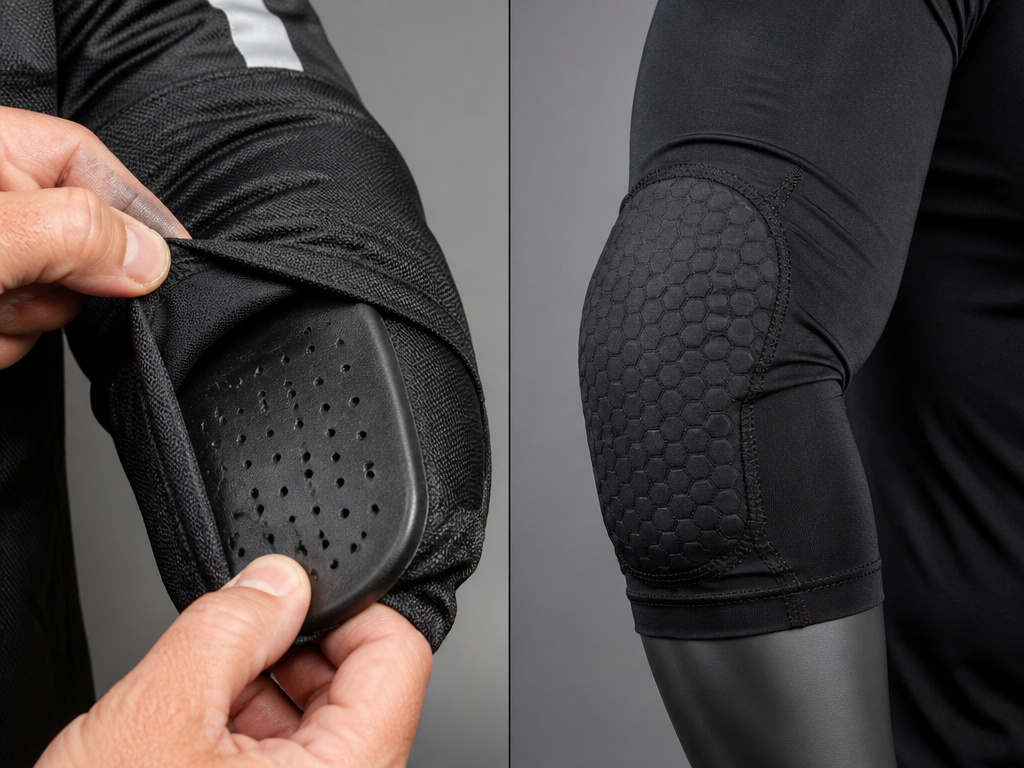
What if your jacket’s pockets are the problem? Even brand new, high-level armor provides no protection if the pocket allows it to slide to your inner elbow during a cornering tuck.
Bohn Body Armor makes this argument directly. They note that traditional motorcycle gear armor pockets are often oversized or poorly positioned.
Their solution: skip the jacket pocket upgrade. Use a dedicated armored shirt instead.
An armored shirt, like those from Bohn, is designed to hold armor against your body with a tight, athletic fit. The armor is sewn into sleeves and a torso panel that keeps it locked over your bones. You then wear any jacket you want over it, a leather jacket, a flannel, a vintage denim piece.
When an armored shirt makes more sense:
- Your jacket pockets are visibly baggy or misaligned when you’re in riding posture.
- You own multiple jackets and want one set of armor to work with all of them.
- You prioritize maximum airflow in heat and prefer a mesh base layer.
When upgrading jacket inserts is better:
- Your jacket pockets are snug and well-placed.
- You want the simplest, most integrated solution.
- You’re only upgrading one jacket.
It’s a different philosophy. The shirt solves the retention problem by redesigning the system.
How to Actually Install New Armor
We will go through the replacement process. It’s simple, but rushing causes mistakes.
- Turn the jacket inside out. Find all armor access points, usually zippers or hook-and-loop flaps.
- Remove the old armor. Note its orientation. Shoulder pads often have a hard shell that faces outward.
- Clean the pocket. Vacuum out dust, sand, or lint. This keeps the new pad from gritting up.
- Test fit the new armor. Without closing the pocket, orient the pad correctly (hard shell/TPU face out). Ensure it sits flat and its edges align with the pocket’s seams.
- Secure the closure. Zip or seal the flap completely. A partially closed flap is an ejector seat for your new pad.
- Do the fit check. Put the jacket on. Sit on your bike or assume your riding posture. Reach for the bars. Have someone tap where each pad should be, you should feel it directly under their finger. If a shoulder pad has slid toward your back, the pocket is too big.
Where this goes sideways: Skipping the riding-position fit check. Armor shifts when you hinge at the hip and reach forward. If it’s not over your joint then, it won’t be in a crash.
When Upgrading Isn’t Enough
Better armor can’t fix a worn-out jacket. The Aerostich R-3 suit, built with 500D Cordura® TLTex® fabric, has an expected lifespan of 5 to 10 years or 50,000 to 100,000 miles. The fabric and seams are the first line of defense against abrasion.
If your jacket is faded, frayed at the cuffs, or the waterproof liner is peeling, it’s time for new gear, not just new pads. Impact protection is one layer of safety; slide protection is another.
Also, some armor is sewn in. If there’s no pocket access, you can’t upgrade it. Don’t cut the lining to create one, you’ll compromise the jacket’s structure and likely void any warranty. In that case, your upgrade path is the armored shirt worn underneath.
Finally, know the limits. As Leatt’s manuals state, no protective equipment can prevent all injuries in high-energy impacts. This upgrade is about improving your odds within the realistic scope of gear technology.
How to identify correct armor size/shape for replacement
The first step is to remove your current armor and measure the pocket it came from. Standard back protector pockets are typically taller than they are wide, while shoulder and elbow pockets are more rectangular. Compare these measurements to any new armor you are considering. A new insert that is noticeably smaller than its pocket may be a reduced coverage type designed for a different jacket, which can compromise protection. The goal of how to upgrade motorcycle jacket armor is to find armor that fits the pocket snugly without excessive gaps, ensuring it stays in the correct position during a fall. If your jacket’s pockets are oversized or poorly positioned, keeping armor in place can be difficult.
Step-by-step process for fitting new armor
Start by removing all the old armor from your jacket. Inspect the interior pockets for any wear, tears, or debris and clean them out. Take your new armor pieces and gently insert each one into its corresponding pocket, ensuring the correct side faces outward. The armor should slide in without forcing it and fit snugly against the pocket’s edges. Once inserted, put the jacket on and move through a riding stance. Check that the armor remains centered over your shoulders, elbows, and back without shifting. If the armor moves out of position, the pocket may be too large, indicating a potential fit issue that could reduce effectiveness in a crash.
Frequently Asked Questions
What level of armor is best for a motorcycle jacket?
For critical areas like back, shoulders, and elbows, CE Level 2 provides the highest certified impact absorption. Level 1 is the minimum for certified protection. If you’re upgrading, aim for Level 2 from a brand like SAS-TEC or D3O.
Can I put any CE armor in my jacket?
No. You must match the size, shape, and coverage type to your jacket’s specific pockets. A “Type A” (reduced coverage) protector in a jacket designed for “Type B” (full coverage) will leave gaps. Always measure your pocket and compare it to the new armor’s dimensions before buying.
How do I know if my old armor needs replacing?
Check for age (3-5 years depending on manufacturer), visible damage (cracks, deep permanent creases), and loss of rebound. If the foam stays compressed after you pinch it, it’s no longer absorbing energy properly. Also, replace any armor after a crash where it impacted the ground.
What is the best replacement armor for motorcycle jackets?
SAS-TEC and D3O are two leading materials for CE Level 2 inserts. Brands like Stealth Armor and Knox sell these materials in standardized sizes designed to fit common jacket pockets.
Is an armored shirt better than upgrading jacket armor?
It depends on your jacket’s pocket fit. If the pockets hold armor securely in a riding position, upgrading inserts is simpler. If the pockets are loose or poorly placed, an armored shirt from Bohn or similar will provide better, more consistent protection by keeping the armor fixed to your body.
Before You Go
Upgrading your armor is one of the smartest, most cost-effective safety moves you can make. But the goal isn’t just a higher CE level in your closet. It’s that level of protection staying over your joints when you need it.
So after you install it, do the real test. Wear the jacket, sit on your bike, and move. If anything shifts, you’ve found the problem before the road does. That might mean trimming a foam edge for a snugger fit, or it might mean reconsidering the entire system and looking at an armored shirt.
The manufacturers disagree on a three-year or five-year replacement schedule. Pick the conservative one. Your armor is a wear item, not a lifetime purchase. And when the jacket fabric itself starts to go, the fading, the fraying, retire the whole piece. No amount of upgraded foam will help if the outer shell disintegrates in a slide.
Start with the jacket you ride most. Check the labels, measure the pockets, and make the swap. The difference isn’t in the specs sheet. It’s in the confidence that what’s between you and the asphalt is actually there to work.
